2018 JEEP GRAND CHEROKEE audio
[x] Cancel search: audioPage 317 of 368
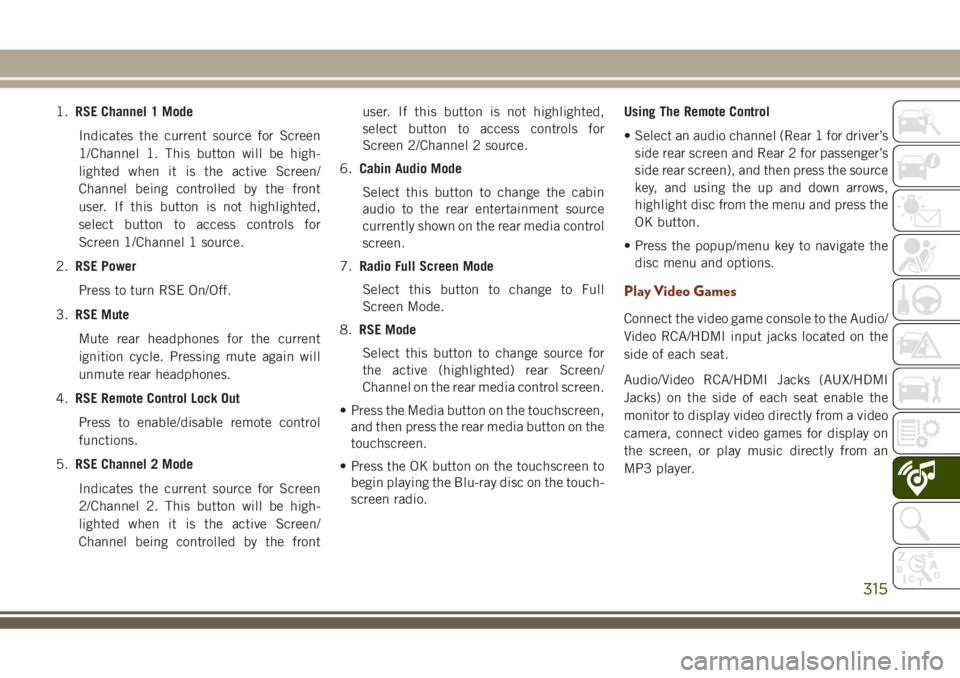
1.RSE Channel 1 Mode
Indicates the current source for Screen
1/Channel 1. This button will be high-
lighted when it is the active Screen/
Channel being controlled by the front
user. If this button is not highlighted,
select button to access controls for
Screen 1/Channel 1 source.
2.RSE Power
Press to turn RSE On/Off.
3.RSE Mute
Mute rear headphones for the current
ignition cycle. Pressing mute again will
unmute rear headphones.
4.RSE Remote Control Lock Out
Press to enable/disable remote control
functions.
5.RSE Channel 2 Mode
Indicates the current source for Screen
2/Channel 2. This button will be high-
lighted when it is the active Screen/
Channel being controlled by the frontuser. If this button is not highlighted,
select button to access controls for
Screen 2/Channel 2 source.
6.Cabin Audio Mode
Select this button to change the cabin
audio to the rear entertainment source
currently shown on the rear media control
screen.
7.Radio Full Screen Mode
Select this button to change to Full
Screen Mode.
8.RSE Mode
Select this button to change source for
the active (highlighted) rear Screen/
Channel on the rear media control screen.
• Press the Media button on the touchscreen,
and then press the rear media button on the
touchscreen.
• Press the OK button on the touchscreen to
begin playing the Blu-ray disc on the touch-
screen radio.Using The Remote Control
• Select an audio channel (Rear 1 for driver’s
side rear screen and Rear 2 for passenger’s
side rear screen), and then press the source
key, and using the up and down arrows,
highlight disc from the menu and press the
OK button.
• Press the popup/menu key to navigate the
disc menu and options.
Play Video Games
Connect the video game console to the Audio/
Video RCA/HDMI input jacks located on the
side of each seat.
Audio/Video RCA/HDMI Jacks (AUX/HDMI
Jacks) on the side of each seat enable the
monitor to display video directly from a video
camera, connect video games for display on
the screen, or play music directly from an
MP3 player.
315
Page 318 of 368

When connecting an external source to the
AUX/HDMI input, ensure to follow the stan-
dard color coding for the audio/video jacks:1. HDMI Input.
2. Right audio in (red).
3. Left audio in (white).
4. Video in (yellow).
NOTE:
Certain high-end video games consoles may
exceed the power limit of the vehicle's Power
Inverter.
NAVIGATION — IF
EQUIPPED
• The information in the section below is only
applicable if you have the Uconnect 4C
NAV With 8.4–inch Display system.Press the “Nav” button on the touchscreen in
the menu bar to access the Navigation sys-
tem.
Changing The Navigation Voice Prompt
Volume
Changing The Navigation Voice Prompt Volume
1. Press the “Settings” button on the touch-
screen in the lower right area of the
screen.
2. In the Settings menu, press the “Guid-
ance” button on the touchscreen.
3. In the Guidance menu, adjust the Nav
Volume by pressing the “+” or “–” buttons
on the touchscreen.
Audio/Video RCA/HDMI Input Jacks
MULTIMEDIA
316
Page 327 of 368
Select The iPhone's Priority Level
When the pairing process has successfully
completed, the system will prompt you to
choose whether or not this is your favorite
mobile phone. Selecting “Yes” will make this
mobile phone the highest priority. This mo-
bile phone will take precedence over other
paired mobile phones within range and will
connect to the Uconnect system automati-
cally when entering the vehicle. Only one
mobile phone and/or one Bluetooth audio
device can be connected to the Uconnect
system at a time. If “No” is selected, simply
select “Uconnect” from the mobile phone/
audio device Bluetooth screen, and the
Uconnect system will reconnect to the
Bluetooth device.Pair Your Android Device:
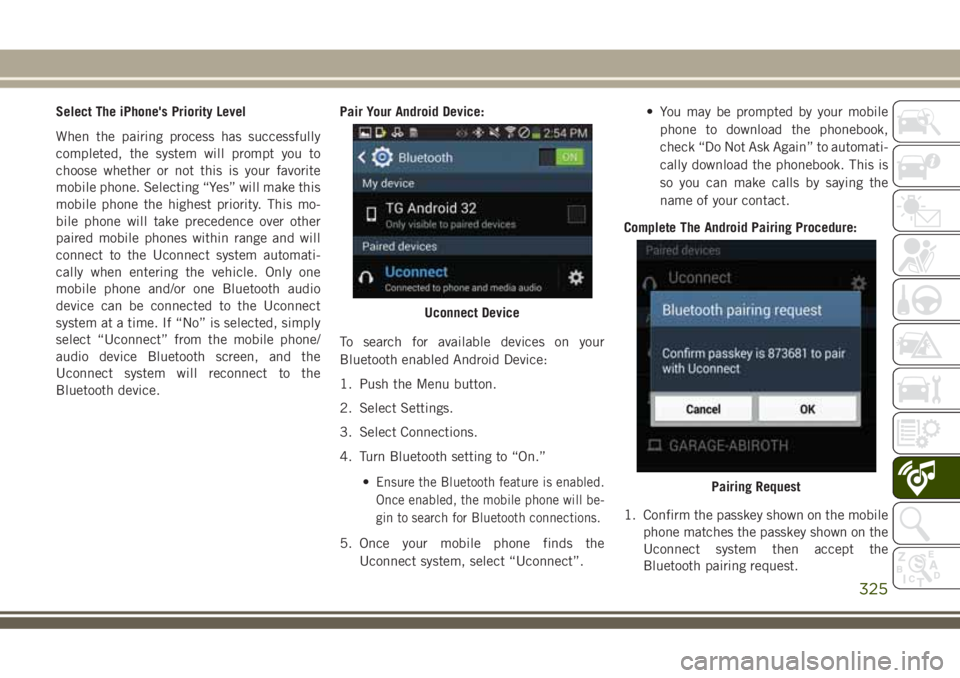
To search for available devices on your
Bluetooth enabled Android Device:
1. Push the Menu button.
2. Select Settings.
3. Select Connections.
4. Turn Bluetooth setting to “On.”
•
Ensure the Bluetooth feature is enabled.
Once enabled, the mobile phone will be-
gin to search for Bluetooth connections.
5. Once your mobile phone finds the
Uconnect system, select “Uconnect”.• You may be prompted by your mobile
phone to download the phonebook,
check “Do Not Ask Again” to automati-
cally download the phonebook. This is
so you can make calls by saying the
name of your contact.
Complete The Android Pairing Procedure:
1. Confirm the passkey shown on the mobile
phone matches the passkey shown on the
Uconnect system then accept the
Bluetooth pairing request.
Uconnect Device
Pairing Request
325
Page 328 of 368
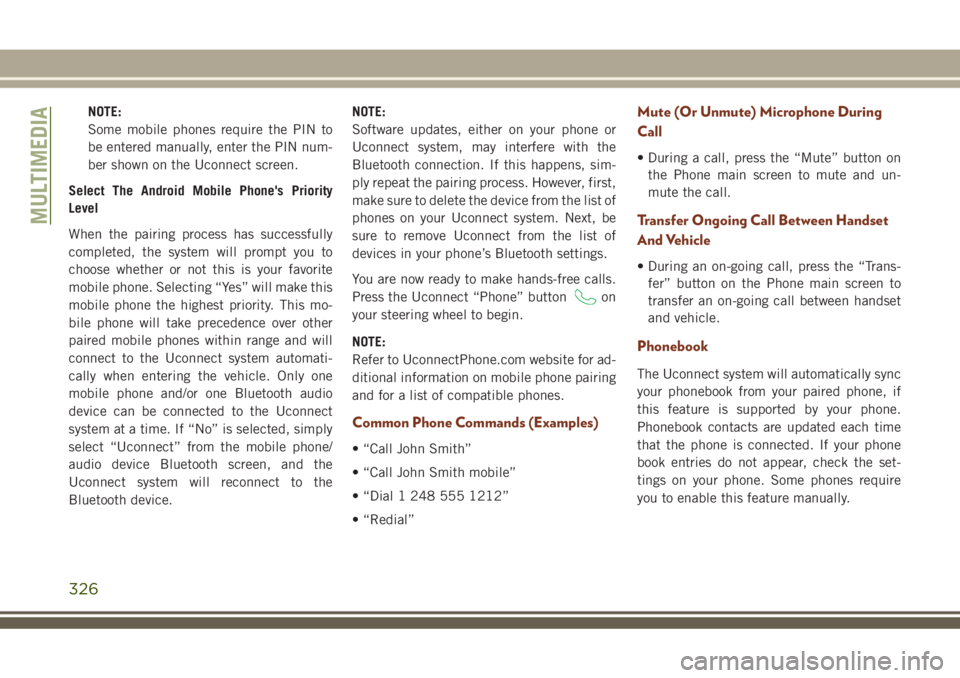
NOTE:
Some mobile phones require the PIN to
be entered manually, enter the PIN num-
ber shown on the Uconnect screen.
Select The Android Mobile Phone's Priority
Level
When the pairing process has successfully
completed, the system will prompt you to
choose whether or not this is your favorite
mobile phone. Selecting “Yes” will make this
mobile phone the highest priority. This mo-
bile phone will take precedence over other
paired mobile phones within range and will
connect to the Uconnect system automati-
cally when entering the vehicle. Only one
mobile phone and/or one Bluetooth audio
device can be connected to the Uconnect
system at a time. If “No” is selected, simply
select “Uconnect” from the mobile phone/
audio device Bluetooth screen, and the
Uconnect system will reconnect to the
Bluetooth device.NOTE:
Software updates, either on your phone or
Uconnect system, may interfere with the
Bluetooth connection. If this happens, sim-
ply repeat the pairing process. However, first,
make sure to delete the device from the list of
phones on your Uconnect system. Next, be
sure to remove Uconnect from the list of
devices in your phone’s Bluetooth settings.
You are now ready to make hands-free calls.
Press the Uconnect “Phone” button
on
your steering wheel to begin.
NOTE:
Refer to UconnectPhone.com website for ad-
ditional information on mobile phone pairing
and for a list of compatible phones.
Common Phone Commands (Examples)
• “Call John Smith”
• “Call John Smith mobile”
• “Dial 1 248 555 1212”
• “Redial”
Mute (Or Unmute) Microphone During
Call
• During a call, press the “Mute” button on
the Phone main screen to mute and un-
mute the call.
Transfer Ongoing Call Between Handset
And Vehicle
• During an on-going call, press the “Trans-
fer” button on the Phone main screen to
transfer an on-going call between handset
and vehicle.
Phonebook
The Uconnect system will automatically sync
your phonebook from your paired phone, if
this feature is supported by your phone.
Phonebook contacts are updated each time
that the phone is connected. If your phone
book entries do not appear, check the set-
tings on your phone. Some phones require
you to enable this feature manually.
MULTIMEDIA
326
Page 329 of 368
• Your phonebook can be browsed on the
Uconnect system touchscreen, but editing
can only be done on your phone. To browse,
press the “Phone” button on the touch-
screen, then the “Phonebook” button on
the touchscreen.
Favorite phonebook entries can be saved as
Favorites for quicker access. Favorites are
shown at the top of the main phone screen.
Voice Command Tips
• Speaking complete names (i.e; Call John
Doe vs. Call John) will result in greater
system accuracy.
• You can “link” commands together for
faster results. Say “Call John Doe, mobile,”
for example.
• If you are listening to available voice com-
mand options, you do not have to listen to
the entire list. When you hear the command
that you need, push the
button on the
steering wheel, wait for the beep and say
your command.
Changing The Volume
• Start a dialogue by pushing the VR button
, then say a command. For example,
"Help".
• Use the radio VOLUME rotary knob to ad-
just the volume to a comfortable level while
the Uconnect system is speaking.
NOTE:
The volume setting for Uconnect is different
than the audio system.
NOTE:
To access help, push the Uconnect VR button
(if active) on the steering wheel and say
"help." Push the Uconnect VR Pickup button
(if active) or the VR button(if
active) and say "cancel" to cancel the help
session.
Using Do Not Disturb
With Do Not Disturb, you can disable notifi-
cations from incoming calls and texts, allow-
ing you to keep your eyes on the road and
hands on the wheel. For your convenience,there is a counter display to keep track of your
missed calls and text messages while you
were using Do Not Disturb.
Do Not Disturb can automatically reply with a
text message, a call or both, when declining
an incoming call and send it to voicemail.
Automatic reply messages can be:
• “I am driving right now, I will get back to
you shortly.”
• Create a custom auto reply message up to
160 characters.
While in Do Not Disturb, Conference Call can
be selected so you can still place a second
call without being interrupted by incoming
calls.
NOTE:
• Only the beginning of your custom message
will be seen on the touchscreen.
• Reply with text message is not compatible
with iPhones.
• Auto reply with text message is only avail-
able on phones that supporting Bluetooth
MAP.
327
Page 330 of 368
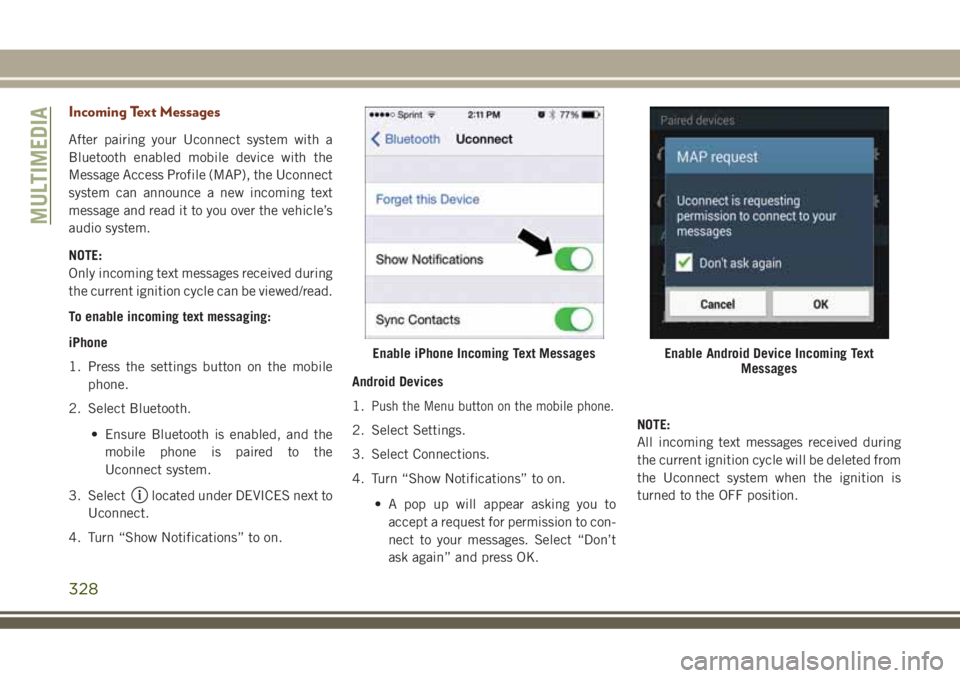
Incoming Text Messages
After pairing your Uconnect system with a
Bluetooth enabled mobile device with the
Message Access Profile (MAP), the Uconnect
system can announce a new incoming text
message and read it to you over the vehicle’s
audio system.
NOTE:
Only incoming text messages received during
the current ignition cycle can be viewed/read.
To enable incoming text messaging:
iPhone
1. Press the settings button on the mobile
phone.
2. Select Bluetooth.
• Ensure Bluetooth is enabled, and the
mobile phone is paired to the
Uconnect system.
3. Select
located under DEVICES next to
Uconnect.
4. Turn “Show Notifications” to on.Android Devices
1.
Push the Menu button on the mobile phone.
2. Select Settings.
3. Select Connections.
4. Turn “Show Notifications” to on.
• A pop up will appear asking you to
accept a request for permission to con-
nect to your messages. Select “Don’t
ask again” and press OK.NOTE:
All incoming text messages received during
the current ignition cycle will be deleted from
the Uconnect system when the ignition is
turned to the OFF position.
Enable iPhone Incoming Text MessagesEnable Android Device Incoming Text
Messages
MULTIMEDIA
328
Page 359 of 368

Accessories..................283
Mopar...................283
Adaptive Cruise Control (ACC) (Cruise
Control)..................165
Off .................166, 168
On..................166, 168
Adding Fuel..............177, 179
Additives, Fuel................273
AirBag ....................110
Air Bag Operation............112
Air Bag Warning Light.........109
Driver Knee Air Bag...........112
Enhanced Accident Response. . . .116
Enhanced Accident Response. . . .228
Event Data Recorder (EDR)......228
Front Air Bag..............110
If Deployment Occurs.........116
Knee Impact Bolsters.........112
Maintaining Your Air Bag System . .117
Maintenance...............117
Redundant Air Bag Warning Light . .110
Side Air Bags..............112
Transporting Pets............130
Air Bag Light...........66, 109, 132
Air Conditioner Maintenance.......249Air Conditioner Refrigerant........249
Air Conditioner System...........249
Air Conditioning Filter.........48, 249
Air Conditioning, Operating Tips......48
Air Conditioning System...........47
Air Pressure
Tires....................256
Alarm
Arm The System...........18, 19
Disarm The System............18
Rearming The System..........19
Security Alarm..............69
Alarm (Security Alarm).........17, 19
Alarm System (Security Alarm).......17
Antifreeze (Engine Coolant). . . .278, 279
Anti-Lock Brake System (ABS).......80
Anti-Lock Warning Light
...........70
Arming System (Security Alarm)
......17
Assist, Hill Start................82
Audio Jack..................309
Auto Down Power Windows.........49
Automatic Door Locks............24
Automatic High Beams...........35
Automatic Temperature Control (ATC) . . .47
Automatic Transmission..........147Adding Fluid..............282
Fluid Type................282
Auto Up Power Windows...........49
Axle Lubrication...............282
Back-Up...................176
Back-Up Camera..............176
Battery..................67, 248
Charging System Light..........67
Belts, Seat..................131
Blind Spot Monitoring............92
Brake Assist System.............81
Brake Control System, Electronic.....81
Brake Fluid..................282
Brake System
Fluid Check...............282
Warning Light...............66
Brake/Transmission Interlock.......146
Break-In Recommendations, New
Vehicle...............143, 144
Bulb Replacement.............198
Bulbs, Light.................133
Camera....................176
Capacities, Fluid...........278, 279
INDEX
357