2018 JEEP COMPASS AUX
[x] Cancel search: AUXPage 77 of 348

SAFETY
SAFETY FEATURES...........76
Anti-Lock Brake System (ABS)......76
Electronic Brake Control System.....77
AUXILIARY DRIVING SYSTEMS . .85
Blind Spot Monitoring (BSM) — If
Equipped...................85
Forward Collision Warning (FCW) With
Mitigation — If Equipped..........89
Tire Pressure Monitor System (TPMS) . .91
OCCUPANT RESTRAINT
SYSTEMS..................97
Occupant Restraint Systems Features . .97
Important Safety Precautions.......97
Seat Belt Systems..............98
Supplemental Restraint Systems (SRS) .105
Child Restraints — Carrying Children
Safely.....................120Transporting Pets..............135SAFETY TIPS..............136
Transporting Passengers..........136
Exhaust Gas.................136
Safety Checks You Should Make Inside
The Vehicle.................137
Periodic Safety Checks You Should Make
Outside The Vehicle.............138
SAFETY
75
Page 87 of 348

Rain Brake Support (RBS)
Rain Brake Support may improve braking
performance in wet conditions. It will periodi-
cally apply a small amount of brake pressure
to remove any water buildup on the front
brake rotors. It functions when the wind-
shield wipers are in LO or HI speed. When
Rain Brake Support is active, there is no
notification to the driver and no driver inter-
action is required.
Ready Alert Braking (RAB)
Ready Alert Braking may reduce the time
required to reach full braking during emer-
gency braking situations. It anticipates when
an emergency braking situation may occur by
monitoring how fast the throttle is released by
the driver. The EBC will prepare the brake
system for a panic stop.
Trailer Sway Control (TSC)
TSC uses sensors in the vehicle to recognize
an excessively swaying trailer and will take
the appropriate actions to attempt to stop the
sway. TSC will become active automatically
once an excessively swaying trailer is recog-
nized.NOTE:
TSC cannot stop all trailers from swaying.
Always use caution when towing a trailer and
follow the trailer tongue weight recommenda-
tions. Refer to “Trailer Towing” in “Starting
And Operating” for further information.
When TSC is functioning, the “ESC
Activation/Malfunction Indicator Light” will
flash, the engine power may be reduced and
you may feel the brakes being applied to
individual wheels to attempt to stop the
trailer from swaying. TSC is disabled when
the ESC system is in the “Partial Off” or “Full
Off” modes.
WARNING!
If TSC activates while driving, slow the
vehicle down, stop at the nearest safe
location, and adjust the trailer load to
eliminate trailer sway.
AUXILIARY DRIVING
SYSTEMS
Blind Spot Monitoring (BSM) — If
Equipped
The Blind Spot Monitoring (BSM) system
uses two radar-based sensors, located inside
the rear bumper fascia, to detect highway
licensable vehicles (automobiles, trucks, mo-
torcycles, etc.) that enter the blind spot
zones from the rear/front/side of the vehicle.
Rear Detection Zones
85
Page 263 of 348

MULTIMEDIA
CYBERSECURITY...........263
TIPS CONTROLS AND GENERAL
INFORMATION.............264
Steering Wheel Audio Controls......264
Reception Conditions............264
Care And Maintenance...........264
Anti-Theft Protection............264
UCONNECT 3 WITH 5–INCH DIS-
PLAY — IF EQUIPPED........265
Uconnect 3 With 5–inch Display At A
Glance.....................265
Clock Setting.................266
Audio Setting................266
Radio Operation...............267
USB/Audio Jack (AUX)/Bluetooth
Operation...................268
Voice Text Reply (Not Compatible With
iPhone)....................269
Apps — If Equipped............270
UCONNECT 4 WITH 7-INCH DIS-
PLAY.....................271
Uconnect 4 At A Glance.........271Drag & Drop Menu Bar...........272
Radio.....................273
Media Hub — USB/Audio Jack (AUX) — If
Equipped...................274
Android Auto — If Equipped.......276
Apple CarPlay Integration — If Equipped. .277
Apps — If Equipped............278
UCONNECT 4C/4C NAV WITH
8.4–INCH DISPLAY..........279
Uconnect 4/4C NAV At A Glance. . . .279
Drag & Drop Menu Bar...........280
Radio.....................281
Media Hub — USB/Audio Jack (AUX) — If
Equipped...................282
Android Auto.................284
Apple CarPlay Integration.........287
Apps — If Equipped............289
Jeep Skills..................289
UCONNECT SETTINGS.......290
NAVIGATION — IF EQUIPPED . .290
Changing The Navigation Voice Prompt
Volume....................290Finding Points Of Interest........292
Finding A Place By Spelling The
Name.....................292
One-Step Voice Destination Entry. . . .292
Setting Your Home Location.......292
Home.....................292
Adding A Stop................294
Taking A Detour...............294
Map Update.................294
UCONNECT PHONE.........295
Uconnect Phone (Bluetooth Hands Free
Calling)....................295
Pairing (Wirelessly Connecting) Your Mobile
Phone To The Uconnect System.....298
Common Phone Commands
(Examples)..................301
Mute (Or Unmute) Microphone During
Call......................301
Transfer Ongoing Call Between Handset
And Vehicle.................301
Phonebook..................301
Voice Command Tips............302
Changing The Volume...........302
MULTIMEDIA
261
Page 270 of 348

Store Radio Presets Manually
The Radio stores up to 12 presets in each of
the Radio modes. There are four visible pre-
sets at the top of the radio screen. Pressing
the “All” button on the touchscreen on the
radio home screen displays all of the preset
stations for that mode.
To store a radio preset manually, follow the
steps below:
1. Tune to the desired station.
2. Press and hold the desired numbered but-
ton on the touchscreen for more than two
seconds, or until you hear a confirmation
beep.
Seek Next/Previous Buttons
• Press the Seek up or Seek down button to
seek through radio stations in AM, FM or
DAB bands.
• Hold either button to bypass stations with-
out stopping.USB/Audio Jack (AUX)/Bluetooth
Operation
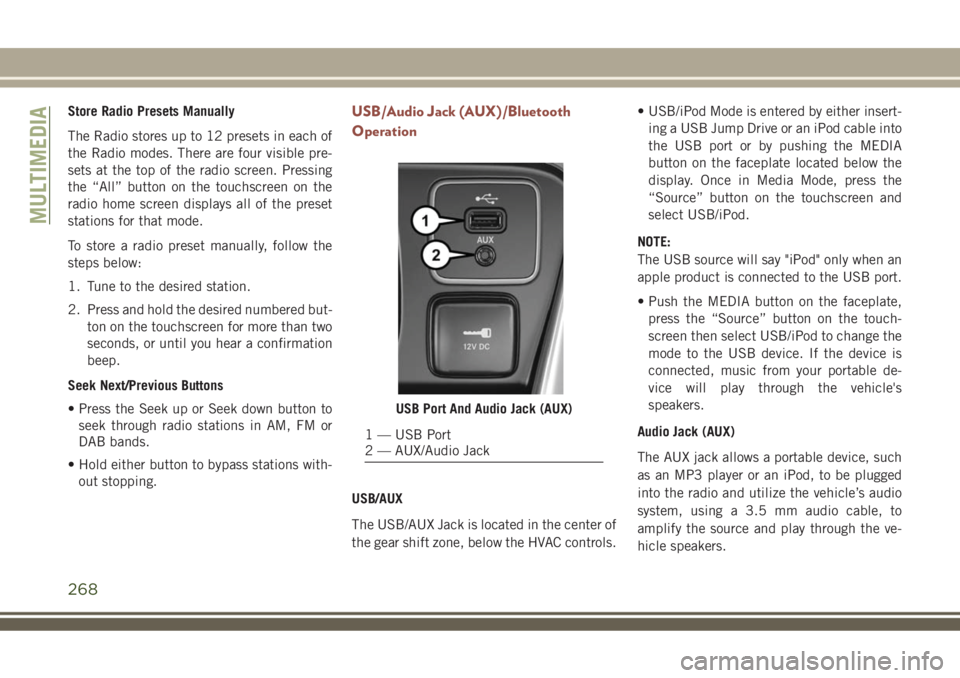
USB/AUX
The USB/AUX Jack is located in the center of
the gear shift zone, below the HVAC controls.• USB/iPod Mode is entered by either insert-
ing a USB Jump Drive or an iPod cable into
the USB port or by pushing the MEDIA
button on the faceplate located below the
display. Once in Media Mode, press the
“Source” button on the touchscreen and
select USB/iPod.
NOTE:
The USB source will say "iPod" only when an
apple product is connected to the USB port.
• Push the MEDIA button on the faceplate,
press the “Source” button on the touch-
screen then select USB/iPod to change the
mode to the USB device. If the device is
connected, music from your portable de-
vice will play through the vehicle's
speakers.
Audio Jack (AUX)
The AUX jack allows a portable device, such
as an MP3 player or an iPod, to be plugged
into the radio and utilize the vehicle’s audio
system, using a 3.5 mm audio cable, to
amplify the source and play through the ve-
hicle speakers.
USB Port And Audio Jack (AUX)
1 — USB Port
2 — AUX/Audio Jack
MULTIMEDIA
268
Page 271 of 348

• Push the MEDIA button on the faceplate,
press the “Source” button on the touch-
screen then select AUX to change the mode
to AUX.
• The functions of the portable device are
controlled using the device. However, the
volume may be controlled using the radio or
portable device.
Bluetooth
If using a Bluetooth - equipped device, you
may also be able to stream music to your
vehicle's sound system.
Push the MEDIA button on the faceplate,
press the “Source” button on the touch-
screen then select Bluetooth to change the
mode to Bluetooth. If the device is paired,
music from your portable device will play
through the vehicle's speakers.NOTE:
If changing the name of the device within the
Bluetooth settings of your device (where ap-
plicable), and the device is connected to the
vehicle Bluetooth system, the system may
change the current playing track.
Uconnect 3 With 5–inch Display Available Me-
dia Hubs
Uconnect 3 Media Hub
(USB, AUX
Ports)Remote USB
Port (Fully
Functional)
SO
S = Standard Equipment
O = Optional Equipment
Voice Text Reply (Not Compatible With
iPhone)
Once your Uconnect system is paired with a
compatible mobile device, the system can
announce a new incoming text message, andread it to you over the vehicle audio system.
You can reply to the message using Voice
Recognition by selecting, or saying, one of
the 18 pre-defined messages.
Here’s How:
1. Push the Uconnect Phone button
and wait for the beep, then say “reply.”
Uconnect will give the following prompt:
“Please say the message you would like to
send.”
2. Wait for the beep and say one of the
pre-defined messages. (If you are not
sure, you can say “help”). Uconnect will
then read the pre-defined messages
allowed.
3. As soon as you hear the message you
would like to send, you can interrupt the
list of prompts by pushing the Uconnect
phone button and saying the phrase.
Uconnect will confirm the message by
reading it back to you.
269
Page 273 of 348

UCONNECT 4 WITH 7-INCH
DISPLAY
Uconnect 4 At A Glance
CAUTION!
Do NOT attach any object to the touch-
screen, doing so can result in damage to
the screen.NOTE:
Uconnect screen images are for illustration
purposes only and may not reflect exact soft-
ware for your vehicle.
Setting The Time
• For Uconnect 4, turn the unit on, and then
press the time display at the top of the
screen. Press “Yes.”
• If the time is not displayed at the top of the
screen, press the “Settings” button on the
touchscreen. In the Settings screen, press
the “Time & Date” button on the touch-
screen, then check or uncheck this option.
• Press “+” or “–” next to Set Time Hours and
Set Time Minutes to adjust the time.
• If these features are not available, uncheck
the Sync Time box.
• Press “X” to save your settings and exit out
of the Clock Setting screen.Audio Settings
• Press the “Audio” button on the touch-
screen to activate the Audio settings screen
to adjust Balance\Fade, Equalizer, Speed
Adjusted Volume, Surround Sound, Loud-
ness, AUX Volume Offset, Auto Play, and
Radio Off With Door.
• You can return to the Radio screen by
pressing the “X” located at the top right.
Balance/Fade
• Press the “Balance/Fade” button on the
touchscreen to Balance audio between the
front speakers or fade the audio between
the rear and front speakers.
• Pressing the “Front,” “Rear,” “Left,” or
“Right” buttons on the touchscreen or
press and drag the Speaker Icon to adjust
the Balance/Fade.
Equalizer
• Press the “Equalizer” button on the touch-
screen to activate the Equalizer screen.
Uconnect 4 With 7–inch Display Radio
Screen
271
Page 274 of 348

• Press the “+” or “–” buttons on the touch-
screen, or press and drag over the level bar
for each of the equalizer bands. The level
value, which spans between plus or minus
nine, is displayed at the bottom of each of
the bands.
Speed Adjusted Volume
• Press the “Speed Adjusted Volume” button
on the touchscreen to activate the Speed
Adjusted Volume screen. The Speed Ad-
justed Volume is adjusted by pressing the
volume level indicator. This alters the auto-
matic adjustment of the audio volume with
variation to vehicle speed.
Loudness
• Press the “On” button on the touchscreen
to activate Loudness. Press “Off” to deac-
tivate this feature. When Loudness is On,
the sound quality at lower volumes
improves.
AUX Volume Offset
• Press the “AUX Volume Offset” button on
the touchscreen to activate the AUX Vol-
ume Offset screen. The AUX Volume Offset
is adjusted by pressing of the “+” and “–”buttons. This alters the AUX input audio
volume. The level value, which spans be-
tween plus or minus three, is displayed
above the adjustment bar.
Auto Play
• Press the “Auto Play” button on the touch-
screen to activate the Auto Play screen. The
Auto Play feature has two settings “On”
and “Off.” With Auto Play on, music begins
playing from a connected device, immedi-
ately after it is connected to the radio.
Drag & Drop Menu Bar
The Uconnect features and services in the
main menu bar are easily changed for your
convenience. Simply follow these steps:1. Press the “Apps
” button to open the
App screen.
2. Press and hold, then drag the selected
App to replace an existing shortcut in the
main menu bar.
The new app shortcut, that was dragged
down onto the main menu bar, will now
be an active App/shortcut.
NOTE:
This feature is only available if the vehicle is
in PARK.
Uconnect 4 Main Menu
MULTIMEDIA
272
Page 276 of 348

WARNING!
ALWAYS drive safely with your hands on
the wheel. You have full responsibility and
assume all risks related to the use of the
Uconnect features and applications in this
vehicle. Only use Uconnect when it is safe
to do so. Failure to do so may result in an
accident involving serious injury or death.
• To access the Radio mode, press the “Ra-
dio” button on the touchscreen.
Selecting Radio Stations
• Press the desired radio band (AM, FM or
DAB) button on the touchscreen.
Seek Up/Seek Down
• Press the Seek up or down arrow buttons on
the touchscreen for less than two seconds
to seek through radio stations.
• Press and hold either arrow button on the
touchscreen for more than two seconds to
bypass stations without stopping. The radio
will stop at the next listenable station once
the arrow button on the touchscreen is
released.Direct Tune
• Tune directly to a radio station by pressing
the “Tune” button on the screen, and en-
tering the desired station number.
Store Radio Presets Manually
Your radio can store 36 total preset stations,
12 presets per band (AM, FM and DAB). They
are shown at the top of your radio screen. To
see the 12 preset stations per band, press the
arrow button on the touchscreen at the top
right of the screen to toggle between the two
sets of six presets.
To store a radio preset manually, follow the
steps below:
1. Tune to the desired station.
2. Press and hold the desired numbered but-
ton on the touchscreen for more than two
seconds or until you hear a confirmation
beep.
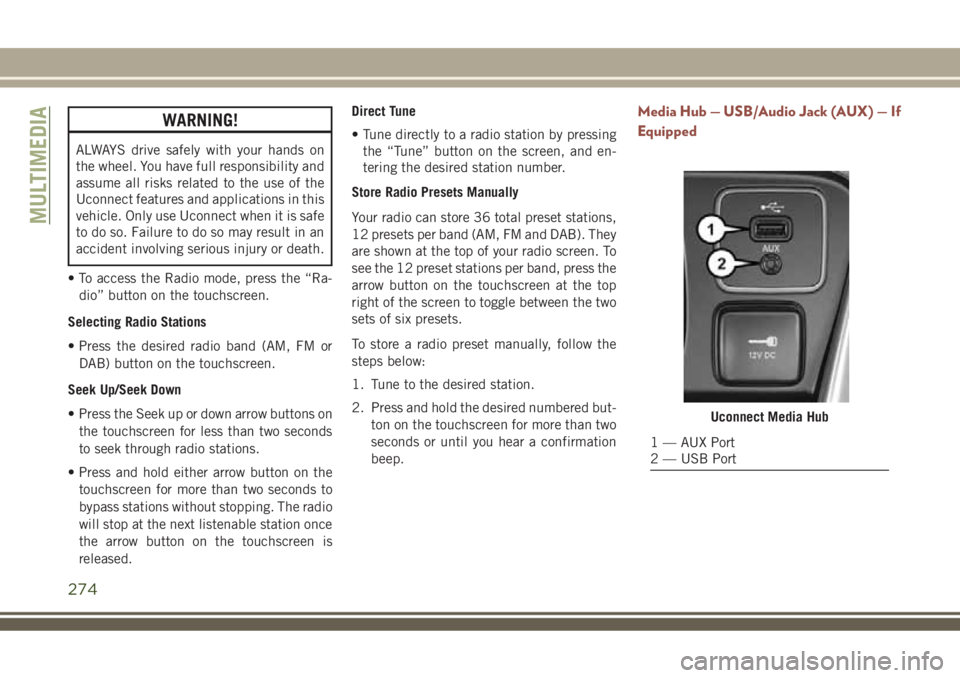
Media Hub — USB/Audio Jack (AUX) — If
Equipped
Uconnect Media Hub
1 — AUX Port
2 — USB Port
MULTIMEDIA
274