2018 JEEP COMPASS display
[x] Cancel search: displayPage 178 of 348

NOTE:
• The system will not apply torque to the
steering wheel whenever a safety system
engages. (anti-lock brakes, traction control
system, electronic stability control, forward
collision warning, etc.).
• Use of the turn signals and Hazard Warning
flashers also suppresses the warnings.
PARKVIEW REAR BACK-UP
CAMERA
Symbols And Messages On The Display
You can see an on-screen image of the rear of
your vehicle whenever the transmission is
shifted into REVERSE. The ParkView Rear
Back-Up Camera image will be displayed on
the Uconnect Display, located on the center
stack of the instrument panel.
If the Uconnect Display appears foggy, clean
the camera lens located on the rear of the
vehicle above the rear license plate.
Refer to “ParkView Back-Up Camera” in
“Starting And Operating” in your Owner's
Manual for further information.
WARNING!
Drivers must be careful when backing up;
even when using the ParkView Rear
Back-Up Camera. Always check carefully
behind your vehicle, and be sure to check
for pedestrians, animals, other vehicles,
obstructions, or blind spots before backing
up. You must continue to pay attention
while backing up. Failure to do so can
result in serious injury or death.
CAUTION!
• To avoid vehicle damage, ParkView
should only be used as a parking aid.
The ParkView camera is unable to view
every obstacle or object in your drive
path.
• To avoid vehicle damage, the vehicle
must be driven slowly when using
ParkView to be able to stop in time when
an obstacle is seen. It is recommended
that the driver look frequently over his/
her shoulder when using ParkView.
REFUELING THE VEHICLE
The Capless Fuel System uses a flapper
placed at the filler pipe of the fuel tank; it
opens and closes automatically upon
insertion/extraction of the fuel nozzle. In cer-
tain countries, the Capless Fuel System is
designed so that it prevents the filling of an
incorrect type of fuel.
1. Unlock the Fuel Filler Door by pushing the
unlock button on the key fob or the unlock
button on the driver-side door trim panel.
2. Open the fuel filler door by pushing on the
outer edge of the Fuel Door.
STARTING AND OPERATING
176
Page 228 of 348

Heavy Duty Use Of Vehicle
†† Change the engine oil and engine oil filter
at every 4500 miles (7,500 km) or
12 months if using your vehicle under any of
the following severe duty conditions:
• Stop and go driving.
• Driving in dusty conditions.
• Short trips of less than 10 miles (16 km).
• Trailer towing.
• Taxi, police, or delivery service (commercial
service).
• Off-road or desert operation.
Diesel Engines
Your vehicle is equipped with an automatic
oil change indicator system. The oil change
indicator system will remind you that it is
time to take your vehicle in for scheduled
maintenance.
Based on engine operation conditions, the oil
change indicator message will illuminate.
This means that service is required for yourvehicle. Operating conditions such as fre-
quent short-trips, trailer tow, extremely hot or
cold ambient temperatures will influence
when the “Oil Change Required” message is
displayed. Severe Operating Conditions can
cause the change oil message to illuminate
as earlier than specified. Have your vehicle
serviced as soon as possible, within the next
500 miles (805 km).
To help you have the best driving experience
possible, the manufacturer has identified the
specific vehicle maintenance service inter-
vals that are required to keep your vehicle
operating properly and safely.
The manufacturer recommends that these
maintenance intervals be performed at your
selling dealer. The technicians at your deal-
ership know your vehicle best, and have ac-
cess to factory trained information, genuine
Mopar parts, and specially designed elec-
tronic and mechanical tools that can help
prevent future costly repairs.
The maintenance intervals shown should be
performed as indicated in this section.NOTE:
•The actual interval for changing engine oil
and replacing the engine oil filter depends on
the vehicle usage conditions, and is signaled
by the warning light or message in the instru-
ment panel. In any case, it must never exceed
two years. If the vehicle is used mainly for
urban driving, change the engine oil and filter
every year.
•Flush and replace the engine coolant at
120 months or 150,000 miles (240,000 km)
whichever comes first.
•Regardless of the distance covered, the tim-
ing and accessory belts must be changed
every 4 years for particularly demanding use
(cold climates, city driving, long periods of
idling) or at least every 6 years. Under no
circumstances should these intervals be
exceeded.SERVICING AND MAINTENANCE
226
Page 263 of 348

MULTIMEDIA
CYBERSECURITY...........263
TIPS CONTROLS AND GENERAL
INFORMATION.............264
Steering Wheel Audio Controls......264
Reception Conditions............264
Care And Maintenance...........264
Anti-Theft Protection............264
UCONNECT 3 WITH 5–INCH DIS-
PLAY — IF EQUIPPED........265
Uconnect 3 With 5–inch Display At A
Glance.....................265
Clock Setting.................266
Audio Setting................266
Radio Operation...............267
USB/Audio Jack (AUX)/Bluetooth
Operation...................268
Voice Text Reply (Not Compatible With
iPhone)....................269
Apps — If Equipped............270
UCONNECT 4 WITH 7-INCH DIS-
PLAY.....................271
Uconnect 4 At A Glance.........271Drag & Drop Menu Bar...........272
Radio.....................273
Media Hub — USB/Audio Jack (AUX) — If
Equipped...................274
Android Auto — If Equipped.......276
Apple CarPlay Integration — If Equipped. .277
Apps — If Equipped............278
UCONNECT 4C/4C NAV WITH
8.4–INCH DISPLAY..........279
Uconnect 4/4C NAV At A Glance. . . .279
Drag & Drop Menu Bar...........280
Radio.....................281
Media Hub — USB/Audio Jack (AUX) — If
Equipped...................282
Android Auto.................284
Apple CarPlay Integration.........287
Apps — If Equipped............289
Jeep Skills..................289
UCONNECT SETTINGS.......290
NAVIGATION — IF EQUIPPED . .290
Changing The Navigation Voice Prompt
Volume....................290Finding Points Of Interest........292
Finding A Place By Spelling The
Name.....................292
One-Step Voice Destination Entry. . . .292
Setting Your Home Location.......292
Home.....................292
Adding A Stop................294
Taking A Detour...............294
Map Update.................294
UCONNECT PHONE.........295
Uconnect Phone (Bluetooth Hands Free
Calling)....................295
Pairing (Wirelessly Connecting) Your Mobile
Phone To The Uconnect System.....298
Common Phone Commands
(Examples)..................301
Mute (Or Unmute) Microphone During
Call......................301
Transfer Ongoing Call Between Handset
And Vehicle.................301
Phonebook..................301
Voice Command Tips............302
Changing The Volume...........302
MULTIMEDIA
261
Page 266 of 348

TIPS CONTROLS AND
GENERAL INFORMATION
Steering Wheel Audio Controls
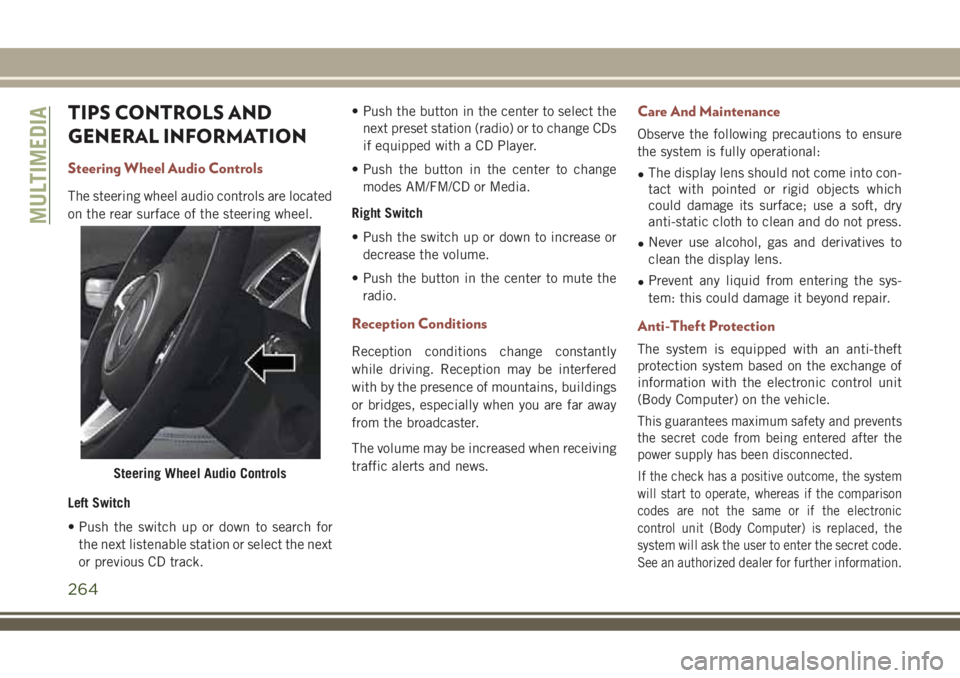
The steering wheel audio controls are located
on the rear surface of the steering wheel.
Left Switch
• Push the switch up or down to search for
the next listenable station or select the next
or previous CD track.• Push the button in the center to select the
next preset station (radio) or to change CDs
if equipped with a CD Player.
• Push the button in the center to change
modes AM/FM/CD or Media.
Right Switch
• Push the switch up or down to increase or
decrease the volume.
• Push the button in the center to mute the
radio.
Reception Conditions
Reception conditions change constantly
while driving. Reception may be interfered
with by the presence of mountains, buildings
or bridges, especially when you are far away
from the broadcaster.
The volume may be increased when receiving
traffic alerts and news.
Care And Maintenance
Observe the following precautions to ensure
the system is fully operational:
•The display lens should not come into con-
tact with pointed or rigid objects which
could damage its surface; use a soft, dry
anti-static cloth to clean and do not press.
•Never use alcohol, gas and derivatives to
clean the display lens.
•Prevent any liquid from entering the sys-
tem: this could damage it beyond repair.
Anti-Theft Protection
The system is equipped with an anti-theft
protection system based on the exchange of
information with the electronic control unit
(Body Computer) on the vehicle.
This guarantees maximum safety and prevents
the secret code from being entered after the
power supply has been disconnected.
If the check has a positive outcome, the system
will start to operate, whereas if the comparison
codes are not the same or if the electronic
control unit (Body Computer) is replaced, the
system will ask the user to enter the secret code.
See an authorized dealer for further information.Steering Wheel Audio Controls
MULTIMEDIA
264
Page 267 of 348

UCONNECT 3 WITH 5–INCH DISPLAY — IF EQUIPPED
Uconnect 3 With 5–inch Display At A
Glance
Uconnect 3 With 5–inch Display Radio Buttons
1 — RADIO Button
2 — COMPASS Button
3 — SETTINGS Button
4 — MORE Functions Button
5 — BROWSE/ENTER Button — TUNE/SCROLL Knob6 — SCREEN OFF Button
7 — Mute Button
8 — System On/Off — Volume Control Knob
9 — Uconnect PHONE Button
10 — MEDIA Button
265
Page 268 of 348

CAUTION!
Do NOT attach any object to the touchscreen,
doing so can result in damage to the touch-
screen.
Clock Setting
To start the clock setting procedure:
1. Push the MORE button on the faceplate.
2. Press the Settings button on the touch-
screen, then press the “Clock and Date”
button.
3. Press the “Set Time” button on the
touchscreen.
4. Press the “Up” or “Down” arrows to ad-
just the hours or minutes, then select the
“AM” or “PM” button on the touchscreen.
You can also select 12hr or 24hr format
by pressing the desired button on the
touchscreen.
5. Once the time is set press the “Done”
button on the touchscreen to exit the time
screen.NOTE:
In the Clock Setting Menu you can also select
Display Clock. Display Clock turns the clock
display in the status bar on or off.
Audio Setting
1. Push the MORE button on the faceplate.
2. Press the “Settings” button on the
touchscreen.
3. Scroll down and press the “Audio” button
on the touchscreen to open the Audio
menu.
4. The Audio Menu shows the following op-
tions for you to customize your audio
settings.
Equalizer
Press the “Equalizer” button on the touch-
screen to adjust the Bass, Mid and Treble.
Use the “+” or “-” button on the touchscreen
to adjust the equalizer to your desired set-
tings.Balance/Fade
Press the “Balance/Fade” button on the touch-
screen to adjust the sound from the speakers.
Use the arrow buttons on the touchscreen to
adjust the sound level from the front and rear or
right and left side speakers. Press the Center
“C” button on the touchscreen to reset the
balance and fade to the factory setting.
Speed Adjusted Volume — If Equipped
Press the “Speed Adjusted Volume” button
on the touchscreen to select between OFF, 1,
2 or 3. This will decrease the radio volume
relative to a decrease in vehicle speed.
Loudness — If Equipped
Press the “Loudness” button on the touch-
screen to select the Loudness feature. When
this feature is activated it improves sound
quality at lower volumes.
Surround Sound — If Equipped
Press the “Surround Sound” button on the
touchscreen, select On or Off followed by
pressing the back arrow button on the touch-
screen. When this feature is activated, it
provides simulated surround sound mode.
MULTIMEDIA
266
Page 270 of 348

Store Radio Presets Manually
The Radio stores up to 12 presets in each of
the Radio modes. There are four visible pre-
sets at the top of the radio screen. Pressing
the “All” button on the touchscreen on the
radio home screen displays all of the preset
stations for that mode.
To store a radio preset manually, follow the
steps below:
1. Tune to the desired station.
2. Press and hold the desired numbered but-
ton on the touchscreen for more than two
seconds, or until you hear a confirmation
beep.
Seek Next/Previous Buttons
• Press the Seek up or Seek down button to
seek through radio stations in AM, FM or
DAB bands.
• Hold either button to bypass stations with-
out stopping.USB/Audio Jack (AUX)/Bluetooth
Operation
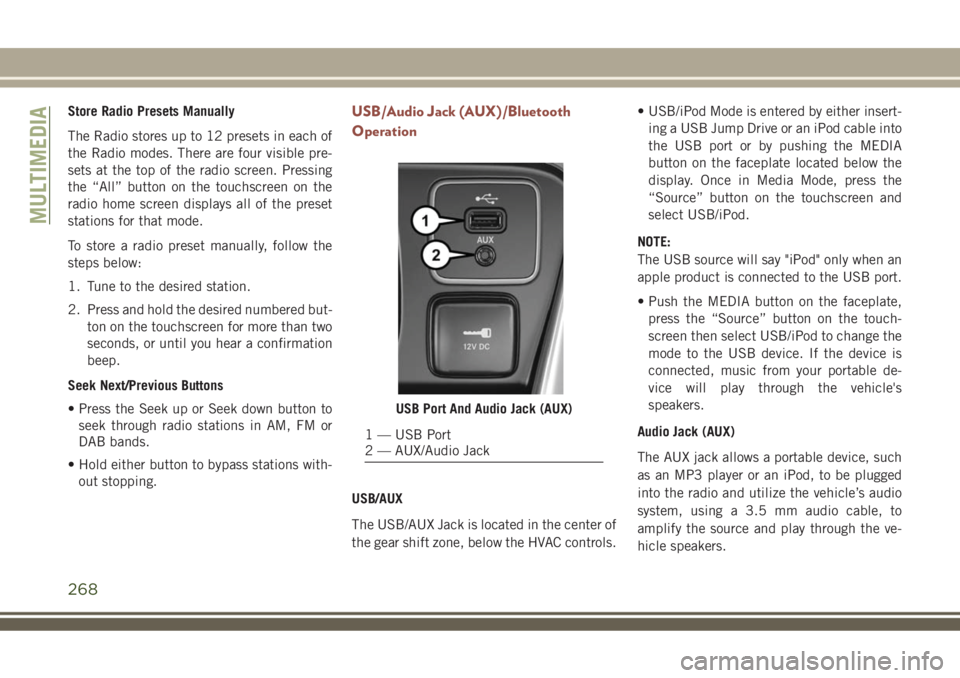
USB/AUX
The USB/AUX Jack is located in the center of
the gear shift zone, below the HVAC controls.• USB/iPod Mode is entered by either insert-
ing a USB Jump Drive or an iPod cable into
the USB port or by pushing the MEDIA
button on the faceplate located below the
display. Once in Media Mode, press the
“Source” button on the touchscreen and
select USB/iPod.
NOTE:
The USB source will say "iPod" only when an
apple product is connected to the USB port.
• Push the MEDIA button on the faceplate,
press the “Source” button on the touch-
screen then select USB/iPod to change the
mode to the USB device. If the device is
connected, music from your portable de-
vice will play through the vehicle's
speakers.
Audio Jack (AUX)
The AUX jack allows a portable device, such
as an MP3 player or an iPod, to be plugged
into the radio and utilize the vehicle’s audio
system, using a 3.5 mm audio cable, to
amplify the source and play through the ve-
hicle speakers.
USB Port And Audio Jack (AUX)
1 — USB Port
2 — AUX/Audio Jack
MULTIMEDIA
268
Page 271 of 348

• Push the MEDIA button on the faceplate,
press the “Source” button on the touch-
screen then select AUX to change the mode
to AUX.
• The functions of the portable device are
controlled using the device. However, the
volume may be controlled using the radio or
portable device.
Bluetooth
If using a Bluetooth - equipped device, you
may also be able to stream music to your
vehicle's sound system.
Push the MEDIA button on the faceplate,
press the “Source” button on the touch-
screen then select Bluetooth to change the
mode to Bluetooth. If the device is paired,
music from your portable device will play
through the vehicle's speakers.NOTE:
If changing the name of the device within the
Bluetooth settings of your device (where ap-
plicable), and the device is connected to the
vehicle Bluetooth system, the system may
change the current playing track.
Uconnect 3 With 5–inch Display Available Me-
dia Hubs
Uconnect 3 Media Hub
(USB, AUX
Ports)Remote USB
Port (Fully
Functional)
SO
S = Standard Equipment
O = Optional Equipment
Voice Text Reply (Not Compatible With
iPhone)
Once your Uconnect system is paired with a
compatible mobile device, the system can
announce a new incoming text message, andread it to you over the vehicle audio system.
You can reply to the message using Voice
Recognition by selecting, or saying, one of
the 18 pre-defined messages.
Here’s How:
1. Push the Uconnect Phone button
and wait for the beep, then say “reply.”
Uconnect will give the following prompt:
“Please say the message you would like to
send.”
2. Wait for the beep and say one of the
pre-defined messages. (If you are not
sure, you can say “help”). Uconnect will
then read the pre-defined messages
allowed.
3. As soon as you hear the message you
would like to send, you can interrupt the
list of prompts by pushing the Uconnect
phone button and saying the phrase.
Uconnect will confirm the message by
reading it back to you.
269