2018 JEEP COMPASS warning
[x] Cancel search: warningPage 255 of 348

TECHNICAL SPECIFICATIONS
IDENTIFICATION DATA.......254
Vehicle Identification Number......254
WHEEL AND TIRE TORQUE SPECI-
FICATIONS................255
Torque Specifications...........255
FUEL REQUIREMENTS — GASOLINE
ENGINE..................255
1.4L Turbo Gasoline Engine........255
Ethanol....................256
Materials Added To Fuel.........256
Fuel System Cautions...........256
Carbon Monoxide Warnings.......257FUEL REQUIREMENTS — DIESEL
ENGINE...................257
Diesel Engine................257
FLUID CAPACITIES..........258
FLUIDS AND LUBRICANTS. . . .259
Engine.....................259
Chassis....................259
TECHNICAL SPECIFICATIONS
253
Page 257 of 348

WHEEL AND TIRE TORQUE
SPECIFICATIONS
Proper lug nut/bolt torque is very important to
ensure that the wheel is properly mounted to
the vehicle. Any time a wheel has been re-
moved and reinstalled on the vehicle, the lug
nuts/bolts should be torqued using a properly
calibrated torque wrench using a high quality
six sided (hex) deep wall socket.
Torque Specifications
Lug Nut/Bolt
Torque**Lug Nut/Bolt
SizeLug Nut/Bolt
Socket Size
100 Ft-Lbs
(135 N·m)M12 x 1.25 17 mm
**Use only your authorized dealer recom-
mended lug nuts/bolts and clean or remove
any dirt or oil before tightening.
Inspect the wheel mounting surface prior to
mounting the tire and remove any corrosion
or loose particles.Tighten the lug nuts/bolts in a star pattern
until each nut/bolt has been tightened twice.
Ensure that the socket is fully engaged on the
lug nut/bolt (do not insert it halfway).
NOTE:
If in doubt about the correct tightness, have
them checked with a torque wrench by your
authorized dealer or service station.After 25 miles (40 km), check the lug nut/
bolt torque to be sure that all the lug nuts/
bolts are properly seated against the wheel.
WARNING!
To avoid the risk of forcing the vehicle off
the jack, do not tighten the lug nuts fully
until the vehicle has been lowered. Failure
to follow this warning may result in per-
sonal injury.
FUEL REQUIREMENTS —
GASOLINE ENGINE
1.4L Turbo Gasoline Engine
This engine is designed to meet all emission
regulations and provide satisfactory fuel
economy and performance when using high-
quality unleaded gasoline having a minimum
research octane rating (RON) of 95. For op-
timum performance and fuel economy the
use of minimum research octane rating
(RON) of 98 or higher is recommended.
Torque Pattern
255
Page 259 of 348

Carbon Monoxide Warnings
WARNING!
Carbon monoxide (CO) in exhaust gases is
deadly. Follow the precautions below to
prevent carbon monoxide poisoning:
• Do not inhale exhaust gases. They con-
tain carbon monoxide, a colorless and
odorless gas, which can kill. Never run
the engine in a closed area, such as a
garage, and never sit in a parked vehicle
with the engine running for an extended
period. If the vehicle is stopped in an
open area with the engine running for
more than a short period, adjust the
ventilation system to force fresh, outside
air into the vehicle.
• Guard against carbon monoxide with
proper maintenance. Have the exhaust
system inspected every time the vehicle
is raised. Have any abnormal conditions
repaired promptly. Until repaired, drive
with all side windows fully open.
FUEL REQUIREMENTS —
DIESEL ENGINE
Diesel Engine
Use good quality diesel fuel from a reputable
supplier. If the outside temperature is very
low, the diesel fuel thickens due to the for-
mation of paraffin clots with consequent de-
fective operation of the fuel supply system.
In order to avoid these problems different
types of fuel are distributed according to the
season: summer type, winter type and arctic
type (cold/mountain areas). If fueling with
diesel fuel whose features are not suitable for
the temperature of use, it is advisable to mix
in a suitable additive with the fuel. With the
proportions shown on the container, pour the
additive in the tank before fueling.
When using or parking the vehicle for a long
time in the mountains or cold areas, it is
advisable to refuel using locally available
fuel. In this case, it is also advisable to keep
the tank over half full.This vehicle must only use premium diesel
fuel that meets the requirements of EN 590.
Biodiesel blends up to 7% that meet EN
590 may also be used.WARNING!
Do not use alcohol or gasoline as a fuel-
blending agent. They can be unstable un-
der certain conditions and hazardous or
explosive when mixed with diesel fuel.
Diesel fuel is seldom completely free of wa-
ter. To prevent fuel system trouble, drain the
accumulated water from the fuel/water sepa-
rator using the provided fuel/water separator
drain. If you buy good quality fuel and follow
the cold weather advice above, fuel condi-
tioners should not be required in your vehicle.
If available in your area, a high cetane “pre-
mium” diesel fuel may offer improved cold-
starting and warm-up performance.
257
Page 265 of 348

CYBERSECURITY
Your vehicle may be a connected vehicle and
may be equipped with both wired and wire-
less networks. These networks allow your ve-
hicle to send and receive information. This
information allows systems and features in
your vehicle to function properly.
Your vehicle may be equipped with certain
security features to reduce the risk of unau-
thorized and unlawful access to vehicle sys-
tems and wireless communications. Vehicle
software technology continues to evolve over
time and FCA, working with its suppliers,
evaluates and takes appropriate steps as
needed. Similar to a computer or other de-
vices, your vehicle may require software up-
dates to improve the usability and perfor-
mance of your systems or to reduce the
potential risk of unauthorized and unlawful
access to your vehicle systems.
The risk of unauthorized and unlawful access
to your vehicle systems may still exist, even if
the most recent version of vehicle software
(such as Uconnect software) is installed.
WARNING!
• It is not possible to know or to predict all
of the possible outcomes if your vehi-
cle’s systems are breached. It may be
possible that vehicle systems, including
safety related systems, could be im-
paired or a loss of vehicle control could
occur that may result in an accident
involving serious injury or death.
• ONLY insert media (e.g., USB, SD card,
or CD) into your vehicle if it came from a
trusted source. Media of unknown origin
could possibly contain malicious soft-
ware, and if installed in your vehicle, it
may increase the possibility for vehicle
systems to be breached.
• As always, if you experience unusual
vehicle behavior, take your vehicle to
your nearest authorized dealer immedi-
ately.
NOTE:
• FCA or your dealer may contact you directly
regarding software updates.• To help further improve vehicle security and
minimize the potential risk of a security
breach, vehicle owners should:
– Routinely check
www.driveuconnect.com/support/
software-update.html to learn about
available Uconnect software updates.
– Only connect and use trusted media
devices (e.g. personal mobile phones,
USBs, CDs).
Privacy of any wireless and wired communi-
cations cannot be assured. Third parties may
unlawfully intercept information and private
communications without your consent. For
further information, refer to “Data Collection
& Privacy” in “Onboard Diagnostic System
(OBD II) Cybersecurity” in “Getting To Know
Your Instrument Panel” in your Owner’s
Manual ).
263
Page 276 of 348

WARNING!
ALWAYS drive safely with your hands on
the wheel. You have full responsibility and
assume all risks related to the use of the
Uconnect features and applications in this
vehicle. Only use Uconnect when it is safe
to do so. Failure to do so may result in an
accident involving serious injury or death.
• To access the Radio mode, press the “Ra-
dio” button on the touchscreen.
Selecting Radio Stations
• Press the desired radio band (AM, FM or
DAB) button on the touchscreen.
Seek Up/Seek Down
• Press the Seek up or down arrow buttons on
the touchscreen for less than two seconds
to seek through radio stations.
• Press and hold either arrow button on the
touchscreen for more than two seconds to
bypass stations without stopping. The radio
will stop at the next listenable station once
the arrow button on the touchscreen is
released.Direct Tune
• Tune directly to a radio station by pressing
the “Tune” button on the screen, and en-
tering the desired station number.
Store Radio Presets Manually
Your radio can store 36 total preset stations,
12 presets per band (AM, FM and DAB). They
are shown at the top of your radio screen. To
see the 12 preset stations per band, press the
arrow button on the touchscreen at the top
right of the screen to toggle between the two
sets of six presets.
To store a radio preset manually, follow the
steps below:
1. Tune to the desired station.
2. Press and hold the desired numbered but-
ton on the touchscreen for more than two
seconds or until you hear a confirmation
beep.
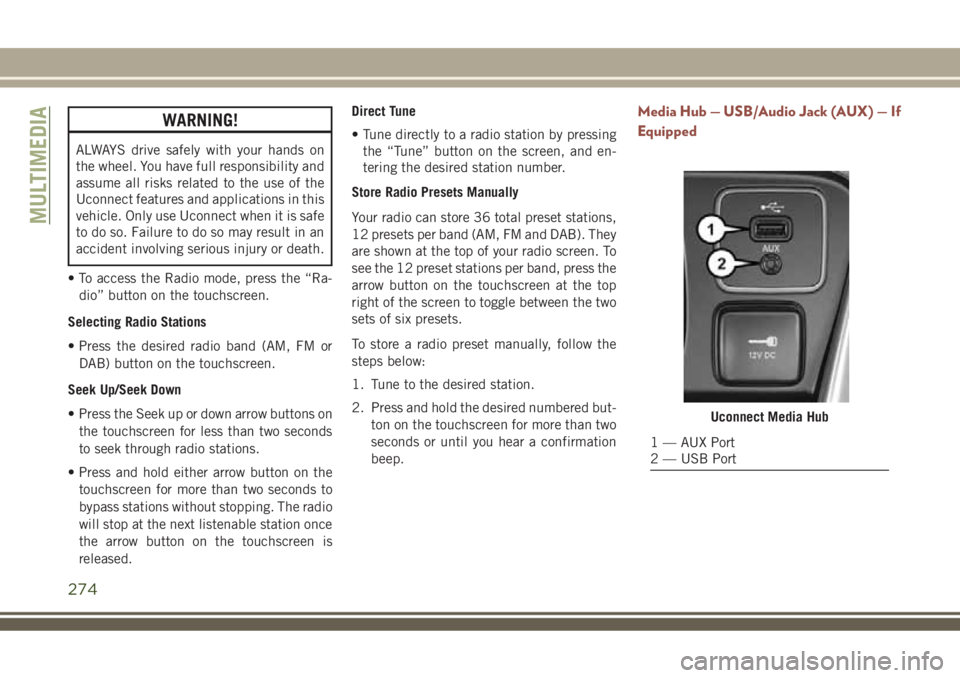
Media Hub — USB/Audio Jack (AUX) — If
Equipped
Uconnect Media Hub
1 — AUX Port
2 — USB Port
MULTIMEDIA
274
Page 281 of 348

UCONNECT 4C/4C NAV
WITH 8.4–INCH DISPLAY
Uconnect 4/4C NAV At A Glance
WARNING!
ALWAYS drive safely with your hands on
the wheel. You have full responsibility and
assume all risks related to the use of the
Uconnect features and applications in this
vehicle. Only use Uconnect when it is safe
to do so. Failure to do so may result in an
accident involving serious injury or death.
CAUTION!
Do not attach any object to touchscreen,
doing so can result in damage to the
touchscreen.
Setting The Time
• Model Uconnect 4/4C NAV synchronizes
time automatically via GPS, so it should not
require any time adjustment. If you do need
to set the time manually, follow the instruc-
tions below for Model Uconnect 4/4C NAV.• For Uconnect 4/4C NAV, turn the unit on,
and then press the time display at the top of
the screen. Press “Yes.”
• If the time is not displayed at the top of the
screen, press the “Settings” button on the
touchscreen. In the Settings screen, press
the “Clock” button on the touchscreen,
then check or uncheck this option.
• Press “+” or “–” next to Set Time Hours and
Set Time Minutes to adjust the time.
• If these features are not available, uncheck
the Sync Time box.
• Press “X” to save your settings and exit out
of the Clock Setting screen.
Background Themes — If Equipped
• Screen background themes are selectable
from a pre-loaded list of themes. If you’d
like to set a theme, follow the instructions
below.
• Press the “Settings” button on the touch-
screen.• Press the “Display” button on the touch-
screen.
• Then press “Set Theme” button on the
touchscreen and select a theme.
Audio Settings
• Press of the “Audio” button on the touch-
screen to activate the Audio settings screen
to adjust Balance\Fade, Equalizer, and
Speed Adjusted Volume.
• You can return to the Radio screen by
pressing the “X” located at the top right.
Balance/Fade
• Press the “Balance/Fade” button on the
touchscreen to Balance audio between the
front speakers or fade the audio between
the rear and front speakers.
• Pressing the “Front,” “Rear,” “Left,” or
“Right” buttons on the touchscreen or
press and drag the Speaker Icon to adjust
the Balance/Fade.
279
Page 284 of 348

WARNING!
ALWAYS drive safely with your hands on
the wheel. You have full responsibility and
assume all risks related to the use of the
Uconnect features and applications in this
vehicle. Only use Uconnect when it is safe
to do so. Failure to do so may result in an
accident involving serious injury or death.
• To access the Radio mode, press the “Ra-
dio” button on the touchscreen.
Selecting Radio Stations
• Press the desired radio band (AM, FM or
DAB) button on the touchscreen.
Seek Up/Seek Down
• Press the Seek up or down arrow buttons on
the touchscreen for less than two seconds
to seek through radio stations.
• Press and hold either arrow button on the
touchscreen for more than two seconds to
bypass stations without stopping. The radio
will stop at the next listenable station once
the arrow button on the touchscreen is
released.Direct Tune
• Tune directly to a radio station by pressing
the “Tune” button on the screen, and en-
tering the desired station number.
Store Radio Presets Manually
Your radio can store 36 total preset stations,
12 presets per band (AM, FM and DAB). They
are shown at the top of your radio screen. To
see the 12 preset stations per band, press the
arrow button on the touchscreen at the top
right of the screen to toggle between the two
sets of six presets.
To store a radio preset manually, follow the
steps below:
1. Tune to the desired station.
2. Press and hold the desired numbered but-
ton on the touchscreen for more than two
seconds or until you hear a confirmation
beep.
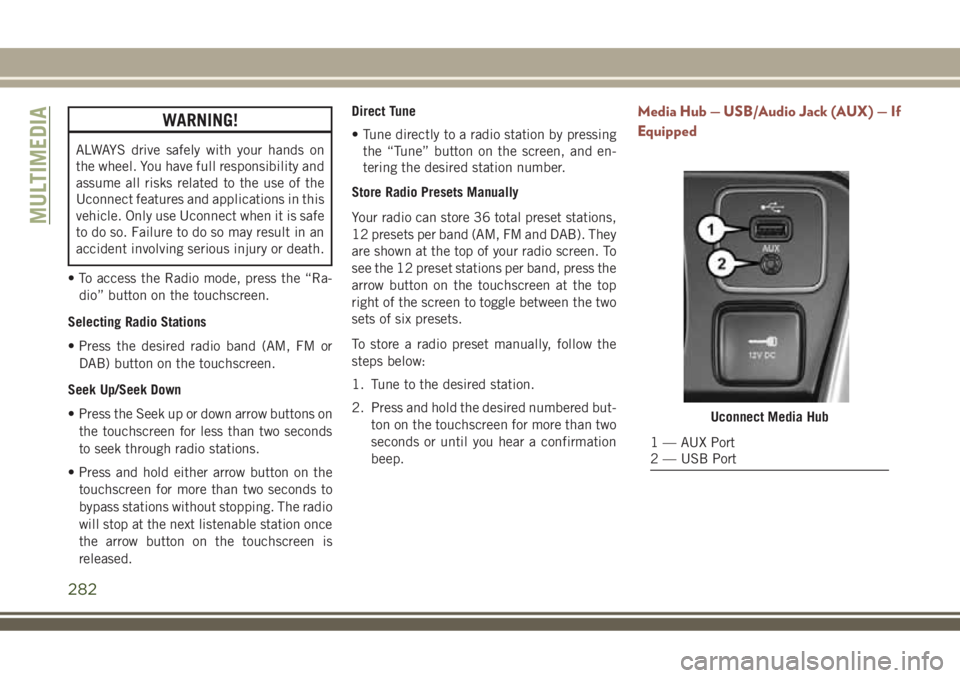
Media Hub — USB/Audio Jack (AUX) — If
Equipped
Uconnect Media Hub
1 — AUX Port
2 — USB Port
MULTIMEDIA
282
Page 335 of 348

Adaptive Cruise Control (ACC)
Off ..............164, 165, 166
On ..............164, 165, 166
Adaptive Cruise Control (ACC) (Cruise
Control)..................164
Additives, Fuel................256
AirBag ....................107
Air Bag Operation............108
Air Bag Warning Light.........106
Enhanced Accident Response. . . .220
Event Data Recorder (EDR)......220
If A Deployment Occurs........117
Knee Impact Bolsters.........113
Maintaining Your Air Bag System . .119
Redundant Air Bag Warning Light . .106
Side Air Bags..............113
Transporting Pets............135
Air Bag Light...........61, 106, 137
Air Bag Maintenance............119
Air Conditioner Maintenance.......234
Air Conditioning Filter.........47, 235
Air Conditioning, Operating Tips......47
Air Conditioning Refrigerant........234
Air Conditioning System.......46, 234
Air Pressure, Tires..............238Alarm
Arm The System.............20
Disarm The System............20
Alarm (Security Alarm).........19, 64
Alarm System (Security Alarm). . . .19, 21
Antifreeze (Engine Coolant)........258
Anti-Lock Brake System (ABS).......76
Anti-Lock Warning Light...........65
Arming System (Security Alarm)......19
Assist, Hill Start................83
Audio Jack...............274, 282
Audio Systems (Radio)...........267
Auto Down Power Windows.........48
Automatic Dimming Mirror.........34
Automatic Headlights............35
Automatic Temperature Control (ATC) . . .46
Automatic Transaxle............150
Automatic Transmission..........152
Adding Fluid.............
.259
Fluid
Level Check...........237
Fluid Type................259
Auto Up Power Windows...........48
Auxiliary Electrical Outlet (Power Outlet) .56
Auxiliary Power Outlet............56
Axle Fluid...................259Axle Lubrication...............259
Back-Up...................176
Back-Up Camera..............176
Battery..................62, 233
Charging System Light.........62
Belts, Seat..................137
Blind Spot Monitoring............85
Brake Assist System.............77
Brake Control System, Electronic.....77
Brake Fluid..................259
Brake System................236
Fluid Check...........236, 259
Master Cylinder.............236
Parking..................145
Brake/Transmission Interlock.......151
Bulb Replacement.............186
Bulbs, Light.................138
Camera....................176
Capacities, Fluid..............258
Caps, Filler
Fuel....................176
Oil (Engine)...............230
Carbon Monoxide Warning.....136, 257
INDEX
333