2018 JEEP COMPASS wheel
[x] Cancel search: wheelPage 250 of 348

CAUTION!
Do not use scouring pads, steel wool, a
bristle brush, metal polishes or oven
cleaner. These products may damage the
wheel's protective finish. Such damage is
not covered by the New Vehicle Limited
Warranty. Only car wash soap, Mopar
Wheel Cleaner or equivalent is recom-
mended.
NOTE:
If you intend parking or storing your vehicle for
an extended period after cleaning the wheels
with wheel cleaner, drive your vehicle and apply
the brakes to remove the water droplets from the
brake components. This activity will remove the
red rust on the brake rotors and prevent vehicle
vibration when braking.
Dark Vapor Chrome, Black Satin Chrome, or Low
Gloss Clear Coat Wheels
CAUTION!
If your vehicle is equipped with these
specialty wheels, DO NOT USE wheel
CAUTION!
cleaners, abrasives, or polishing com-
pounds. They will permanently damage
this finish and such damage is not covered
by the New Vehicle Limited Warranty.
HAND WASH ONLY USING MILD SOAP
AND WATER WITH A SOFT CLOTH. Used
on a regular basis; this is all that is re-
quired to maintain this finish.
Cleaning Headlights
Your vehicle is equipped with plastic head-
lights and fog lights that are lighter and less
susceptible to stone breakage than glass
headlights.
Plastic is not as scratch resistant as glass and
therefore different lens cleaning procedures
must be followed.
To minimize the possibility of scratching the
lenses and reducing light output, avoid wip-
ing with a dry cloth. To remove road dirt, wash
with a mild soap solution followed by rinsing.Do not use abrasive cleaning components,
solvents, steel wool or other aggressive mate-
rial to clean the lenses.
Preserving The Bodywork
Washing
• Wash your vehicle regularly. Always wash
your vehicle in the shade using a mild car
wash soap, and rinse the panels completely
with clear water.
• Use a high quality cleaner wax to remove
road film, stains and to protect your paint
finish. Take care never to scratch the paint.
• Avoid using abrasive compounds and power
buffing that may diminish the gloss or thin
out the paint finish.
CAUTION!
• Do not use abrasive or strong cleaning
materials such as steel wool or scouring
powder that will scratch metal and
painted surfaces.
SERVICING AND MAINTENANCE
248
Page 251 of 348

CAUTION!
• Use of power washers exceeding
1,200 psi (8,274 kPa) can result in
damage or removal of paint and decals.
Special Care
• If you drive on salted or dusty roads or if you
drive near the ocean, hose off the undercar-
riage at least once a month.
• It is important that the drain holes in the
lower edges of the doors, rocker panels, and
trunk be kept clear and open.
• If you detect any stone chips or scratches in
the paint, touch them up immediately. The
cost of such repairs is considered the re-
sponsibility of the owner.
• If your vehicle is damaged due to a collision
or similar cause that destroys the paint and
protective coating, have your vehicle re-
paired as soon as possible. The cost of such
repairs is considered the responsibility of
the owner.• If you carry special cargo such as chemi-
cals, fertilizers, de-icer salt, etc., be sure
that such materials are well packaged and
sealed.
• If a lot of driving is done on gravel roads,
consider mud or stone shields behind each
wheel.
• An authorized dealer has touch up paint to
match the color of your vehicle.
INTERIORS
Seats And Fabric Parts
Use Mopar Total Clean to clean fabric uphol-
stery and carpeting.
WARNING!
Do not use volatile solvents for cleaning
purposes. Many are potentially flammable,
and if used in closed areas they may cause
respiratory harm.
Stain Repel Fabric Cleaning Procedure — If
Equipped
Stain Repel seats may be cleaned in the
following manner:
• Remove as much of the stain as possible by
blotting with a clean, dry towel.
• Blot any remaining stain with a clean,
damp towel.
• For tough stains, apply Mopar Total Clean,
or a mild soap solution to a clean, damp
cloth and remove stain. Use a fresh, damp
towel to remove soap residue.
• For grease stains, apply Mopar Multi-
Purpose Cleaner to a clean, damp cloth and
remove stain. Use a fresh, damp towel to
remove soap residue.
• Do not use any harsh solvents or any other
form of protectants on Stain Repel
products.
249
Page 255 of 348

TECHNICAL SPECIFICATIONS
IDENTIFICATION DATA.......254
Vehicle Identification Number......254
WHEEL AND TIRE TORQUE SPECI-
FICATIONS................255
Torque Specifications...........255
FUEL REQUIREMENTS — GASOLINE
ENGINE..................255
1.4L Turbo Gasoline Engine........255
Ethanol....................256
Materials Added To Fuel.........256
Fuel System Cautions...........256
Carbon Monoxide Warnings.......257FUEL REQUIREMENTS — DIESEL
ENGINE...................257
Diesel Engine................257
FLUID CAPACITIES..........258
FLUIDS AND LUBRICANTS. . . .259
Engine.....................259
Chassis....................259
TECHNICAL SPECIFICATIONS
253
Page 257 of 348

WHEEL AND TIRE TORQUE
SPECIFICATIONS
Proper lug nut/bolt torque is very important to
ensure that the wheel is properly mounted to
the vehicle. Any time a wheel has been re-
moved and reinstalled on the vehicle, the lug
nuts/bolts should be torqued using a properly
calibrated torque wrench using a high quality
six sided (hex) deep wall socket.
Torque Specifications
Lug Nut/Bolt
Torque**Lug Nut/Bolt
SizeLug Nut/Bolt
Socket Size
100 Ft-Lbs
(135 N·m)M12 x 1.25 17 mm
**Use only your authorized dealer recom-
mended lug nuts/bolts and clean or remove
any dirt or oil before tightening.
Inspect the wheel mounting surface prior to
mounting the tire and remove any corrosion
or loose particles.Tighten the lug nuts/bolts in a star pattern
until each nut/bolt has been tightened twice.
Ensure that the socket is fully engaged on the
lug nut/bolt (do not insert it halfway).
NOTE:
If in doubt about the correct tightness, have
them checked with a torque wrench by your
authorized dealer or service station.After 25 miles (40 km), check the lug nut/
bolt torque to be sure that all the lug nuts/
bolts are properly seated against the wheel.
WARNING!
To avoid the risk of forcing the vehicle off
the jack, do not tighten the lug nuts fully
until the vehicle has been lowered. Failure
to follow this warning may result in per-
sonal injury.
FUEL REQUIREMENTS —
GASOLINE ENGINE
1.4L Turbo Gasoline Engine
This engine is designed to meet all emission
regulations and provide satisfactory fuel
economy and performance when using high-
quality unleaded gasoline having a minimum
research octane rating (RON) of 95. For op-
timum performance and fuel economy the
use of minimum research octane rating
(RON) of 98 or higher is recommended.
Torque Pattern
255
Page 263 of 348

MULTIMEDIA
CYBERSECURITY...........263
TIPS CONTROLS AND GENERAL
INFORMATION.............264
Steering Wheel Audio Controls......264
Reception Conditions............264
Care And Maintenance...........264
Anti-Theft Protection............264
UCONNECT 3 WITH 5–INCH DIS-
PLAY — IF EQUIPPED........265
Uconnect 3 With 5–inch Display At A
Glance.....................265
Clock Setting.................266
Audio Setting................266
Radio Operation...............267
USB/Audio Jack (AUX)/Bluetooth
Operation...................268
Voice Text Reply (Not Compatible With
iPhone)....................269
Apps — If Equipped............270
UCONNECT 4 WITH 7-INCH DIS-
PLAY.....................271
Uconnect 4 At A Glance.........271Drag & Drop Menu Bar...........272
Radio.....................273
Media Hub — USB/Audio Jack (AUX) — If
Equipped...................274
Android Auto — If Equipped.......276
Apple CarPlay Integration — If Equipped. .277
Apps — If Equipped............278
UCONNECT 4C/4C NAV WITH
8.4–INCH DISPLAY..........279
Uconnect 4/4C NAV At A Glance. . . .279
Drag & Drop Menu Bar...........280
Radio.....................281
Media Hub — USB/Audio Jack (AUX) — If
Equipped...................282
Android Auto.................284
Apple CarPlay Integration.........287
Apps — If Equipped............289
Jeep Skills..................289
UCONNECT SETTINGS.......290
NAVIGATION — IF EQUIPPED . .290
Changing The Navigation Voice Prompt
Volume....................290Finding Points Of Interest........292
Finding A Place By Spelling The
Name.....................292
One-Step Voice Destination Entry. . . .292
Setting Your Home Location.......292
Home.....................292
Adding A Stop................294
Taking A Detour...............294
Map Update.................294
UCONNECT PHONE.........295
Uconnect Phone (Bluetooth Hands Free
Calling)....................295
Pairing (Wirelessly Connecting) Your Mobile
Phone To The Uconnect System.....298
Common Phone Commands
(Examples)..................301
Mute (Or Unmute) Microphone During
Call......................301
Transfer Ongoing Call Between Handset
And Vehicle.................301
Phonebook..................301
Voice Command Tips............302
Changing The Volume...........302
MULTIMEDIA
261
Page 266 of 348

TIPS CONTROLS AND
GENERAL INFORMATION
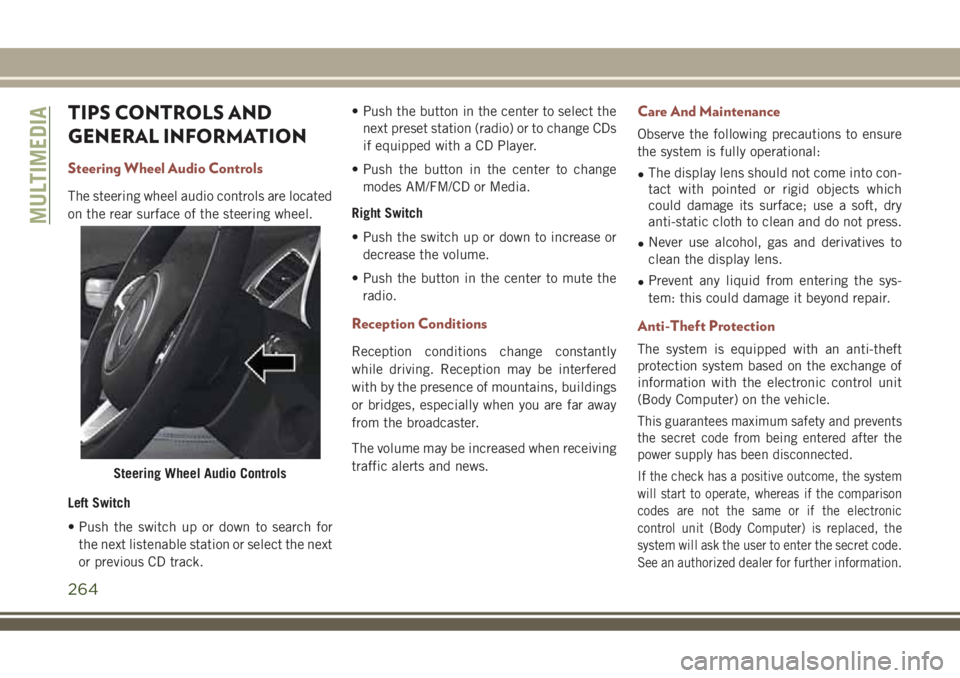
Steering Wheel Audio Controls
The steering wheel audio controls are located
on the rear surface of the steering wheel.
Left Switch
• Push the switch up or down to search for
the next listenable station or select the next
or previous CD track.• Push the button in the center to select the
next preset station (radio) or to change CDs
if equipped with a CD Player.
• Push the button in the center to change
modes AM/FM/CD or Media.
Right Switch
• Push the switch up or down to increase or
decrease the volume.
• Push the button in the center to mute the
radio.
Reception Conditions
Reception conditions change constantly
while driving. Reception may be interfered
with by the presence of mountains, buildings
or bridges, especially when you are far away
from the broadcaster.
The volume may be increased when receiving
traffic alerts and news.
Care And Maintenance
Observe the following precautions to ensure
the system is fully operational:
•The display lens should not come into con-
tact with pointed or rigid objects which
could damage its surface; use a soft, dry
anti-static cloth to clean and do not press.
•Never use alcohol, gas and derivatives to
clean the display lens.
•Prevent any liquid from entering the sys-
tem: this could damage it beyond repair.
Anti-Theft Protection
The system is equipped with an anti-theft
protection system based on the exchange of
information with the electronic control unit
(Body Computer) on the vehicle.
This guarantees maximum safety and prevents
the secret code from being entered after the
power supply has been disconnected.
If the check has a positive outcome, the system
will start to operate, whereas if the comparison
codes are not the same or if the electronic
control unit (Body Computer) is replaced, the
system will ask the user to enter the secret code.
See an authorized dealer for further information.Steering Wheel Audio Controls
MULTIMEDIA
264
Page 272 of 348

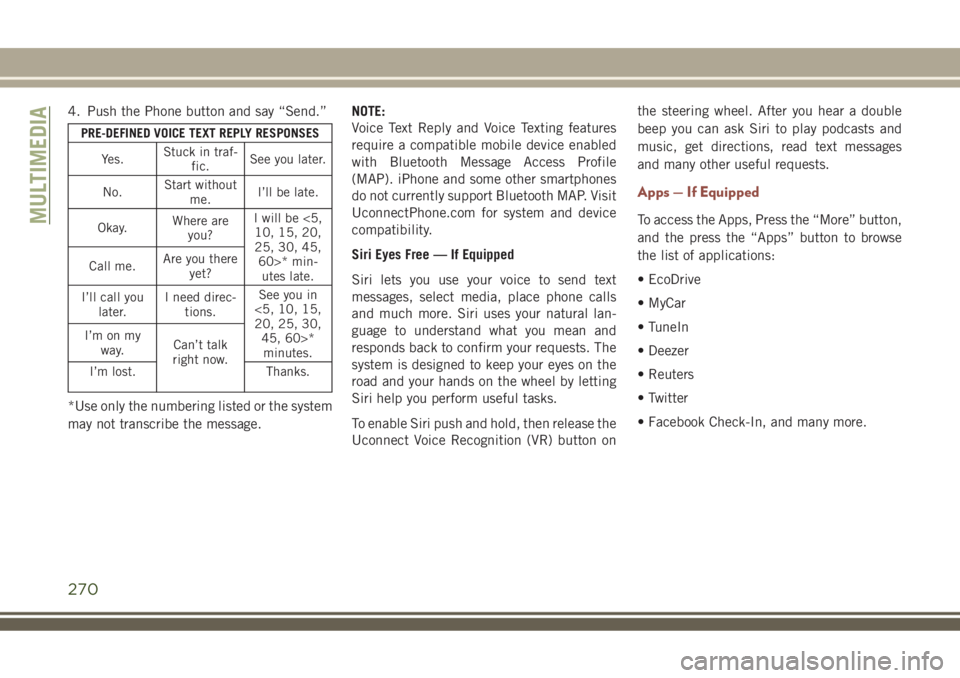
4. Push the Phone button and say “Send.”
PRE-DEFINED VOICE TEXT REPLY RESPONSES
Yes.Stuck in traf-
fic.See you later.
No.Start without
me.I’ll be late.
Okay.Where are
you?I will be <5,
10, 15, 20,
25, 30, 45,
60>* min-
utes late. Call me.Are you there
yet?
I’ll call you
later.I need direc-
tions.See you in
<5, 10, 15,
20, 25, 30,
45, 60>*
minutes. I’m on my
way.Can’t talk
right now.
I’m lost. Thanks.
*Use only the numbering listed or the system
may not transcribe the message.NOTE:
Voice Text Reply and Voice Texting features
require a compatible mobile device enabled
with Bluetooth Message Access Profile
(MAP). iPhone and some other smartphones
do not currently support Bluetooth MAP. Visit
UconnectPhone.com for system and device
compatibility.
Siri Eyes Free — If Equipped
Siri lets you use your voice to send text
messages, select media, place phone calls
and much more. Siri uses your natural lan-
guage to understand what you mean and
responds back to confirm your requests. The
system is designed to keep your eyes on the
road and your hands on the wheel by letting
Siri help you perform useful tasks.
To enable Siri push and hold, then release the
Uconnect Voice Recognition (VR) button onthe steering wheel. After you hear a double
beep you can ask Siri to play podcasts and
music, get directions, read text messages
and many other useful requests.
Apps — If Equipped
To access the Apps, Press the “More” button,
and the press the “Apps” button to browse
the list of applications:
• EcoDrive
• MyCar
• TuneIn
• Deezer
• Reuters
• Twitter
• Facebook Check-In, and many more.MULTIMEDIA
270
Page 276 of 348

WARNING!
ALWAYS drive safely with your hands on
the wheel. You have full responsibility and
assume all risks related to the use of the
Uconnect features and applications in this
vehicle. Only use Uconnect when it is safe
to do so. Failure to do so may result in an
accident involving serious injury or death.
• To access the Radio mode, press the “Ra-
dio” button on the touchscreen.
Selecting Radio Stations
• Press the desired radio band (AM, FM or
DAB) button on the touchscreen.
Seek Up/Seek Down
• Press the Seek up or down arrow buttons on
the touchscreen for less than two seconds
to seek through radio stations.
• Press and hold either arrow button on the
touchscreen for more than two seconds to
bypass stations without stopping. The radio
will stop at the next listenable station once
the arrow button on the touchscreen is
released.Direct Tune
• Tune directly to a radio station by pressing
the “Tune” button on the screen, and en-
tering the desired station number.
Store Radio Presets Manually
Your radio can store 36 total preset stations,
12 presets per band (AM, FM and DAB). They
are shown at the top of your radio screen. To
see the 12 preset stations per band, press the
arrow button on the touchscreen at the top
right of the screen to toggle between the two
sets of six presets.
To store a radio preset manually, follow the
steps below:
1. Tune to the desired station.
2. Press and hold the desired numbered but-
ton on the touchscreen for more than two
seconds or until you hear a confirmation
beep.
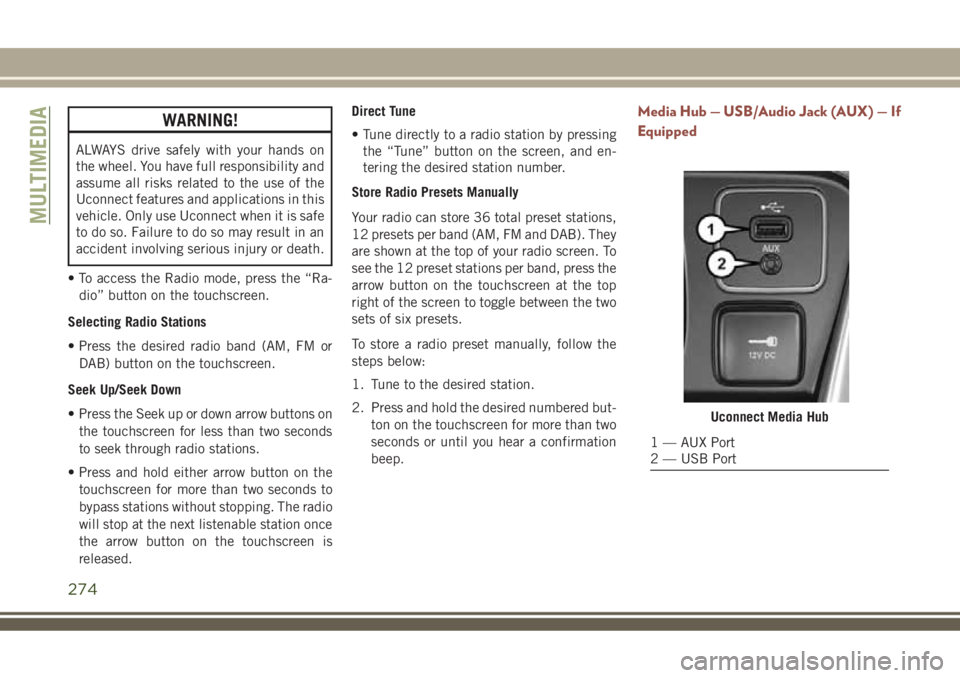
Media Hub — USB/Audio Jack (AUX) — If
Equipped
Uconnect Media Hub
1 — AUX Port
2 — USB Port
MULTIMEDIA
274