2018 JEEP CHEROKEE wheel
[x] Cancel search: wheelPage 231 of 312

TECHNICAL SPECIFICATIONS
VEHICLE IDENTIFICATION
NUMBER..................230
WHEEL AND TIRE TORQUE
SPECIFICATIONS ...........231
Torque Specifications ...........231
FUEL REQUIREMENTS —
GASOLINE ENGINE ..........231
Methanol...................232
Ethanol ....................232
Clean Air Gasoline .............232
CNG And LP Fuel System
Modifications .................232
MMT In Gasoline ..............232
Materials Added To Fuel .........233
Fuel Icon Identification Compliant
To EN16942 .................233
FUEL REQUIREMENTS —
DIESEL ENGINE ............235
Fuel Icon Identification Compliant
To EN16942.................236
FLUID CAPACITIES ..........237
FLUIDS AND LUBRICANTS .....238
Engine.................... .238
Chassis ....................240
MOPAR ACCESSORIES ........241
Authentic Accessories By Mopar .....241
TECHNICAL SPECIFICATIONS
229
Page 233 of 312

WHEEL AND TIRE TORQUE
SPECIFICATIONS
Proper lug nut/bolt torque is very important to
ensure that the wheel is properly mounted to
the vehicle. Any time a wheel has been re-
moved and reinstalled on the vehicle, the lug
nuts/bolts should be torqued using a properly
calibrated torque wrench using a high quality
six sided (hex) deep wall socket.
Torque Specifications
Lug Nut/BoltTorque **Lug Nut/Bolt
Size Lug Nut/Bolt
Socket Size
100 Ft-Lbs (135 N·m) M12 x 1.25 19 mm
**Use only an authorized dealer recom-
mended lug nuts/bolts and clean or remove
any dirt or oil before tightening.
Inspect the wheel mounting surface prior to
mounting the tire and remove any corrosion
or loose particles. Tighten the lug nuts/bolts in a star pattern
until each nut/bolt has been tightened twice.
Ensure that the socket is fully engaged on the
lug nut/bolt (do not insert it halfway).
After 25 miles (40 km), check the lug nut/
bolt torque to be sure that all the lug nuts/
bolts are properly seated against the wheel.
WARNING!
To avoid the risk of forcing the vehicle off
the jack, do not tighten the lug nuts fully
until the vehicle has been lowered. Failure
to follow this warning may result in per-
sonal injury.
FUEL REQUIREMENTS —
GASOLINE ENGINE
This engine is designed to meet all emissions
regulations and provide excellent fuel
economy and performance when using high
quality unleaded gasoline with a minimum
research octane rating (RON) of 91.
Light spark knock at low engine speeds is not
harmful to your engine. However, continued
heavy spark knock at high speeds can cause
damage, and immediate service is required.
Poor quality gasoline can cause problems
such as hard starting, stalling, and hesita-
tions. If you experience these symptoms, try
another brand of gasoline before considering
service for the vehicle.
Torque Pattern
231
Page 243 of 312

MOPAR ACCESSORIES
Authentic Accessories By Mopar
• The following highlights just some of themany Authentic Jeep Accessories by Mopar
featuring a fit, finish, and functionality spe-
cifically for your Jeep Cherokee. • In choosing Authentic Accessories you gain
far more than expressive style, premium
protection, or extreme entertainment, you
also benefit from enhancing your vehicle
with accessories that have been thoroughly
tested and factory-approved. • For the full line of Authentic Jeep Accesso-
ries by Mopar, visit your local dealership or
online at mopar.com for U.S. residents and
mopar.ca for Canadian residents.
NOTE:
All parts are subject to availability.
JEEP CARGO MANAGEMENT SYSTEM:
• Off Road Kit • Roadside Safety Kit • Cooler
• First Aid Kit • Collapsible Tote • Cargo Area Cover
EXTERIOR:
• Rock Rails • Front End Cover • Hood Decal
• Wheels • Splash Guards • Skid Plates
• Wheel Locks • Locking Gas Cap • Spare Tire Kit
• License Plate Frames • Side Window Air Deflectors • Camping Tent
• Valve Stem Caps • Vehicle Cover
INTERIOR:
• Premium Floor Mats • Emergency Roadside Kit • Molded Cargo Tray
• Security Cover • Bright Pedal Kit • Katzkin Leather Interiors
• All-Weather Mats • Door Sill Guards • Carpet Cargo Mat
241
Page 245 of 312

MULTIMEDIA
CYBERSECURITY...........245
TIPS CONTROLS AND GENERAL
INFORMATION .............246
Steering Wheel Audio Controls ......246
Reception Conditions ............246
Care And Maintenance ...........246
Anti-Theft Protection ............246
UCONNECT 3 WITH 5-INCH
DISPLAY..................247
Controls On The Front Panel .......247
Clock Setting .................248
Equalizer, Balance And Fade .......248
Radio Mode ..................249
Media Mode .................249
Bluetooth Source ..............252
UCONNECT 3C/3C NAV .......253
Uconnect 3C/3C NAV At A Glance . . .253
Drag & Drop Menu Bar...........255
Radio Mode ..................255
Media Mode .................256
UCONNECT SETTINGS ........256IPOD/USB/SD CARD/MEDIA
PLAYER CONTROL
..........257
Audio Jack (AUX)..............257
USB Port ...................257
SD Card ................... .258
Bluetooth Streaming Audio ........258
NAVIGATION...............258
Changing The Navigation Voice
Prompt Volume ...............258
Finding Points Of Interest .........259
Finding A Place By Spelling
The Name ...................259
One-Step Voice Destination Entry . . . .259
Setting Your Home Location ........259
Go Home ...................260
Adding A Stop ................260
Taking A Detour ...............260
UCONNECT PHONE ..........261
Operation...................261
Uconnect Phone Features .........263
Uconnect Phone (Bluetooth Hands
Free Calling) .................263 Pairing (Wirelessly Connecting)
Your Mobile Phone To The
Uconnect System
..............263
Common Phone Commands
(Examples) ..................266
Mute (Or Unmute) Microphone
During Call ..................266
Transfer Ongoing Call Between
Handset And Vehicle ............266
Phonebook ..................267
Voice Command Tips ............267
Changing The Volume ...........267
Using Do Not Disturb ...........267
Incoming Text Messages .........268
Voice Text Reply (Not Compatible
With iPhone) ................269
Helpful Tips And Common Questions
To Improve Bluetooth Performance
With Your Uconnect System ........270UCONNECT VOICE RECOGNITION
QUICK TIPS................271
Introducing Uconnect ...........271
Get Started .................272
MULTIMEDIA
243
Page 248 of 312

TIPS CONTROLS AND
GENERAL INFORMATION
Steering Wheel Audio Controls
The steering wheel audio controls are located
on the rear surface of the steering wheel.
Left Switch
• Push the switch up or down to search forthe next listenable station. • Push the button in the center to change
modes AM/FM/DAB.
Right Switch
• Push the switch up or down to increase or decrease the volume.
• Push the button in the center to mute the radio.
Reception Conditions
Reception conditions change constantly
while driving. Reception may be interfered
with by the presence of mountains, buildings
or bridges, especially when you are far away
from the broadcaster.
The volume may be increased when receiving
traffic alerts and news.
Care And Maintenance
Observe the following precautions to ensure
the system is fully operational:
• The display lens should not come into con-tact with pointed or rigid objects which
could damage its surface; use a soft, dry
anti-static cloth to clean and do not press. • Never use alcohol, gas and derivatives to
clean the display lens.
• Prevent any liquid from entering the sys- tem: this could damage it beyond repair.
Anti-Theft Protection
The system is equipped with an anti-theft
protection system based on the exchange of
information with the electronic control unit
(Body Computer) on the vehicle.
This guarantees maximum safety and pre-
vents the secret code from being entered
after the power supply has been discon-
nected.
If the check has a positive outcome, the
system will start to operate, whereas if the
comparison codes are not the same or if the
electronic control unit (Body Computer) is
replaced, the system will ask the user to enter
the secret code. See an authorized dealer for
further information.
Steering Wheel Audio Controls
MULTIMEDIA
246
Page 255 of 312

• Select “Paired Phones” then press the“Add Device” button on the touch-
screen.
• Search for available devices on your Bluetooth enabled device (see below).
When prompted on the device, select
“Uconnect” and accept the connection
request.
6. Uconnect Phone will display an in prog- ress screen while the system is
connecting.
7. When your device finds the Uconnect sys- tem, select “Uconnect.”
8. When prompted on the device, accept the connection request from Uconnect
Phone.
NOTE:
Some devices will require you to enter the
PIN number. 9. When the pairing process has successfully
completed, the system will prompt you to
choose whether or not this is your favorite
device. Selecting “Yes” will make this
device the highest priority. This device
will take precedence over other paired
devices within range and will connect to
the Uconnect system automatically when
entering the vehicle. Only one Bluetooth
device can be connected to the Uconnect
system at a time. If “No” is selected,
simply select “Uconnect” from the device
Bluetooth screen, and the Uconnect sys-
tem will reconnect to the Bluetooth
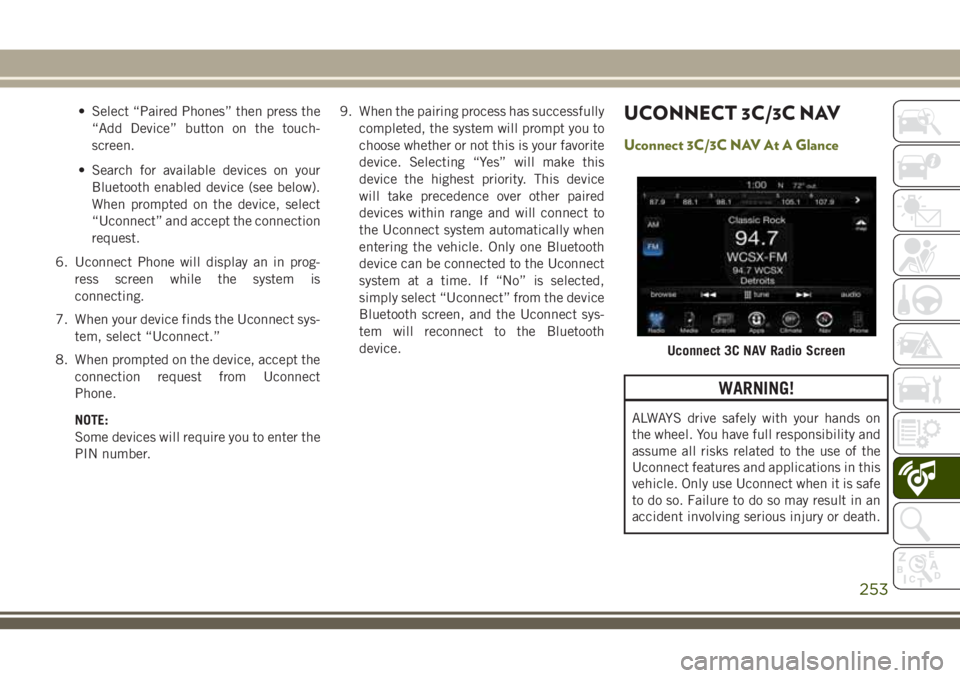
device.UCONNECT 3C/3C NAV
Uconnect 3C/3C NAV At A Glance
WARNING!
ALWAYS drive safely with your hands on
the wheel. You have full responsibility and
assume all risks related to the use of the
Uconnect features and applications in this
vehicle. Only use Uconnect when it is safe
to do so. Failure to do so may result in an
accident involving serious injury or death.
Uconnect 3C NAV Radio Screen
253
Page 257 of 312

volume level indicator. This alters the auto-
matic adjustment of the audio volume with
variation to vehicle speed.
Drag & Drop Menu Bar
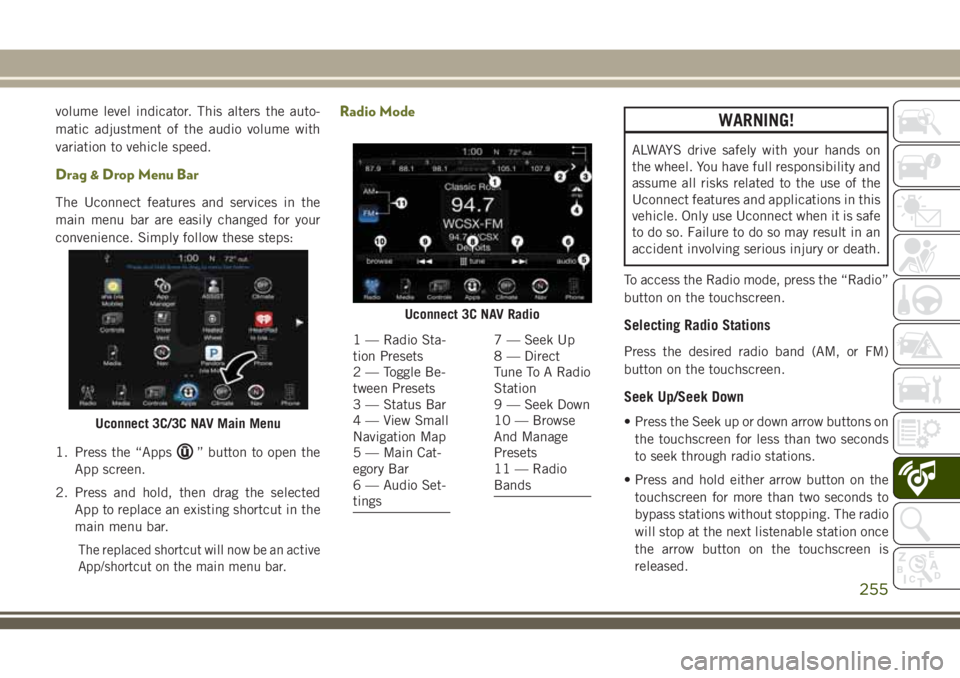
The Uconnect features and services in the
main menu bar are easily changed for your
convenience. Simply follow these steps:
1. Press the “Apps
” button to open the
App screen.
2. Press and hold, then drag the selected App to replace an existing shortcut in the
main menu bar.
The replaced shortcut will now be an active
App/shortcut on the main menu bar.
Radio ModeWARNING!
ALWAYS drive safely with your hands on
the wheel. You have full responsibility and
assume all risks related to the use of the
Uconnect features and applications in this
vehicle. Only use Uconnect when it is safe
to do so. Failure to do so may result in an
accident involving serious injury or death.
To access the Radio mode, press the “Radio”
button on the touchscreen.
Selecting Radio Stations
Press the desired radio band (AM, or FM)
button on the touchscreen.
Seek Up/Seek Down
• Press the Seek up or down arrow buttons on the touchscreen for less than two seconds
to seek through radio stations.
• Press and hold either arrow button on the touchscreen for more than two seconds to
bypass stations without stopping. The radio
will stop at the next listenable station once
the arrow button on the touchscreen is
released.Uconnect 3C/3C NAV Main Menu
Uconnect 3C NAV Radio
1 — Radio Sta-
tion Presets
2 — Toggle Be-
tween Presets
3 — Status Bar
4 — View Small
Navigation Map
5 — Main Cat-
egory Bar
6 — Audio Set-
tings7 — Seek Up
8 — Direct
Tune To A Radio
Station
9 — Seek Down
10 — Browse
And Manage
Presets
11 — Radio
Bands
255
Page 260 of 312

• When connected, the compatible USB de-vice can be controlled using the radio or
Steering Wheel Audio Controls to play, skip
to the next or previous track, browse, and
list the contents.
• The battery charges when plugged into the USB port (if supported by the specific de-
vice).
• To route the USB cable out of the center console, use the access cut out.
NOTE:
When connecting your device for the first
time, the system may take several minutes to
read your music, depending on the number of
files. For example, the system will take ap-
proximately five minutes for every
1,000 songs loaded on the device. Also dur-
ing the reading process, the Shuffle and
Browse functions will be disabled. This pro-
cess is needed to ensure the full use of your
features and only happens the first time it is
connected. After the first time, the reading
process of your device will take considerably
less time unless changes are made or new
songs are added to the playlist.SD Card
• Play songs stored on an SD card inserted into the SD card slot.
• Song playback can be controlled using the radio or Steering Wheel Audio Controls to
play, skip to the next or previous track,
browse, and list the contents.
Bluetooth Streaming Audio
If using a Bluetooth equipped device you may
also be able to stream music to your vehicle's
sound system. Your connected device must
be Bluetooth compatible and paired with
your system (see Uconnect Phone for pairing
instructions). You can access the music from
your connected Bluetooth device by pressing
the Bluetooth button on the touchscreen
while in Media mode.
NAVIGATION
• The information in the section below is onlyapplicable if you have the 3C NAV system
or the Navigation has been activated on
your 3C system.
• If you have a Uconnect 3C system your radio is “Navigation-Ready,” and can be
equipped with Navigation at an extra cost.
Please see your dealer for details.
Press the “Nav” button on the touchscreen in
the menu bar to access the Navigation sys-
tem.
Changing The Navigation Voice Prompt
Volume
1. Press the “View Map” button on the touchscreen from the Nav Main Menu.
2. With the map displayed, press the “Set- tings” button on the touchscreen in the
lower right area of the screen.
3. In the Settings menu, press the “Guid- ance” button on the touchscreen.
MULTIMEDIA
258