Page 9 of 26
Quick Reference Guide I 1514 I Quick Reference Guide
INSTRUMENT CLUSTER
Type A
3
3
3
5
5
5
4
4
211
1
5
6
Type B (colored display)
3
5
5
5
54
22
2
1
5
6
1 Tachometer
2 Speedometer
3 Engine coolant temperature gauge
4 Fuel gauge
5 Warning and indicator lights
6 LCD display (including Trip computer)
Type C
Type D (colored display)
5
5
5
5
5
5
5
5
6
6
4
SONATAHYUND
Page 10 of 26
Quick Reference Guide I 1716 I Quick Reference Guide
INSTRUMENT CLUSTER
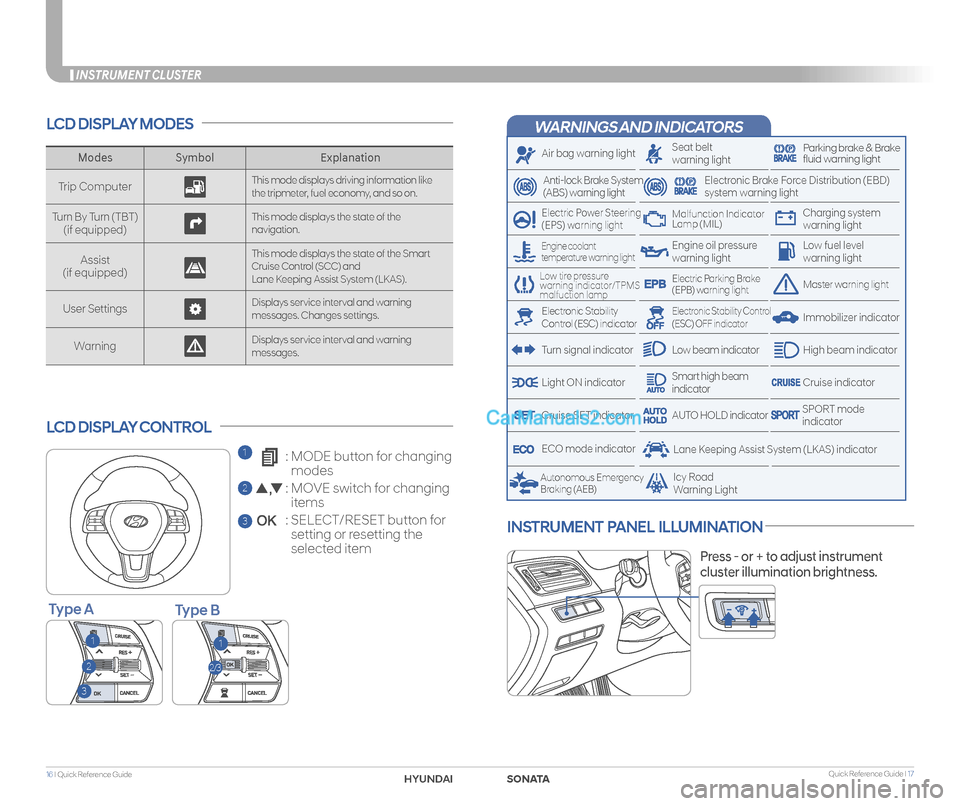
WARNINGS AND INDICATORS
Air bag warning light
Electric Power Steering (EPS) warning light
Seat beltwarning lightParking brake & Brake fluid warning light
Electronic Brake Force Distribution (EBD) system warning light
Low tire pressure warning indicator/TPMS malfuction lamp
Low fuel level warning light
Low beam indicator
Smart high beam indicatorLight ON indicator
ECO mode indicator
Autonomous Emergency Braking (AEB)Icy RoadWarning Light
Anti-lock Brake System(ABS) warning light
High beam indicator
Electronic Stability Control (ESC) indicator
Master warning lightElectric Parking Brake(EPB) warning light
Engine oil pressure warning light
Charging system warning light
Immobilizer indicator
Malfunction IndicatorLamp (MIL)
Electronic Stability Control (ESC) OFF indicator
Cruise indicator
Lane Keeping Assist System (LKAS) indicator
Cruise SET indicatorSPORT modeindicatorAUTO HOLD indicator
Turn signal indicator
LCD DISPLAY MODES
LCD DISPLAY CONTROL
ModesSymbol Explanation
Trip ComputerThis mode displays driving information like the tripmeter, fuel economy, and so on.
Turn By Turn (TBT)(if equipped)This mode displays the state of the navigation.
Assist(if equipped)
This mode displays the state of the Smart Cruise Control (SCC) andLane Keeping Assist System (LKAS).
User SettingsDisplays service interval and warning messages. Changes settings.
Warning Displays service interval and warning messages.
11
2
3
2/3
Engine coolant temperature warning light
1 : MODE button for changing
modes
2 : MOVE switch for changing
items
3 : SELECT/RESET button for
setting or resetting the
selected item
INSTRUMENT PANEL ILLUMINATION
Press - or + to adjust instrument
cluster illumination brightness.
Type BType A
SONATAHYUNDAI
Page 11 of 26
Quick Reference Guide I 1918 I Quick Reference Guide
CLIMATE CONTROL
DEFOGGING / DEFROSTING
3. Set the fan speed to
the highest speed.
2. Select warmest
temperature.
1. Press the defrost
button.
AIR INTAKE CONTROL
Press to activate/deactivate
the rear defroster.
A/C MAX MODE
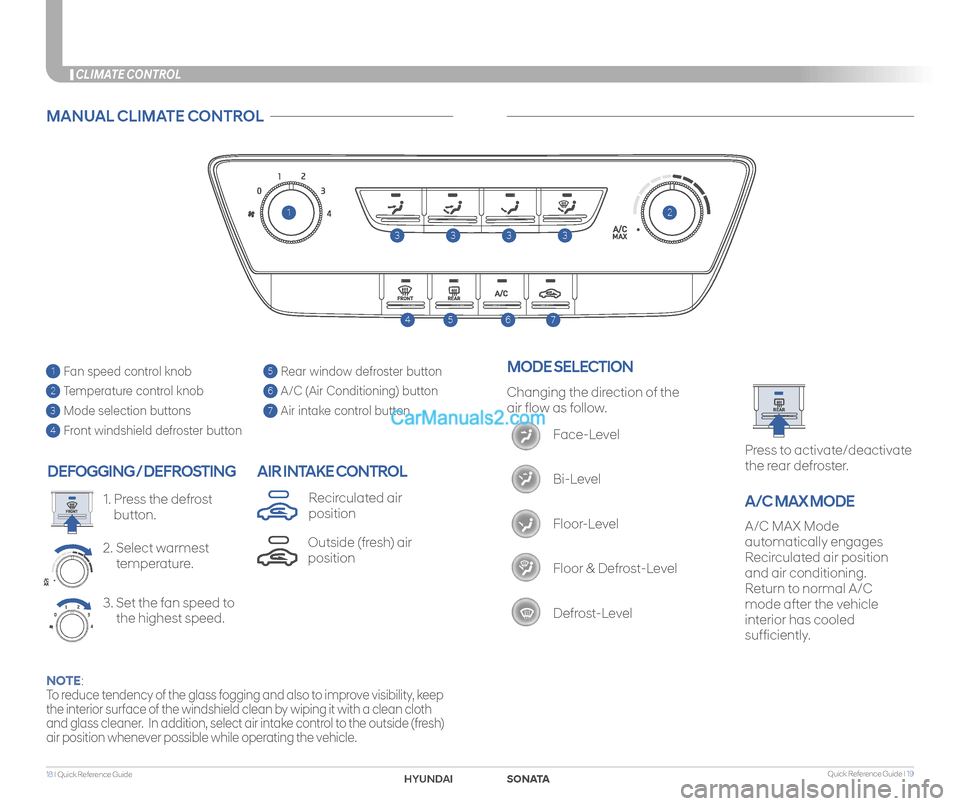
5 Rear window defroster button
6 A/C (Air Conditioning) button
7 Air intake control button
1 Fan speed control knob
2 Temperature control knob
3 Mode selection buttons
4 Front windshield defroster button
MANUAL CLIMATE CONTROL
1
746
3333
2
5
Changing the direction of the
air flow as follow.
Face-Level
Bi-Level
Floor-Level
Floor & Defrost-Level
Defrost-Level
MODE SELECTION
NOTE:
To reduce tendency of the glass fogging and also to improve visibility, keep
the interior surface of the windshield clean by wiping it with a clean cloth
and glass cleaner. In addition, select air intake control to the outside (fresh)
air position whenever possible while operating the vehicle.
A/C MAX Mode
automatically engages
Recirculated air position
and air conditioning.
Return to normal A/C
mode after the vehicle
interior has cooled
sufficiently.
Outside (fresh) air
position
Recirculated air
position
SONATAHYUNDAI
Page 12 of 26
Type AType B
Quick Reference Guide I 2120 I Quick Reference Guide
CLIMATE CONTROL
DEFOGGING / DEFROSTING
3. Set the fan speed to
the highest speed.
2. Select warmest
temperature.
1. Press the defrost
button.
AIR INTAKE CONTROLSYSTEM OFF
Pressing the OFF button will
place the system in the OFF
mode.
• Climate control fan will turn off.
• Outside (fresh) air position will
be selected.
• Vented air will be at last set
temperature.
The modes, fan speeds, air
intake and air conditioning
will be controlled
automatically by the
temperature setting you
select.
AUTOMATIC HEATING /
AIR CONDITIONING
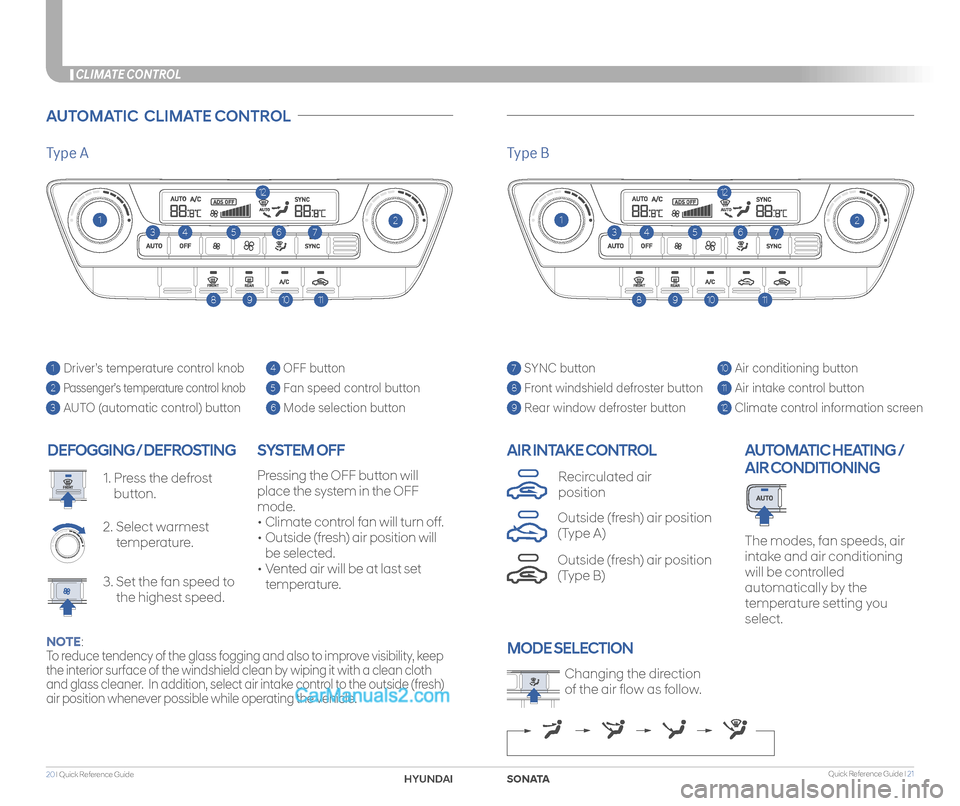
7 SYNC button
8 Front windshield defroster button
9 Rear window defroster button
10 Air conditioning button
11 Air intake control button
12 Climate control information screen
1 Driver’s temperature control knob
2 Passenger’s temperature control knob
3 AUTO (automatic control) button
4 OFF button
5 Fan speed control button
6 Mode selection button
AUTOMATIC CLIMATE CONTROL
Changing the direction
of the air flow as follow.
MODE SELECTION
Outside (fresh) air position
(Type B)
Recirculated air
position
Outside (fresh) air position
(Type A)
NOTE:
To reduce tendency of the glass fogging and also to improve visibility, keep
the interior surface of the windshield clean by wiping it with a clean cloth
and glass cleaner. In addition, select air intake control to the outside (fresh)
air position whenever possible while operating the vehicle.
12
746325
108911
1
12
746325
108911
1
SONATAHYUNDAI
Page 13 of 26
Quick Reference Guide I 2322 I Quick Reference Guide
MULTIMEDIA
STEERING WHEEL AUDIO CONTROL
2
3
1
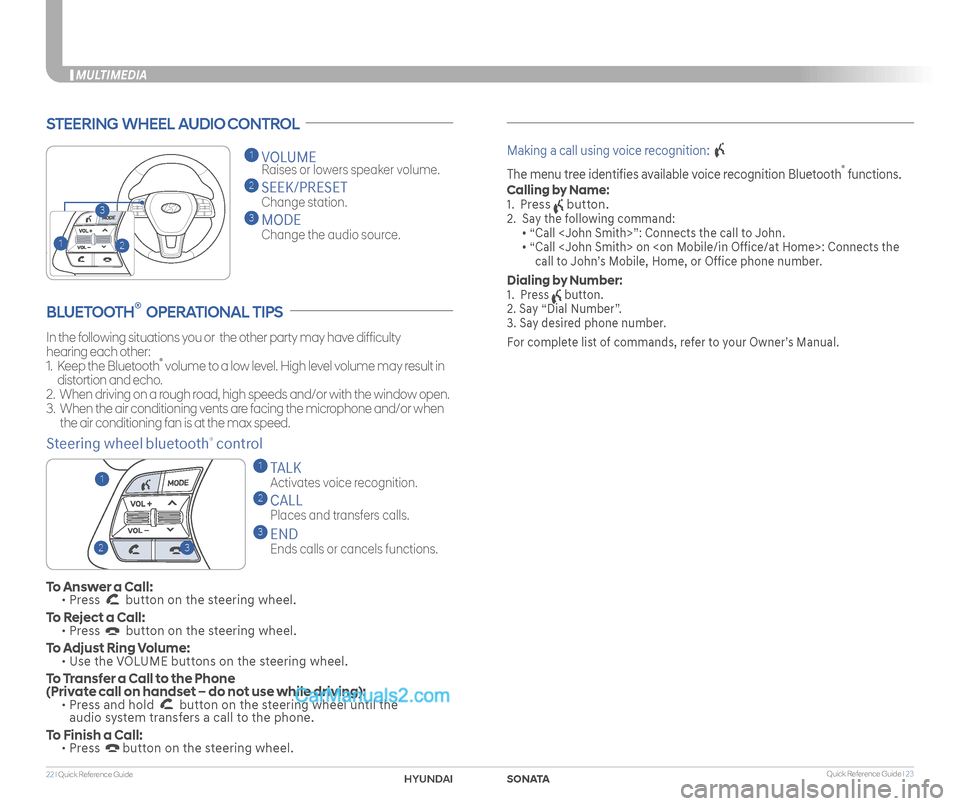
1 VOLUME
Raises or lowers speaker volume.
2 SEEK/PRESET
Change station.
3 MODE
Change the audio source.
To Answer a Call: • Press button on the steering wheel.
To Reject a Call: • Press button on the steering wheel.
To Adjust Ring Volume: • Use the VOLUME buttons on the steering wheel.
To Transfer a Call to the Phone (Private call on handset – do not use while driving): • Press and hold button on the steering wheel until the audio system transfers a call to the phone.
To Finish a Call: • Press button on the steering wheel.
BLUETOOTH® OPERATIONAL TIPS
In the following situations you or the other party may have difficulty
hearing each other:
1. Keep the Bluetooth® volume to a low level. High level volume may result in
distortion and echo.
2. When driving on a rough road, high speeds and/or with the window open.
3. When the air conditioning vents are facing the microphone and/or when
the air conditioning fan is at the max speed.
Steering wheel bluetooth® control
1 TALK
Activates voice recognition.
2 CALL
Places and transfers calls.
3 END
Ends calls or cancels functions.
Making a call using voice recognition:
The menu tree identifies available voice recognition Bluetooth® functions.
Calling by Name:
1. Press button.
2. Say the following command:
• “Call ”: Connects the call to John.
• “ Call on : Connects the
call to John’s Mobile, Home, or Office phone number.
Dialing by Number:
1. Press button.
2. Say “Dial Number”.
3. Say desired phone number.
For complete list of commands, refer to your Owner’s Manual.
23
1
SONATAHYUNDAI
Page 14 of 26
Quick Reference Guide I 2524 I Quick Reference Guide
MULTIMEDIA
Pairing tutorials, phone compatibility and
operational tips can be found through the
Smart QR code using the QR reader
application on your Smartphone.
BLUETOOTH PHONE PAIRING
BLUETOOTH PHONE OPERATION
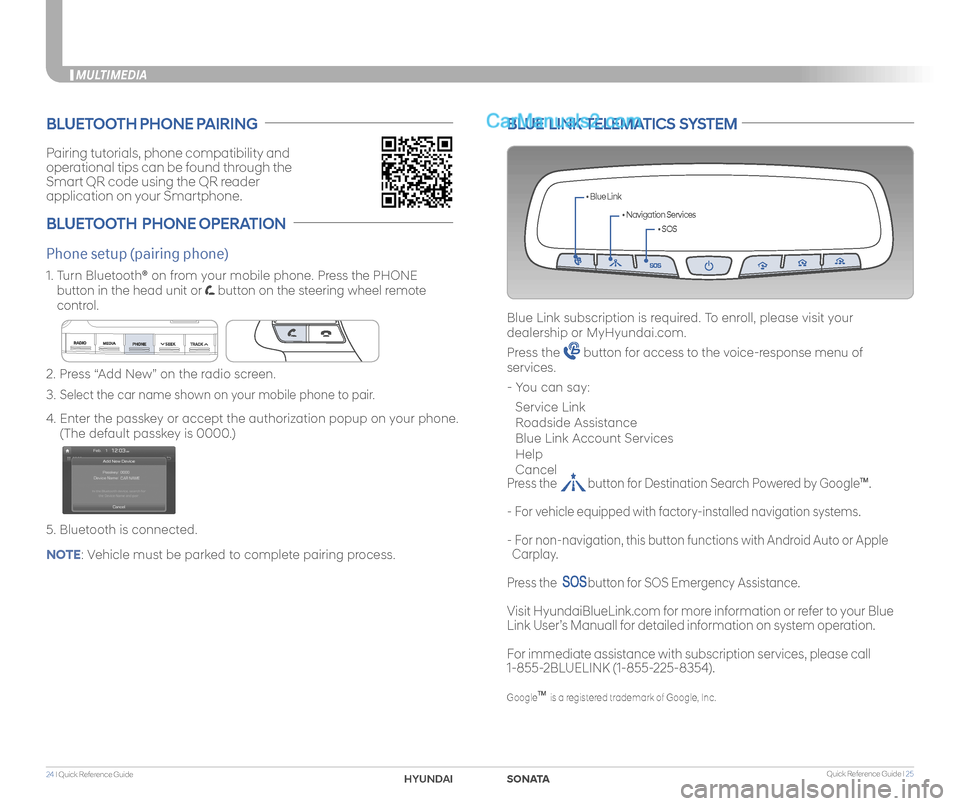
Phone setup (pairing phone)
2. Press “Add New” on the radio screen.
3. Select the car name shown on your mobile phone to pair.
4. Enter the passkey or accept the authorization popup on your phone.
(The default passkey is 0000.)
5. Bluetooth is connected.
1. Turn Bluetooth® on from your mobile phone. Press the PHONE
button in the head unit or button on the steering wheel remote
control.
BLUE LINK TELEMATICS SYSTEM
• SOS
• Navigation Services
• Blue Link
Blue Link subscription is required. To enroll, please visit your
dealership or MyHyundai.com.
Press the button for access to the voice-response menu of
services.
- You can say:
Service Link
Roadside Assistance
Blue Link Account Services
Help
Cancel
Press the button for Destination Search Powered by GoogleTM.
- For vehicle equipped with factory-installed navigation systems.
- For non-navigation, this button functions with Android Auto or Apple
Carplay.
Press the button for SOS Emergency Assistance.
Visit HyundaiBlueLink.com for more information or refer to your Blue
Link User’s Manuall for detailed information on system operation.
For immediate assistance with subscription services, please call
1-855-2BLUELINK (1-855-225-8354).
GoogleTM is a registered trademark of Google, Inc.
NOTE: Vehicle must be parked to complete pairing process.
SONATAHYUNDAI
Page 15 of 26
Quick Reference Guide I 2726 I Quick Reference Guide
MULTIMEDIA
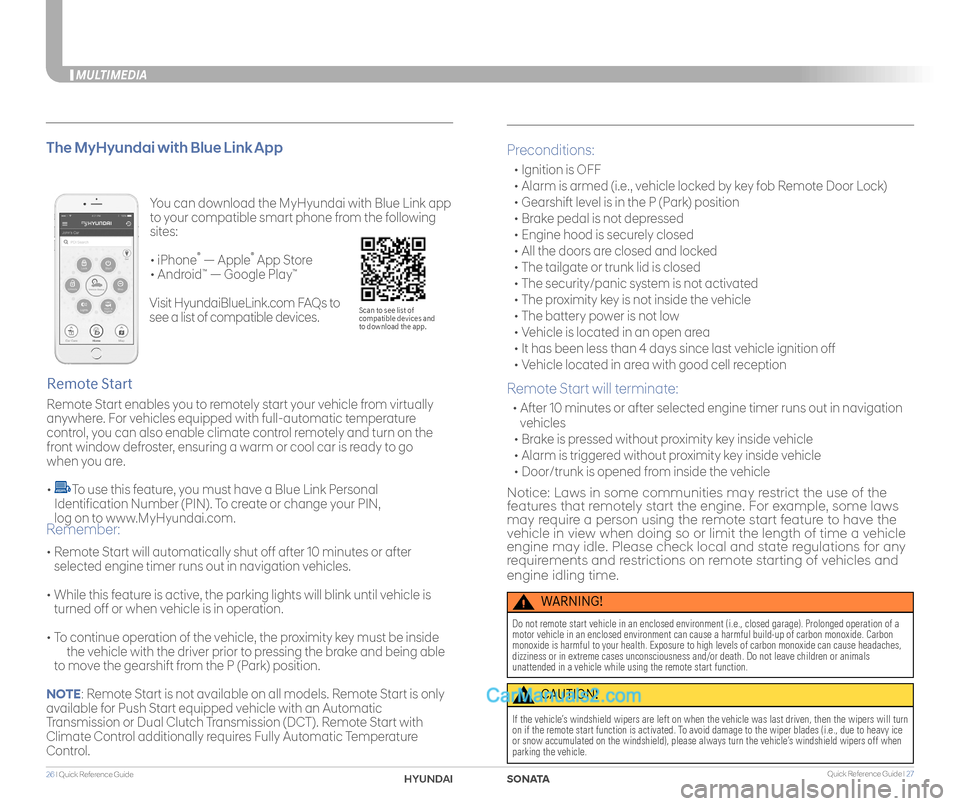
You can download the MyHyundai with Blue Link app
to your compatible smart phone from the following
sites:
• iPhone® — Apple® App Store
• Android™ — Google Play™
Remote Start enables you to remotely start your vehicle from virtually
anywhere. For vehicles equipped with full-automatic temperature
control, you can also enable climate control remotely and turn on the
front window defroster, ensuring a warm or cool car is ready to go
when you are.
• To use this feature, you must have a Blue Link Personal
Identification Number (PIN). To create or change your PIN,
log on to www.MyHyundai.com.
Remote Start
The MyHyundai with Blue Link App
• Remote Start will automatically shut off after 10 minutes or after
selected engine timer runs out in navigation vehicles.
• While this feature is active, the parking lights will blink until vehicle is
turned off or when vehicle is in operation.
• To continue operation of the vehicle, the proximity key must be inside
the vehicle with the driver prior to pressing the brake and being able
to move the gearshift from the P (Park) position.
Remember:
Preconditions:
• Ignition is OFF
• Alarm is armed (i.e., vehicle locked by key fob Remote Door Lock)
• Gearshift level is in the P (Park) position
• Brake pedal is not depressed
• Engine hood is securely closed
• All the doors are closed and locked
• The tailgate or trunk lid is closed
• The security/panic system is not activated
• The proximity key is not inside the vehicle
• The battery power is not low
• Vehicle is located in an open area
• It has been less than 4 days since last vehicle ignition off
• Vehicle located in area with good cell reception
Remote Start will terminate:
• After 10 minutes or after selected engine timer runs out in navigation
vehicles
• Brake is pressed without proximity key inside vehicle
• Alarm is triggered without proximity key inside vehicle
• Door/trunk is opened from inside the vehicle
Notice: Laws in some communities may restrict the use of the features that remotely start the engine. For example, some laws may require a person using the remote start feature to have the vehicle in view when doing so or limit the length of time a vehicle engine may idle. Please check local and state regulations for any requirements and restrictions on remote starting of vehicles and
engine idling time.
WARNING!
Do not remote start vehicle in an enclosed environment (i.e., closed ga\
rage). Prolonged operation of a motor vehicle in an enclosed environment can cause a harmful build-up of\
carbon monoxide. Carbon monoxide is harmful to your health. Exposure to high levels of carbon mo\
noxide can cause headaches, dizziness or in extreme cases unconsciousness and/or death. Do not leave\
children or animals unattended in a vehicle while using the remote start function.
CAUTION!
If the vehicle’s windshield wipers are left on when the vehicle was last driven, then t\
he wipers will turn on if the remote start function is activated. To avoid damage to the wiper blades (i.e., due to heavy ice or snow accumulated on the windshield), please always turn the vehicle’\
s windshield wipers off when parking the vehicle.
Scan to see list of compatible devices and to download the app.
Visit HyundaiBlueLink.com FAQs to
see a list of compatible devices.
NOTE: Remote Start is not available on all models. Remote Start is only
available for Push Start equipped vehicle with an Automatic
Transmission or Dual Clutch Transmission (DCT). Remote Start with
Climate Control additionally requires Fully Automatic Temperature
Control.
SONATAHYUNDAI
Page 16 of 26
Quick Reference Guide I 2928 I Quick Reference Guide
MULTIMEDIA
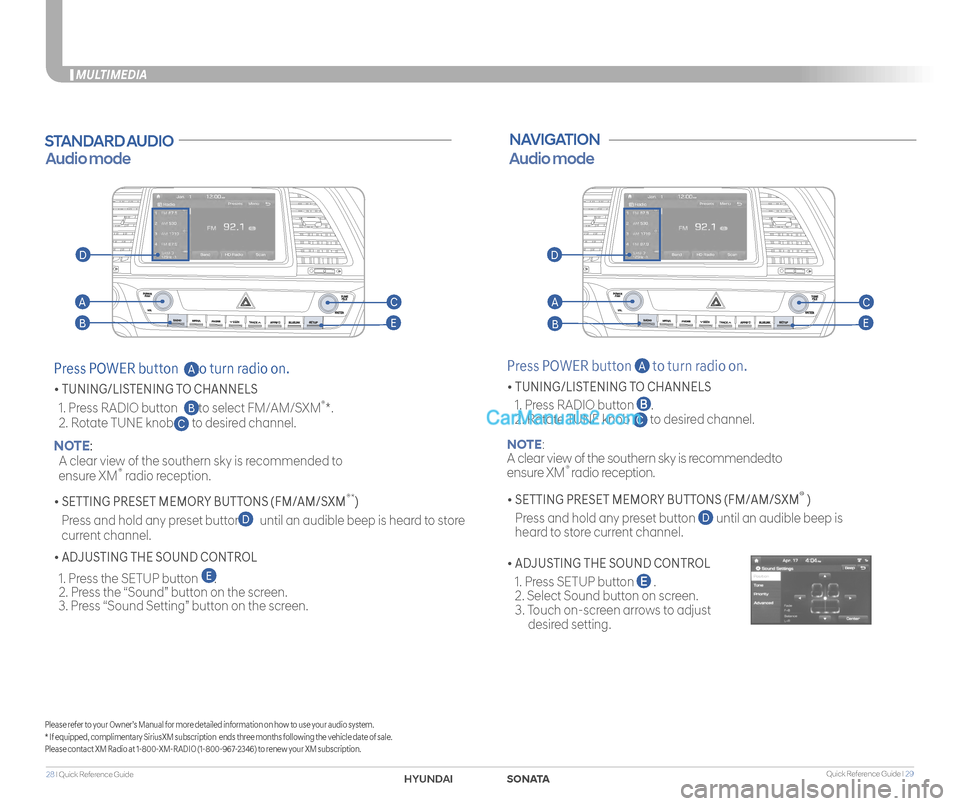
STANDARD AUDIO
Audio mode
Press POWER button to turn radio on.
• TUNING/LISTENING TO CHANNELS
1. Press RADIO button to select FM/AM/SXM®*.
2. Rotate TUNE knob to desired channel. NOTE:
A clear view of the southern sky is recommended to
ensure XM® radio reception.
• SETTING PRESET MEMORY BUTTONS (FM/AM/SXM®*)
Press and hold any preset button until an audible beep is heard to store
current channel.
• ADJUSTING THE SOUND CONTROL
1. Press the SETUP button . 2. Press the “Sound” button on the screen. 3. Press “Sound Setting” button on the screen.
C
D
E
B
A
Please refer to your Owner’s Manual for more detailed information on how to use your audio system.* If equipped, complimentary SiriusXM subscription ends three months following the vehicle date of sale.Please contact XM Radio at 1-800-XM-RADIO (1-800-967-2346) to renew your XM subscription.
NAVIGATION
Press POWER button A to turn radio on.
• TUNING/LISTENING TO CHANNELS
1. Press RADIO button .
2. Rotate TUNE knob C to desired channel.
NOTE:
A clear view of the southern sky is recommendedto
ensure XM® radio reception.
• SETTING PRESET MEMORY BUTTONS (FM/AM/SXM® )
Press and hold any preset button D until an audible beep is
heard to store current channel.
• ADJUSTING THE SOUND CONTROL
1. Press SETUP button .
2. Select Sound button on screen.
3. Touch on-screen arrows to adjust
desired setting.
Audio mode
AA
BB
CC
EE
DD
SONATAHYUNDAI