2018 Hyundai Kona air condition
[x] Cancel search: air conditionPage 433 of 523
7-21
7
Maintenance
Brake pads, calipers and
rotors
Check the pads for excessive wear,
discs for run out and wear, and
calipers for fluid leakage.
For more information on checking
the pads or lining wear limit, refer to
the HYUNDAI web site. (http://ser
vice.hyundai-motor.com)
Suspension mounting bolts
Check the suspension connections
for looseness or damage. Retighten
to the specified torque.
Steering gear box, linkage &
boots/lower arm ball joint
With the vehicle stopped and engine
off, check for excessive free-play in
the steering wheel.
Check the linkage for bends or dam-
age. Check the dust boots and ball
joints for deterioration, cracks, or
damage. Replace any damaged
parts.
Drive shafts and boots
Check the drive shafts, boots and
clamps for cracks, deterioration, or
damage. Replace any damaged
parts and, if necessary, repack the
grease.
Air conditioning refrigerant/ compressor
Check the air conditioning lines and
connections for leakage and dam-
age.
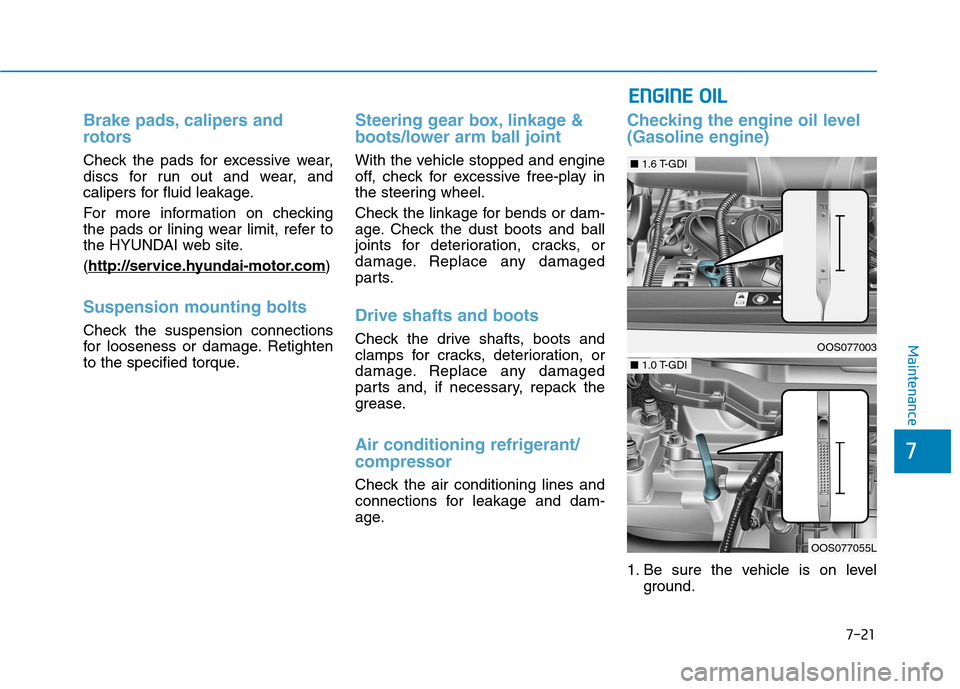
Checking the engine oil level (Gasoline engine)
1. Be sure the vehicle is on level
ground.
EENN GGIINN EE OO IILL
OOS077003
OOS077055L
■ 1.0 T-GDI
■1.6 T-GDI
Page 438 of 523
7-26
MaintenanceB
B RRAA KKEE//CC LLUU TTCCHH FF LLUU IIDD (( IIFF EE QQ UUIIPP PPEEDD ))
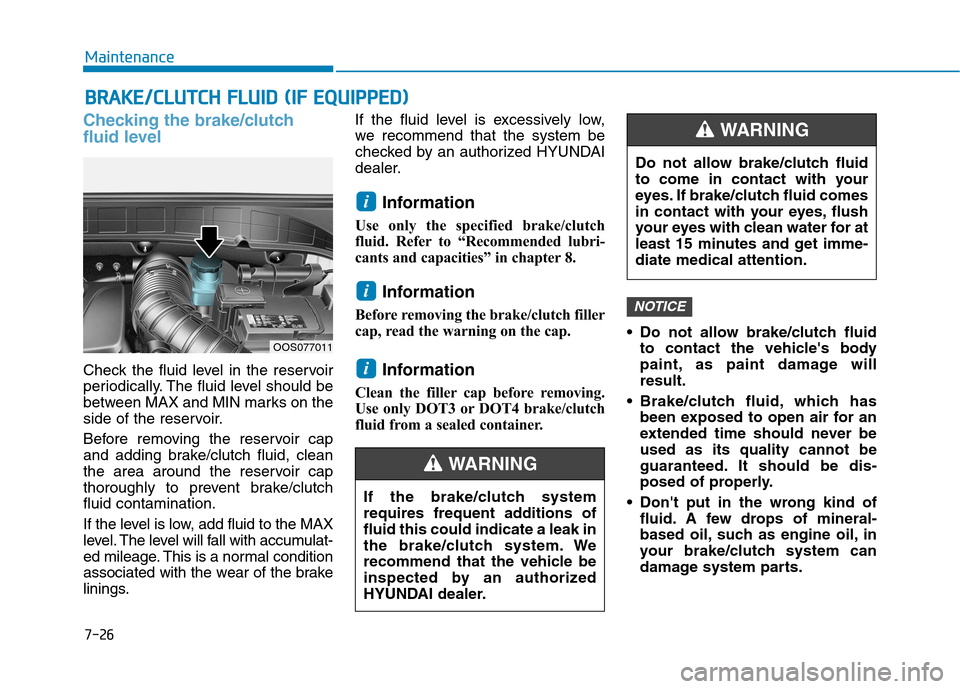
Checking the brake/clutch
fluid level
Check the fluid level in the reservoir
periodically. The fluid level should be
between MAX and MIN marks on the
side of the reservoir.
Before removing the reservoir cap
and adding brake/clutch fluid, clean
the area around the reservoir cap
thoroughly to prevent brake/clutchfluid contamination.
If the level is low, add fluid to the MAX
level. The level will fall with accumulat-
ed mileage. This is a normal condition
associated with the wear of the brake
linings. If the fluid level is excessively low,
we recommend that the system be
checked by an authorized HYUNDAI
dealer.
Information
Use only the specified brake/clutch
fluid. Refer to “Recommended lubri-
cants and capacities” in chapter 8.
Information
Before removing the brake/clutch filler
cap, read the warning on the cap.
Information
Clean the filler cap before removing.
Use only DOT3 or DOT4 brake/clutch
fluid from a sealed container. Do not allow brake/clutch fluid
to contact the vehicle's body
paint, as paint damage willresult.
Brake/clutch fluid, which has been exposed to open air for an
extended time should never beused as its quality cannot be
guaranteed. It should be dis-
posed of properly.
Don't put in the wrong kind of fluid. A few drops of mineral-
based oil, such as engine oil, in
your brake/clutch system can
damage system parts.
NOTICE
i
i
i
Do not allow brake/clutch fluid
to come in contact with your
eyes. If brake/clutch fluid comes
in contact with your eyes, flush
your eyes with clean water for at
least 15 minutes and get imme-diate medical attention.
WARNING
If the brake/clutch system
requires frequent additions offluid this could indicate a leak in
the brake/clutch system. We
recommend that the vehicle be
inspected by an authorized
HYUNDAI dealer.
WARNING
OOS077011
Page 440 of 523

7-28
MaintenanceA
A IIRR CC LLEE AA NN EERR
Filter replacement
The air cleaner filter can be cleaned
for inspection using compressed air.
Do not attempt to wash or to rinse it,
as water will damage the filter.
If soiled, the air cleaner filter must be replaced. 1. Loosen the air cleaner cover
attaching clips and open the cover.
2. Wipe the inside of the air cleaner.
3. Replace the air cleaner filter. 4. Lock the cover with the cover
attaching clips.
5. Check that the cover is firmly installed.
Information
If the vehicle is operated in extremely
dusty or sandy areas, replace the element
more often than the usual recommended
intervals (refer to “Maintenance Under
Severe Usage Conditions” in this chap-
ter).
Do not drive with the air cleaner filter removed. This will result in
excessive engine wear.
When removing the air cleaner filter, be careful that dust or dirt
does not enter the air intake, or
damage may result.
Use HYUNDAI genuine parts. Use of non-genuine parts could
damage the air flow sensor.
NOTICE
i
OOS077013
OOS077015
OOS077016
Page 450 of 523
7-38
Maintenance
Check tire inflation pressure
Check your tires, including the spare
tire, once a month or more.
How to check
Use a good quality tire pressure
gauge to check tire pressure. You
can not tell if your tires are properly
inflated simply by looking at them.
Radial tires may look properly inflat-
ed when they are under-inflated.
Remove the valve cap from the tire
valve stem. Press the tire gauge firm-
ly onto the valve to get a pressure
measurement. If the cold tire inflationpressure matches the recommendedpressure on the tire and loading
information label, no further adjust-
ment is necessary. If the pressure is
low, add air until you reach the rec-
ommended pressure. Make sure to
put the valve caps back on the valve
stems. Without the valve cap, dirt or
moisture could get into the valve
core and cause air leakage. If a valve
cap is missing, install a new one as
soon as possible.If you overfill the tire, release air bypushing on the metal stem in the
center of the tire valve. Recheck the
tire pressure with the tire gauge. Be
sure to put the valve caps back on
the valve stems. Without the valve
cap, dirt or moisture could get into
the valve core and cause air leakage.
If a valve cap is missing, install a new
one as soon as possible.
Tire rotation
To equalize tread wear, HYUNDAI recommends that the tires be rotated
every 12,000 km (7,500 miles) or
sooner if irregular wear develops.
During rotation, check the tires for
correct balance.
When rotating tires, check for uneven
wear and damage. Abnormal wear is
usually caused by incorrect tire pres-
sure, improper wheel alignment, out-
of-balance wheels, severe braking or
severe cornering. Look for bumps or
bulges in the tread or side of the tire.
Replace the tire if you find any of
these conditions. Replace the tire if
fabric or cord is visible. After rotation,
be sure to bring the front and rear tire
pressures to specification and check
lug nut tightness (proper torque is 11~13 kgf·m [79~94 lbf·ft]).
Page 457 of 523
7-45
7
Maintenance
Temperature - A, B & C
The temperature grades are A (the highest), B and C representing the
tire’s resistance to the generation ofheat and its ability to dissipate heatwhen tested under controlled condi-
tions on a specified indoor laboratorytest wheel.
Sustained high temperature can
cause the material of the tire to
degenerate and reduce tire life, and
excessive temperature can lead to
sudden tire failure. Grades B and A
represent higher levels of perform-
ance on the laboratory test wheel
than the minimum required by law.
Low aspect ratio tires
A low aspect ratio tire, of which the
aspect ratio is lower than 50, is
designed for a sporty-look vehicle.
The low aspect ratio is to optimize
handling and braking. Thus, it may
be uncomfortable to ride and it may
generate noises, in comparison with
a normal tire.When there is an impact on a
tire, inspect the tire condition.
Or, contact an authorized
HYUNDAI dealer.
Inspect the tire condition and
pressure every 3,000 km
(1,800 miles) to prevent a tire
damage.
It is difficult to recognize a tire
damage only with your eyes.When there is a slight hint of a
tire damage, check and replace
the tire to prevent the damage
caused by air leakage.
When a tire is damaged while
driving on a rough road, off a
road, or over obstacles, such
as a pothole, manhole, or curb
stone, your warranty does not
cover the damage.
The tire information is speci- fied on the tire side wall.
The temperature grade for this
tire is established for a tire that
is properly inflated and not
overloaded. Excessive speed,
under-inflation, over-inflation,
or excessive loading, either
separately or in combination,
can cause heat build-up and
possible sudden tire failure.
This may cause loss of vehicle
control resulting in an accident.
WARNING
The side wall of a low aspect
ratio tire is shorter than the nor-
mal one. Thus, the low-aspect
wheel and tire are easily dam-
aged. Follow the below instruc-tions.
When driving on a rough road
or driving off a road, be care-
ful not to damage the tires
and wheels. After driving,inspect the tires and wheels.
When passing over a pothole,
speed bump, manhole, or
curb stone, slowly drive the
vehicle not to damage thetires and wheels.
CAUTION
Page 493 of 523
7-81
7
Maintenance
Do not use any cleanser contain-ing acid or alkaline detergents.
Corrosion protection
Protecting your vehicle from corro-
sion
By using the most advanced design
and construction practices to combat
corrosion, we produces vehicles of
the highest quality. However, this is
only part of the job. To achieve the
long-term corrosion resistance your
vehicle can deliver, the owner's
cooperation and assistance is alsorequired.
Common causes of corrosion
The most common causes of corro-
sion on your vehicle are:
Road salt, dirt and moisture that isallowed to accumulate underneath
the vehicle.
Removal of paint or protective coat- ings; by stones, gravel, abrasion or
minor scrapes and dents which
leave unprotected metal exposed tocorrosion.
High-corrosion areas
If you live in an area where your vehi-
cle is regularly exposed to corrosive
materials, corrosion protection is
particularly important. Some of the
common causes of accelerated cor-
rosion are road salts, dust control
chemicals, ocean air and industrialpollution.
Moisture breeds corrosion
Moisture creates the conditions in
which corrosion is most likely to occur.
For example, corrosion is accelerated
by high humidity, particularly when
temperatures are just above freezing.
In such conditions, the corrosive
material is kept in contact with the
vehicle surfaces by moisture that is
slow to evaporate.
Mud is particularly corrosive because it
is slow to dry and holds moisture in
contact with the vehicle. Although the
mud appears to be dry, it can still retainmoisture and promote corrosion.
High temperatures can also acceler-
ate corrosion of parts that are not
properly ventilated so the moisturecan be dispersed. For all these reasons, it is particularly
important to keep your vehicle clean
and free of mud or accumulations of
other materials. This applies not only
to the visible surfaces but particularly
to the underside of the vehicle.
To help prevent corrosion
You can help prevent corrosion from
getting started by observing the fol-
lowing:
Keep your vehicle clean
The best way to prevent corrosion is
to keep your vehicle clean and free
of corrosive materials. Attention to
the underside of the vehicle is partic-
ularly important.
If you live in a high-corrosion area
— where road salts are used, near
the ocean, areas with industrial
pollution, acid rain, etc.—, you
should take extra care to prevent
corrosion. In winter, hose off the
underside of your car at least oncea month and be sure to clean theunderside thoroughly when winter
is over.
Page 494 of 523

7-82
Maintenance
vehicle, give particular attention to
the components under the fendersand other areas that are hidden
from view. Do a thorough job; just
dampening the accumulated mud
rather than washing it away will
accelerate corrosion rather than
prevent it. Water under high pres-
sure and steam are particularly
effective in removing accumulated
mud and corrosive materials.
When cleaning lower door panels, rocker panels and frame members,
be sure that drain holes are keptopen so that moisture can escape
and not be trapped inside to accel-
erate corrosion.
Keep your garage dry
Don't park your vehicle in a damp,
poorly ventilated garage. This cre-
ates a favorable environment for cor-
rosion. This is particularly true if you
wash your vehicle in the garage or
drive it into the garage when it is still
wet or covered with snow, ice or
mud. Even a heated garage can con-
tribute to corrosion unless it is well
ventilated so moisture is dispersed.
Keep paint and trim in good condition
Scratches or chips in the finish
should be covered with "touch-up"
paint as soon as possible to reduce
the possibility of corrosion. If bare
metal is showing through, the atten-tion of a qualified body and paintshop is recommended.
Bird droppings : Bird droppings are
highly corrosive and may damage
painted surfaces in just a few hours.
Always remove bird droppings as
soon as possible.
Don't neglect the interior
Moisture can collect under the floor
mats and vehicle peting to cause
corrosion. Check under the mats
periodically to be sure the carpeting
is dry. Use particular care if you carry
fertilizers, cleaning materials or
chemicals in the vehicle.
These should be carried only in
proper containers and any spills or
leaks should be cleaned up, flushed
with clean water and thoroughly
dried.
Interior care
Interior general precautions
Prevent chemicals such as perfume, cosmetic oil, sun cream, hand cleanerand air freshener from contacting the
interior parts because they may
cause damage or discoloration. If they
do contact the interior parts, wipe them
off immediately.
See the instructions that follow for
the proper way to clean vinyl.
Never allow water or other liquids to come in contact with electrical/elec-
tronic components inside the vehi-
cle as this may damage them.
When cleaning leather products
(steering wheel, seats etc.), use
neutral detergents or low alcohol
content solutions. If you use highalcohol content solutions or acid/
alkaline detergents, the color of
the leather may fade or the sur-
face may get stripped off.
NOTICE
NOTICE
Page 498 of 523
7-86
Maintenance
A hot exhaust system can
ignite flammable items under
your vehicle. Do not park, idle,
or drive the vehicle over or
near flammable objects, such
as dry grass, paper, leaves, etc.
The exhaust system and cat-
alytic system are very hotwhile the engine is running or
immediately after the engine
is turned off. Keep away from
the exhaust system and cat-
alytic converter as you may
get burned.
Also, do not remove the heat
sink around the exhaust sys-
tem, do not seal the bottom of
the vehicle and do not coat the
vehicle for corrosion control. It
may present a fire risk under
certain conditions.
WARNING
3. Exhaust emission control system
The Exhaust Emission Control System
is a highly effective system which con-
trols exhaust emissions while main-
taining good vehicle performance.
Engine exhaust gas precautions
(carbon monoxide)
Carbon monoxide can be present with other exhaust fumes. Therefore,
if you smell exhaust fumes of any
kind inside your vehicle, have it
inspected and repaired immediately.
If you ever suspect exhaust fumes
are coming into your vehicle, drive it
only with all the windows fully open.
Have your vehicle checked and
repaired immediately. Do not operate the engine in con-
fined or closed areas (such as
garages) any more than what is
necessary to move the vehicle in orout of the area.
When the vehicle is stopped in an open area for more than a short
time with the engine running,
adjust the ventilation system (as
needed) to draw outside air into the
vehicle.
Never sit in a parked or stopped vehicle for any extended time with
the engine running.
When the engine stalls or fails to start, excessive attempts to restart
the engine may cause damage tothe emission control system.
Operating precautions for cat-
alytic converters (if equipped)
Engine exhaust gases contain
carbon monoxide (CO). Though
colorless and odorless, it is dan-
gerous and could be lethal if
inhaled. Follow the instructions
following to avoid CO poisoning.
WARNING