2018 Hyundai Kona audio
[x] Cancel search: audioPage 17 of 523

1-6
Your vehicle at a glanceI
I NN SSTT RR UU MM EENN TT PP AA NN EELL OO VVEERR VV IIEE WW (( II))
1. Instrument cluster ........................................3-37
2. Horn ..............................................................3-19
3. Driver’s front air bag......................................2-48
4. Key ignition switch/ ........................................5-6
Engine Start/Stop button ................................5-9
5. Light control/Turn signals ..............................3-83
6. Wiper/Washer................................................3-95
7. Audio system/ ................................................4-7 Navigation system ..........................................4-4
8. Hazard warning flasher switch ........................6-3
9. Manual climate control system/ ..................3-108 Automatic climate control system ..............3-116
10. Passenger’s front air bag ............................2-48
11. Glove box ..................................................3-128
12. Power outlet ..............................................3-132
13. Manual transmission shift lever/ Dual clutch transmission shift lever ..5-16, 5-19
14. Drive mode button ......................................5-53
15. Heated steering wheel ................................3-18
16. Idle stop and go (ISG) OFF button ............5-47
17. Seat warmer................................................2-19
18. Seat warmer/Air ventilation seat ................2-21
19. 4WD lock button..........................................5-41
20. DBC button ................................................5-38
21. Parking Distance Warning (Reverse/Forward) button ........................3-104
22. Cup holder ................................................3-131
23. Steering wheel audio controls/ ....................4-3 Bluetooth ®
wireless technology
hands-free controls ......................................4-4
24. Speed limiter controls/ ................................5-88 Cruise controls/ ..........................................5-90
[A-F] : Type A ~ Type F
The actual shape may differ from the illustration. OOS017004
■
Left-Hand drive type
Page 18 of 523

1-7
Your vehicle at a glance
IINN SSTT RR UU MM EENN TT PP AA NN EELL OO VVEERR VV IIEE WW (( IIII))
11. Instrument cluster ........................................3-37
2. Horn ..............................................................3-19
3. Driver’s front air bag......................................2-48
4. Engine Start/Stop button ................................5-9
5. Light control/Turn signals ..............................3-83
6. Wiper/Washer................................................3-95
7. Audio system/ ................................................4-7
Navigation system ..........................................4-4
8. Hazard warning flasher switch ........................6-3
9. Manual climate control system/ ..................3-108 Automatic climate control system ..............3-116
10. Passenger’s front air bag ............................2-48
11. Glove box ..................................................3-128
12. Power outlet ..............................................3-132
13. Manual transmission shift lever/ Dual clutch transmission shift lever ..5-16, 5-19
14. 4WD lock button..........................................5-41
15. DBC button .................................5-38
16. Parking Distance Warning (Reverse/Forward) button ........................................................3-104
17. Seat warmer................................................2-19
18. Seat warmer/Air ventilation seat ................2-21
19. Drive mode button ......................................5-53
20. Heated steering wheel ...............................3-18
21. Idle stop and go (ISG) OFF button ............5-47
22. Cup holder ................................................3-131
23. Steering wheel audio controls/ ....................4-3 Bluetooth ®
wireless technology
hands-free controls ......................................4-4
24. Speed limiter controls/ ................................5-88
Cruise controls ..........................................5-90
[A-F] : Type A ~ Type F
The actual shape may differ from the illustration. OOS017004E
■
Right-Hand drive type
Page 165 of 523

3-82
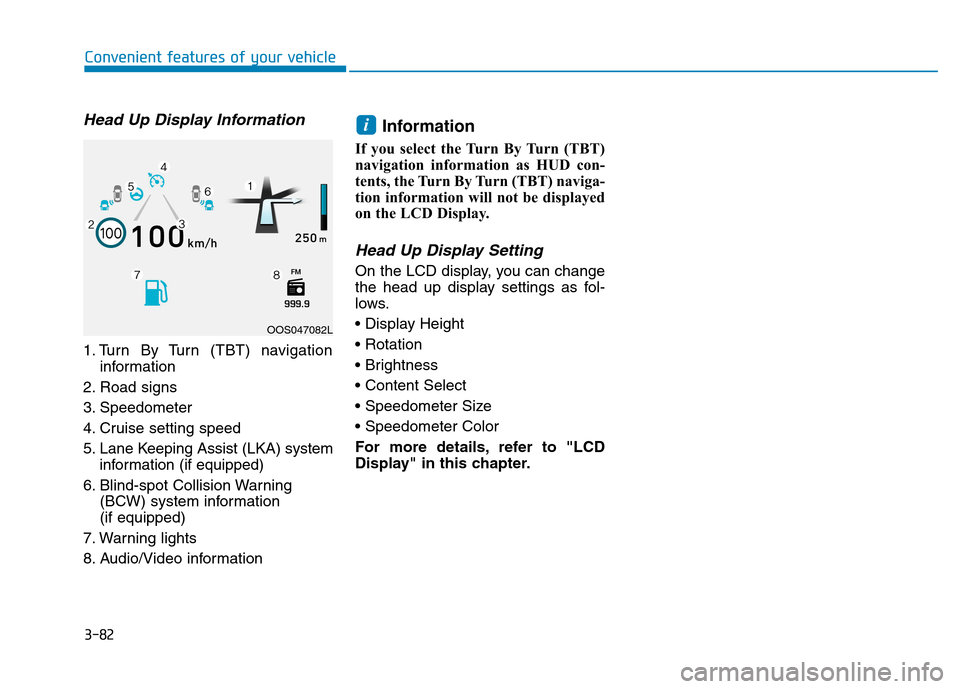
Head Up Display Information
1. Turn By Turn (TBT) navigationinformation
2. Road signs
3. Speedometer
4. Cruise setting speed
5. Lane Keeping Assist (LKA) system information (if equipped)
6. Blind-spot Collision Warning (BCW) system information (if equipped)
7. Warning lights
8. Audio/Video information Information
If you select the Turn By Turn (TBT)
navigation information as HUD con-
tents, the Turn By Turn (TBT) naviga-
tion information will not be displayed
on the LCD Display.
Head Up Display Setting
On the LCD display, you can change
the head up display settings as fol-
lows.
For more details, refer to "LCD
Display" in this chapter.
i
Convenient features of your vehicle
OOS047082L
Page 216 of 523

3-133
Convenient features of your vehicle
3
Some electronic devices cancause electronic interference
when plugged into a vehicle’s
power outlet. These devices may
cause excessive audio staticand malfunctions in other elec-
tronic systems or devices used
in your vehicle.
Push the plug in as far as it will go. If good contact is not made,
the plug may overheat and the
fuse may open.
Plug in battery equipped electrical/ electronic devices with reverse
current protection. The current
from the battery may flow into the
vehicle's electrical/electronic sys-tem and cause system malfunc-tion.Wireless cellular phone charg- ing system (if equipped)
There is a wireless cellular phone
charger inside the front console.
The system is available when all doors are closed, and when the igni-
tion switch is in the ACC/ON position.
To charge a cellular phone
The wireless cellular phone charging
system charges only the Qi-enabled
cellular phones ( ). Read the label
on the cellular phone accessory
cover or visit your cellular phone
manufacturer’s website to check
whether your cellular phone supports
the Qi technology. The wireless charging process starts
when you put a Qi-enabled cellularphone on the wireless charging unit.
1. Remove other items, including the
smart key, from the wireless charg-
ing unit. If not, the wireless charg-
ing process may be interrupted.Place the cellular phone on thecenter of charging pad.
2. The indicator light is orange when the cellular phone is charging. The
indicator light turns green when
phone charging is complete.
3. You can turn ON or OFF the wire- less charging function in the User
Settings mode on the instrument
cluster. For further information, refer
to the “LCD Display Modes” in this
chapter.
If your cellular phone is not charging:
- Slightly change the position of the cellular phone on the charging pad.
- Make sure the indicator light is orange.
OOS047064
Page 218 of 523
![Hyundai Kona 2018 Owners Manual 3-135
Convenient features of your vehicle
3
Clock
Vehicles with Audio system
Select the [SETUP/CLOCK ] button on
the audio system ➟Select [Date/Time].
Set time: Set the time displayed on
the audio Hyundai Kona 2018 Owners Manual 3-135
Convenient features of your vehicle
3
Clock
Vehicles with Audio system
Select the [SETUP/CLOCK ] button on
the audio system ➟Select [Date/Time].
Set time: Set the time displayed on
the audio](/manual-img/35/16231/w960_16231-217.png)
3-135
Convenient features of your vehicle
3
Clock
Vehicles with Audio system
Select the [SETUP/CLOCK ] button on
the audio system ➟Select [Date/Time].
Set time: Set the time displayed on
the audio screen.
Time format: Choose between 12- hour and 24-hour time formats.
Vehicles with Navigation system
Select the Settings menu on the
Navigation system ➟Select
[Date/Time].
GPS time: Displays time according to the received GNSS time.
24-hour: Switches to 12 hour or 24 hour.
For more details, please refer to
the separate manual that was sup-
plied with your vehicle.
Clothes hanger (if equipped)
These hangers are not designed to
hold large or heavy items. Do not hang other objects such
as hangers or hard objects
except clothes. Also, do not put
heavy, sharp or breakable
objects in the clothes pockets. In an accident or when the cur-
tain air bag is inflated, it may
cause vehicle damage or per-
sonal injury.
WARNING
OOS047066
Do not adjust the clock while
driving. You may lose your steer-
ing control and cause severe
personal injury or accidents.
WARNING
OOS047065
Page 222 of 523

Multimedia System
Multimedia system .................................................4-2AUX, USB and iPod ®
port ...............................................4-2
Antenna ...............................................................................4-2
Steering wheel audio controls .......................................4-3
Bluetooth® Wireless Technology hands-free ..........4-4
Audio / Video / Navigation system (AVN) ..................4-4
How vehicle radio works .................................................4-4
AUDIO (Without Touch Screen) ...........................4-7 Feature of your audio......................................................4-8
Radio...................................................................................4-13
Media..................................................................................4-14
Phone .................................................................................4-23
Setup ..................................................................................4-31
Declaration of conformity ..................................4-33 CE for EU ..........................................................................4-33
4
Page 223 of 523

4-2
Multimedia System
Information
If you install an aftermarket HID headlamp, your vehicle’s audio and
electronic devices may malfunction.
Prevent chemicals such as perfume, cosmetic oil, sun cream, hand clean-
er, and air freshener from contacting
the interior parts because they may
cause damage or discoloration.
AUX, USB and iPod ®
port
You can use an AUX port to connect
audio devices and an USB port to plug
in an USB and an iPod ®
port. Information
When using a portable audio device
connected to the power outlet, noise
may occur during playback. If this
happens, use the power source of the
portable audio device. ❈ iPod ®
is a trademark of Apple Inc.
Antenna
Roof antenna
The roof antenna receives transmit-
ted data. (For example : AM/FM,
DAB, GPS/GNSS)Rotate the roof antenna in a counter-
clockwise direction to remove it. Rotate it in a clockwise direction toreinstall it.
Before entering a place with low
height clearance or a car wash,
remove the antenna by rotating it
counterclockwise. If not, the
antenna may be damaged.
When reinstalling your antenna, it is important that it is fullytightened and adjusted to the
upright position to ensure prop-er reception.
Do not clean the inside of the rear window glass with a cleaner
or use a scraper to remove for-
eign deposits as this may cause
damage to the antenna elements.
Avoid adding metallic coatings such as Ni, Cd, and so on. Thesecan degrade the received AM
and FM broadcast signals.
NOTICE
NOTICE
ii
MM UULLTT IIMM EEDD IIAA SS YY SSTT EEMM
OOS047071
OOS047074
Page 224 of 523

4-3
Multimedia System
4
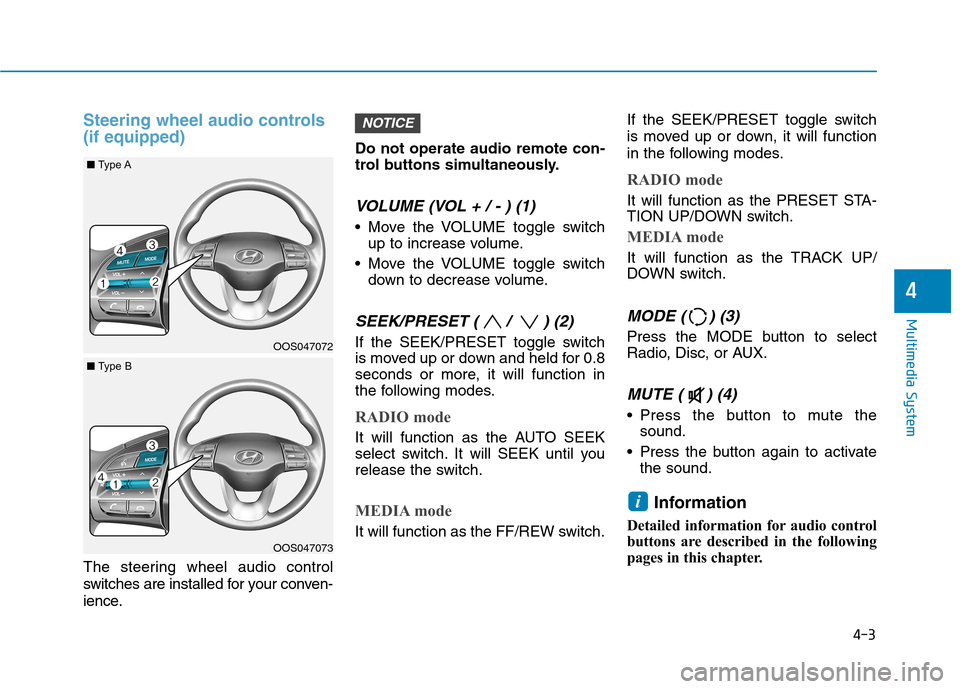
Steering wheel audio controls (if equipped)
The steering wheel audio control
switches are installed for your conven-
ience.Do not operate audio remote con-
trol buttons simultaneously.
VOLUME (VOL + / - ) (1)
Move the VOLUME toggle switch
up to increase volume.
Move the VOLUME toggle switch down to decrease volume.
SEEK/PRESET ( / ) (2)
If the SEEK/PRESET toggle switch
is moved up or down and held for 0.8
seconds or more, it will function in
the following modes.
RADIO mode
It will function as the AUTO SEEK
select switch. It will SEEK until you
release the switch.
MEDIA mode
It will function as the FF/REW switch. If the SEEK/PRESET toggle switch
is moved up or down, it will function
in the following modes.
RADIO mode
It will function as the PRESET STA-
TION UP/DOWN switch.
MEDIA mode
It will function as the TRACK UP/
DOWN switch.
MODE ( ) (3)
Press the MODE button to select
Radio, Disc, or AUX.
MUTE ( ) (4)
Press the button to mute the
sound.
Press the button again to activate the sound.
Information
Detailed information for audio control
buttons are described in the following
pages in this chapter.
i
NOTICE
OOS047072
OOS047073
■ Type A
■Type B