Page 15 of 523

1-4
Your vehicle at a glanceI
I NN TTEERR IIOO RR OO VVEERR VV IIEE WW (( II))
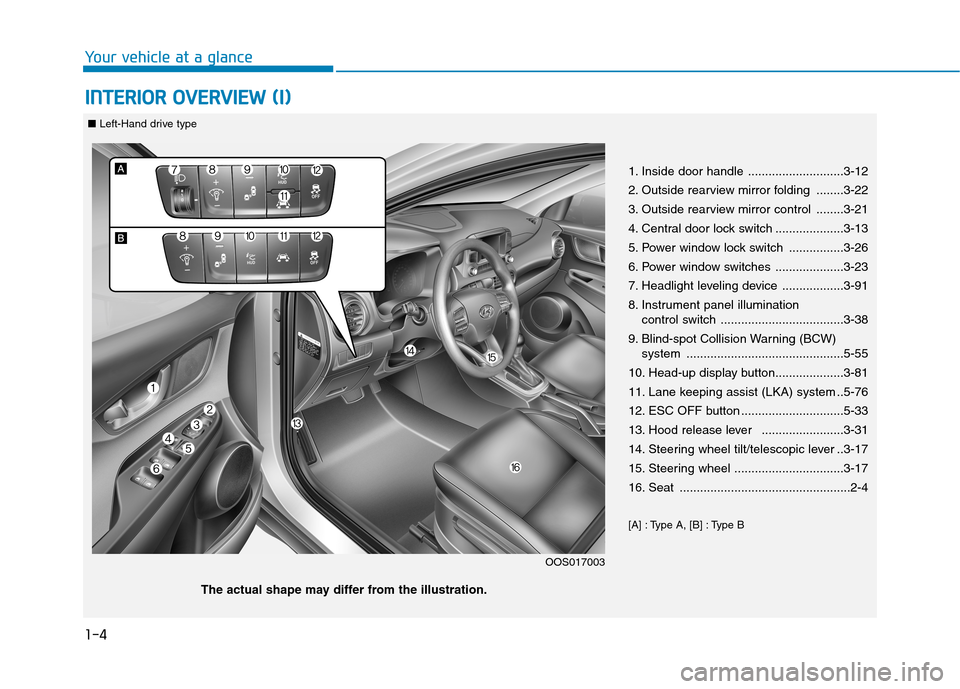
1. Inside door handle ............................3-12
2. Outside rearview mirror folding ........3-22
3. Outside rearview mirror control ........3-21
4. Central door lock switch ....................3-13
5. Power window lock switch ................3-26
6. Power window switches ....................3-23
7. Headlight leveling device ..................3-91
8. Instrument panel illumination
control switch ....................................3-38
9. Blind-spot Collision Warning (BCW) system ..............................................5-55
10. Head-up display button....................3-81
11. Lane keeping assist (LKA) system ..5-76
12. ESC OFF button ..............................5-33
13. Hood release lever ........................3-31
14. Steering wheel tilt/telescopic lever ..3-17
15. Steering wheel ................................3-17
16. Seat ..................................................2-4
[A] : Type A, [B] : Type B
OOS017003
The actual shape may differ from the illustration.
■ Left-Hand drive type
Page 16 of 523

1-5
Your vehicle at a glance
IINN TTEERR IIOO RR OO VVEERR VV IIEE WW (( IIII))
1
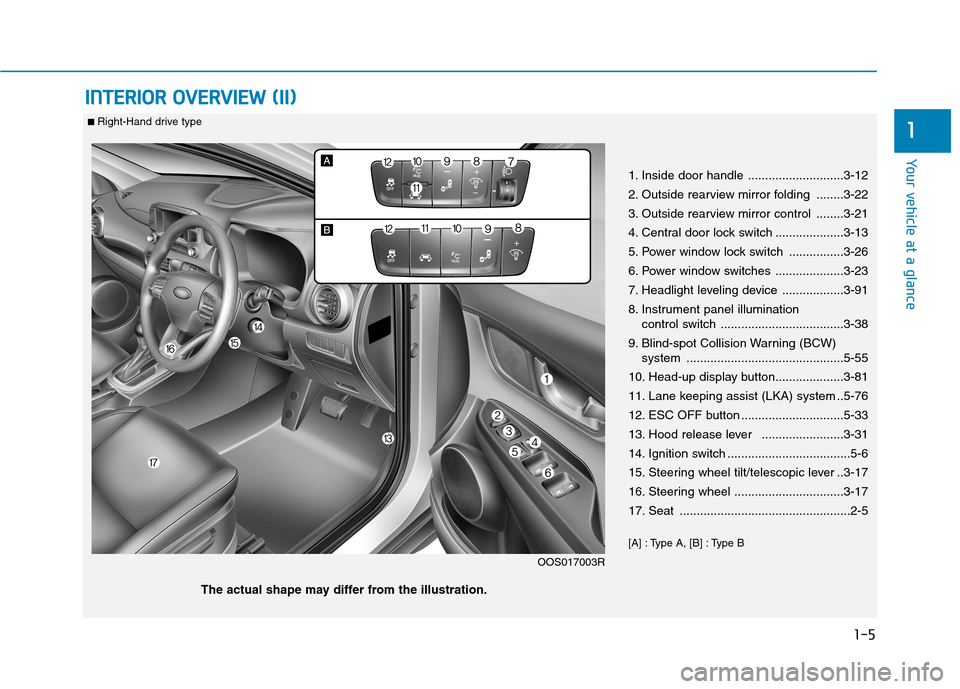
1. Inside door handle ............................3-12
2. Outside rearview mirror folding ........3-22
3. Outside rearview mirror control ........3-21
4. Central door lock switch ....................3-13
5. Power window lock switch ................3-26
6. Power window switches ....................3-23
7. Headlight leveling device ..................3-91
8. Instrument panel illumination
control switch ....................................3-38
9. Blind-spot Collision Warning (BCW) system ..............................................5-55
10. Head-up display button....................3-81
11. Lane keeping assist (LKA) system ..5-76
12. ESC OFF button ..............................5-33
13. Hood release lever ........................3-31
14. Ignition switch ....................................5-6
15. Steering wheel tilt/telescopic lever ..3-17
16. Steering wheel ................................3-17
17. Seat ..................................................2-5
[A] : Type A, [B] : Type B
OOS017003R
The actual shape may differ from the illustration.
■ Right-Hand drive type
Page 114 of 523

3-31
Convenient features of your vehicle
3
EEXX TTEERR IIOO RR FF EE AA TTUU RREESS
Hood
Opening the hood
1. Park the vehicle and set the park-
ing brake.
2. Pull the release lever to unlatch the hood. The hood should pop
open slightly. 3. Go to the front of the vehicle, raise
the hood slightly, push the second-
ary latch up (1) inside of the hoodcenter and lift the hood (2).
4. Pull out the support rod. 5. Hold the hood open with the sup-
port rod (1).
Closing the hood
1. Before closing the hood, check thefollowing:
ment must be correctly installed.
bustible material must be removed
from the engine compartment.
2. Return the support rod to its clip to prevent it from rattling.
OOS047024
OOS047025
Grasp the support rod in the
area wrapped in rubber. The
rubber will help prevent you
from being burned by hotmetal when the engine is hot.
The support rod must be
inserted completely into the
hole provided whenever you
inspect the engine compart-
ment. This will prevent the
hood from falling and possi-
bly injuring you.
WARNING
OOS047026
Page 302 of 523

5-48
Driving your vehicle
Auto stop
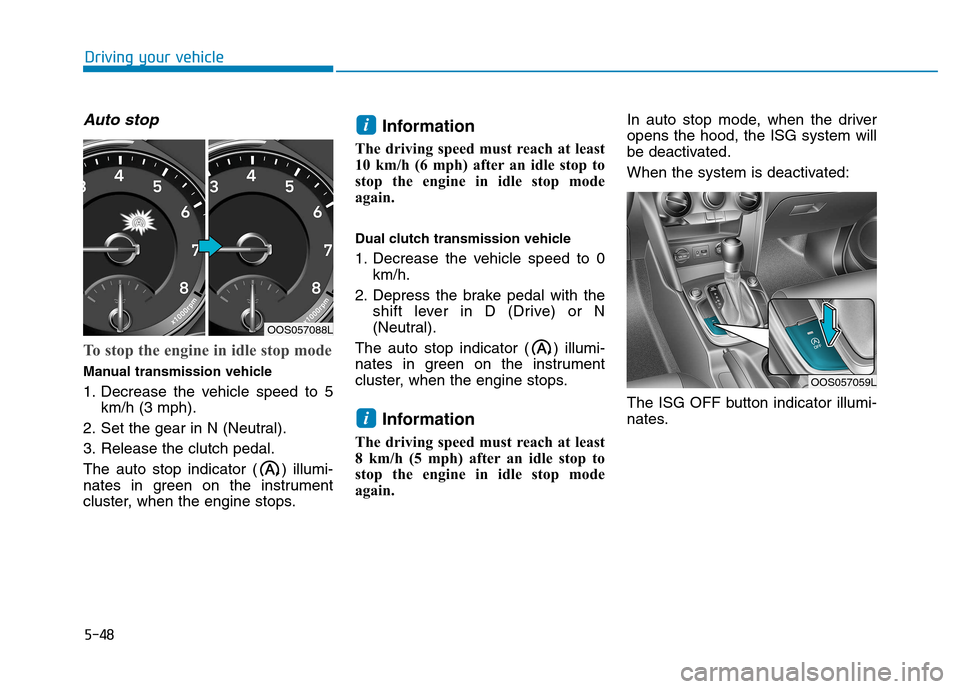
To stop the engine in idle stop mode
Manual transmission vehicle
1. Decrease the vehicle speed to 5km/h (3 mph).
2. Set the gear in N (Neutral).
3. Release the clutch pedal.
The auto stop indicator ( ) illumi-
nates in green on the instrument
cluster, when the engine stops. Information
The driving speed must reach at least
10 km/h (6 mph) after an idle stop to
stop the engine in idle stop mode
again.
Dual clutch transmission vehicle
1. Decrease the vehicle speed to 0 km/h.
2. Depress the brake pedal with the shift lever in D (Drive) or N
(Neutral).
The auto stop indicator ( ) illumi-
nates in green on the instrument
cluster, when the engine stops.
Information
The driving speed must reach at least
8 km/h (5 mph) after an idle stop to
stop the engine in idle stop mode
again. In auto stop mode, when the driveropens the hood, the ISG system will
be deactivated.
When the system is deactivated:
The ISG OFF button indicator illumi-
nates.
i
i
OOS057059L
OOS057088L
Page 375 of 523

6-8
What to do in an emergency
If your temperature gauge indicates
overheating, you experience a loss
of power, or hear loud pinging or
knocking, the engine may be over-
heating. If this happens, you should:
1. Pull off the road and stop as soonas it is safe to do so.
2. Place the shift lever in P (Park, for dual clutch transmission vehicle)
or neutral (for manual transmis-
sion/dual clutch transmission vehi-
cle) and set the parking brake. If
the air conditioning is ON, turn it
OFF.
3. If engine coolant is running out under the vehicle or steam is com-ing out from the hood, stop the
engine. Do not open the hood until
the coolant has stopped running
or the steaming has stopped. If
there is no visible loss of engine
coolant and no steam, leave the
engine running and check to be
sure the engine cooling fan is
operating. If the fan is not running,
turn the engine off. 4. Check for coolant leaking from the
radiator, hoses or under the vehi-
cle. (If the air conditioning had been
in use, it is normal for cold water to
be draining from it when you stop.)
5. If engine coolant is leaking out, stop the engine immediately and we rec-
ommend that you call an authorized
HYUNDAI dealer for assistance.
IIFF TT HH EE EE NN GGIINN EE OO VVEERR HH EEAA TTSS
While the engine is
running, keep hands,
clothing and tools
away from the mov-
ing parts such as thecooling fan and drive
belt to prevent seri-
ous injury.
WARNING
NEVER remove the radiator cap or thedrain plug while theengine and radiator
are hot. Hot coolant
and steam may blow out under
pressure, causing serious injury.
Turn the engine off and wait
until the engine cools down.
Use extreme care when remov-
ing the radiator cap. Wrap a
thick towel around it, and turn it
counterclockwise slowly to the
first stop. Step back while the
pressure is released from the
cooling system. When you aresure all the pressure has been
released, press down on the
cap, using a thick towel, and
continue turning counterclock-
wise to remove it.
WARNING