2018 Hyundai Kona ignition
[x] Cancel search: ignitionPage 157 of 523
3-74
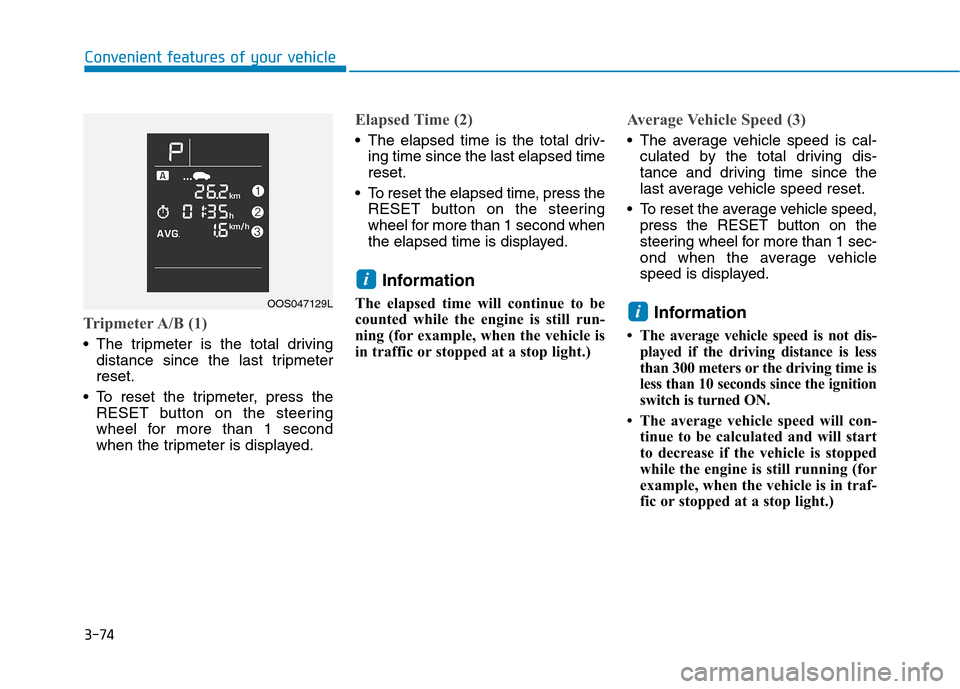
Tripmeter A/B (1)
The tripmeter is the total drivingdistance since the last tripmeter reset.
To reset the tripmeter, press the RESET button on the steering
wheel for more than 1 second
when the tripmeter is displayed.
Elapsed Time (2)
The elapsed time is the total driv-ing time since the last elapsed time reset.
To reset the elapsed time, press the RESET button on the steering
wheel for more than 1 second when
the elapsed time is displayed.
Information
The elapsed time will continue to be
counted while the engine is still run-
ning (for example, when the vehicle is
in traffic or stopped at a stop light.)
Average Vehicle Speed (3)
The average vehicle speed is cal- culated by the total driving dis-
tance and driving time since the
last average vehicle speed reset.
To reset the average vehicle speed, press the RESET button on the
steering wheel for more than 1 sec-
ond when the average vehicle
speed is displayed.
Information
The average vehicle speed is not dis- played if the driving distance is less
than 300 meters or the driving time is
less than 10 seconds since the ignition
switch is turned ON.
The average vehicle speed will con- tinue to be calculated and will start
to decrease if the vehicle is stopped
while the engine is still running (for
example, when the vehicle is in traf-
fic or stopped at a stop light.)
i
i
Convenient features of your vehicle
OOS047129L
Page 158 of 523

3-75
Convenient features of your vehicle
Digital speedometer ON/OFF
The digital speedometer can be
turned on and off.
To turn on the digital speedometer,
press the RESET button on the steer-
ing wheel for more than one second
when “SPEED OFF” is displayed. To
turn off the digital speedometer, press
the RESET button for more than one
second when “SPEED ON” is dis-
played.This message shows the speed of the
vehicle when the digital speedometer
is turned on.
Service reminder
If the remaining mileage or days is
below 1,500 km or 30 days, the serv-
ice reminder will be displayed with a
warning sound for a few seconds
each time you turn the ignition switchto the ON position.
Information
To change or deactivate the service
interval, consult an authorized
HYUNDAI dealer.
i
3
OAD045180N
OOS047132L
OOS047133LOOS047130L/OOS047131L
Page 161 of 523
3-78
Convenient features of your vehicle
Fuel economy
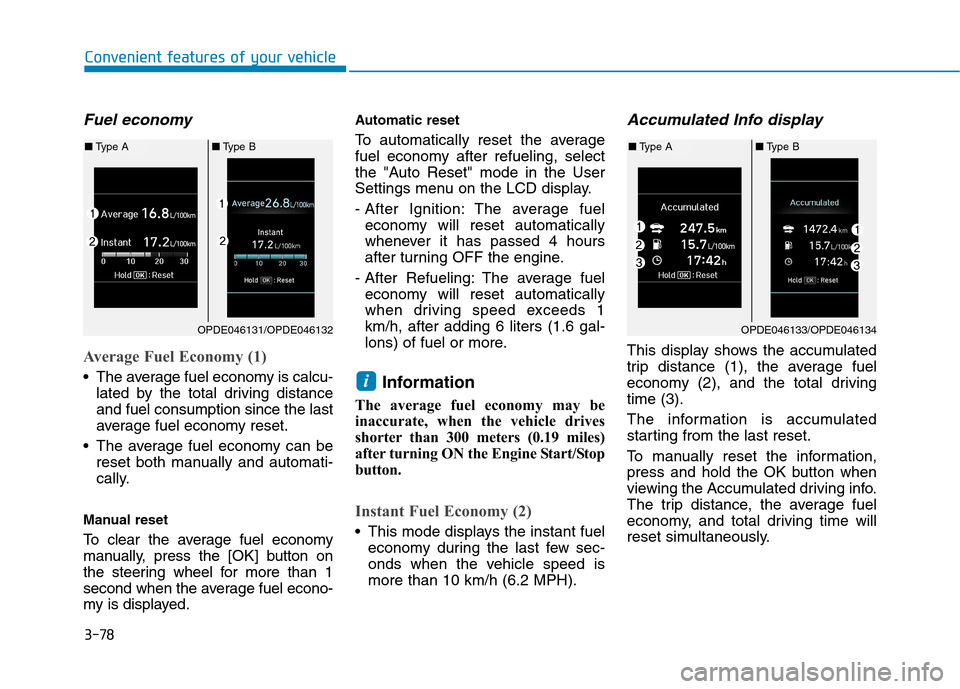
Average Fuel Economy (1)
The average fuel economy is calcu-lated by the total driving distance and fuel consumption since the last
average fuel economy reset.
The average fuel economy can be reset both manually and automati-
cally.
Manual reset
To clear the average fuel economy
manually, press the [OK] button on
the steering wheel for more than 1
second when the average fuel econo-
my is displayed. Automatic reset
To automatically reset the average
fuel economy after refueling, select
the "Auto Reset" mode in the User
Settings menu on the LCD display.
- After Ignition: The average fuel
economy will reset automatically
whenever it has passed 4 hours
after turning OFF the engine.
- After Refueling: The average fuel economy will reset automatically
when driving speed exceeds 1km/h, after adding 6 liters (1.6 gal-
lons) of fuel or more.
Information
The average fuel economy may be
inaccurate, when the vehicle drives
shorter than 300 meters (0.19 miles)
after turning ON the Engine Start/Stop
button.
Instant Fuel Economy (2)
This mode displays the instant fuel economy during the last few sec-
onds when the vehicle speed ismore than 10 km/h (6.2 MPH).
Accumulated Info display
This display shows the accumulated
trip distance (1), the average fuel
economy (2), and the total drivingtime (3).
The information is accumulated
starting from the last reset.
To manually reset the information,
press and hold the OK button when
viewing the Accumulated driving info.
The trip distance, the average fuel
economy, and total driving time will
reset simultaneously.
i
OPDE046131/OPDE046132
■Type A ■Type B
OPDE046133/OPDE046134
■Type A ■Type B
Page 162 of 523
3-79
Convenient features of your vehicle
3
The accumulated driving information
will continue to be counted while the
engine is still running (for example,
when the vehicle is in traffic orstopped at a stop light).Information
The vehicle must be driven for a min-
imum of 300 meters (0.19 miles) since
the last ignition key cycle before the
average fuel economy will be recalcu-
lated.
Drive Info display
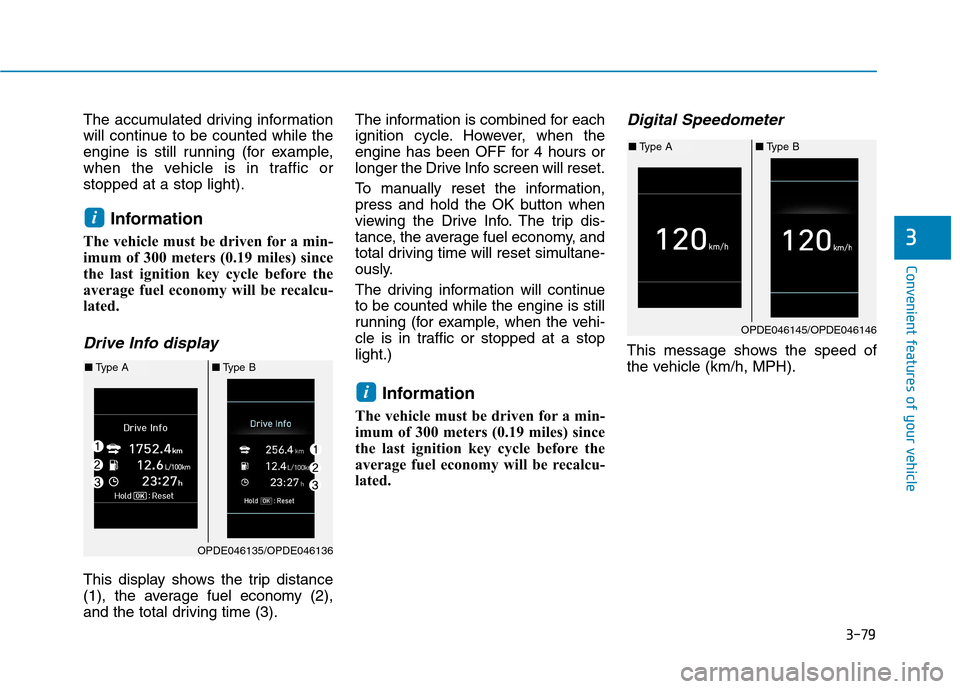
This display shows the trip distance
(1), the average fuel economy (2),
and the total driving time (3). The information is combined for each
ignition cycle. However, when the
engine has been OFF for 4 hours or
longer the Drive Info screen will reset.
To manually reset the information,
press and hold the OK button when
viewing the Drive Info. The trip dis-
tance, the average fuel economy, and
total driving time will reset simultane-
ously.
The driving information will continue to be counted while the engine is still
running (for example, when the vehi-
cle is in traffic or stopped at a stoplight.)
Information
The vehicle must be driven for a min-
imum of 300 meters (0.19 miles) since
the last ignition key cycle before the
average fuel economy will be recalcu-
lated.
Digital Speedometer
This message shows the speed of
the vehicle (km/h, MPH).
i
i
OPDE046135/OPDE046136
■ Type A ■Type B
OPDE046145/OPDE046146
■Type A ■Type B
Page 167 of 523
3-84
Convenient features of your vehicle
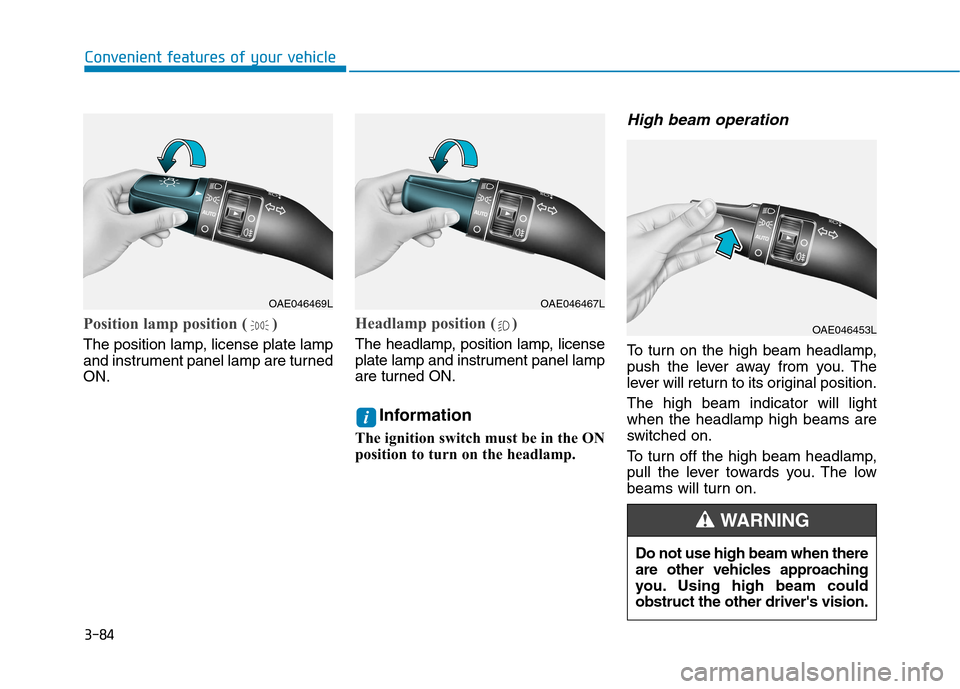
Position lamp position ( )
The position lamp, license plate lamp
and instrument panel lamp are turnedON.
Headlamp position ( )
The headlamp, position lamp, license
plate lamp and instrument panel lamp
are turned ON.Information
The ignition switch must be in the ON
position to turn on the headlamp.
High beam operation
To turn on the high beam headlamp,
push the lever away from you. The
lever will return to its original position. The high beam indicator will light when the headlamp high beams are
switched on.
To turn off the high beam headlamp,
pull the lever towards you. The low
beams will turn on.
i
OAE046469LOAE046467L
OAE046453L
Do not use high beam when there
are other vehicles approaching
you. Using high beam couldobstruct the other driver's vision.
WARNING
Page 173 of 523
3-90
Convenient features of your vehicle
Battery saver function
The purpose of this feature is to pre-
vent the battery from being dis-
charged. The system automatically
turns off the position lamp when the
driver turns the engine off and opens
the driver-side door.
With this feature, the position lamps
will turn off automatically if the driver
parks on the side of road at night.
If necessary, to keep the lamps on
when the engine is turned off, perform
the following:
1) Open the driver-side door.
2) Turn the position lamps OFF andON again using the light switch on
the steering column.
Headlamp delay function
(if equipped)
If you place the ignition switch to the
ACC or OFF position with the head-lamps ON, the headlamps (and/or
position lamps) remain on for about 5
minutes. However, with the engine off if
the driver’s door is opened and closed,the headlamps (and/or position lamps)
are turned off after 15 seconds. The headlamps (and/or position
lamps) can be turned off by pressing
the lock button on the remote key or
smart key twice or turning the light
switch to the OFF or AUTO position.
However, if you turn the light switch
to the AUTO position when it is dark
outside, the headlamps will not be
turned off.
You can activate or deactivate the
Headlamp Delay function from theUser Settings mode on the LCD dis-
play. For more details, refer to
"LCD Display" in this chapter. If the driver gets out of the vehicle
through other doors (except dri-
ver's door), the battery saver func-tion does not operate and the
headlamp delay function does not
turn off automatically. Therefore, It
causes the battery to be dis-
charged. In this case, make sure to
turn off the lamp before getting out
of the vehicle.
NOTICE
Page 176 of 523
3-93
Convenient features of your vehicle
Interior lights
Do not use the interior lights for
extended periods when the engine
is turned off otherwise the battery
will discharge.
Interior lamp AUTO cut
The interior lamps will automatically
go off approximately 20 minutes after
the engine is turned off and the
doors are closed. If a door is opened,
the lamp will go off 40 minutes after
the engine is turned off. If the doors
are locked and the vehicle enters the
armed stage of the theft alarm sys-
tem, the lamps will go off five sec-
onds later.
Front lamps
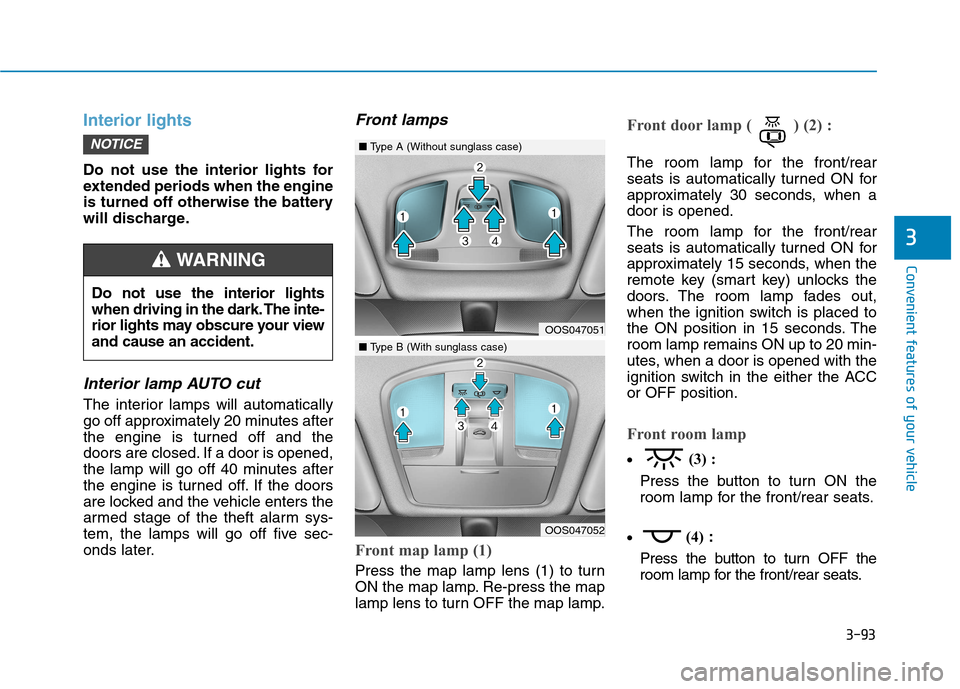
Front map lamp (1)
Press the map lamp lens (1) to turn
ON the map lamp. Re-press the map
lamp lens to turn OFF the map lamp.
Front door lamp ( ) (2) :
The room lamp for the front/rear
seats is automatically turned ON for
approximately 30 seconds, when adoor is opened.
The room lamp for the front/rear
seats is automatically turned ON for
approximately 15 seconds, when the
remote key (smart key) unlocks the
doors. The room lamp fades out,
when the ignition switch is placed to
the ON position in 15 seconds. Theroom lamp remains ON up to 20 min-
utes, when a door is opened with the
ignition switch in the either the ACCor OFF position.
Front room lamp
(3) :
Press the button to turn ON the
room lamp for the front/rear seats.
(4)
:
Press the button to turn OFF the
room lamp for the front/rear seats.
NOTICE
3
Do not use the interior lights
when driving in the dark. The inte-
rior lights may obscure your viewand cause an accident.
WARNING
OOS047051
OOS047052
■ Type A (Without sunglass case)
■Type B (With sunglass case)
Page 179 of 523

3-96
Convenient features of your vehicle
Windshield wipers
Operates as follows when the igni-
tion switch is turned ON./MIST : For a single wiping cycle,
move the lever down ( ) or up (MIST) and release
it. The wipers will operate
continuously if the lever isheld in this position.
O/OFF : Wiper is not in operation
---/INT : Wiper operates intermittently
at the same wiping intervals.
Use this mode in light rain or
mist. To vary the speed set-
ting, turn the speed control
knob.
1/LO : Normal wiper speed
2/HI : Fast wiper speed
Information
If there is heavy accumulation of snow
or ice on the windshield, defrost the
windshield for about 10 minutes, or until
the snow and/or ice is removed before
using the windshield wipers to ensure
proper operation.
If you do not remove the snow and/or ice
before using the wiper and washer, it may
damage the wiper and washer system.
AUTO (Automatic) control (if equipped)
The rain sensor located on the upperend of the windshield glass senses
the amount of rainfall and controls
the wiping cycle for the proper inter-
val. The more it rains, the faster the
wiper operates.
When the rain stops, the wiper stops.
To vary the speed setting, turn thespeed control knob (1).
If the wiper switch is set in AUTO
mode when the ignition switch is inthe ON position, the wiper will oper-
ate once to perform a self-check of
the system. Set the wiper to OFF
position when the wiper is not in use.
When washing the vehicle, set the wiper switch in the O (OFF) positionto stop the auto wiper operation.
The wiper may operate and be dam-
aged if the switch is set in the AUTO
mode while washing the vehicle.
Do not remove the sensor cover located on the upper end of the
passenger side windshield glass.
Damage to system parts could
occur and may not be covered by
your vehicle warranty.
NOTICE
i
OOS047322L
Sensor To avoid personal injury from the
windshield wipers, when theengine is running and the wind-
shield wiper switch is placed in
the AUTO mode:
Do not touch the upper end of the windshield glass facing the
rain sensor.
Do not wipe the upper end of the windshield glass with a
damp or wet cloth.
Do not put pressure on the windshield glass.
WARNING