2018 Hyundai Kona turn signal
[x] Cancel search: turn signalPage 370 of 523
6-3
What to do in an emergency
6
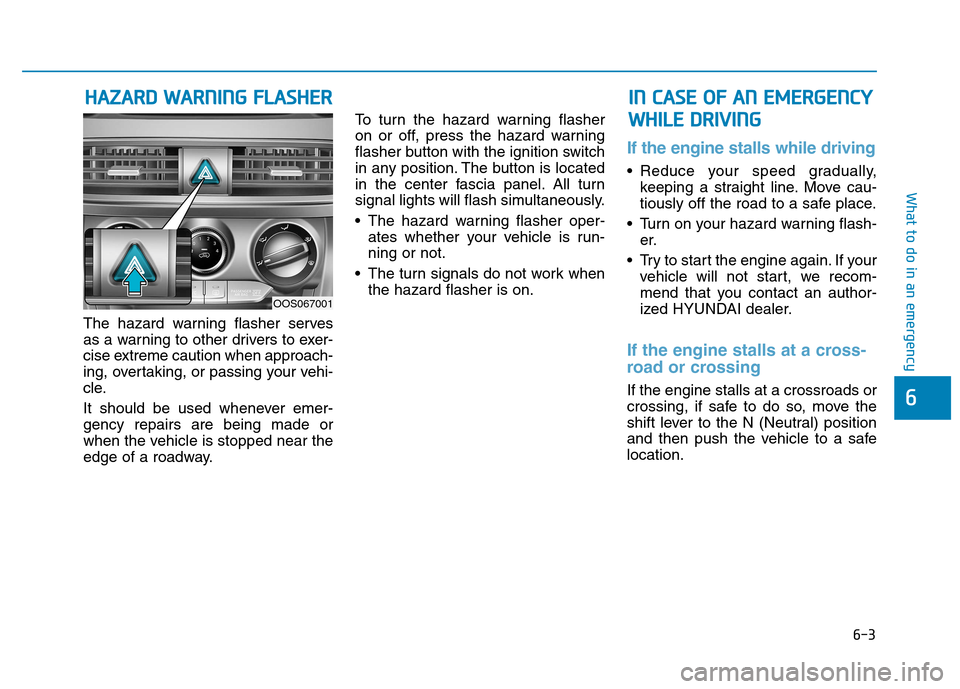
The hazard warning flasher serves
as a warning to other drivers to exer-
cise extreme caution when approach-
ing, overtaking, or passing your vehi-
cle.
It should be used whenever emer- gency repairs are being made or
when the vehicle is stopped near the
edge of a roadway.To turn the hazard warning flasher
on or off, press the hazard warning
flasher button with the ignition switch
in any position. The button is located
in the center fascia panel. All turn
signal lights will flash simultaneously.
• The hazard warning flasher oper-
ates whether your vehicle is run- ning or not.
The turn signals do not work when the hazard flasher is on.
If the engine stalls while driving
Reduce your speed gradually,keeping a straight line. Move cau-
tiously off the road to a safe place.
Turn on your hazard warning flash- er.
Try to start the engine again. If your vehicle will not start, we recom-
mend that you contact an author-
ized HYUNDAI dealer.
If the engine stalls at a cross-
road or crossing
If the engine stalls at a crossroads or
crossing, if safe to do so, move the
shift lever to the N (Neutral) position
and then push the vehicle to a safelocation.
HHAAZZAA RRDD WW AARRNN IINN GG FF LLAA SSHH EERR IINN CC AA SSEE OO FF AA NN EE MM EERR GG EENN CCYY
W
W HHIILL EE DD RRIIVV IINN GG
OOS067001
Page 377 of 523

6-10
What to do in an emergency
Your vehicle has also been equipped
with a TPMS malfunction indicator toindicate when the system is not
operating properly. The TPMS mal-function indicator is combined with
the low tire pressure telltale. Whenthe system detects a malfunction,
the telltale will flash for approximate-
ly one minute and then remain con-
tinuously illuminated.
This sequence will continue upon
subsequent vehicle start-ups as long
as the malfunction exists. When themalfunction indicator is illuminated,
the system may not be able to detect
or signal low tire pressure as intend-
ed. TPMS malfunctions may occur
for a variety of reasons, including theinstallation of replacement or alter-
nate tires or wheels on the vehicle
that prevent the TPMS from function-
ing properly. Always check theTPMS malfunction telltale afterreplacing one or more tires or wheels
on your vehicle to ensure that the
replacement or alternate tires and
wheels allow the TPMS to continue
to function properly.If the TPMS indicator does not illu-
minate for 3 seconds when the
ignition switch is turned to the ON
position or engine is running, or if
it comes on after blinking for
approximately one minute, we rec-
ommend that you contact an
authorized HYUNDAI dealer.Low tire pressure telltale
When the tire pressure
monitoring system warn-ing indicator is illuminated
and warning message
displayed on the cluster LCD display,
one or more of your tires is signifi-cantly under-inflated.
If the telltale illuminates, immediately
reduce your speed, avoid hard cor-
nering and anticipate increased stop-
ping distances. You should stop and
check your tires as soon as possible.Inflate the tires to the proper pres-
sure as indicated on the vehicle'splacard or tire inflation pressure label
located on the driver's side center
pillar outer panel. If you cannot reach
a service station or if the tire cannot
hold the newly added air, replace the
low pressure tire with the spare tire.
Then the Low Tire Pressure telltale
may flash for approximately one
minute and then remain continuously
illuminated after restarting and about
10 minutes of continuous driving
before you have the low pressure tire
repaired and replaced on the vehicle.
NOTICE
Page 414 of 523

7
Tires and wheels ..................................................7-36Tire care ............................................................................7-36
Recommended cold tire inflation pressures.............7-37
Check tire inflation pressure........................................7-38
Tire rotation .....................................................................7-38
Wheel alignment and tire balance ..............................7-39
Tire replacement .............................................................7-40
Wheel replacement .........................................................7-41
Tire traction ......................................................................7-41
Tire maintenance ............................................................7-41
Tire sidewall labeling ......................................................7-41
Low aspect ratio tires ....................................................7-45
Fuses ......................................................................7-46 Instrument panel fuse replacement ...........................7-47
Engine compartment panel fuse replacement.........7-48
Fuse/Relay panel description ......................................7-50 Light bulbs.............................................................7-63
Headlamp, Low beam assist - Static,
position lamp, turn signal lamp and
daytime running light bulb replacement ...................7-64
Front fog lamp .................................................................7-68
Headlamp and front fog lamp aiming (for Europe) ..7-68
Side repeater lamp replacement .................................7-74
Rear combination lamp bulb replacement ................7-74
High mounted stop lamp replacement .......................7-76
License plate light bulb replacement .........................7-76
Interior light bulb replacement ....................................7-77
Appearance care ..................................................7-78 Exterior care ....................................................................7-78
Interior care......................................................................7-82
Emission control system .....................................7-85 Crankcase emission control system ...........................7-85
Evaporative emission control system.........................7-85
Exhaust emission control system ...............................7-86
Page 418 of 523
7-6
Maintenance
While operating your vehicle:
Note any changes in the sound ofthe exhaust or any smell of exhaust
fumes in the vehicle.
Check for vibrations in the steering wheel. Notice if there is any
increased steering effort or loose-
ness in the steering wheel, or
change in its straight-ahead position.
Notice if your vehicle constantly turns slightly or “pulls” to one side when
traveling on smooth, level road.
When stopping, listen and check for unusual sounds, pulling to one side,
increased brake pedal travel or
“hard-to-push” brake pedal.
If any slipping or changes in the operation of your transmission
occurs, check the transmission fluid
level.
Check the dual clutch transmission P (Park) function.
Check the parking brake.
Check for fluid leaks under your vehicle (water dripping from the air
conditioning system during or after
use is normal).
At least monthly:
Check coolant level in the enginecoolant reservoir.
Check the operation of all exterior lights, including the stoplights, turn
signals and hazard warning flashers.
Check the inflation pressures of all tires including the spare for tires
that are worn, show uneven wear,or are damaged.
Check for loose wheel lug nuts.
At least twice a year: (i.e., every Spring and Autumn)
Check radiator, heater and air condi- tioning hoses for leaks or damage.
Check windshield washer spray and wiper operation. Clean wiper
blades with a clean cloth damp-
ened with washer fluid.
Check headlamp alignment.
Check muffler, exhaust pipes, shields and clamps.
Check the seat belts for wear and function.
At least once a year:
Clean body and door drain holes.
Lubricate door hinges and hoodhinges.
Lubricate door and hood locks and latches.
Lubricate door rubber weather strips.
Check the air conditioning system.
Inspect and lubricate dual clutch transmission linkage and controls.
Clean the battery and terminals.
Check the brake fluid level.
Page 476 of 523
7-64
Maintenance
Headlamp, Low beam assist –
Static, position lamp, turn sig-
nal lamp and daytime running
light bulb replacement
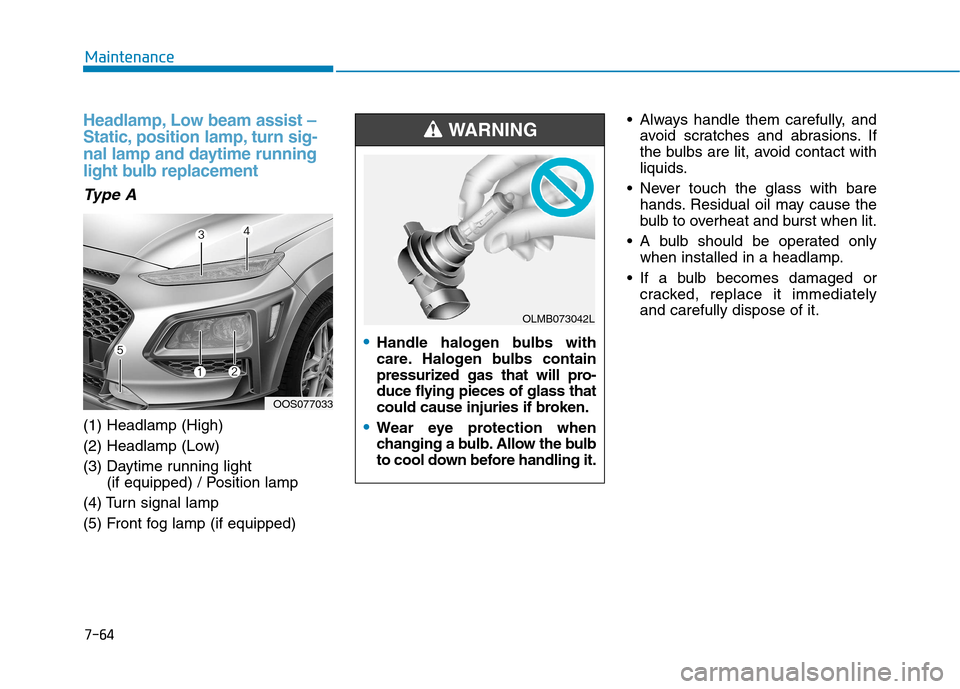
Type A
(1) Headlamp (High)
(2) Headlamp (Low)
(3) Daytime running light (if equipped) / Position lamp
(4) Turn signal lamp
(5) Front fog lamp (if equipped) Always handle them carefully, and
avoid scratches and abrasions. If
the bulbs are lit, avoid contact with
liquids.
Never touch the glass with bare hands. Residual oil may cause the
bulb to overheat and burst when lit.
A bulb should be operated only when installed in a headlamp.
If a bulb becomes damaged or cracked, replace it immediatelyand carefully dispose of it.
OOS077033
Handle halogen bulbs with
care. Halogen bulbs contain
pressurized gas that will pro-
duce flying pieces of glass that
could cause injuries if broken.
Wear eye protection when
changing a bulb. Allow the bulb
to cool down before handling it.
WARNING
OLMB073042L
Page 477 of 523
![Hyundai Kona 2018 Owners Manual 7-65
7
Maintenance
[1] : High beam, [2] : Low beam
Headlamp and position lamp
1. Open the hood.
2. Disconnect the negative batterycable.
3. Remove the bulb cover by turning it counterclockwise.
4. Di Hyundai Kona 2018 Owners Manual 7-65
7
Maintenance
[1] : High beam, [2] : Low beam
Headlamp and position lamp
1. Open the hood.
2. Disconnect the negative batterycable.
3. Remove the bulb cover by turning it counterclockwise.
4. Di](/manual-img/35/16231/w960_16231-476.png)
7-65
7
Maintenance
[1] : High beam, [2] : Low beam
Headlamp and position lamp
1. Open the hood.
2. Disconnect the negative batterycable.
3. Remove the bulb cover by turning it counterclockwise.
4. Disconnect the bulb socket-con- nector. (for low beam and high beam)
5. Remove the bulb from the head- lamp assembly.
6. Install a new bulb.
7. Connect the bulb socket-connec- tor. (for low beam and high beam)
8. Install the bulb cover by turning it clockwise.
Turn signal lamp
1. Open the hood.
2. Disconnect the negative batterycable.
3.Remove the socket (1) from the assembly by turning the socket
counterclockwise until the tabs on
the socket align with the slots on
the assembly.
4.Remove the bulb from the socket by pressing it in and rotating it
counterclockwise until the tabs on
the bulb align with the slots in the
socket. Pull the bulb out of the
socket. 5.Insert a new bulb by inserting it into
the socket and rotating it until it
locks into place.
6.Install the socket in the assembly by aligning the tabs on the socket
with the slots in the assembly.
7.Push the socket into the assembly and turn the socket clockwise.
Daytime running light
If the LED lamp does not operate, we
recommend you to have the vehicle
checked by an authorized HYUNDAI
dealer.OOS077038OOS077034
Page 478 of 523
7-66
Maintenance
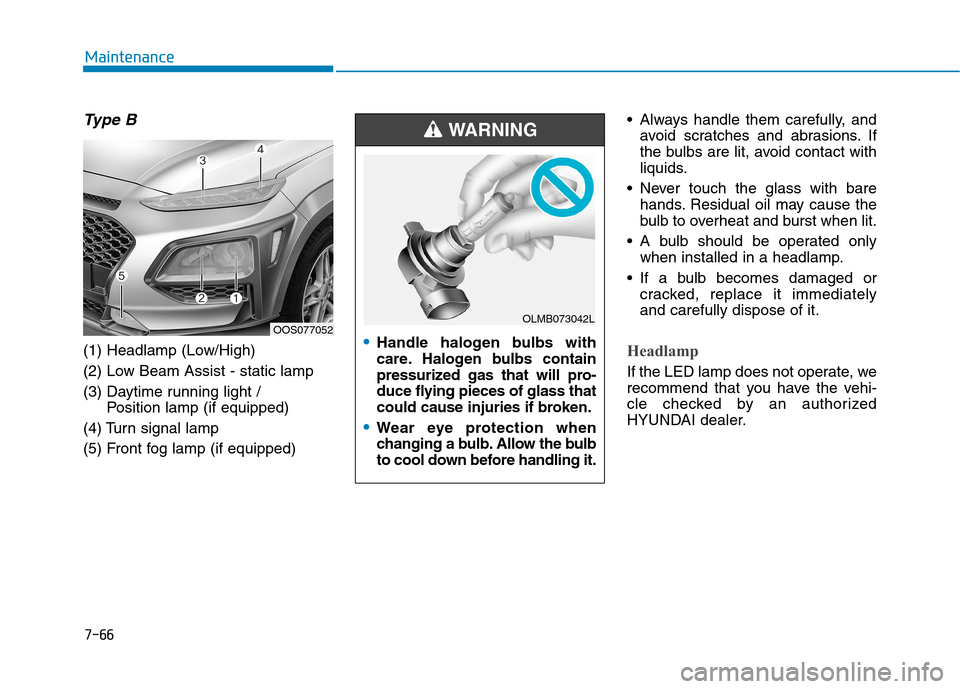
Type B
(1) Headlamp (Low/High)
(2) Low Beam Assist - static lamp
(3) Daytime running light / Position lamp (if equipped)
(4) Turn signal lamp
(5) Front fog lamp (if equipped) Always handle them carefully, and
avoid scratches and abrasions. If
the bulbs are lit, avoid contact with
liquids.
Never touch the glass with bare hands. Residual oil may cause the
bulb to overheat and burst when lit.
A bulb should be operated only when installed in a headlamp.
If a bulb becomes damaged or cracked, replace it immediatelyand carefully dispose of it.Headlamp
If the LED lamp does not operate, we
recommend that you have the vehi-
cle checked by an authorized
HYUNDAI dealer.
OOS077052Handle halogen bulbs with
care. Halogen bulbs contain
pressurized gas that will pro-
duce flying pieces of glass that
could cause injuries if broken.
Wear eye protection when
changing a bulb. Allow the bulb
to cool down before handling it.
WARNING
OLMB073042L
Page 479 of 523
7-67
7
Maintenance
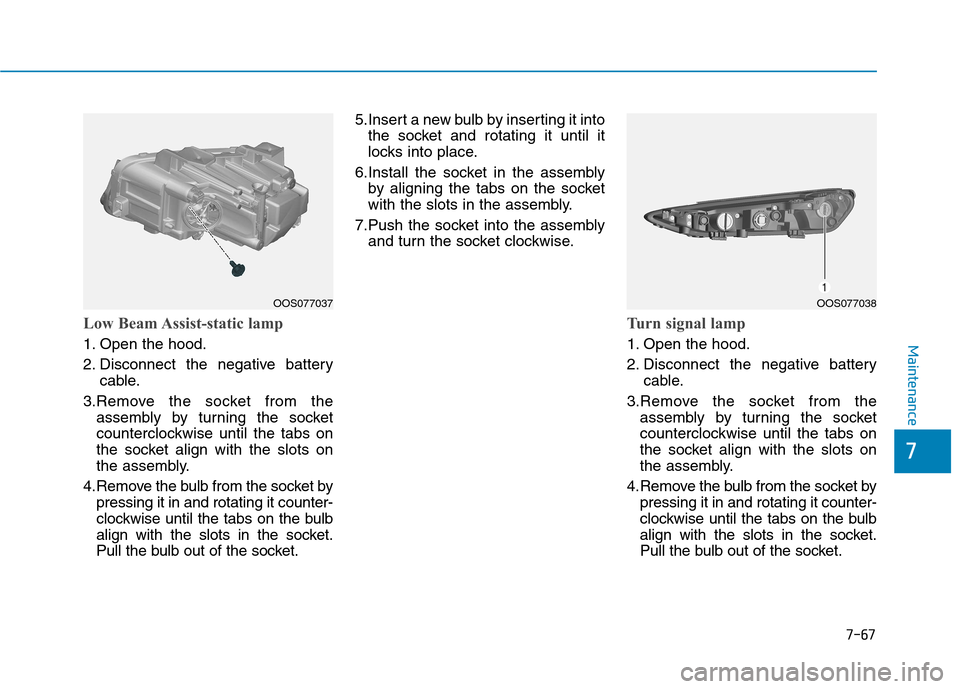
Low Beam Assist-static lamp
1. Open the hood.
2. Disconnect the negative batterycable.
3.Remove the socket from the assembly by turning the socket
counterclockwise until the tabs on
the socket align with the slots on
the assembly.
4.Remove the bulb from the socket by pressing it in and rotating it counter-
clockwise until the tabs on the bulb
align with the slots in the socket.
Pull the bulb out of the socket. 5.Insert a new bulb by inserting it into
the socket and rotating it until it
locks into place.
6.Install the socket in the assembly by aligning the tabs on the socket
with the slots in the assembly.
7.Push the socket into the assembly and turn the socket clockwise.
Turn signal lamp
1. Open the hood.
2. Disconnect the negative battery cable.
3.Remove the socket from the assembly by turning the socket
counterclockwise until the tabs on
the socket align with the slots on
the assembly.
4.Remove the bulb from the socket by pressing it in and rotating it counter-
clockwise until the tabs on the bulb
align with the slots in the socket.
Pull the bulb out of the socket.
OOS077037 OOS077038