2018 Hyundai Kona light
[x] Cancel search: lightPage 432 of 497
7-25
7
Maintenance
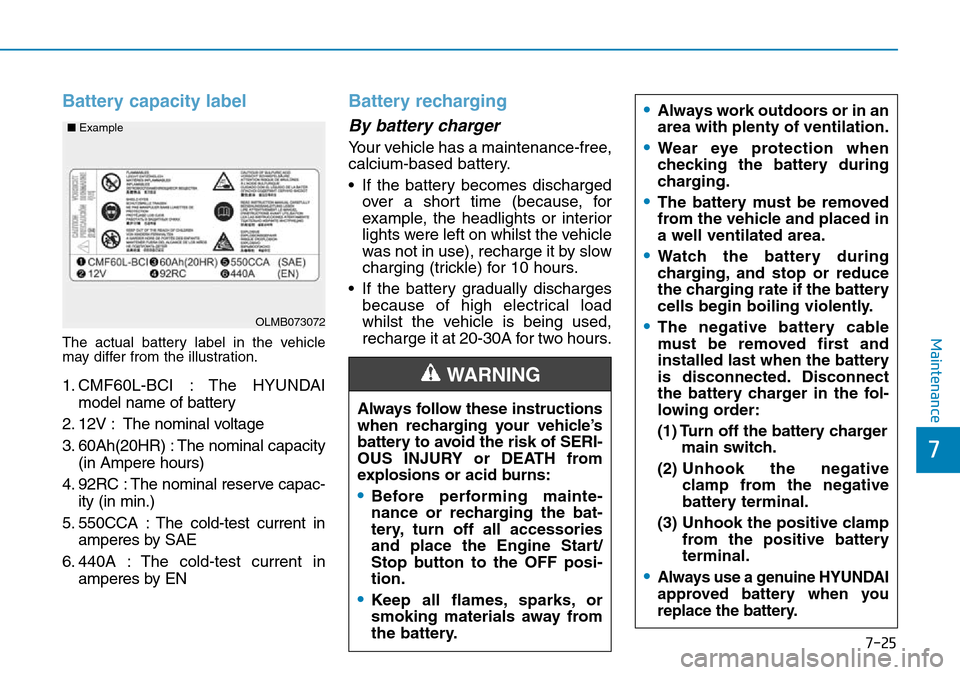
Battery capacity label
The actual battery label in the vehicle
may differ from the illustration.
1. CMF60L-BCI : The HYUNDAImodel name of battery
2. 12V : The nominal voltage
3. 60Ah(20HR) : The nominal capacity (in Ampere hours)
4. 92RC : The nominal reserve capac- ity (in min.)
5. 550CCA : The cold-test current in amperes by SAE
6. 440A : The cold-test current in amperes by EN
Battery recharging
By battery charger
Your vehicle has a maintenance-free,
calcium-based battery.
• If the battery becomes dischargedover a short time (because, for
example, the headlights or interior
lights were left on whilst the vehicle
was not in use), recharge it by slow
charging (trickle) for 10 hours.
• If the battery gradually discharges because of high electrical load
whilst the vehicle is being used,
recharge it at 20-30A for two hours.
OLMB073072
■
Example
Always follow these instructions
when recharging your vehicle’s
battery to avoid the risk of SERI-
OUS INJURY or DEATH from
explosions or acid burns:
•Before performing mainte-
nance or recharging the bat-
tery, turn off all accessories
and place the Engine Start/
Stop button to the OFF posi-
tion.
•Keep all flames, sparks, or
smoking materials away from
the battery.
WARNING
•Always work outdoors or in an
area with plenty of ventilation.
•Wear eye protection when
checking the battery during
charging.
•The battery must be removed
from the vehicle and placed in
a well ventilated area.
•Watch the battery during
charging, and stop or reduce
the charging rate if the battery
cells begin boiling violently.
•The negative battery cable
must be removed first and
installed last when the battery
is disconnected. Disconnect
the battery charger in the fol-
lowing order:
(1) Turn off the battery charger
main switch.
(2) Unhook the negative
clamp from the negative
battery terminal.
(3) Unhook the positive clamp from the positive battery
terminal.
•Always use a genuine HYUNDAI
approved battery when you
replace the battery.
Page 443 of 497
7-36
Maintenance
Temperature - A, B & C
The temperature grades are A (the
highest), then B and C representing
the tyre’s resistance to the genera-
tion of heat and its ability to dissipate
heat when tested under controlled
conditions on a specified indoor lab-
oratory test wheel.
Sustained high temperature can
cause the material of the tyre to
degenerate and reduce tyre life, and
excessive temperature can lead to
sudden tyre failure. Grades B and A
represent higher levels of perform-
ance on the laboratory test wheel
than the minimum required by law.
Low aspect ratio tyres
A low aspect ratio tyre, of which the
aspect ratio is lower than 50, is
designed for a sporty-look vehicle.
The low aspect ratio is to optimize
handling and braking. Thus, it may
be uncomfortable to ride and it may
generate noises, in comparison with
a normal tyre.•When there is an impact on a
tyre, inspect the tyre condi-
tion or contact a HYUNDAI
authorised repairer.
•Inspect the tyre condition and
pressure every 1,800 miles
(3,000 km) to prevent tyre
damage.
•It is difficult to recognise a tyre
damage only with your eyes.
When there is a slight hint of a
tyre damage, check and
replace the tyre to prevent the
damage caused by air leakage.
•When a tyre is damaged
whilst driving on a rough
road, off a road, or over obsta-
cles, such as a pothole, man-
hole, or kerb stone, your war-
ranty does not cover the dam-
age.
•The tyre information is speci-
fied on the tyre side wall.
The temperature grade for this
tyre is established for a tyre that
is properly inflated and not
overloaded. Excessive speed,
under-inflation, over-inflation,
or excessive loading, either
separately or in combination,
can cause heat build-up and
possible sudden tyre failure.
This may cause loss of vehicle
control resulting in an accident.
WARNING
The side wall of a low aspect
ratio tyre is shorter than the
normal one. Thus, the low-
aspect wheel and tyre are easily
damaged. Follow the below
instructions.
•When driving on a rough road
or driving off a road, be care-
ful not to damage the tyres
and wheels. After driving,
inspect the tyres and wheels.
•When passing over a pothole,
speed bump, manhole, or kerb
stone, slowly drive the vehicle
not to damage the tyres and
wheels.
CAUTION
Page 444 of 497
7-37
7
Maintenance
FUSES
A vehicle’s electrical system is pro-
tected from electrical overload dam-
age by fuses.
This vehicle has 2 (or 3) fuse panels,
one located in the driver’s side panel
bolster, the other in the engine com-
partment.
If any of your vehicle’s lights, acces-
sories, or controls do not work, check
the appropriate circuit fuse. If a fuse
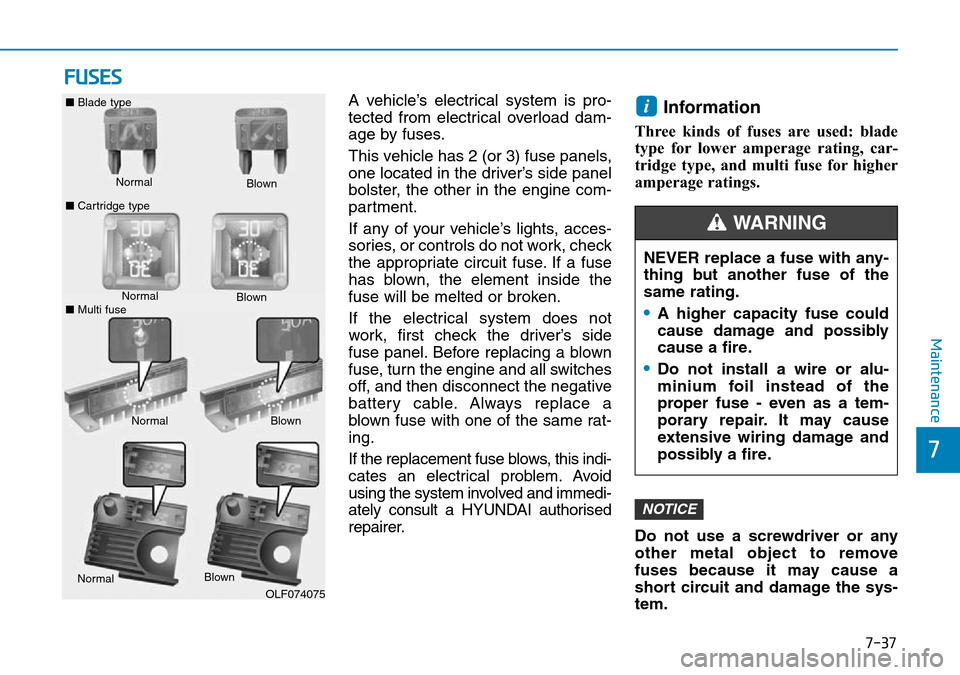
has blown, the element inside the
fuse will be melted or broken.
If the electrical system does not
work, first check the driver’s side
fuse panel. Before replacing a blown
fuse, turn the engine and all switches
off, and then disconnect the negative
battery cable. Always replace a
blown fuse with one of the same rat-
ing.
If the replacement fuse blows, this indi-
cates an electrical problem. Avoid
using the system involved and immedi-
ately consult a HYUNDAI authorised
repairer.Information
Three kinds of fuses are used: blade
type for lower amperage rating, car-
tridge type, and multi fuse for higher
amperage ratings.
Do not use a screwdriver or any
other metal object to remove
fuses because it may cause a
short circuit and damage the sys-
tem.
NOTICE
i
Normal
■
Blade type
■ Cartridge type Blown
Normal Blown
Normal Blown
OLF074075
NEVER replace a fuse with any-
thing but another fuse of the
same rating.
•A higher capacity fuse could
cause damage and possibly
cause a fire.
•Do not install a wire or alu-
minium foil instead of the
proper fuse - even as a tem-
porary repair. It may cause
extensive wiring damage and
possibly a fire.
WARNING
Normal Blown
■ Multi fuse
Page 445 of 497
7-38
Maintenance
Instrument panel fuse replace-
ment
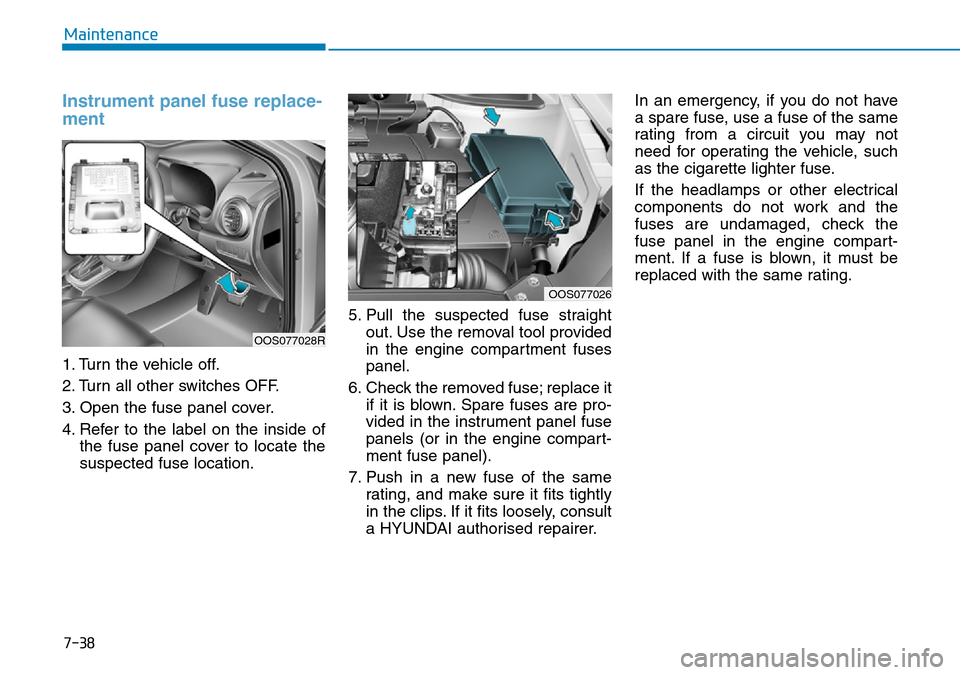
1. Turn the vehicle off.
2. Turn all other switches OFF.
3. Open the fuse panel cover.
4. Refer to the label on the inside ofthe fuse panel cover to locate the
suspected fuse location. 5. Pull the suspected fuse straight
out. Use the removal tool provided
in the engine compartment fuses
panel.
6. Check the removed fuse; replace it if it is blown. Spare fuses are pro-
vided in the instrument panel fuse
panels (or in the engine compart-
ment fuse panel).
7. Push in a new fuse of the same rating, and make sure it fits tightly
in the clips. If it fits loosely, consult
a HYUNDAI authorised repairer. In an emergency, if you do not have
a spare fuse, use a fuse of the same
rating from a circuit you may not
need for operating the vehicle, such
as the cigarette lighter fuse.
If the headlamps or other electrical
components do not work and the
fuses are undamaged, check the
fuse panel in the engine compart-
ment. If a fuse is blown, it must be
replaced with the same rating.
OOS077028R
OOS077026
Page 461 of 497
7-54
Maintenance
LIGHT BULBS
Consult a HYUNDAI authorised
repairer to replace most vehicle light
bulbs. It is difficult to replace vehicle
light bulbs because other parts of the
vehicle must be removed before you
can get to the bulb. This is especially
true for removing the headlamp
assembly to get to the bulb(s).
Removing/installing the headlamp
assembly can result in damage to
the vehicle.Be sure to replace the burned-out
bulb with one of the same wattage
rating. Otherwise, it may cause
damage to the fuse or electrical
wiring system.
Information
After heavy driving rain or washing,
headlamp and tail lamp lenses could
appear frosty. This condition is caused
by the temperature difference between
the lamp inside and outside. This is
similar to the condensation on your
windows inside your vehicle when
raining and doesn’t indicate a problem
with your vehicle. If the water leaks
into the lamp bulb circuitry, we rec-
ommend that the system be checked
by a HYUNDAI authorised repairer.
Information
The headlamp aiming should be adjust-
ed after an accident or after the head-
lamp assembly is reinstalled at a
HYUNDAI authorised repairer.
Information - Traffic Change
The low beam light distribution is
asymmetric. If you go abroad to a coun-
try with opposite traffic direction, this
asymmetric part will dazzle oncoming
car driver. To prevent dazzle, ECE reg-
ulation demand several technical solu-
tions (ex. automatic change system,
adhesive sheet, down aiming). These
headlamps are designed not to dazzle
opposite drivers. So, you need not
change your headlamps in a country
with opposite traffic direction.i
i
i
NOTICE
Prior to working on a light, firmly
apply the parking brake, ensure
that the ignition switch is in the
LOCK/OFF position and turn off
the lights to avoid sudden move-
ment of the vehicle and burning
your fingers or receiving an elec-
tric shock.
WARNING
Page 462 of 497
7-55
7
Maintenance
Headlamp, Low beam assist –
Static, position lamp, turn sig-
nal lamp and daytime running
light bulb replacement
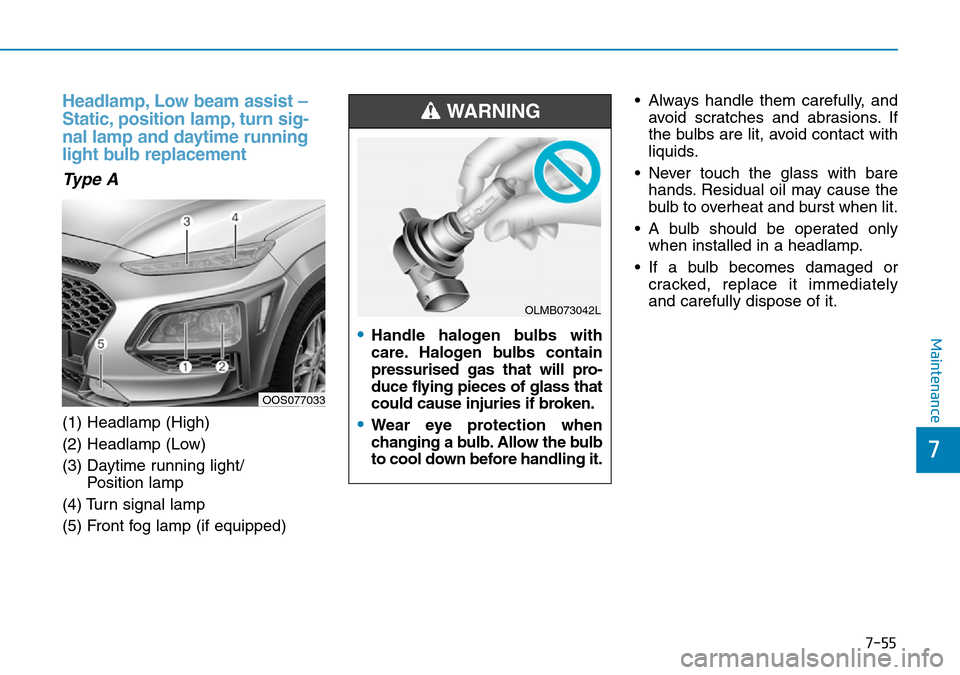
Type A
(1) Headlamp (High)
(2) Headlamp (Low)
(3) Daytime running light/ Position lamp
(4) Turn signal lamp
(5) Front fog lamp (if equipped) • Always handle them carefully, and
avoid scratches and abrasions. If
the bulbs are lit, avoid contact with
liquids.
• Never touch the glass with bare hands. Residual oil may cause the
bulb to overheat and burst when lit.
• A bulb should be operated only when installed in a headlamp.
• If a bulb becomes damaged or cracked, replace it immediately
and carefully dispose of it.
OOS077033
•Handle halogen bulbs with
care. Halogen bulbs contain
pressurised gas that will pro-
duce flying pieces of glass that
could cause injuries if broken.
•Wear eye protection when
changing a bulb. Allow the bulb
to cool down before handling it.
WARNING
OLMB073042L
Page 463 of 497
![Hyundai Kona 2018 Owners Manual - RHD (UK, Australia) 7-56
Maintenance
[1] : High beam, [2] : Low beam
Headlamp and position lamp
1. Open the bonnet.
2. Disconnect the negative batterycable.
3. Remove the bulb cover by turning it counterclockwise.
4. Dis Hyundai Kona 2018 Owners Manual - RHD (UK, Australia) 7-56
Maintenance
[1] : High beam, [2] : Low beam
Headlamp and position lamp
1. Open the bonnet.
2. Disconnect the negative batterycable.
3. Remove the bulb cover by turning it counterclockwise.
4. Dis](/manual-img/35/16232/w960_16232-462.png)
7-56
Maintenance
[1] : High beam, [2] : Low beam
Headlamp and position lamp
1. Open the bonnet.
2. Disconnect the negative batterycable.
3. Remove the bulb cover by turning it counterclockwise.
4. Disconnect the bulb socket-con- nector. (for low beam and high
beam)
5. Remove the bulb from the head- lamp assembly.
6. Install a new bulb.
7. Connect the bulb socket-connec- tor. (for low beam and high beam)
8. Install the bulb cover by turning it clockwise.
Turn signal lamp
1. Open the bonnet.
2. Disconnect the negative batterycable.
3. Remove the socket (1) from the assembly by turning the socket
counterclockwise until the tabs on
the socket align with the slots on
the assembly.
4. Remove the bulb from the socket by pressing it in and rotating it
counterclockwise until the tabs on
the bulb align with the slots in the
socket. Pull the bulb out of the
socket. 5. Insert a new bulb by inserting it
into the socket and rotating it until
it locks into place.
6. Install the socket in the assembly by aligning the tabs on the socket
with the slots in the assembly.
7. Push the socket into the assembly and turn the socket clockwise.
Daytime running light
If the LED lamp does not operate, we
recommend you to have the vehicle
checked by a HYUNDAI authorised
repairer.OOS077038OOS077034
Page 464 of 497
7-57
7
Maintenance
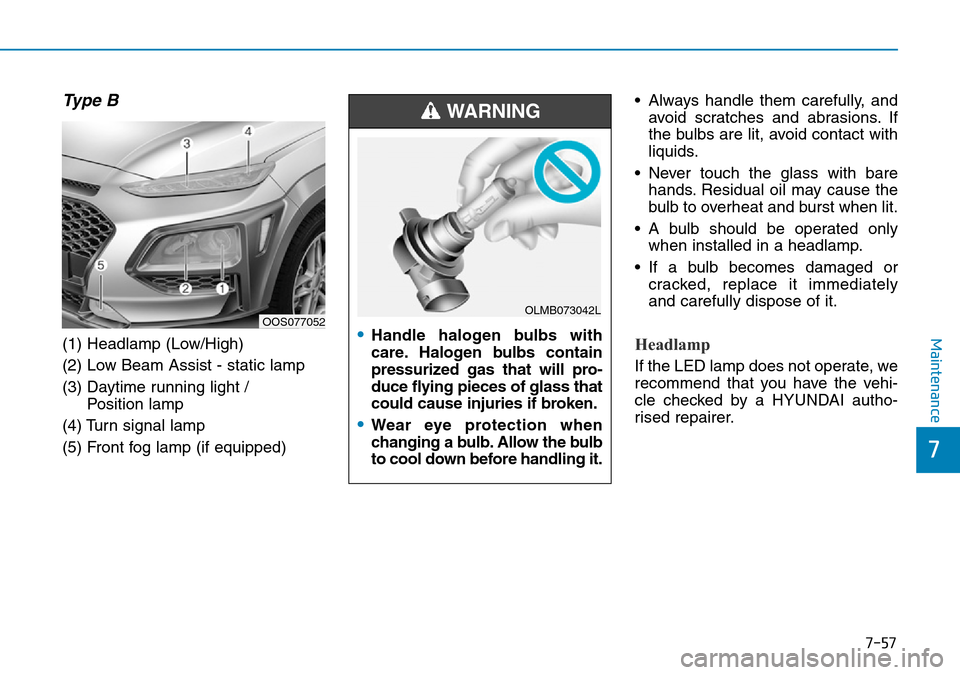
Type B
(1) Headlamp (Low/High)
(2) Low Beam Assist - static lamp
(3) Daytime running light / Position lamp
(4) Turn signal lamp
(5) Front fog lamp (if equipped) • Always handle them carefully, and
avoid scratches and abrasions. If
the bulbs are lit, avoid contact with
liquids.
• Never touch the glass with bare hands. Residual oil may cause the
bulb to overheat and burst when lit.
• A bulb should be operated only when installed in a headlamp.
• If a bulb becomes damaged or cracked, replace it immediately
and carefully dispose of it.Headlamp
If the LED lamp does not operate, we
recommend that you have the vehi-
cle checked by a HYUNDAI autho-
rised repairer.
OOS077052•Handle halogen bulbs with
care. Halogen bulbs contain
pressurized gas that will pro-
duce flying pieces of glass that
could cause injuries if broken.
•Wear eye protection when
changing a bulb. Allow the bulb
to cool down before handling it.
WARNING
OLMB073042L