Page 179 of 534

3-94
Convenient features of your vehicle
Range
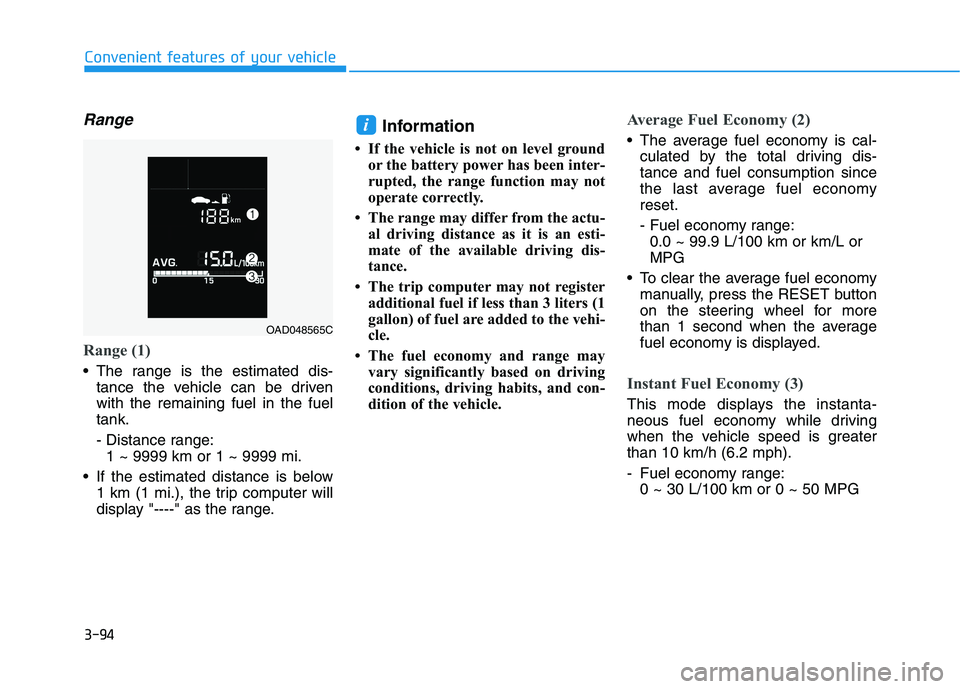
Range (1)
The range is the estimated dis-tance the vehicle can be driven with the remaining fuel in the fueltank.
- Distance range:1 ~ 9999 km or 1 ~ 9999 mi.
If the estimated distance is below 1 km (1 mi.), the trip computer will
display "----" as the range. Information
If the vehicle is not on level ground or the battery power has been inter-
rupted, the range function may not
operate correctly.
The range may differ from the actu- al driving distance as it is an esti-
mate of the available driving dis-
tance.
The trip computer may not register additional fuel if less than 3 liters (1
gallon) of fuel are added to the vehi-
cle.
The fuel economy and range may vary significantly based on driving
conditions, driving habits, and con-
dition of the vehicle.
Average Fuel Economy (2)
The average fuel economy is cal-culated by the total driving dis- tance and fuel consumption since
the last average fuel economyreset.
- Fuel economy range:0.0 ~ 99.9 L/100 km or km/L or MPG
To clear the average fuel economy manually, press the RESET button
on the steering wheel for more
than 1 second when the average
fuel economy is displayed.
Instant Fuel Economy (3)
This mode displays the instanta-
neous fuel economy while driving
when the vehicle speed is greaterthan 10 km/h (6.2 mph).
- Fuel economy range:0 ~ 30 L/100 km or 0 ~ 50 MPG
i
OAD048565C
Page 182 of 534
3-97
Convenient features of your vehicle
3
Supervision Cluster
The trip computer is a microcomput-
er-controlled driver information sys-
tem that displays information related
to driving.Information
Some driving information stored in
the trip computer (for example
Average Vehicle Speed) resets if the
battery is disconnected.
Trip modes
To change the trip mode, toggle the
UP/DOWN arrow switch " ▲ , ▼ " on
the steering wheel.
i
Accumulated Info
Drive Info
Fuel Economy
Digital Speedometer
Smart Shift
OAD048580N
■
Type A
■Type B
Page 269 of 534

5-28
Driving your vehicle
Always come to a complete stopbefore shifting into D (Drive) or
R (Reverse).
Do not put the shift lever in N (Neutral) while driving.
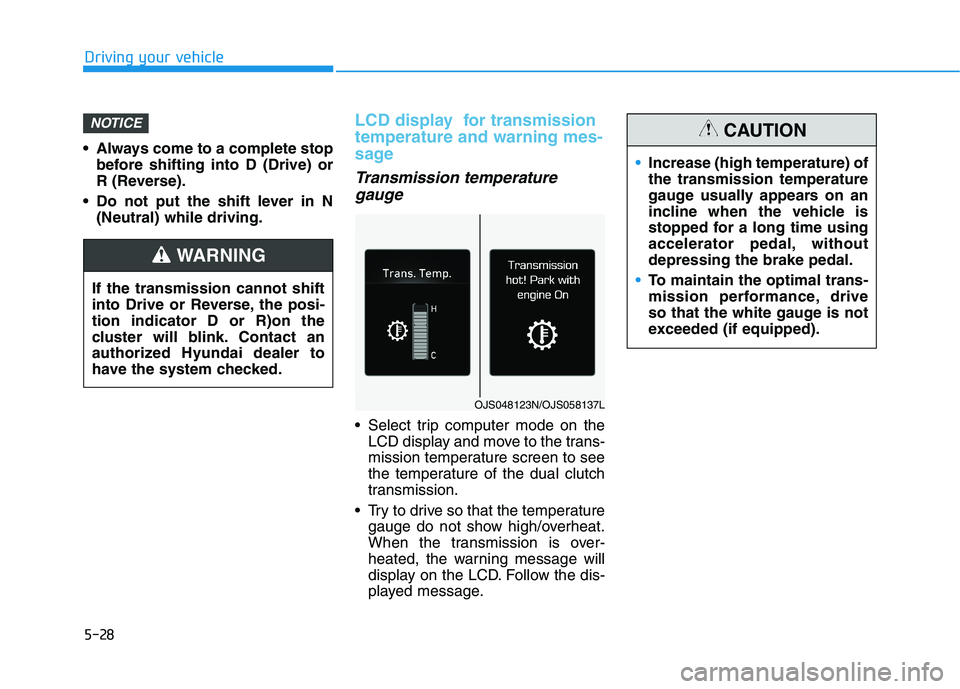
LCD display for transmission temperature and warning mes-
sage
Transmission temperature
gauge
Select trip computer mode on the LCD display and move to the trans-
mission temperature screen to see
the temperature of the dual clutch
transmission.
Try to drive so that the temperature gauge do not show high/overheat.
When the transmission is over-
heated, the warning message will
display on the LCD. Follow the dis-
played message.
NOTICE
If the transmission cannot shift
into Drive or Reverse, the posi-tion indicator D or R)on the
cluster will blink. Contact an
authorized Hyundai dealer to
have the system checked.
WARNING
OJS048123N/OJS058137L
Increase (high temperature) of the transmission temperature
gauge usually appears on an
incline when the vehicle is
stopped for a long time using
accelerator pedal, withoutdepressing the brake pedal.
To maintain the optimal trans-
mission performance, drive
so that the white gauge is not
exceeded (if equipped).
CAUTION
Page 462 of 534

7-37
7
Maintenance
By jump starting
After a jump start from a good bat-
tery, drive the vehicle for 20-30 min-
utes before it is shutoff. The vehicle
may not restart if you shut it off
before the battery had a chance to
adequately recharge. See "Jump
Starting" in chapter 6 for more infor-
mation on jump starting procedures.Information An inappropriately disposedbattery can be harmful to
the environment and human
health.
Dispose the battery accord- ing to your local law(s) or
regulation.
Reset Features
The following items may need to be
reset after the battery has been dis-
charged or the battery has been dis-connected.
Power Windows
Trip Computer
Climate Control System
Clock
Audio System
Sunroof
i
Watch the battery during
charging, and stop or reduce
the charging rate if the battery
cells begin boiling violently.
The negative battery cable
must be removed first and
installed last when the battery
is disconnected. Disconnect
the battery charger in the fol-
lowing order:
(1) Turn off the battery charg- er main switch.
(2) Unhook the negative
clamp from the negative
battery terminal.
(3) Unhook the positive clamp from the positive batteryterminal.
Always use a genuine
HYUNDAI approved battery
when you replace the battery.
Page 533 of 534

I-10
Theft-Alarm System .......................................................3-19
Tire Specification and Pressure Label ............................8-11
Tires and Wheels .....................................................7-38, 8-5
All Season Tires .........................................................7-51
Check Tire Inflation Pressure .....................................7-40
Low Aspect Ratio Tires ..............................................7-52
Radial-Ply Tires ..........................................................7-51
Recommended Cold Tire Inflation Pressures.............7-39
Snow Tires ..................................................................7-51
Summer Tires .............................................................7-51
Tire Care .....................................................................7-38
Tire Maintenance ........................................................7-44
Tire Replacement........................................................7-42
Tire Rotation...............................................................7-41
Tire Sidewall Labeling ...............................................7-44
Tire Terminology and Definitions ..............................7-48
Tire Traction ...............................................................7-43
Wheel Alignment and Tire Balance ...........................7-42
Wheel Replacement....................................................7-43
Towing ............................................................................6-30
Dinghy towing ............................................................6-31
Emergency towing......................................................6-32
Removable Towing Hook...........................................6-32
Towing service ...........................................................6-30 Trailer Towing...............................................................5-148
Trip Computer .................................................................3-93
Conventional Cluster ..................................................3-93
Supervision Cluster ....................................................3-97
Trunk ...............................................................................3-46
Turn Signal Lamp Replacement .....................................7-65
USB Charger .................................................................3-151
User Settings Mode.........................................................3-86
Vehicle Certification Label .............................................8-10
Vehicle Identification Number (VIN) .............................8-10
Vehicle Load Limit .......................................................5-142 Tire Loading Information Label...............................5-143
Vehicle Stability Management (VSM)............................5-49
Volume and Weight ...........................................................8-6
Index
T
U
V