2018 HYUNDAI ELANTRA SPORT change time
[x] Cancel search: change timePage 1 of 534

OOWW NNEERR ''SS MM AANN UU AALL
OOppeerraa ttiioo nn
M
M aaiinn ttee nn aann ccee
S
S ppeecciiff iicc aa ttiioo nnss
All information in this Owner's Manual is current at the time of publi-
cation. However, HYUNDAI Auto Canada Corp. reserves the right to
make changes at any time so that our policy of continual product
improvement may be carried out.
This manual applies to all HYUNDAI models and includes descriptions
and explanations of optional as well as standard equipment. As a
result, you may find material in this manual that does not apply to your
specific vehicle.
* Trademarks and tradenames owned in Canada by HYUNDAI Auto Canada Corp. which carries on business as HYUNDAI Auto Canada.
Page 27 of 534
2-9
Safety system of your vehicle
2
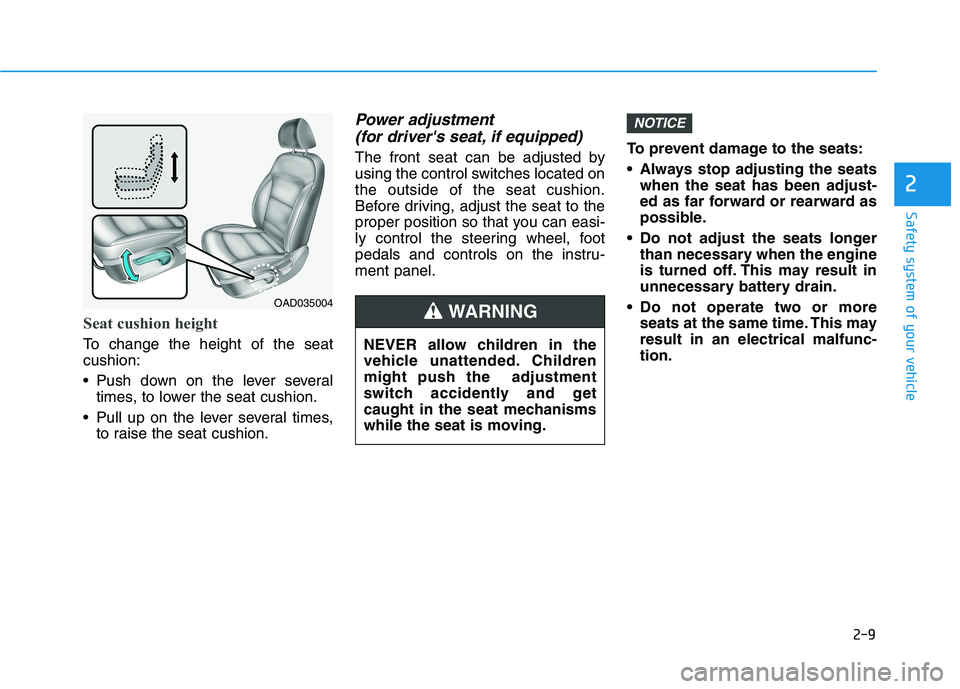
Seat cushion height
To change the height of the seat cushion:
Push down on the lever severaltimes, to lower the seat cushion.
Pull up on the lever several times, to raise the seat cushion.
Power adjustment
(for driver's seat, if equipped)
The front seat can be adjusted by
using the control switches located onthe outside of the seat cushion.
Before driving, adjust the seat to the
proper position so that you can easi-
ly control the steering wheel, foot
pedals and controls on the instru-ment panel. To prevent damage to the seats:
Always stop adjusting the seats
when the seat has been adjust-
ed as far forward or rearward as
possible.
Do not adjust the seats longer than necessary when the engine
is turned off. This may result in
unnecessary battery drain.
Do not operate two or more seats at the same time. This mayresult in an electrical malfunc-tion.
NOTICE
OAD035004
NEVER allow children in the
vehicle unattended. Childrenmight push the adjustment
switch accidently and get
caught in the seat mechanisms
while the seat is moving.WARNING
Page 37 of 534
2-19
Safety system of your vehicle
2
Seat Warmers
Front seat warmers (if equipped)
Seat warmers are provided to warm
the seats during cold weather.
To prevent damage to the seat
warmers and seats:
Never use a solvent such aspaint thinner, benzene, alcohol
or gasoline to clean the seats.
Do not place heavy or sharp objects on seats equipped with
seat warmers.
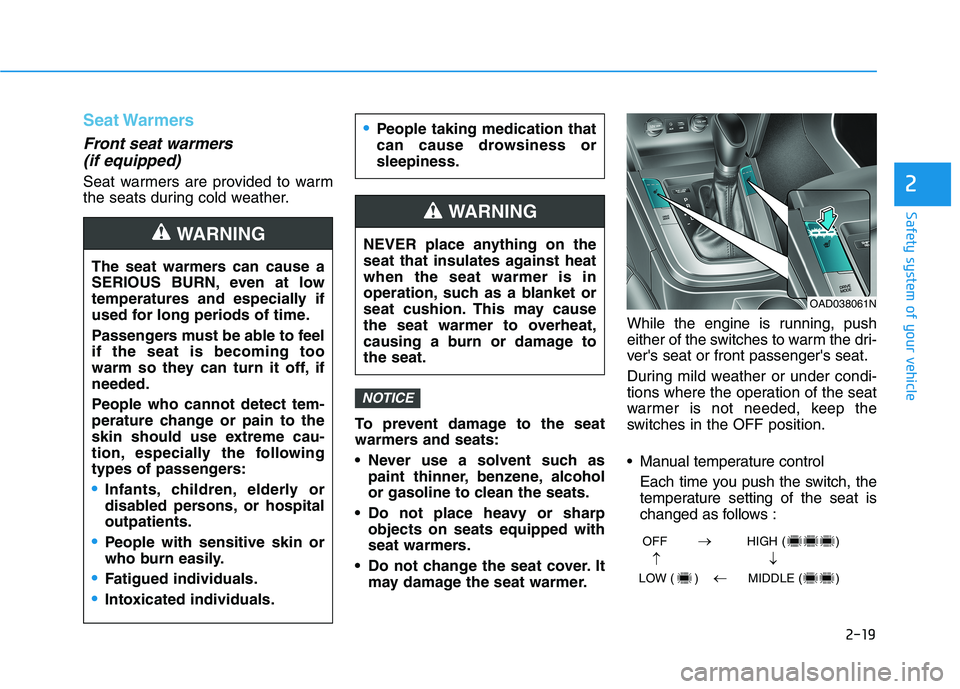
Do not change the seat cover. It may damage the seat warmer. While the engine is running, push
either of the switches to warm the dri-
ver's seat or front passenger's seat.
During mild weather or under condi-
tions where the operation of the seat
warmer is not needed, keep the
switches in the OFF position.
Manual temperature control
Each time you push the switch, thetemperature setting of the seat is
changed as follows :
NOTICE
The seat warmers can cause a
SERIOUS BURN, even at low
temperatures and especially if
used for long periods of time.
Passengers must be able to feel if the seat is becoming too
warm so they can turn it off, ifneeded.
People who cannot detect tem-
perature change or pain to the
skin should use extreme cau-
tion, especially the following
types of passengers:
Infants, children, elderly or
disabled persons, or hospitaloutpatients.
People with sensitive skin or
who burn easily.
Fatigued individuals.
Intoxicated individuals.
People taking medication that
can cause drowsiness orsleepiness.
WARNING NEVER place anything on the
seat that insulates against heatwhen the seat warmer is in
operation, such as a blanket or
seat cushion. This may cause
the seat warmer to overheat,
causing a burn or damage tothe seat.
WARNING
OAD038061N
OFF HIGH ( )
LOW ( ) MIDDLE ( )
��
�
�
Page 38 of 534
2-20
Safety system of your vehicle
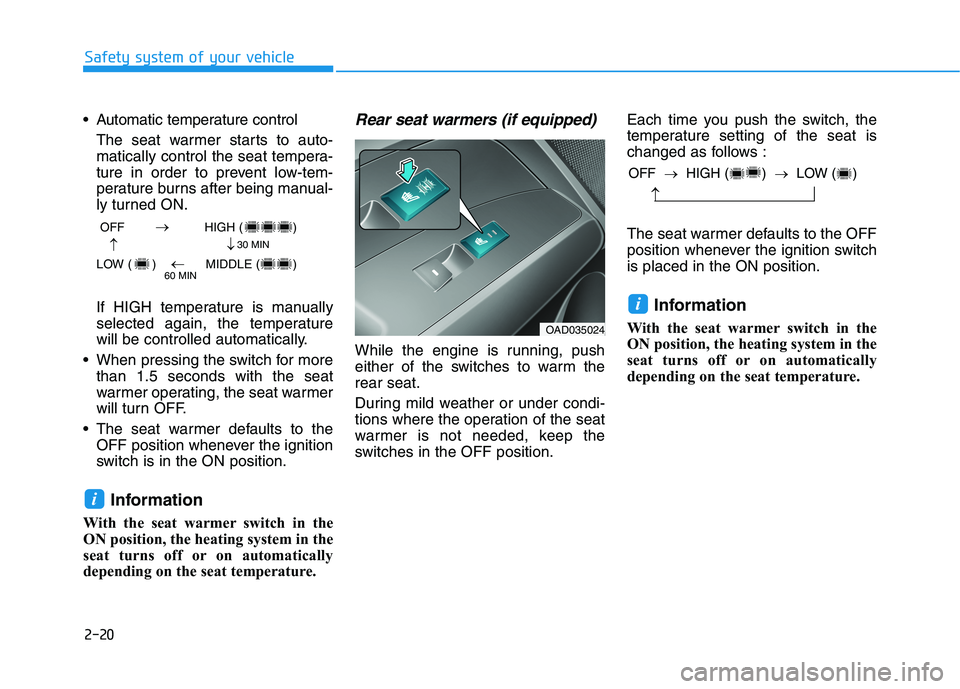
Automatic temperature controlThe seat warmer starts to auto-matically control the seat tempera-
ture in order to prevent low-tem-
perature burns after being manual-
ly turned ON.
If HIGH temperature is manually selected again, the temperature
will be controlled automatically.
When pressing the switch for more than 1.5 seconds with the seat
warmer operating, the seat warmer
will turn OFF.
The seat warmer defaults to the OFF position whenever the ignition
switch is in the ON position.
Information
With the seat warmer switch in the
ON position, the heating system in the
seat turns off or on automatically
depending on the seat temperature.Rear seat warmers (if equipped)
While the engine is running, push
either of the switches to warm therear seat.
During mild weather or under condi-
tions where the operation of the seat
warmer is not needed, keep the
switches in the OFF position. Each time you push the switch, the
temperature setting of the seat is
changed as follows :
The seat warmer defaults to the OFF
position whenever the ignition switchis placed in the ON position.
Information
With the seat warmer switch in the
ON position, the heating system in the
seat turns off or on automatically
depending on the seat temperature.
i
i
OFF HIGH ( )
LOW ( ) MIDDLE ( )
��
�
� 30 MIN
60 MIN
OAD035024 OFF
�HIGH ( ) �LOW ( )
�
Page 97 of 534
3-12Information
This device complies with Industry
Canada RSS-210 standard.
Operation is subject to the following
three conditions:
1. This device may not cause harmful interference.
2. This device must accept any inter- ference received, including interfer-
ence that may cause undesired
operation.
3. Changes or modifications not expressly approved by the party
responsible for compliance could
void the user's authority to operate
the device.
"Limp Home" Mode and Related
Procedures
If the immobilizer warning indicator
blinks for five seconds when the igni-
tion key is turned to the "ON" posi-
tion, this indicates the immobilizer
system requires service. The engine
cannot be started without using the
procedure below.
The following procedure describes
how to start the engine using thelimp home function (0, 1, 2, 3 as a
sample password).
You can get a limp home pass-
word when the vehicle is first
delivered to you. If you do not
have a password, consult your
authorized HYUNDAI dealer. 1. To activate the password, turn the
ignition key "ON" and "OFF"
according to the digit numbers.
The immobilizer indicator will blink
along with the operation of the
ignition key. For example, turn the
ignition key once for digit number
"1", and twice for "2", and so on.
For the digit number "0", you must
cycle the ignition key 10 times.
2. Wait for 3~10 seconds.
3. You may set the remaining num- ber of digits by following steps 1 and 2.
4. If all of the four password digits have been successfully entered,
turn the ignition key "ON" and
check that the immobilizer indica-
tor illuminates. From this time, you
have to start your engine within 30
seconds. If you try to start your
engine after 30 seconds, your
engine will not start.
NOTICE
i
Convenient features of your vehicle
Page 99 of 534
3-14
Convenient features of your vehicle
Operating Door Locks from
Outside the Vehicle
Mechanical key
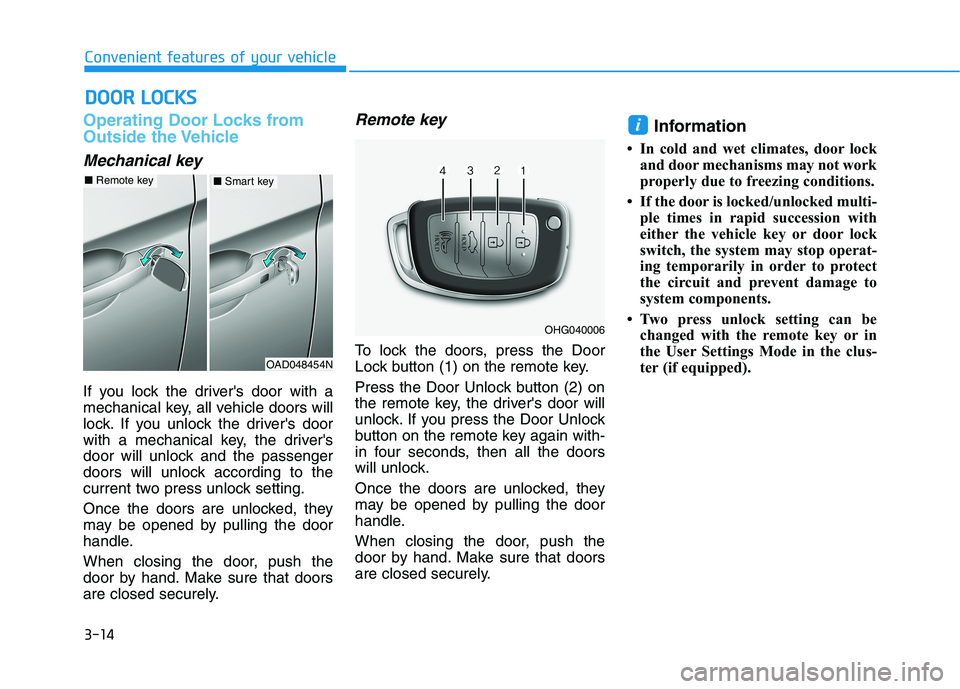
If you lock the driver's door with a
mechanical key, all vehicle doors will
lock. If you unlock the driver's door
with a mechanical key, the driver's
door will unlock and the passenger
doors will unlock according to the
current two press unlock setting.
Once the doors are unlocked, they
may be opened by pulling the door
handle.
When closing the door, push the
door by hand. Make sure that doors
are closed securely.
Remote key
To lock the doors, press the Door
Lock button (1) on the remote key.
Press the Door Unlock button (2) on
the remote key, the driver's door will
unlock. If you press the Door Unlock
button on the remote key again with-
in four seconds, then all the doors
will unlock.
Once the doors are unlocked, they
may be opened by pulling the door
handle.
When closing the door, push the
door by hand. Make sure that doors
are closed securely.Information
In cold and wet climates, door lock and door mechanisms may not work
properly due to freezing conditions.
If the door is locked/unlocked multi- ple times in rapid succession with
either the vehicle key or door lock
switch, the system may stop operat-
ing temporarily in order to protect
the circuit and prevent damage to
system components.
Two press unlock setting can be changed with the remote key or in
the User Settings Mode in the clus-
ter (if equipped).
i
DDOO OORR LL OO CCKK SS
OAD048454N
■Remote key■ Smart key
OHG040006
Page 100 of 534
3-15
Convenient features of your vehicle
3
Smart key
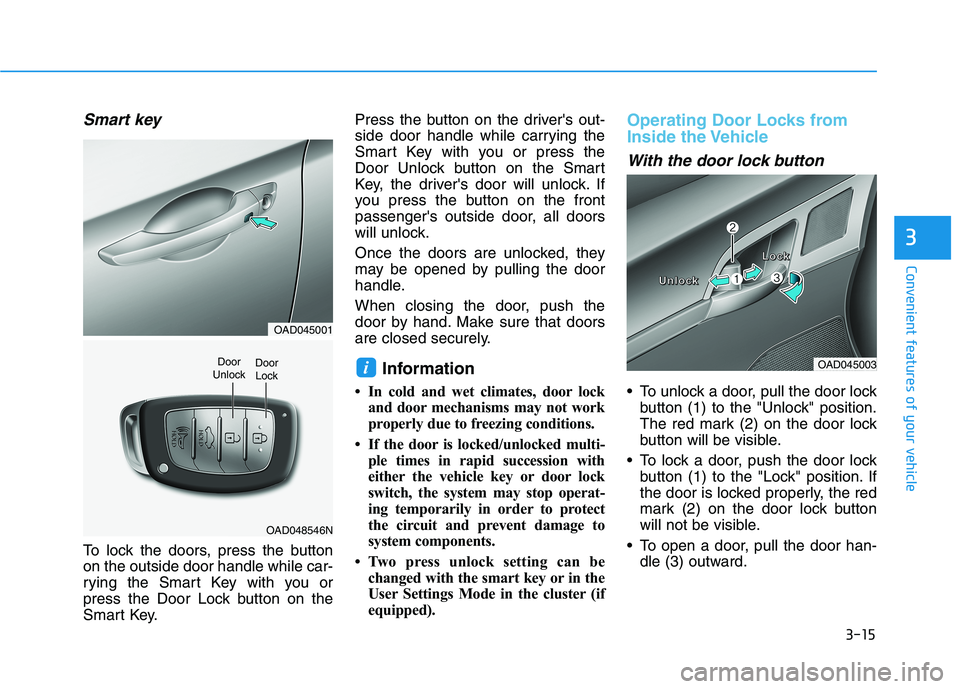
To lock the doors, press the button on the outside door handle while car-
rying the Smart Key with you or
press the Door Lock button on the
Smart Key.Press the button on the driver's out-
side door handle while carrying the
Smart Key with you or press the
Door Unlock button on the Smart
Key, the driver's door will unlock. If
you press the button on the front
passenger's outside door, all doors
will unlock.
Once the doors are unlocked, they
may be opened by pulling the door
handle.
When closing the door, push the
door by hand. Make sure that doors
are closed securely.
Information
In cold and wet climates, door lock and door mechanisms may not work
properly due to freezing conditions.
If the door is locked/unlocked multi- ple times in rapid succession with
either the vehicle key or door lock
switch, the system may stop operat-
ing temporarily in order to protect
the circuit and prevent damage to
system components.
Two press unlock setting can be changed with the smart key or in the
User Settings Mode in the cluster (if
equipped).
Operating Door Locks from
Inside the Vehicle
With the door lock button
To unlock a door, pull the door lockbutton (1) to the "Unlock" position.
The red mark (2) on the door lock
button will be visible.
To lock a door, push the door lock button (1) to the "Lock" position. If
the door is locked properly, the red
mark (2) on the door lock button
will not be visible.
To open a door, pull the door han- dle (3) outward.
iOAD045003
UUUUnnnnlllloooocccckkkk
LLLLoooocccckkkk
OAD045001
OAD048546N
Door
UnlockDoor Lock
Page 109 of 534
3-24
Convenient features of your vehicle
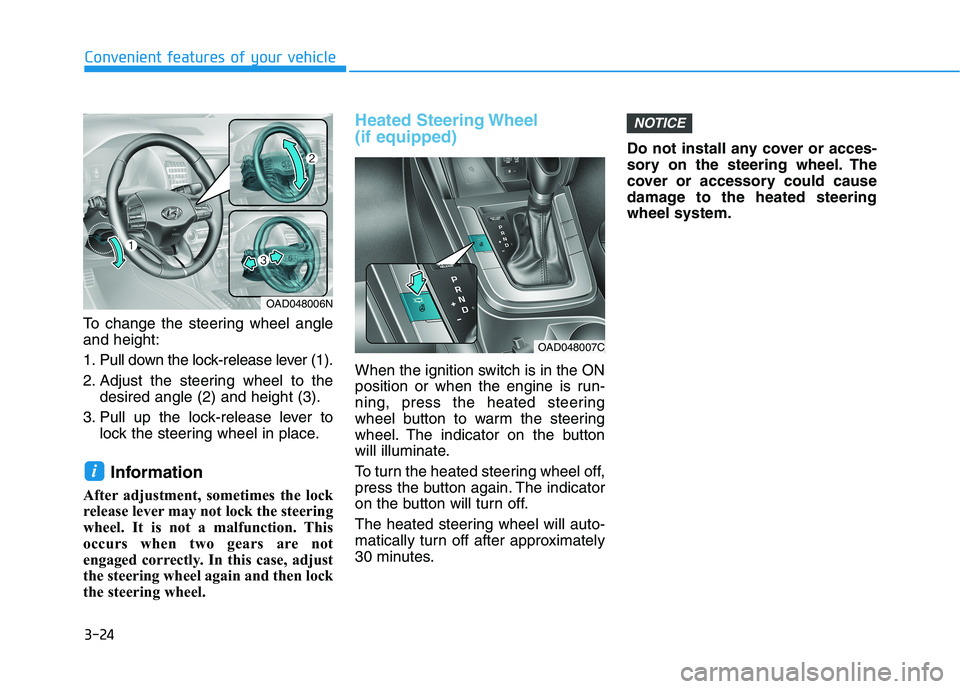
To change the steering wheel angle and height:
1. Pull down the lock-release lever (1).
2. Adjust the steering wheel to thedesired angle (2) and height (3).
3. Pull up the lock-release lever to lock the steering wheel in place.
Information
After adjustment, sometimes the lock
release lever may not lock the steering
wheel. It is not a malfunction. This
occurs when two gears are not
engaged correctly. In this case, adjust
the steering wheel again and then lock
the steering wheel.
Heated Steering Wheel (if equipped)
When the ignition switch is in the ON
position or when the engine is run-
ning, press the heated steering
wheel button to warm the steering
wheel. The indicator on the button
will illuminate.
To turn the heated steering wheel off,
press the button again. The indicator
on the button will turn off.
The heated steering wheel will auto-
matically turn off after approximately
30 minutes. Do not install any cover or acces-
sory on the steering wheel. The
cover or accessory could cause
damage to the heated steeringwheel system.
NOTICE
i
OAD048006N
OAD048007C