2018 Hyundai Elantra tow
[x] Cancel search: towPage 28 of 526

2-11
Safety system of your vehicle
2
4. Fold the seatback toward the front ofthe vehicle.
5. To use the rear seat, lift and unfold the seatback to the upright position. Push
the seatback firmly until it clicks into
place. Make sure the seatback is
locked in place.
When you return the seatback to its upright position, always be sure it has
locked into position by pushing on the
top of the seatback.
OAD035022
Do not place objects in the rear
seats, since they cannot be proper-
ly secured and may hit vehicle
occupants in a collision causing
serious injury or death.
WARNING
When returning the rear seatback
from a folded to an upright posi-
tion, hold the seatback and return it
slowly. Ensure that the seatback is
completely locked into its upright
position by pushing on the top of
the seatback. In an accident or sud-
den stop, the unlocked seatback
could allow cargo to move forward
with great force and enter the pas-
senger compartment, which could
result in serious injury or death.
WARNING
Make sure the engine is off, the
shift lever is in P (Park), and the
parking brake is securely applied
whenever loading or unloading
cargo. Failure to take these steps
may allow the vehicle to move if the
shift lever is inadvertently moved to
another position.
WARNING
Page 31 of 526

2-14
Safety system of your vehicle
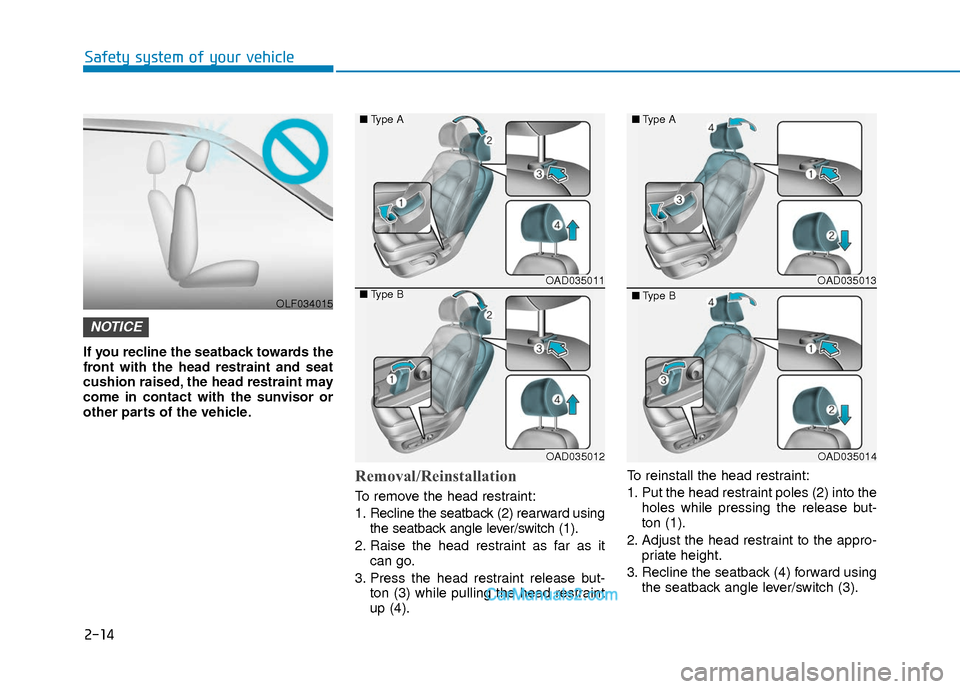
If you recline the seatback towards the
front with the head restraint and seat
cushion raised, the head restraint may
come in contact with the sunvisor or
other parts of the vehicle.
Removal/Reinstallation
To remove the head restraint:
1. Recline the seatback (2) rearward usingthe seatback angle lever/switch (1).
2. Raise the head restraint as far as it can go.
3. Press the head restraint release but- ton (3) while pulling the head restraint
up (4). To reinstall the head restraint:
1. Put the head restraint poles (2) into the
holes while pressing the release but-
ton (1).
2. Adjust the head restraint to the appro- priate height.
3. Recline the seatback (4) forward using the seatback angle lever/switch (3).
NOTICE
OLF034015
OAD035011
OAD035012
■Type A
■Type BOAD035013
OAD035014
■Type A
■Type B
Page 54 of 526

2-37
Safety system of your vehicle
2
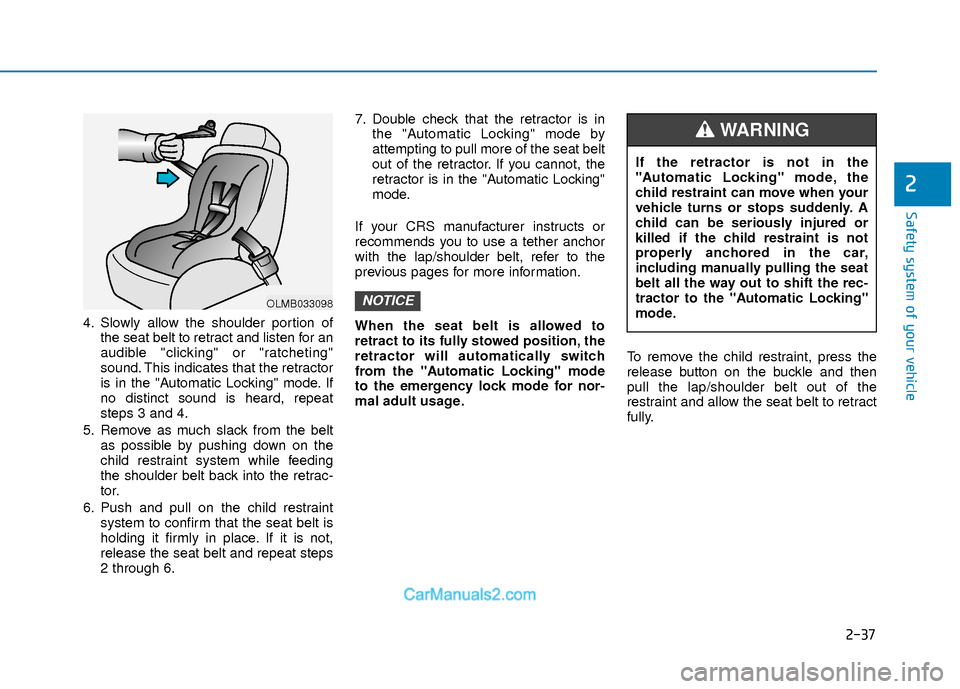
4. Slowly allow the shoulder portion ofthe seat belt to retract and listen for an
audible "clicking" or "ratcheting"
sound. This indicates that the retractor
is in the "Automatic Locking" mode. If
no distinct sound is heard, repeat
steps 3 and 4.
5. Remove as much slack from the belt as possible by pushing down on the
child restraint system while feeding
the shoulder belt back into the retrac-
tor.
6. Push and pull on the child restraint system to confirm that the seat belt is
holding it firmly in place. If it is not,
release the seat belt and repeat steps
2 through 6. 7. Double check that the retractor is in
the "Automatic Locking" mode by
attempting to pull more of the seat belt
out of the retractor. If you cannot, the
retractor is in the "Automatic Locking"
mode.
If your CRS manufacturer instructs or
recommends you to use a tether anchor
with the lap/shoulder belt, refer to the
previous pages for more information.
When the seat belt is allowed to
retract to its fully stowed position, the
retractor will automatically switch
from the "Automatic Locking" mode
to the emergency lock mode for nor-
mal adult usage. To remove the child restraint, press the
release button on the buckle and then
pull the lap/shoulder belt out of the
restraint and allow the seat belt to retract
fully.
NOTICEOLMB033098
If the retractor is not in the
"Automatic Locking" mode, the
child restraint can move when your
vehicle turns or stops suddenly. A
child can be seriously injured or
killed if the child restraint is not
properly anchored in the car,
including manually pulling the seat
belt all the way out to shift the rec-
tractor to the "Automatic Locking"
mode.
WARNING
Page 66 of 526

2-49
Safety system of your vehicle
2
Always be sure that you and all vehicle
occupants are seated properly and wear-
ing the seat belt properly for the most
effective protection by the air bag and the
seat belt.
The OCS may not function properly if the
passenger takes actions which can affect
the classification system. These include:
Failing to sit in an upright position.
Leaning against the door or centerconsole.
Sitting towards the sides of the front of the seat.
Putting their legs on the dashboard or resting them on other locations which
reduce the passenger weight on the
front seat.
Wearing the seat belt improperly.
Reclining the seatback.
Wearing a thick cloth like ski wear or hip protection wear.
Putting an additional thick cushion on the seat.
Putting electrical devices (e.g. note- book, satellite radio) on the seat with
inverter charging.Condition and operation in the front passenger Occupant Classification
System
Condition detected by the
occupant classification system
Indicator/Warning lightDevices
"PASSENGER
AIR BAG OFF" indicator lightSRS
warning lightFront passenger
air bag
1. Adult *1OffOffActivated
2. Infant *2or child restraint
system with 12 months old *3*4 OnOffDeactivated
3. Unoccupied OnOffDeactivated
4. Malfunction in the systemOffOnActivated
*1The system judges a person of adult size as an adult. When a smaller adult sits in the front
passenger seat, the system may recognize him/her as a child depending on his/her physique
and posture.
*
2Do not allow children to ride in the front passenger seat. When a larger child who has out- grown a child restraint system sits in the front passenger seat, the system may recognize
him/her as an adult depending upon his/her physique or sitting position.
*
3Never install a child restraint system on the front passenger seat.
*4The PASSENGER AIR BAG "OFF" indicator may turn on or off when a child above 12 months
to 12 years old (with or without child restraint system) sits in the front passenger seat. This is
a normal condition.
Page 67 of 526

2-50
Safety system of your vehicle
Riding in an improper position or placing weight on the front passenger’s seat when it is unoccupied by a passenger
adversely affects the OCS. To reduce the risk of serious injury or death:
WARNING
OVQ036013NB
OLMB033100
OLMB033101
OLMB033103
OLMB033102
OLMB033104
NEVER put a heavy load in
the front seat or seatback
pocket, or hang any items on
the front passenger seat.
NEVER place your feet on
the front passenger seat-
back.
NEVER sit with your hips
shifted towards the front of
the seat.
NEVER ride with the seat-
back reclined when the vehi-
cle is moving.
NEVER place your feet or
legs on the dashboard.
NEVER lean on the door or
center console or sit on one
side of the front passenger
seat.(Continued)
Page 70 of 526

2-53
Safety system of your vehicle
2
Why Didn't My Air Bag Go Off
in a Collision?
Air bags are not designed to inflate in
every collision. There are certain types of
accidents in which the air bag would not
be expected to provide additional protec-
tion. These include rear impacts, second
or third collisions in multiple impact acci-
dents, as well as low speed impacts.
Damage to the vehicle indicates a colli-
sion energy absorption, and is not an
indicator of whether or not an air bag
should have inflated.
Air bag collision sensors
NEVER place a rear-facing or
front-facing child restraint in the
front passenger’s seat of the
vehicle.
An inflating frontal air bag could
forcefully strike a child resulting
in serious injury or death.
Always properly restrain children
in an appropriate child restraint
in the rear seat of the vehicle.
WARNING
To reduce the risk of an air bag
deploying unexpectedly and caus-
ing serious injury or death:
Do not hit or allow any objects to
impact the locations where air
bags or sensors are installed.
Do not perform maintenance on
or around the air bag sensors. If
the location or angle of the sen-
sors is altered, the air bags may
deploy when they should not or
may not deploy when they
should.
Do not install bumper guards or
replace the bumper with a non-
genuine HYUNDAI parts. This
may adversely affect the collision
and air bag deployment perform-
ance.
Place the ignition switch in the
LOCK/OFF or ACC position when
the vehicle is being towed to pre-
vent inadvertent air bag deploy-
ment.
Have all air bag repairs conduct-
ed by an authorized HYUNDAI
dealer.
WARNING
Page 86 of 526

3-9
Convenient features of your vehicle
3
Loss of a smart key
A maximum of two Smart Keys can be
registered to a single vehicle. If you hap-
pen to lose your smart key, you should
immediately take the vehicle and remain-
ing keys to your authorized HYUNDAI
dealer or tow the vehicle, if necessary.
Smart key precautions
The smart key will not work if any of the
following occur:
The smart key is close to a radio trans-mitter such as a radio station or an air-
port which can interfere with normal
operation of the transmitter.
The smart key is near a mobile two way radio system or a cellular phone.
Another vehicle’s smart key is being operated close to your vehicle.
When the smart key does not work cor-
rectly, open and close the door with the
mechanical key. If you have a problem
with the smart key, contact an authorized
HYUNDAI dealer.
If the smart key is in close proximity to
your mobile phone, the signal could be
blocked by your mobile phones normal
operational signals. This is especially
important when the phone is active such
as making and receiving calls, text mes-
saging, and/or sending/receiving emails. Avoid placing the smart key and your
mobile phone in the same pants or jack-
et pocket and always try to maintain an
adequate distance between the two
devices.
Information
This device complies with Part 15 of the
FCC rules.
Operation is subject to the following three
conditions:
1. This device may not cause harmful
interference, and
2. This device must accept any interfer- ence received, including interference
that may cause undesired operation.
3. Changes or modifications not expressly approved by the party responsible for
compliance could void the user 's
authority to operate the device.
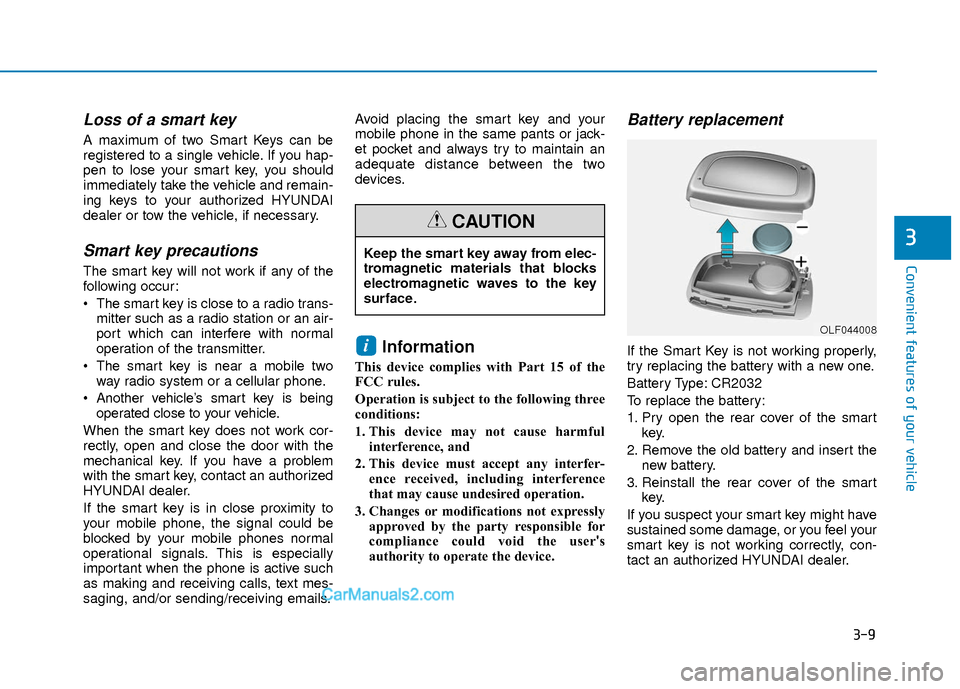
Battery replacement
If the Smart Key is not working properly,
try replacing the battery with a new one.
Battery Type: CR2032
To replace the battery:
1. Pry open the rear cover of the smart key.
2. Remove the old battery and insert the new battery.
3. Reinstall the rear cover of the smart key.
If you suspect your smart key might have
sustained some damage, or you feel your
smart key is not working correctly, con-
tact an authorized HYUNDAI dealer.i
Keep the smart key away from elec-
tromagnetic materials that blocks
electromagnetic waves to the key
surface.
CAUTION
OLF044008
Page 96 of 526

3-19
Convenient features of your vehicle
3
Tilt Steering/Telescope Steering
Adjust the steering wheel so it points
toward your chest, not toward your face.
Make sure you can see the instrument
cluster warning lights and gauges. After
adjusting, push the steering wheel both
up and down to be certain it is locked in
position. Always adjust the position of the
steering wheel before driving.To change the steering wheel angle and
height:
1. Pull down the lock-release lever (1).
2. Adjust the steering wheel to thedesired angle (2) and height (3).
3. Pull up the lock-release lever to lock the steering wheel in place.
Information
After adjustment, sometimes the lock
release lever may not lock the steering
wheel. It is not a malfunction. This occurs
when two gears are not engaged correctly.
In this case, adjust the steering wheel
again and then lock the steering wheel.
Horn
To sound the horn, press the area indi-
cated by the horn symbol on your steer-
ing wheel (see illustration). The horn will
operate only when this area is pressed.
Do not strike the horn severely to
operate it, or hit it with your fist. Do
not press on the horn with a sharp-
pointed object.
NOTICE
i
NEVER adjust the steering wheel
while driving. This may cause loss
of vehicle control resulting in an
accident.
WARNING OAD045006
OAD045008