2018 Hyundai Elantra clock
[x] Cancel search: clockPage 484 of 526

7-66
Maintenance
Headlamp (High, Halogen type)
Always handle them carefully, andavoid scratches and abrasions. If the
bulbs are lit, avoid contact with liquids.
Never touch the glass with bare hands. Residual oil may cause the bulb to
overheat and burst when lit.
A bulb should be operated only when installed in a headlamp.
If a bulb becomes damaged or cracked, replace it immediately and
carefully dispose of it.
1. Open the hood.
2. Disconnect the negative battery cable.
3. Remove the headlamp bulb cover byturning it counterclockwise.
4. Disconnect the headlamp bulb socket- connector.
5. Unsnap the headlamp bulb retaining wire by pressing the end and pushing
it upward.
6. Remove the bulb from the headlamp assembly.
7. Install a new headlamp bulb and snap the headlamp bulb retaining wire into
position by aligning the wire with the
groove on the bulb.
OLMB073042L
Handle halogen bulbs with care.
Halogen bulbs contain pressur-
ized gas that will produce flying
pieces of glass that could cause
injuries if broken.
Wear eye protection when chang-
ing a bulb. Allow the bulb to cool
down before handling it.
WARNING
OAD075079N
Page 485 of 526

7-67
7
Maintenance
8. Connect the headlamp bulb socket-connector.
9. Install the headlamp bulb cover by turning it clockwise.
Information
The headlamp aiming should be adjusted
after an accident or after the headlamp
assembly is reinstalled at an authorized
HYUNDAI dealer.
Turn signal lamp
1. Open the hood.
2. Disconnect the negative battery cable.
3. Remove the socket from the assemblyby turning the socket counterclock-
wise until the tabs on the socket align
with the slots on the assembly.
4. Remove the bulb from the socket by pressing it in and rotating it counter-
clockwise until the tabs on the bulb
align with the slots in the socket. Pull
the bulb out of the socket.
5. Install a new bulb by inserting it into the socket and rotating it until it locks
into place. 6. Install the socket in the assembly by
aligning the tabs on the socket with
the slots in the assembly.
7. Push the socket into the assembly and turn the socket clockwise.
i
OAD075033
Page 486 of 526

7-68
Maintenance
Side marker
1. Open the hood.
2. Disconnect the negative battery cable.
3. Remove the socket from the assemblyby turning the socket counterclock-
wise until the tabs on the socket align
with the slots on the assembly.
4. Remove the bulb from the socket by pulling out the bulb.
5. Insert a new bulb.
Parking lamp/Daytime running
lamp (LED type)
Your vehicle is equipped with LED lamps.
LED lamps do not have replaceable
bulbs. If the LED lamp does not operate,
have the vehicle checked by an author-
ized HYUNDAI dealer.
Type D - HID headlamp type (LED side marker)
(1) Headlamp (Low/High)
(2) Turn signal lamp
(3) Side marker
(4) Daytime running lamp (DRL) &
Parking lamp
Headlamp (Low/High, HID type)
If the light bulb does not operate, have
the vehicle checked by an authorized
HYUNDAI dealer.
Information
If your vehicle is equipped with High
Intensity Discharge (HID) headlamps,
these headlamps contain mercury. So if
you need to have your vehicle disposed,
you should remove the HID Headlamps
before disposal. The removed HID head-
lamps should be recycled, re-used or dis-
posed as hazardous waste.
i
OAD075082N
HID Headlamp low beam
Do not attempt to replace or
inspect the low beam (XENON bulb)
due to electric shock danger. If the
low beam (XENON bulb) is not
working, have your vehicle checked
by an authorized HYUNDAI Dealer.
WARNING
OAD076123
Page 487 of 526

7-69
7
Maintenance
Information
HID lamps have superior performance vs.
halogen bulbs.
HID lamps are estimated by the manufac-
turer to last twice as long or longer than
halogen bulbs depending on their frequen-
cy of use. They will probably require
replacement at some point in the life of the
vehicle. Cycling the headlamps on and off
more than typical use will shorten HID
lamps life. HID lamps do not fail in the
same manner as halogen incandescent
lamps. If a headlamp goes out after a peri-
od of operation but will immediately
relight when the headlamp switch is cycled
it is likely the HID lamp needs to be
replaced. HID lighting components are
more complex than conventional halogen
bulbs thus have higher replacement cost.
Turn signal lamp
1. Open the hood.
2. Disconnect the negative battery cable.
3. Remove the socket from the assemblyby turning the socket counterclock-
wise until the tabs on the socket align
with the slots on the assembly.
4. Remove the bulb from the socket by pressing it in and rotating it counter-
clockwise until the tabs on the bulb
align with the slots in the socket. Pull
the bulb out of the socket.
5. Install a new bulb by inserting it into the socket and rotating it until it locks
into place. 6. Install the socket in the assembly by
aligning the tabs on the socket with
the slots in the assembly.
7. Push the socket into the assembly and turn the socket clockwise.
Side marker/Parking lamp/Daytime
running lamp (LED type)
Your vehicle is equipped with LED lamps.
LED lamps do not have replaceable
bulbs. If the LED lamp does not operate,
have the vehicle checked by an author-
ized HYUNDAI dealer.
i
OAD076127
Page 490 of 526

7-72
Maintenance
Stop/Tail light and turn signal light
5. Remove the socket from the assemblyby turning the socket counterclock-
wise until the tabs on the socket align
with the slots on the assembly.
6. Remove the bulb from the socket by pressing it in and rotating it counter-
clockwise until the tabs on the bulb
align with the slots in the socket. Pull
the bulb out of the socket.
7. Insert a new bulb by inserting it into the socket and rotating it until it locks
into place.
8. Install the socket in the assembly by aligning the tabs on the socket with
the slots in the assembly. Push the
socket into the assembly and turn the
socket clockwise.
Stop/Tail light (Type B/Type C)
If the LED light does not operate, have
the vehicle checked by an authorized
HYUNDAI dealer.
Side marker (Type A/Type B)
5. Remove the socket from the assemblyby turning the socket counterclock-
wise until the tabs on the socket align
with the slots on the assembly.
6. Remove the bulb by pulling it out.
7. Inset a new bulb by insetring it into the socket.
8. Install the socket in the assembly by aligning the tabs on the socket with
the slots in the assembly. Push the
socket into the assembly and turn the
socket clockwise.
Side marker (Type C)
If the LED light does not operate, have
the vehicle checked by an authorized
HYUNDAI dealer.
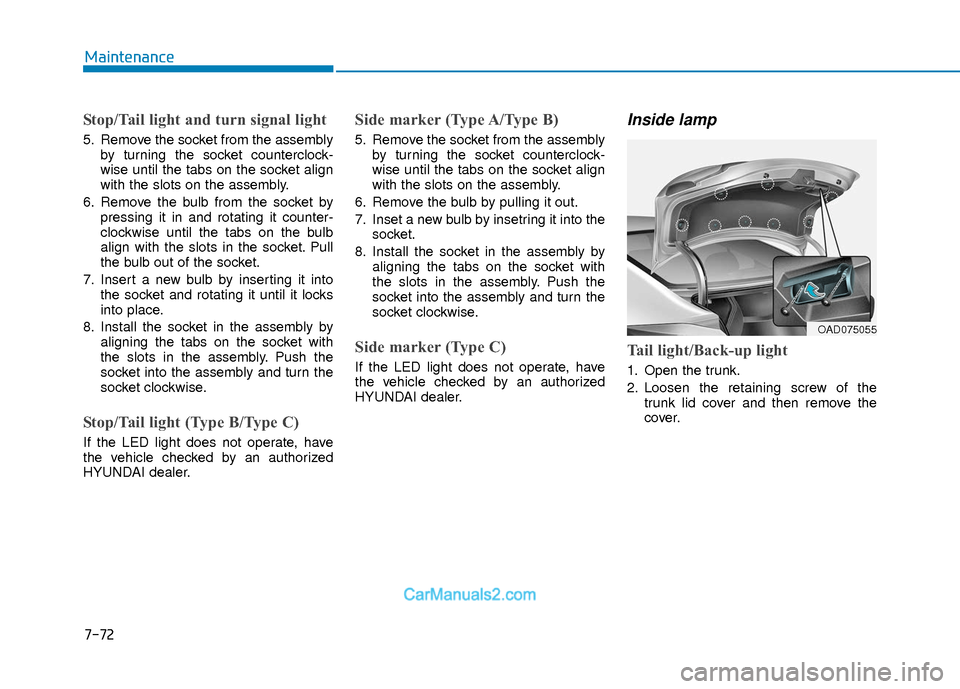
Inside lamp
Tail light/Back-up light
1. Open the trunk.
2. Loosen the retaining screw of thetrunk lid cover and then remove the
cover.
OAD075055
Page 491 of 526

7-73
7
Maintenance
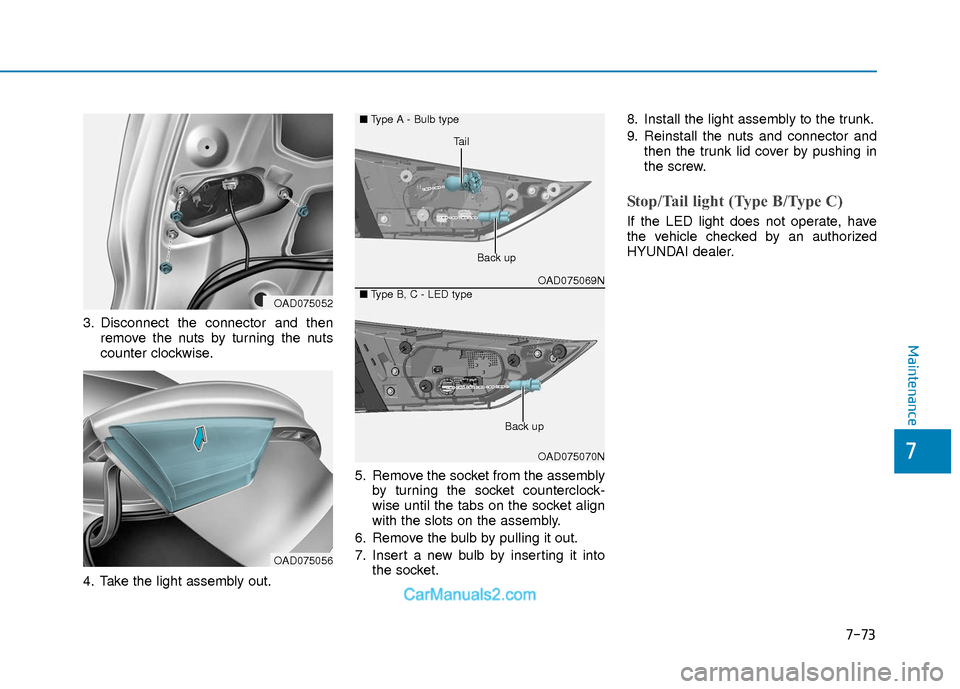
3. Disconnect the connector and thenremove the nuts by turning the nuts
counter clockwise.
4. Take the light assembly out. 5. Remove the socket from the assembly
by turning the socket counterclock-
wise until the tabs on the socket align
with the slots on the assembly.
6. Remove the bulb by pulling it out.
7. Insert a new bulb by inserting it into the socket. 8. Install the light assembly to the trunk.
9. Reinstall the nuts and connector and
then the trunk lid cover by pushing in
the screw.
Stop/Tail light (Type B/Type C)
If the LED light does not operate, have
the vehicle checked by an authorized
HYUNDAI dealer.
OAD075052
OAD075056
OAD075069N
OAD075070N
■
Type A - Bulb type
■ Type B, C - LED type
Back up
Tail
Back up
Page 492 of 526

7-74
Maintenance
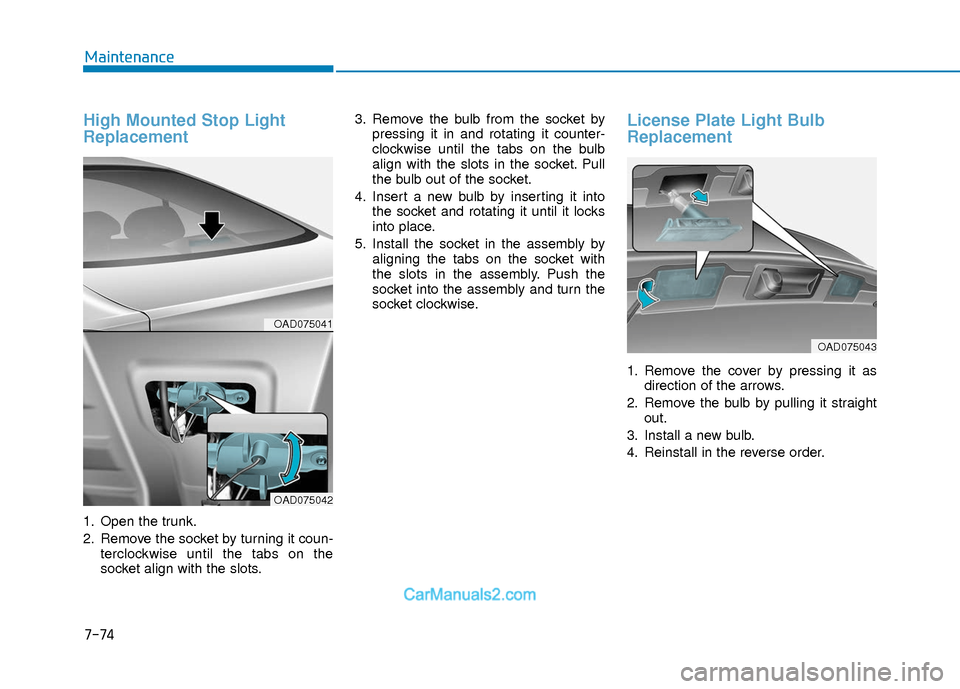
High Mounted Stop Light
Replacement
1. Open the trunk.
2. Remove the socket by turning it coun-terclockwise until the tabs on the
socket align with the slots. 3. Remove the bulb from the socket by
pressing it in and rotating it counter-
clockwise until the tabs on the bulb
align with the slots in the socket. Pull
the bulb out of the socket.
4. Insert a new bulb by inserting it into the socket and rotating it until it locks
into place.
5. Install the socket in the assembly by aligning the tabs on the socket with
the slots in the assembly. Push the
socket into the assembly and turn the
socket clockwise.
License Plate Light Bulb
Replacement
1. Remove the cover by pressing it asdirection of the arrows.
2. Remove the bulb by pulling it straight out.
3. Install a new bulb.
4. Reinstall in the reverse order.
OAD075041
OAD075042
OAD075043
Page 522 of 526

I-5
If You Have a Flat Tire ...................................................6-13Checking the tire inflation pressure ...........................6-32
Components of the Tire Mobility Kit.........................6-29
Distributing the sealant ..............................................6-32
Introduction ................................................................6-27
Notes on the safe use of the Tire Mobility Kit ..........6-28
Using the Tire Mobility Kit........................................6-30
With Spare Tire ..........................................................6-13
With Tire Mobility Kit (TMK) - Type A,B ................6-19
With Tire Mobility Kit (TMK) - Type C ...................6-27
Ignition Switch..................................................................5-6 Engine Start/Stop Button ..............................................5-9
Key Ignition Switch .....................................................5-6
Important safety precautions.............................................2-2 Air Bag Hazards ...........................................................2-2
Always Wear Your Seat Belt ........................................2-2
Control Your Speed ......................................................2-2
Driver Distraction.........................................................2-2
Keep Your Vehicle in Safe Condition ..........................2-2
Restrain All Children....................................................2-2
In Case of an Emergency While Driving .........................6-2 If the Engine Stalls at a Crossroad or Crossing ...........6-2
If the Engine Stalls While Driving...............................6-2
If you Have a Flat Tire While Driving.........................6-2 Instrument Cluster...........................................................3-54
Gauges ........................................................................\
3-56
Instrument Cluster Control .........................................3-56
LCD Display Messages ..............................................3-71
Warning and Indicator lights ......................................3-61
Instrument Panel Overview ..............................................1-5
Interior Features ............................................................3-138 Clock ........................................................................\
3-141
Clothes Hanger .........................................................3-141
Cup Holder ...............................................................3-138
Floor Mat Anchor(s) .................................................3-142
Luggage Net Holder .................................................3-142
Power Outlet.............................................................3-139
Sunvisor ....................................................................3-13\
9
USB Charger ............................................................3-140
Interior Overview..............................................................1-4
Jump Starting ....................................................................6-3
I
Index
J