Page 17 of 526
1-6
Your vehicle at a glance
E
EN
N G
GI
IN
N E
E
C
C O
O M
M P
PA
A R
RT
TM
M E
EN
N T
T
1. Engine oil filler cap ...........................7-20
2. Engine oil dipstick .............................7-19
3. Brake/Clutch fluid reservoir...............7-23
4. Positive battery terminal ...................7-30
5. Negative battery terminal..................7-30
6. Fuse box ...........................................7-49
7. Air cleaner.........................................7-25
8. Engine coolant reservoir ...................7-21
9. Windshield washer fluid reservoir .....7-24
OAD076120/OAD075100LThe actual engine compartment in the vehicle may differ from the illustration.
■
■Nu 2.0 MPI
■
■Gamma 1.6 T-GDI
Page 217 of 526

3-140
Convenient features of your vehicle
To prevent damage to the Power
Outlets :
Use the power outlet only when theengine is running and remove the
accessory plug after use. Using the
accessory plug for prolonged peri-
ods of time with the engine off could
cause the battery to discharge.
Only use 12V electric accessories which are less than 180 W (Watts) in
electric capacity.
Adjust the air-conditioner or heater to the lowest operating level when
using the power outlet.
Close the cover when not in use. (Continued)(Continued)
Some electronic devices can cause
electronic interference when
plugged into a vehicle’s power out-
let. These devices may cause exces-
sive audio static and malfunctions
in other electronic systems or
devices used in your vehicle.
Push the plug in as far as it will go. If good contact is not made, the
plug may overheat and the fuse may
open.
Plug in battery equipped electri- cal/electronic devices with reverse
current protection. The current from
the battery may flow into the vehi-
cle's electrical/electronic system
and cause system malfunction.
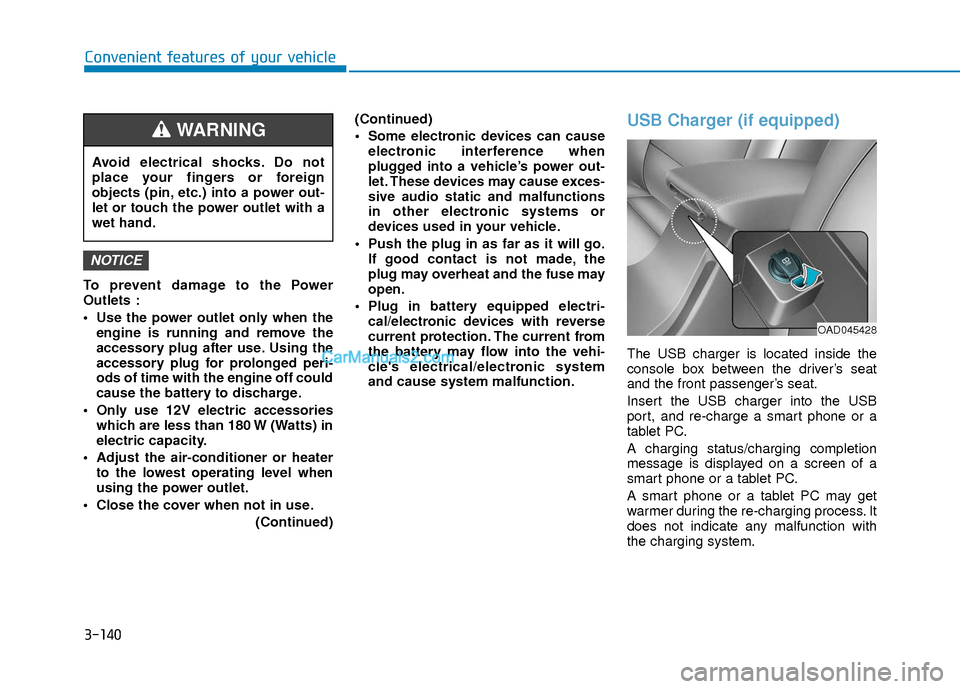
USB Charger (if equipped)
The USB charger is located inside the
console box between the driver’s seat
and the front passenger’s seat.
Insert the USB charger into the USB
port, and re-charge a smart phone or a
tablet PC.
A charging status/charging completion
message is displayed on a screen of a
smart phone or a tablet PC.
A smart phone or a tablet PC may get
warmer during the re-charging process. It
does not indicate any malfunction with
the charging system.
NOTICE
Avoid electrical shocks. Do not
place your fingers or foreign
objects (pin, etc.) into a power out-
let or touch the power outlet with a
wet hand.
WARNING
OAD045428
Page 421 of 526
7-3
7
Maintenance
E
EN
N G
GI
IN
N E
E
C
C O
O M
M P
PA
A R
RT
TM
M E
EN
N T
T
OAD076120/OAD075100L
■
■Nu 2.0 MPI
■
■Gamma 1.6 T-GDI
1. Engine oil filler cap
2. Engine oil dipstick
3. Brake fluid reservoir
4. Positive battery terminal
5. Negative battery terminal
6. Fuse box
7. Air cleaner
8. Engine coolant reservoir
9. Windshield washer fluid reservoir
The actual engine compartment in the
vehicle may differ from the illustration.
Page 469 of 526

7-51
7
Maintenance
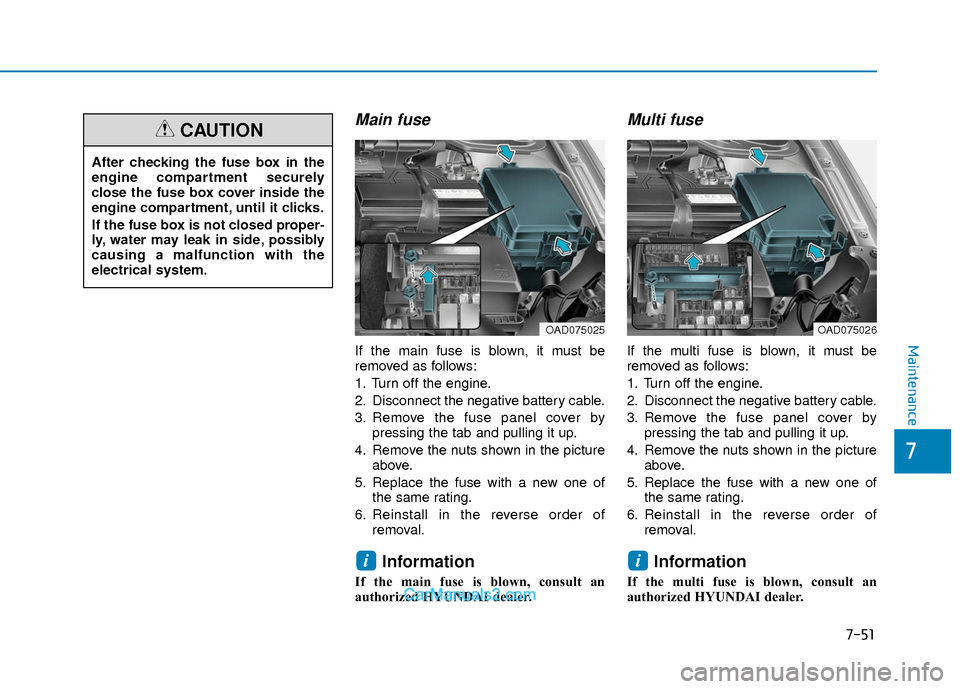
Main fuse
If the main fuse is blown, it must be
removed as follows:
1. Turn off the engine.
2. Disconnect the negative battery cable.
3. Remove the fuse panel cover bypressing the tab and pulling it up.
4. Remove the nuts shown in the picture above.
5. Replace the fuse with a new one of the same rating.
6. Reinstall in the reverse order of removal.
Information
If the main fuse is blown, consult an
authorized HYUNDAI dealer.
Multi fuse
If the multi fuse is blown, it must be
removed as follows:
1. Turn off the engine.
2. Disconnect the negative battery cable.
3. Remove the fuse panel cover bypressing the tab and pulling it up.
4. Remove the nuts shown in the picture above.
5. Replace the fuse with a new one of the same rating.
6. Reinstall in the reverse order of removal.
Information
If the multi fuse is blown, consult an
authorized HYUNDAI dealer.
ii
After checking the fuse box in the
engine compartment securely
close the fuse box cover inside the
engine compartment, until it clicks.
If the fuse box is not closed proper-
ly, water may leak in side, possibly
causing a malfunction with the
electrical system.
CAUTION
OAD075025OAD075026
Page 470 of 526
7-52
Maintenance
Blade type fuse
Before inspecting a fuse, you should turn
OFF the engine as well as the other elec-
tric system switches.
If a fuse is blown out, remove the blown-
out fuse and install a new fuse of the
same capacity by using the fuse puller,
which is prepared inside the fuse box in
the engine compartment. A new fuse
may be prepared along with the fuse
puller. However, if not, you may tem-
porarily select/use a fuse of the other
systems, which do not affect the vehicle
operation, such as the audio system.
Cartridge type fuse
Before inspecting a fuse, you should turn
OFF the engine as well as the other elec-
tric system switches.
If a fuse is blown out, remove the blown-
out fuse and install a new fuse of the
same capacity. Pay extreme caution not
to damage the blown-out fuse while
removing it.
OAD075054OAD075053
Page 471 of 526
7-53
7
Maintenance
Fuse/Relay Panel Description
Instrument panel fuse panel
Inside the fuse/relay box cover, you can
find the fuse/relay label describing
fuse/relay name and capacity.
Information
Not all fuse panel descriptions in this man-
ual may be applicable to your vehicle; the
information is accurate at the time of
printing. When you inspect the fuse box on
your vehicle, refer to the fuse box label.
i
OAD075029
OAD075104N
Page 474 of 526
7-56
Maintenance
Engine compartment fuse panel
Inside the fuse/relay box cover, you can
find the fuse/relay label describing fuse/
relay name and capacity.
Information
Not all fuse panel descriptions in this man-
ual may be applicable to your vehicle; the
information is accurate at the time of
printing. When you inspect the fuse panel
in your vehicle, refer to the fuse panel
label.
i
OAD075027
OAD077132L