2018 Hyundai Elantra lock
[x] Cancel search: lockPage 376 of 526

5-93
Driving your vehicle
V
VE
EH
H I
IC
C L
LE
E
L
L O
O A
AD
D
L
L I
IM
M I
IT
T
5
Don't place foreign objects or
materials in the engine com-partment
Placement of foreign object or materials
which prevent cooling of the engine, in
the engine compartment, may cause a
failure or combustion. The manufacturer
is not responsible for the damage caused
by such placement.
To keep locks from freezing
To keep the locks from freezing, squirt an
approved de-icer fluid or glycerine into
the key opening. If a lock is covered with
ice, squirt it with an approved de-icing
fluid to remove the ice. If the lock is
frozen internally, you may be able to thaw
it out by using a heated key. Handle the
heated key with care to avoid injury.
Two labels on your driver's door sill
show how much weight your vehicle
was designed to carry: the Tire and
Loading Information Label and the
Certification Label.
Before loading your vehicle, familiar-
ize yourself with the following terms
for determining your vehicle’s weight
ratings, from the vehicle's specifica-
tions and the Certification Label:
Base Curb Weight
This is the weight of the vehicle
including a full tank of fuel and all
standard equipment. It does not
include passengers, cargo, or option-
al equipment.
Vehicle Curb Weight
This is the weight of your new vehicle
when you picked it up from your deal-
er plus any aftermarket equipment.
Cargo Weight
This figure includes all weight added
to the Base Curb Weight, including
cargo and optional equipment. GAW (Gross Axle Weight)
This is the total weight placed on
each axle (front and rear) - including
vehicle curb weight and all payload.
GAWR (Gross Axle Weight Rating)
This is the maximum allowable
weight that can be carried by a single
axle (front or rear). These numbers
are shown on the Certification Label.
The total load on each axle must
never exceed its GAWR.
GVW (Gross Vehicle Weight)
This is the Base Curb Weight plus
actual Cargo Weight plus passen-
gers.
GVWR (Gross Vehicle Weight
Rating)
This is the maximum allowable
weight of the fully loaded vehicle
(including all options, equipment,
passengers and cargo). The GVWR
is shown on the Certification Label
located on the driver’s door sill.
Page 383 of 526

6-2
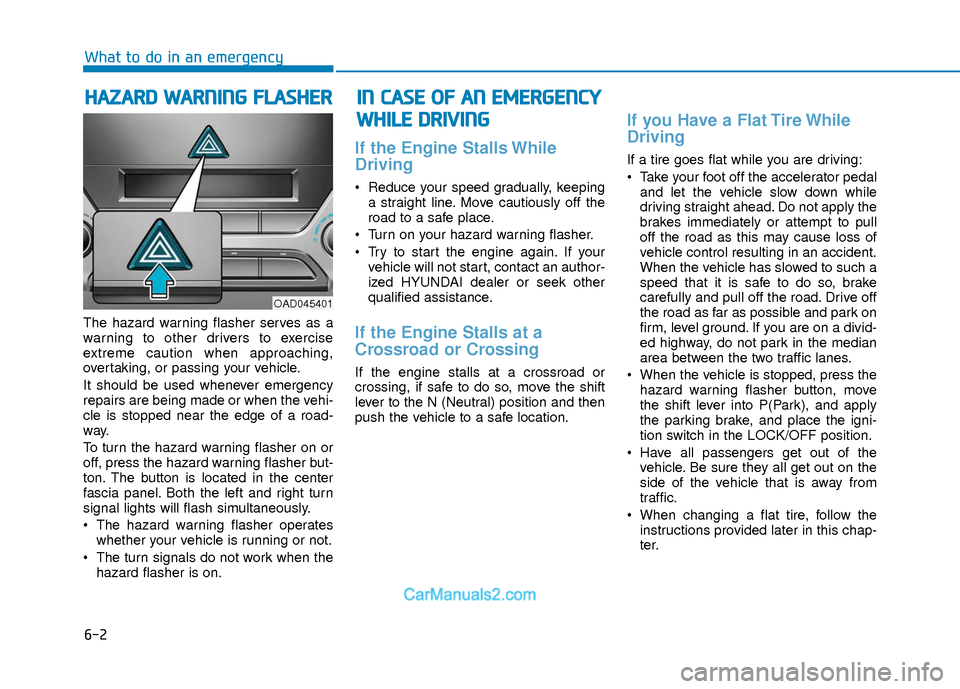
The hazard warning flasher serves as a
warning to other drivers to exercise
extreme caution when approaching,
overtaking, or passing your vehicle.
It should be used whenever emergency
repairs are being made or when the vehi-
cle is stopped near the edge of a road-
way.
To turn the hazard warning flasher on or
off, press the hazard warning flasher but-
ton. The button is located in the center
fascia panel. Both the left and right turn
signal lights will flash simultaneously.
• The hazard warning flasher operates
whether your vehicle is running or not.
The turn signals do not work when the hazard flasher is on.
If the Engine Stalls While
Driving
Reduce your speed gradually, keepinga straight line. Move cautiously off the
road to a safe place.
Turn on your hazard warning flasher.
Try to start the engine again. If your vehicle will not start, contact an author-
ized HYUNDAI dealer or seek other
qualified assistance.
If the Engine Stalls at a
Crossroad or Crossing
If the engine stalls at a crossroad or
crossing, if safe to do so, move the shift
lever to the N (Neutral) position and then
push the vehicle to a safe location.
If you Have a Flat Tire While
Driving
If a tire goes flat while you are driving:
Take your foot off the accelerator pedaland let the vehicle slow down while
driving straight ahead. Do not apply the
brakes immediately or attempt to pull
off the road as this may cause loss of
vehicle control resulting in an accident.
When the vehicle has slowed to such a
speed that it is safe to do so, brake
carefully and pull off the road. Drive off
the road as far as possible and park on
firm, level ground. If you are on a divid-
ed highway, do not park in the median
area between the two traffic lanes.
When the vehicle is stopped, press the hazard warning flasher button, move
the shift lever into P(Park), and apply
the parking brake, and place the igni-
tion switch in the LOCK/OFF position.
Have all passengers get out of the vehicle. Be sure they all get out on the
side of the vehicle that is away from
traffic.
When changing a flat tire, follow the instructions provided later in this chap-
ter.
H HA
AZ
ZA
A R
RD
D
W
W A
AR
RN
N I
IN
N G
G
F
F L
LA
A S
SH
H E
ER
R
What to do in an emergency
I
IN
N
C
C A
A S
SE
E
O
O F
F
A
A N
N
E
E M
M E
ER
R G
G E
EN
N C
CY
Y
W
W H
HI
IL
L E
E
D
D R
RI
IV
V I
IN
N G
G
OAD045401
Page 387 of 526

6-6
What to do in an emergency
If your temperature gauge indicates over-
heating, you experience a loss of power,
or hear loud pinging or knocking, the
engine may be overheating. If this hap-
pens, you should:
1. Pull off the road and stop as soon asit is safe to do so.
2. Place the shift lever in P (Park) and set the parking brake. If the air condi-
tioning is ON, turn it OFF.
3. If engine coolant is running out under the vehicle or steam is coming out
from the hood, stop the engine. Do not
open the hood until the coolant has
stopped running or the steaming has
stopped. If there is no visible loss of
engine coolant and no steam, leave
the engine running and check to be
sure the engine cooling fan is operat-
ing. If the fan is not running, turn the
engine off. 4. Check for coolant leaking from the
radiator, hoses or under the vehicle. (If
the air conditioning had been in use, it
is normal for cold water to be draining
from it when you stop.)
5. If engine coolant is leaking out, stop the engine immediately and call the
nearest authorized HYUNDAI dealer
for assistance. 6. If you cannot find the cause of the
overheating, wait until the engine tem-
perature has returned to normal.
Then, if coolant has been lost, careful-
ly add coolant to the reservoir to bring
the fluid level in the reservoir up to the
halfway mark.
7. Proceed with caution, keeping alert for further signs of overheating. If over-
heating happens again, call an author-
ized HYUNDAI dealer for assistance.
I IF
F
T
T H
H E
E
E
E N
N G
GI
IN
N E
E
O
O V
VE
ER
R H
H E
EA
A T
TS
S
While the engine is run-
ning, keep hands, cloth-
ing and tools away from
the moving parts such
as the cooling fan and
drive belt to prevent
serious injury.
WARNING
Your vehicle is
equipped with a pres-
surized coolant reserve
tank. NEVER remove
the coolant reserve tank
cap or the radiator drain plug while
the engine and radiator are HOT.
Hot coolant and steam may blow
out under pressure, causing seri-
ous injury.
Turn the engine off and wait until
the engine cools down. Use
extreme care when removing the
coolant reserve tank cap. Wrap a
towel or thick rag around it, and
turn it counterclockwise slowly to
release some of the pressure from
the system. Step back while the
pressure is released.
(Continued)
(Continued)
When you are sure all the pressure
has been released, continue turn-
ing the cap counterclockwise to
remove it.
WARNING
Serious loss of coolant indicates a
leak in the cooling system and
should be checked as soon as pos-
sible by an authorized HYUNDAI
dealer.
CAUTION
Page 394 of 526

6-13
What to do in an emergency
6
With Spare Tire (if equipped)Jack and tools
➀Jack handle
② Jack
③ Wheel lug nut wrench
The jack, jack handle, and wheel lug
nut wrench are stored in the luggage
compartment under the luggage box
cover.
The jack is provided for emergency
tire changing only. Turn the winged hold down bolt
counterclockwise to remove the
spare tire.
Store the spare tire in the same com-
partment by turning the winged hold
down bolt clockwise.
To prevent the spare tire and tools
from "rattling", store them in their
proper location.
I I
F
F
Y
Y O
O U
U
H
H A
AV
VE
E
A
A
F
F L
LA
A T
T
T
T I
IR
R E
E
Changing a tire can be danger-
ous. Follow the instructions in
this section when changing a
tire to reduce the risk of serious
injury or death.
WARNING
OLF064004N
OLF064031N
Be careful as you use the jack
handle to stay clear of the flat
end. The flat end has sharp
edges that could cause cuts.
CAUTION
Page 395 of 526

6-14
What to do in an emergency
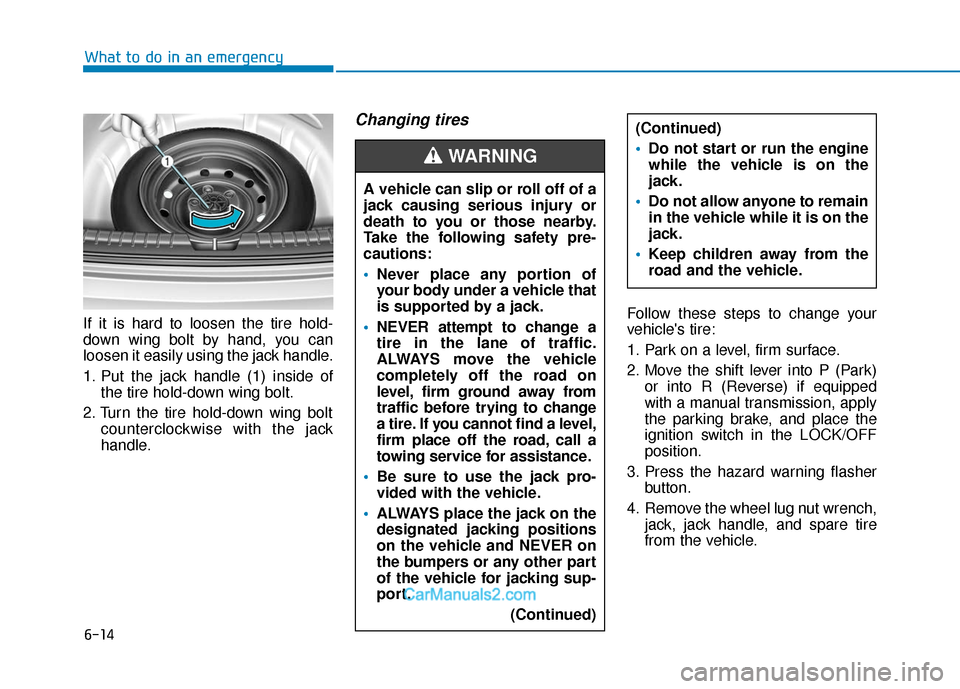
If it is hard to loosen the tire hold-
down wing bolt by hand, you can
loosen it easily using the jack handle.
1. Put the jack handle (1) inside of the tire hold-down wing bolt.
2. Turn the tire hold-down wing bolt counterclockwise with the jack
handle.
Changing tires
Follow these steps to change your
vehicle's tire:
1. Park on a level, firm surface.
2. Move the shift lever into P (Park)or into R (Reverse) if equipped
with a manual transmission, apply
the parking brake, and place the
ignition switch in the LOCK/OFF
position.
3. Press the hazard warning flasher button.
4. Remove the wheel lug nut wrench, jack, jack handle, and spare tire
from the vehicle.
A vehicle can slip or roll off of a
jack causing serious injury or
death to you or those nearby.
Take the following safety pre-
cautions:
Never place any portion of
your body under a vehicle that
is supported by a jack.
NEVER attempt to change a
tire in the lane of traffic.
ALWAYS move the vehicle
completely off the road on
level, firm ground away from
traffic before trying to change
a tire. If you cannot find a level,
firm place off the road, call a
towing service for assistance.
Be sure to use the jack pro-
vided with the vehicle.
ALWAYS place the jack on the
designated jacking positions
on the vehicle and NEVER on
the bumpers or any other part
of the vehicle for jacking sup-
port.
(Continued)
(Continued)
Do not start or run the engine
while the vehicle is on the
jack.
Do not allow anyone to remain
in the vehicle while it is on the
jack.
Keep children away from the
road and the vehicle.
WARNING
Page 396 of 526

6-15
What to do in an emergency
6
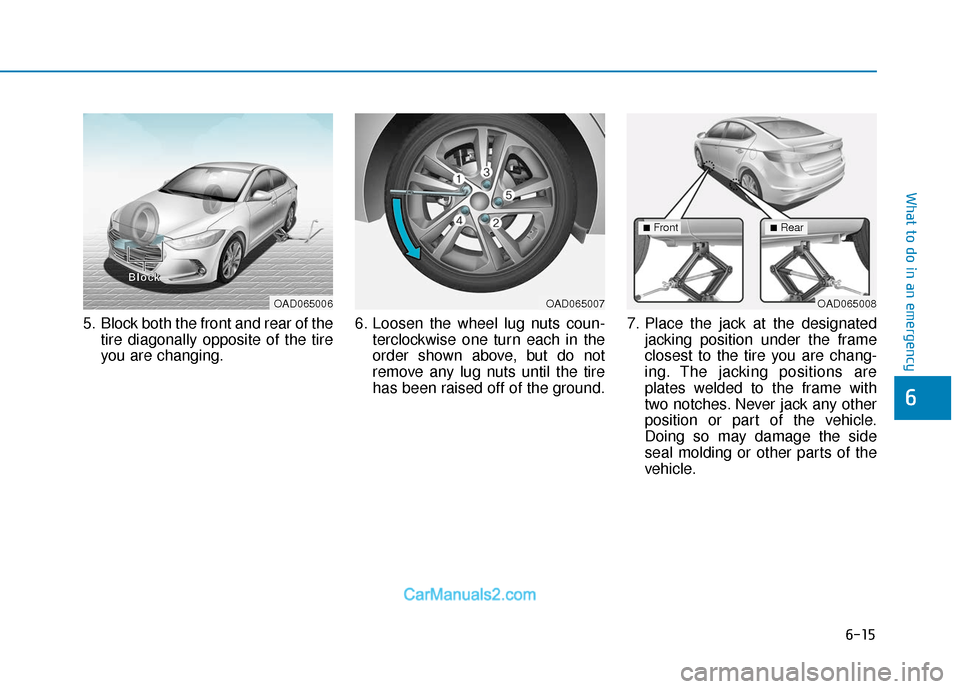
5. Block both the front and rear of thetire diagonally opposite of the tire
you are changing. 6. Loosen the wheel lug nuts coun-
terclockwise one turn each in the
order shown above, but do not
remove any lug nuts until the tire
has been raised off of the ground. 7. Place the jack at the designated
jacking position under the frame
closest to the tire you are chang-
ing. The jacking positions are
plates welded to the frame with
two notches. Never jack any other
position or part of the vehicle.
Doing so may damage the side
seal molding or other parts of the
vehicle.
OAD065006
B
B
B
B
l
l
l
l
o
o
o
o
c
c
c
c
k
k
k
kOAD065007OAD065008
■Front■Rear
Page 397 of 526

6-16
What to do in an emergency
8. Insert the jack handle into the jack and turn it clockwise, raising the
vehicle until the tire clears the
ground. Make sure the vehicle is
stable on the jack. 9. Loosen the lug nuts with the wheel
lug nut wrench and remove them
with your fingers. Remove the
wheel from the studs and lay it flat
on the ground out of the way.
Remove any dirt or debris from
the studs, mounting surfaces, and
wheel.
10. Install the spare tire onto the studs of the hub.
11. Tighten the lug nuts with your fin- gers onto the studs with the
smaller end of the lug nuts clos-
est to the wheel.
12. Lower the vehicle to the ground by turning the jack handle coun-
terclockwise. 13. Use the wheel lug nut wrench to
tighten the lug nuts in the order
shown. Double-check each lug
nut until they are tight. After
changing tires, have an author-
ized HYUNDAI dealer tighten the
lug nuts to their proper torque as
soon as possible. The wheel lug
nut should be tightened to
79~94 lbf·ft (11~13 kgf·m).
OLF064012OLF064013
■Rear
Page 416 of 526

6-35
What to do in an emergency
6
When towing your vehicle in an emer-
gency without wheel dollies:
1. Place the ignition switch in the ACCposition.
2. Place the shift lever in N (Neutral).
3. Release the parking brake.
Removable Towing Hook 1. Open the trunk, and remove the tow- ing hook from the tool case.
2. Remove the hole cover pressing the lower part of the cover on the front or
rear bumper.
3. Install the towing hook by turning it clockwise into the hole until it is fully
secured.
4. Remove the towing hook and install the cover after use.
If your vehicle is equipped with a
rollover sensor, place the ignition
switch in the LOCK/OFF or ACC
position when the vehicle is being
towed. The side impact and curtain
air bag may deploy if the sensor
detects the situation as a rollover.WARNING
Failure to place the shift lever in N
(Neutral) when being towed with
the front wheels on the ground can
cause internal damage to the
transaxle.
CAUTION
OLF064024
OAD065018
OAD066018
■Front
■Rear (if equipped)