2018 HONDA RIDGELINE ECO mode
[x] Cancel search: ECO modePage 190 of 623

188
Controls
Climate Control System*
Using Automatic Climate Control
The automatic climate control system maintains the interior temperature you select.
The system also selects the proper mix of heated or cooled air that will as quickly as
possible, raise or lower the interior temperature to your preference.
Use the system when the engine is running.
1. Press the AUTO button.
2. Adjust the interior temperature using the driver’s side or passenger’s side
temperature control switch.
3. Press the ON/OFF button to cancel.1Using Automatic Climate Control
If any buttons are presse d while using the climate
control system in auto, the function of the button
that was pressed will take priority.
The AUTO indicator will go off, but functions
unrelated to the button th at was pressed will be
controlled automatically.
If ECON mode is selected, the fan may turn off.
To prevent cold air from bl owing in from outside, the
fan may operate at low speed for a while after the
AUTO button has been pressed.
Once you have set the de sired temperature, do not
use the temperature control switches more than
necessary.
Doing so may delay the time it takes to reach the set
temperature.
If the interior is very warm, you can cool it down
more rapidly by partial ly opening the windows,
turning the system on auto, and setting the
temperature to low. Change the fresh mode to
recirculation mode until the temperature cools down.
When you set the temperature to the lower or upper
limit, Lo or Hi is displayed.
Pressing the ON/OFF button switches the
climate control system be tween on and off. When
turned on, the system returns to your last selection.
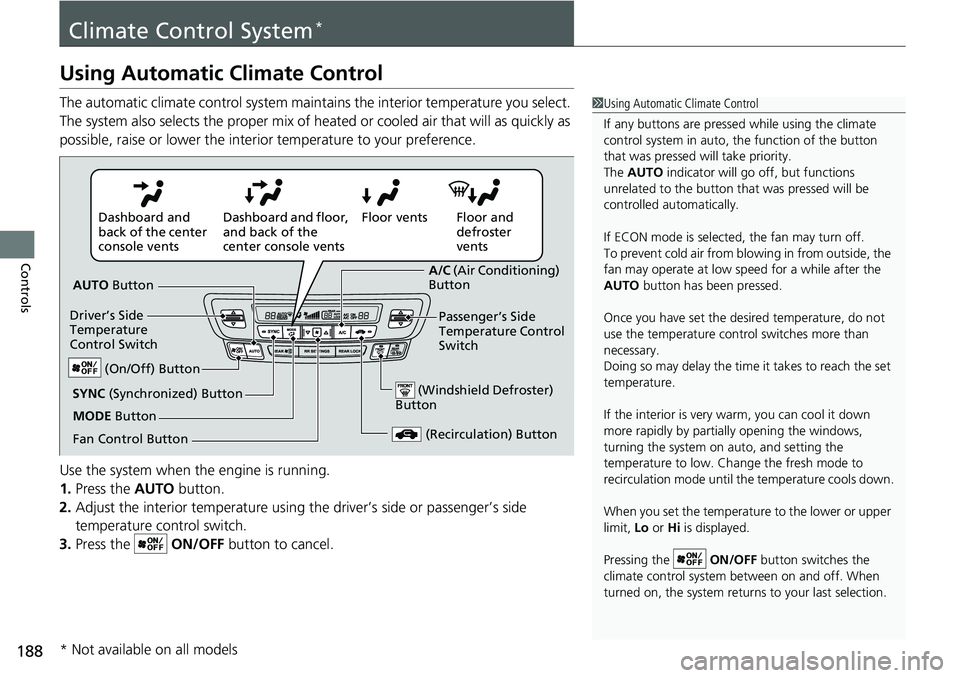
Floor and
defroster
vents
Floor vents
Dashboard and floor,
and back of the
center console vents
Dashboard and
back of the center
console vents
AUTO Button
Driver’s Side
Temperature
Control Switch
(Recirculation) Button
Fan Control Button A/C
(Air Conditioning)
Button
Passenger’s Side
Temperature Control
Switch
(Windshield Defroster)
ButtonSYNC (Synchronized) Button
(On/Off) Button
MODE Button
* Not available on all models
Page 203 of 623

201
uuAudio System uUSB Port(s)
Features
USB Port(s)
Install the iPod USB connector or the USB flash drive to the USB port.
■On the front console compartment*
The USB port (1.5A) is for charging devices,
playing audio files and connecting compatible
phones with Apple CarPlay or Android Auto.
■In the consol e compartment
The USB port (1.0A) is for playing audio files
on a USB flash drive, connecting a mobile
phone, and charging devices.
■On the back of the console
compartment*
The USB ports (2.5A) are only for charging
devices.
1 USB Port(s)
•Do not leave the iPod or USB flash drive in the
vehicle. Direct sunlight and high temperatures may
damage it.
•We recommend using an extension cable with the
USB port.
•Do not connect the iPod or USB flash drive using a
hub.
•Do not use a device such as a card reader or hard disk
drive, as the device or your files may be damaged.
•We recommend keeping y our data backed up
before using the device in your vehicle.
•Displayed messages may vary depending on the
device model and software version.
If the audio system does not recognize the iPod, try
reconnecting it a few times or reboot the device. To
reboot, follow the manufac turer’s instructions
provided with the iPod or visit www.apple.com/ipod.
The USB port can supply up to 1.0A/1.5A/2.5A of
power. It does not output 1.0A/1.5A/2.5A unless the
device requests.
For amperage details, read the operating manual of
the device that ne eds to be charged.
Set the power mode to ACCESSORY or ON first.
This port is for battery charge only. You cannot play
music even if you have conne cted a music player to it.
Under certain condi tions, a device connected to the
port may generate noise in the radio you are listening
to.
USB charge
On the front console
compartment
In the console compartment
On the back of the console
compartment
* Not available on all models
Page 205 of 623

203
uuAudio System uAudio System Theft Protection
Features
Audio System Theft Protection
The audio system is disabled when it is disconnected from the power source, such as
when the battery is disconnected or goes dead. In certain conditions, the system
may display a code entry screen. If this occurs, reactivate the audio system.
■Reactivating the audio system
1. Set the power mode to ON.
2. Turn on the audio system.
3. Press and hold the audio system power button for more than two seconds.
u The audio system is reac tivated when the audio co ntrol unit establishes a
connection with the vehicle control unit. If the control unit fails to recognize
the audio unit, you must go to a dealer and have the audio unit checked.
1 Audio System Theft Protection
Find the audio system’s se curity code and serial
number label in your owner’s manual kit.
We recommend that you write down the serial
number in this owner’s manual.
Do not store the label in your vehicle. If you lose the
label, you must first retrie ve the serial number, and
then obtain the code.
You can find out about your serial number and
security code from a dealer.
U.S. models
Page 208 of 623

206
Features
Audio System Basic Operation
To use the audio system, the power mode must be in ACCESSORY or ON.
Use the selector knob or MENU/CLOCK
button to access some audio functions.
Selector knob: Rotate left or right to scroll
through the available ch oices. Press to set
your selection.
MENU/CLOCK button: Press to select any
mode.
The available modes include the wallpaper,
display, clock, langu age setup, and play
modes. Play modes can be also selected from
scan, random, repeat, and so on.
(Back) button: Press to go back to the previous display.
(Sound) button: Press to select the sound setting mode.
(Day/Night) button: Press to change the audio/information screen brightness.
Press , then adjust th e brightness using .
u Each time you press , the mode switches between the daytime mode,
nighttime mode and OFF mode.
Models with color audio system1Audio System Basic Operation
These indications are used to show how to operate
the selector knob.
Rotate to select.
Press to enter.
Menu Items 2 Wallpaper Setup P. 209
2 Display Setup P. 212
2 Scan P. 214, 220
2 Play Mode P. 217, 220
2 RDS Settings P. 214
One of the operating system s used in this unit is
eCos.
For software license terms and condition, visit their
website (eCos license URL:
http://ecos.sourceware.org/license-overview.html )
For source code disclo sure and other details
regarding eCos, visit:
http://www.hondaopensource2.com
Press the SOURCE, , , or button on the
steering wheel to cha nge any audio setting.
2 Audio Remote Controls P. 204
(Back)
Button
Selector
Knob
MENU/
CLOCK
Button
(Day/Night)
Button
(Sound)
Button
Menu Display
Page 216 of 623

uuAudio System Basic Operation uPlaying AM/FM Radio
214
Features
Provides text data information related to your selected RDS capable FM station.
■To find an RDS station from Station List
1. Press while listening to an FM station.
2. Rotate to select the station, then press .
■Update List
Updates your available station list at any time.
1. Press while listening to an FM station.
2. Rotate to select Update List, then press .
■Radio text
Displays the radio text informat ion of the selected RDS station.
1. Press the MENU/CLOCK button.
2. Rotate to select Settings, then press .
3. Rotate to select RDS Settings, then press .
4. Rotate to select Radio Text, then press .
■Scan
Samples each of the strongest stations on the selected band for 10 seconds.
1. Press the MENU/CLOCK button.
2. Rotate to select Scan, then press .
To turn off scan, press .
■Radio Data System (RDS)1 Playing AM/FM Radio
The ST indicator appears on the display indicating
stereo FM broadcasts.
Stereo reproduction in AM is not available.
You can store 6 AM stations and 12 FM stations into
reset button memory. FM1 and FM2 let you store 6
stations each.
Switching the Audio Mode
Press the SOURCE button on the steering wheel.
2 Audio Remote Controls P. 204
1Radio Data System (RDS)
When you select an RDS-capable FM station, the RDS
automatically turns on, and the frequency display
changes to the station name. However, when the
signals of that station become weak, the display
changes from the statio n name to the frequency.
Page 220 of 623

218
uuAudio System Basic Operation uPlaying a USB Flash Drive
Features
Playing a USB Flash Drive
Your audio system reads and plays audio f iles on a USB flash drive in either MP3,
WMA or AAC*1 format.
Connect your USB flash drive to the USB port, then press the CD/AUX button.
2USB Port(s) P. 201
*1:Only AAC format files recorded with iTunes are playable on this unit.
USB Indicator
Appears when a USB flash drive
is connected.
CD/AUX Button
Press to select USB flash drive
(if connected).
(Back) Button
Press to go back to the previous
display.
/ (Seek/Skip) Buttons
Press or to change tracks.
Press and hold to move rapidly within a track.
VOL/ (Volume/Power) Knob
Press to turn the audio system on
and off.
Turn to adjust the volume.
Selector Knob
Turn to change folders.
Press and turn to select an item,
then press to set your selection.
MENU/CLOCK Button
Press to display the menu items.
Audio/Information Screen
Play Mode Buttons (1-6)
Press to select a play mode.
Page 222 of 623

uuAudio System Basic Operation uPlaying a USB Flash Drive
220
Features
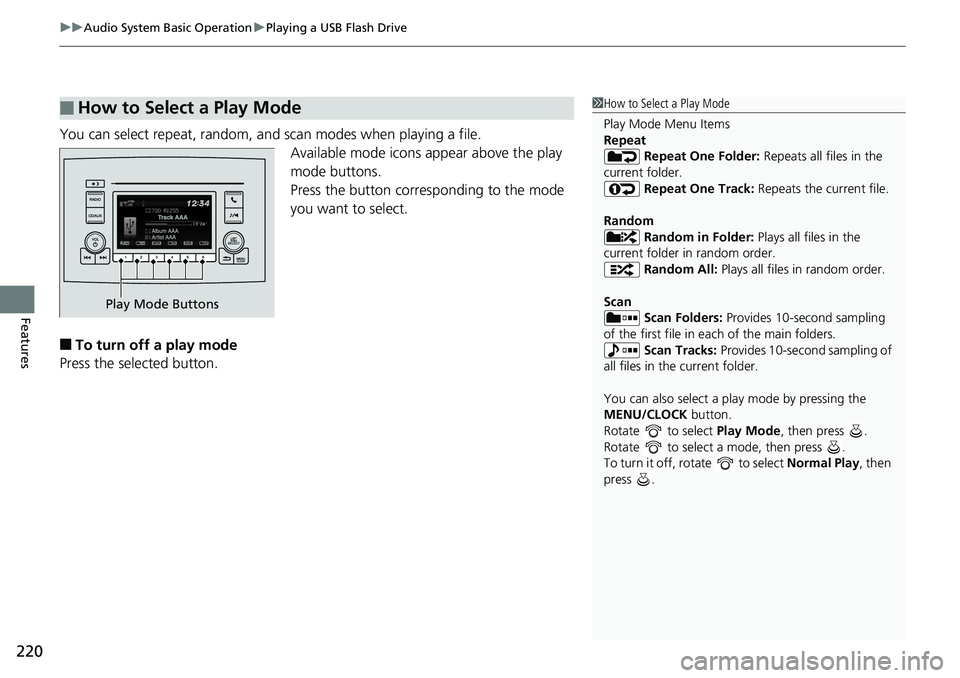
You can select repeat, random, and scan modes when playing a file.
Available mode icons appear above the play
mode buttons.
Press the button corresponding to the mode
you want to select.
■To turn off a play mode
Press the selected button.
■How to Select a Play Mode1 How to Select a Play Mode
Play Mode Menu Items
Repeat
Repeat One Folder: Repeats all files in the
current folder. Repeat One Track: Repeats the current file.
Random Random in Folder: Plays all files in the
current folder in random order. Random All: Plays all files in random order.
Scan Scan Folders: Provides 10-second sampling
of the first file in each of the main folders.
Scan Tracks: Provides 10-second sampling of
all files in the current folder.
You can also select a pl ay mode by pressing the
MENU/CLOCK button.
Rotate to select Play Mode, then press .
Rotate to select a mode, then press .
To turn it off, rotate to select Normal Play, then
press .
Play Mode Buttons
Page 248 of 623

246
uuAudio System Basic Operation uVoice Control Operation
FeaturesWhen the (Talk) button is pressed,
available voice commands appear on the
screen.
For a complete list of commands, say “ Voice
Help ” after the beep or select Voice Help.
You can see the list of commands in Voice
Info on the Info menu screen. Select Info,
then select .
The system only reco gnizes the commands
on the following pages, at certain screens.
Free form voice commands are not
recognized.
*1: Models with navigation system
■Voice Portal Screen■Phone Call
This can be only used when the phone is
connected. When the sy stem recognizes the
Phone call command, the screen will
change the dedicated screen for the voice
recognition of the phone.
• Dial by number
• Call history
• Redial
• Call
• Call
Phone Call commands are not available if
using Apple CarPlay.
■Music Search*1
This can be only used when the iPod or USB
device is connected.
■Audio*1
When the system recognizes the Audio
command, the screen will change the
dedicated screen for the voice recognition
of the audio.
• Audio On
• Audio Off
• Radio FM
• Radio AM
• Radio SXM
*
•DISC*
•Pandora*
•iPod
• USB
• Other Sources
Pandora ®
* cannot be used with Android
Auto.
■Navigation*1
The screen changes the navigation screen.
2 Refer to the Navigation System Manual
■Voice Settings
The screen changes the Voice Recog tab
on the System settings screen.
■Trip Computer*1
The screen changes the trip computer
screen.
* Not available on all models