Page 411 of 623

409
Driving
This chapter discusses driving and refueling.
Before Driving................................... 410
Towing a Trailer ................................ 418
Off-Highway Driving Guidelines ..... 430
When Driving Starting the Engine .......................... 432
Precautions While Driving................. 438
Automatic Transmission ................... 439
Shifting ............................................ 440
ECON Button ................................... 442
Intelligent Traction Management...... 443
Cruise Control
*................................ 445
Front Sensor Camera*...................... 448Road Departure Mi tigation (RDM)
System*...................................... 450
Adaptive Cruise Control (ACC)*....... 455
Lane Keeping Assist System (LKAS)*.... 468Vehicle Stability Assist (VSA ®), aka Electronic
Stability Control (ESC), System ............. 476
Agile Handling Assist ....................... 478
i-VTM4 (Intelligent Variable Torque
Management)-4 ® System
*.............. 479
TPMS with Tire Fill Assist .................. 480
Tire Pressure Monitoring System (TPMS) -
Required Federal Explanation ......... 482
Blind spot inform ation (BSI) System
*.... 484
LaneWatchTM*.................................. 486 Braking
Brake System ................................... 488
Anti-lock Brake System (ABS) ........... 490
Brake Assist System ......................... 491
Collision Mitigation Braking System
TM
(CMBSTM)*..................................... 492
Parking Your Vehicle When Stopped ................................ 501
Parking Sensor System
*................... 502
Cross Traffic Monitor*..................... 506
Multi-View Rear Camera .................. 510
Refueling Fuel Information .............................. 512
How to Refuel ................................. 513
Fuel Economy and CO
2 Emissions .... 515
* Not available on all models
Page 422 of 623

420
uuTowing a Trailer uTowing Preparation
Driving
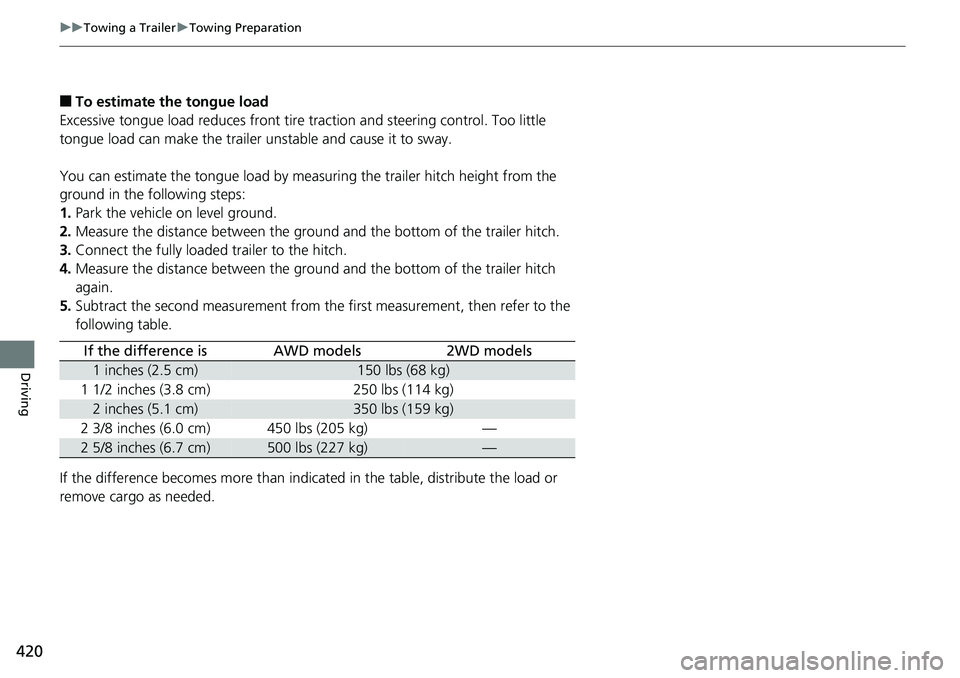
■To estimate the tongue load
Excessive tongue load reduces front tire traction and steering control. Too little
tongue load can make the trailer unstable and cause it to sway.
You can estimate the tongue load by meas uring the trailer hitch height from the
ground in the following steps:
1. Park the vehicle on level ground.
2. Measure the distance between the ground and the bottom of the trailer hitch.
3. Connect the fully loaded trailer to the hitch.
4. Measure the distance between the ground and the bottom of the trailer hitch
again.
5. Subtract the second measurement from th e first measurement, then refer to the
following table.
If the difference becomes more than indicated in the table, distribute the load or
remove cargo as needed.
If the difference isAWD models2WD models
1 inches (2.5 cm)150 lbs (68 kg)
1 1/2 inches (3.8 cm)250 lbs (114 kg)
2 inches (5.1 cm)350 lbs (159 kg)
2 3/8 inches (6.0 cm)450 lbs (205 kg)—
2 5/8 inches (6.7 cm)500 lbs (227 kg)—
Page 424 of 623

uuTowing a Trailer uTowing Preparation
422
Driving
Towing generally requires a variety of supplemental equipment.
To ensure the best quality, we recommend that you purchase Honda equipment
whenever possible.
Your vehicle has a class 3 trailer hitch as standard equipment. The jumper harness
and trailer brake fuse are stored in the glove box.
2 Trailer brakes P. 423
Open the lid of the socket (located next to the
trailer hitch) to expose the 7-pin trailer
connector.
■Hitches
Read the trailer manufacturer’s instructions , and select the appropriate draw bar for
the height of the trailer you will be towing.
■Towing Equipment and Accessories
Models with AWD1 Towing Equipment and Accessories
Make sure that all equipment is properly installed and
maintained, and that it meets federal, state, province/
territory, and lo cal regulations.
Consult your trai ler maker for prope r installation and
setup of the equipment.
Improper installation and setup can affect the
handling, stability, and br aking performance of your
vehicle.
Consult your traile r sales or rental agency if any other
items are recommended or required for your towing
situation.
The lighting and wiring of tra ilers can vary by type
and brand. If a connector is required, it should only
be installed by a qua lified technician.
Trailer packages and products:
•Ball mount, hitch plug, hitch pin etc.•Wiring harness kit
•Trailer hitch kit (jum per harness included)
Are available at a dealer.
7-Pin trailer connector
Lid Trailer hitch
Page 434 of 623

432
Driving
When Driving
Starting the Engine
1.Make sure the parking brake is applied.
2. Check that the shift lever is in
(P, then
depress the brake pedal.
u Although it is possible to start the vehicle
in
(N, it is safer to start it in (P.
3. Press the ENGINE START/STOP button
without depressing the accelerator pedal.
The engine will crank until it starts.
1 Starting the Engine
Keep your foot firmly on the brake pedal when
starting the engine.
The engine is harder to st art in cold weather and in
thinner air found at altitudes above 8,000 feet (2,400
meters).
When starting the engine in cold weather, turn off all
electrical accessories such as the lights, heating and
cooling system
*/climate control system*, and rear
defogger in order to reduce battery drain.
If you live in a region where winter is extremely cold,
an engine block heater will improve starting and
warming of the engine. Cons ult a dealer for details.
Bring the smart entry remote close to the ENGINE
START/STOP button if the battery in the smart entry
remote is weak.
2 If the Smart Entry Remote Battery is Weak
P. 577
The engine may not start if the smart entry remote is
subjected to strong radio waves.
Do not hold the ENGINE START/STOP button to
start the engine.
If the engine does not start, wait at least 30 seconds
before trying again.
Parking Brake
Brake Pedal
* Not available on all models
Page 436 of 623

uuWhen Driving uStarting the Engine
434
Driving
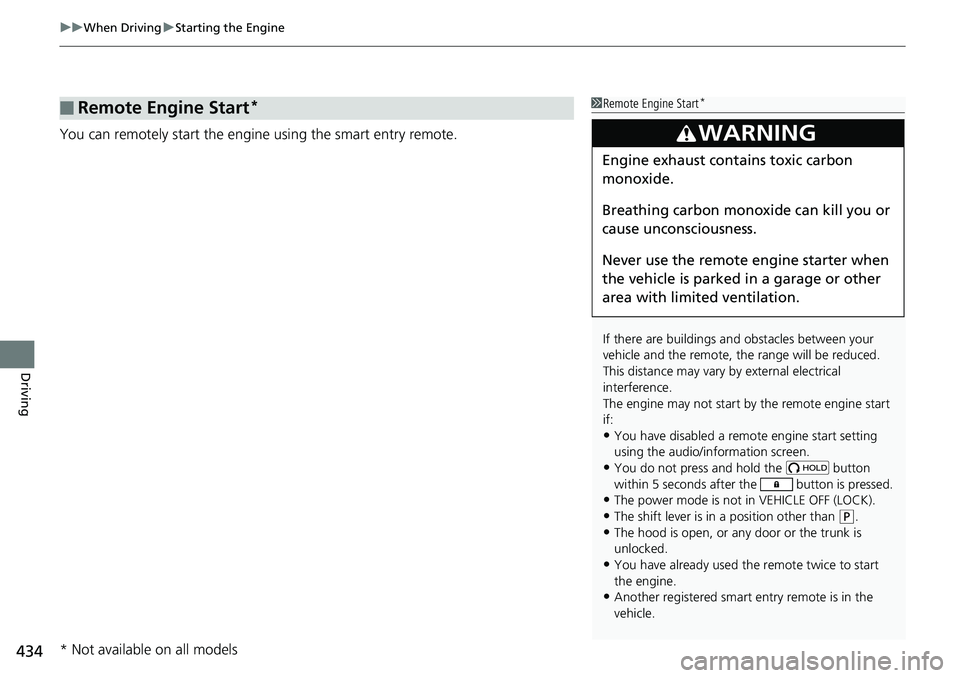
You can remotely start the engine using the smart entry remote.
■Remote Engine Start*1Remote Engine Start*
If there are buildings an d obstacles between your
vehicle and the remote, th e range will be reduced.
This distance may vary by external electrical
interference.
The engine may not start by the remote engine start
if:
•You have disabled a remo te engine start setting
using the audio/information screen.
•You do not press and hold the button
within 5 seconds after the button is pressed.
•The power mode is not in VEHICLE OFF (LOCK).•The shift lever is in a position other than ( P.
•The hood is open, or any door or the trunk is
unlocked.
•You have already used the remote twice to start
the engine.
•Another registered smart entry remote is in the
vehicle.
3WARNING
Engine exhaust contains toxic carbon
monoxide.
Breathing carbon monoxide can kill you or
cause unconsciousness.
Never use the remote engine starter when
the vehicle is parked in a garage or other
area with limited ventilation.
* Not available on all models
Page 438 of 623
uuWhen Driving uStarting the Engine
436
Driving
■To stop the engine1Remote Engine Start*
While the engine is running, the vehicle will
automatically preconditi on inside the vehicle.
When it is warm outside:
•The heating and cooling system*/climate control
system* is activated in recirculation mode.
•The seat ventilation* is activated.
When it is cold outside:
•The defroster is activated at a moderately warm
temperature.
•The rear defogger and door mirror heaters* are
activated.
•The seat heaters* and heated steering wheel* are
activated. 2Heated Steering Wheel
* P. 180
2 Front Seat Heaters and Seat
Ventilation
* P. 182, 183
Press and hold the
button for one second.Go within the range, and try again.
Some exterior lights will not flash when the remote is out of
the keyless access system range.
The engine will not stop.
Some exterior lights flash once if the engine stops
successfully.
* Not available on all models
Page 440 of 623

438
uuWhen Driving uPrecautions While Driving
Driving
Precautions While Driving
Utility vehicles have a significantly higher ro llover rate than other types of vehicles.
To prevent rollovers or loss of control:
• Take corners at slower speeds than yo u would with a passenger vehicle.
• Avoid sharp turns and abrupt maneuvers whenever possible.
• Do not modify your vehicle in any way that you would raise the center of gravity.
• Do not carry heavy cargo on the roof.
Never carry more than 165 lbs (75 kg) of cargo on the roof rack (Honda accessory).
Avoid driving in deep water and on flooded roads. This can damage the engine,
driveline, or cause electrical component failure.
If there is a strong impact with something un der the vehicle, stop in a safe location.
Check the underside of the vehicle for damage or any fluid leaks.
■Driving Guidelines for Your Utility Vehicle
■In Rain
■Other Precautions
1 Precautions While Driving
NOTICE
Do not change the shift lever while pressing the
accelerator pedal. You could damage the
transmission.
NOTICE
If you repeatedly turn the steering wheel at an
extremely low speed, or hold the steering wheel in
the full left or right position for a while, the system
heats up. The system goes into a protective mode,
and limits its performa nce. The steering wheel
becomes harder and harder to operate. Once the
system cools down, the EPS system is restored.
Repeated operation under these conditions can
eventually damage the system.
If the power mode is set to ACCESSORY while
driving, the engine will shut down and all steering
and brake power assist functi ons will stop, making it
difficult to control the vehicle.
Do not put the shift lever in
( N, as you will lose
engine braking (and acce leration) performance.
During the first 600 miles (1,000 km) of operation,
avoid sudden acceleration or full throttle operation so
as not to damage the engine or powertrain.
Avoid hard braking for the first 200 miles (300 km).
You should also follow this when the brake pads are
replaced.
Page 444 of 623
442
uuWhen Driving uECON Button
Driving
ECON Button
The ECON button turns the ECON mode on
and off.
The ECON mode helps you improve your fuel
economy by adjusting the performance of the
engine, air conditioning system, and cruise
control.1 ECON Button
While in ECON mode, the climate control system
* has
greater temperature fluctuation.
* Not available on all models