2018 HONDA HR-V stop start
[x] Cancel search: stop startPage 385 of 503

383
uuBraking uAnti-lock Brake System (ABS)
Driving
Anti-lock Brake System (ABS)
Helps prevent the wheels from locking up, and helps you retain steering control by
pumping the brakes rapidly, much faster than you.
The electronic brake distribu tion (EBD) system, which is part of the ABS, also
balances the front-to-rear braking distribution according to vehicle loading.
You should never pump the brake pedal. Let the ABS work for you by always
keeping firm, steady pressure on the brake pe dal. This is sometimes referred to as
“stomp and steer.”
■ABS operation
The brake pedal may pulsate slightly when the ABS is working. Keep holding the
pedal firmly down. On dry pavement, you will need to press on the brake pedal very
hard before the ABS activates. However, you may feel the ABS activate immediately
if you are trying to stop on snow or ice.
ABS may activate when you depres s the brake pedal when driving on:
• Wet or snow covered roads.
• Roads paved with stone.
• Roads with uneven surf aces, such as potholes, cracks, manholes, etc.
When the vehicle speed goes under 6 mph (10 km/h), the ABS stops.
■ABS1Anti-lock Brake System (ABS)
NOTICE
The ABS may not function correc tly if you use a tire of
the wrong size or type.
If the ABS indicator comes on while driving, there
may be a problem with the system.
While normal braking will not be affected, there is a
possibility that the ABS will not operating. Have your
vehicle checked by a dealer immediately.
The ABS is not designed for the purpose of reducing
the time or distance it takes for a vehicle to stop: It is
designed to limit brake lo ckup which can lead to
skidding and loss of steering control.
In the following cases, your vehicle may need more
distance to stop than a vehicle without the ABS:
•You are driving on rough or uneven road surfaces,
such as gravel or snow.
•The tires are equipped with snow chains.
The following may be observed with the ABS system:
•Motor sounds coming from the engine
compartment when the brakes are applied, or
when system checks are being performed after the
engine has been started and while vehicle is
accelerates.
•Brake pedal and/or the ve hicle body vibration when
ABS activates.
These vibrations and sounds are normal to ABS
systems and are no cause for concern.
18 HR-V-31T7A6200.book 383 ページ 2017年6月30日 金曜日 午後1時23分
Page 389 of 503

387
uuMulti-View Rear Camera uAbout Your Multi-View Rear Camera
Driving
You can view three different camera angles on the rearview display.
Press the LIST/SELECT (selector) knob to switch the angle.
Touch the appropriate icon to switch the angle. : Wide view
: Normal view
: Top down view
• If the last used viewing mode was Wide or Normal, the same mode is selected the
next time you put the transmission into
(R.
• If Top down view was last used before you turned off the engine, Wide View
mode is selected next time you turn the ignition switch to ON
(w*1 and put the
transmission into
(R.
• If Top down view was last used more than 10 seconds after you put the
transmission from
(R, Wide View mode is selected the next time you put the
transmission into
(R.
*1: Models with the smart entry system have an ENGINE START/STOP button instead of an
ignition switch.
Models with color audio system
Models with display audio system
All models
18 HR-V-31T7A6200.book 387 ページ 2017年6月30日 金曜日 午後1時23分
Page 397 of 503

395Continued
Maintenance
Maintenance MinderTM
If the engine oil life is less than 15%, you will see the Maintenance Minder messages
appear on the information display every time you turn the ignition switch to ON
(w*1. The messages notify you when to change the engine oil, or when to bring your
vehicle to a dealer for indicated maintenance services.
To Use Maintenance MinderTM
1. Turn the ignition switch to ON (w*1.
2. Press the (select/reset) knob repeatedly
until the engine oil life appears on the
information display.
The Maintenance Minder indicator ( ) stays
on in the instrument panel after the engine oil
life becomes 0% . Have the indicated
maintenance done by a dealer immediately.
*1: Models with the smart entry system have an ENGINE START/STOP button instead of an
ignition switch.
■Displaying the Engine Oil Life1 Displaying the Engine Oil Life
Based on the engine ope rating conditions, the
remaining engine oi l life is calculated and displayed
as a percentage.
Displayed Engine Oil Life (%)Calculated Engine Oil Life (%)
100 100 to 91
9090 to 81
80 80 to 71
7070 to 61
60 60 to 51
5050 to 41
40 40 to 31
3030 to 21
20 20 to 16
1515 to 11
10 10 to 6
55 to 1
00
18 HR-V-31T7A6200.book 395 ページ 2017年6月30日 金曜日 午後1時23分
Page 400 of 503

uuMaintenance MinderTMuTo Use Maintenance MinderTM
398
Maintenance
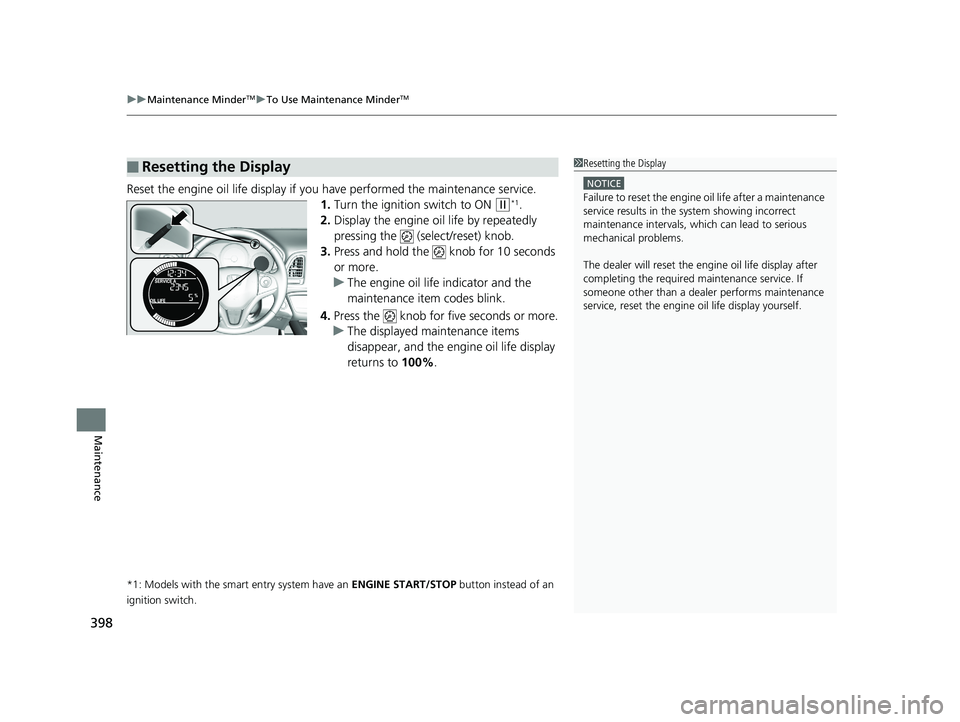
Reset the engine oil life display if yo u have performed the maintenance service.
1. Turn the ignition switch to ON
(w*1.
2. Display the engine oil life by repeatedly
pressing the (select/reset) knob.
3. Press and hold the knob for 10 seconds
or more.
u The engine oil life indicator and the
maintenance item codes blink.
4. Press the knob for five seconds or more.
u The displayed maintenance items
disappear, and the engine oil life display
returns to 100%.
*1: Models with the smart entry system have an ENGINE START/STOP button instead of an
ignition switch.
■Resetting the Display1 Resetting the Display
NOTICE
Failure to reset the engine oil life after a maintenance
service results in the sy stem showing incorrect
maintenance intervals, which can lead to serious
mechanical problems.
The dealer will reset the en gine oil life display after
completing the required ma intenance service. If
someone other than a deal er performs maintenance
service, reset the engine oil life display yourself.
18 HR-V-31T7A6200.book 398 ページ 2017年6月30日 金曜日 午後1時23分
Page 407 of 503

405
uuMaintenance Under the Hood uChanging the Engine Oil and Oil Filter
Maintenance
5. Remove the oil filter and dispose of the
remaining oil.
6. Check that the filter gasket is not stuck to
the engine contact surface.
u If it is stuck, you must detach it.
7. Wipe away dirt and dust adhering to the
contact surface of the engine block, and
install a new oil filter.
u Apply a light coat of new engine oil to
the filter gasket.
8. Put a new washer on the drain bolt, then
reinstall the drain bolt.
u Tightening torque:
30 lbf∙ft (40 N∙m, 4.0 kgf∙m)
9. Pour the recommended engine oil into the
engine.
u Engine oil change capacity (including
filter):
3.9 US qt (3.7 L)
10. Reinstall the engine oil fill cap securely and
start the engine.
11. Run the engine for a few minutes, and
then check that there is no leak from the
drain bolt or oil filter.
12. Stop the engine, wait for three minutes,
and then check the oil level on the
dipstick.
u If necessary, add more engine oil.1Changing the Engine Oil and Oil Filter
You will need a special wrench to replace the oil
filter. You can buy this wrench from a dealer.
When installing the new oil filter, follow the
instructions supplied with the oil filter.
Reinstall the engine oil fill cap. Start the engine. The
low oil pressure indicator should go off within five
seconds. If it does not, turn off the engine, and check
your work.
Oil Filter
18 HR-V-31T7A6200.book 405 ページ 2017年6月30日 金曜日 午後1時23分
Page 447 of 503

445
Handling the Unexpected
This chapter explains how to handle unexpected troubles.
ToolsTypes of Tools .................................. 446
If a Tire Goes Flat Changing a Flat Tire ......................... 448
Engine Does Not Start Checking the Engine ........................ 457
If the Smart Entry Remote Battery is Weak ....458
Emergency Engine Stop ................... 459
Jump Starting .................................... 460
Shift Lever Does Not Move .............. 462
Overheating How to Handle Overheating ............. 463 Indicator, Coming On/Blinking
If the Low Oil Pressure Indicator Comes
On ............................................. 465
If the Charging System Indicator Comes
On ................................................. 465
If the Malfunction Indicator Lamp Comes On or Blinks ..................................... 466
If the Brake System Indicator (Red) Comes On...................................................... 467
If the Electric Power Steering (EPS) System Indicator Comes On ....................... 467 If the Electric Parking Brake System
Indicator Comes On ....................... 468
If the Low Tire Pressure/TPMS Indicator Comes On or Blinks ....................... 469
Fuses Fuse Locations ................................. 470
Inspecting and Changing Fuses ........ 474
Emergency Towing ........................... 475
When You Cannot Open the Tailgate..... 476
18 HR-V-31T7A6200.book 445 ページ 2017年6月30日 金曜日 午後1時23分
Page 450 of 503

448
Handling the Unexpected
If a Tire Goes Flat
Changing a Flat Tire
If a tire goes flat while driving, grasp the steering wheel firmly, and brake gradually
to reduce speed. Then, stop in a safe place. Replace the flat tire with a compact
spare tire. Go to a dealer as soon as possibl e to have the full-size tire repaired or
replaced.
1. Park the vehicle on firm, level, and non- slippery surface and apply the parking
brake.
2. Move the shift lever to
(P.
2. Move the shift lever to
(R.
3. Turn on the hazard warning lights an d turn the ignition switch to LOCK
(0*1.
*1: Models with the smart entry system have an ENGINE START/STOP button instead of an
ignition switch.
1 Changing a Flat Tire
Follow compact spare precautions:
Periodically check the tire pressure of the compact
spare. It should be set to the specified pressure.
Specified Pressure: 60 psi (420 kPa, 4.2 kgf/cm
2)
When driving with the compact spare tire, keep the
vehicle speed under 50 mph (80 km/h). Replace with
a full-size tire as soon as possible.
The compact spare tire and wheel in your vehicle are
specifically for this model. Do not use them with
another vehicle. Do not us e another type of compact
spare tire or wheel with your vehicle.
Do not mount tire chains on a compact spare tire.
If a chain-mounted front tire goes flat, remove one of
the full-size rear tires and replace it with the compact
spare tire. Remove the flat front tire and replace it
with the full-size tire that was removed from the rear.
Mount the tire chains on the front tire.
Do not use the jack if it doesn’t work properly. Call
your dealer or a prof essional towing service.
Continuously variable transmission models
Manual transmission models
All models
18 HR-V-31T7A6200.book 448 ページ 2017年6月30日 金曜日 午後1時23分
Page 460 of 503

458
uuEngine Does Not Start uIf the Smart Entry Remote Battery is Weak
Handling the Unexpected
If the Smart Entry Remote Battery is Weak
If the beeper sounds, the indicator on the ENGINE START/STOP button flashes,
and the engine won’t start.
Start the engine as follows. 1.Touch the center of the ENGINE START/
STOP button with the H logo on the smart
entry remote while the indicator on the
ENGINE START/STOP button is flashing.
The buttons on the smart entry remote
should be facing you.
u The indicator flashes for about 30
seconds.
2. Depress the brake pedal (continuously
variable transmission) or clutch pedal
(manual transmission) and press the
ENGINE START/STOP button within 10
seconds after the beeper sounds while the
indicator stays on.
u If you don’t depress the pedal, the mode
will change to ACCESSORY.
Models with smart entry system
ENGINE
START
STOP
18 HR-V-31T7A6200.book 458 ページ 2017年6月30日 金曜日 午後1時23分