Page 36 of 263

34
uuPersonal InformationuPIN Numbers
System Setup
PIN Numbers
HHOMEuSettingsuNavigationuPersonal Info tabuPIN Number
Set a 4-digit PIN for protecting personal addresses and your home addresses. Once
you set a PIN, you are prompted to enter it whenever you access a personal address
or a home address for the first time after setting the power mode to ACCESSORY or
ON.
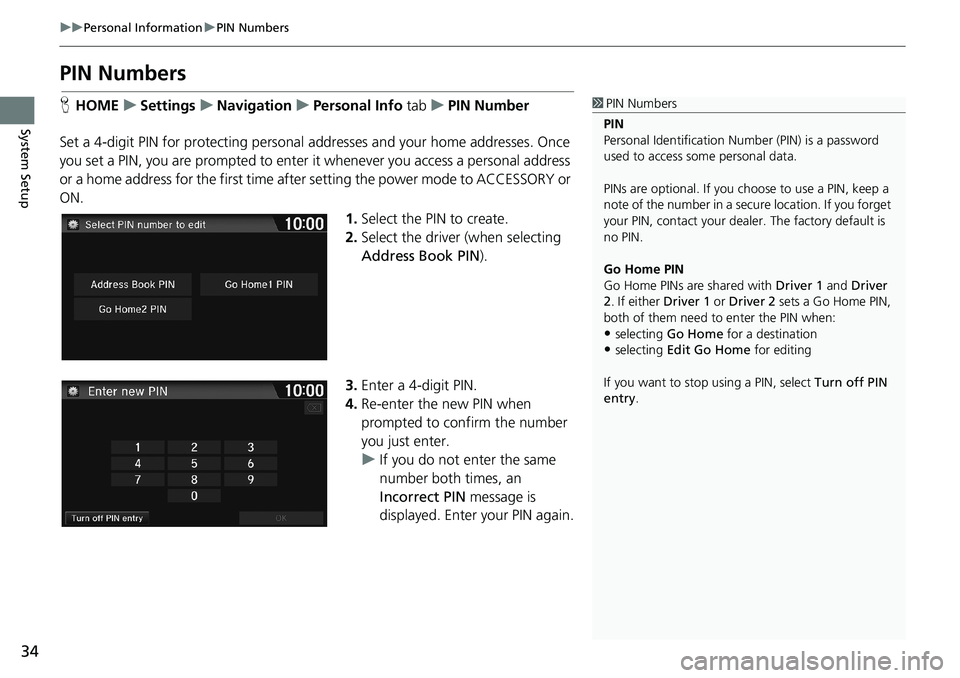
1.Select the PIN to create.
2.Select the driver (when selecting
Address Book PIN).
3.Enter a 4-digit PIN.
4.Re-enter the new PIN when
prompted to confirm the number
you just enter.
uIf you do not enter the same
number both times, an
Incorrect PIN message is
displayed. Enter your PIN again.1PIN Numbers
PIN
Personal Identification Number (PIN) is a password
used to access some personal data.
PINs are optional. If you choose to use a PIN, keep a
note of the number in a secure location. If you forget
your PIN, contact your dealer. The factory default is
no PIN.
Go Home PIN
Go Home PINs are shared with Driver 1 and Driver
2. If either Driver 1 or Driver 2 sets a Go Home PIN,
both of them need to enter the PIN when:
•selecting Go Home for a destination
•selecting Edit Go Home for editing
If you want to stop using a PIN, select Turn off PIN
entry.
Page 41 of 263
39
uuRoutinguRoute Preference
System Setup
Route Preference
HHOMEuSettingsuNavigationuRouting tabuRoute Preference
Change the route preference by selecting minimum or maximum driving methods.
1.Select an item.
2.Select MIN or MAX.
3.Select OK.1Route Preference
The calculated route may not be the shortest route or
the route you would choose. For safety reasons, the
system generally applies the following rules to your
route:
•Shortcuts through residential areas are avoided.
•Right turns are favored over left turns or U-turns.•Time-restricted turns (turns prohibited at certain
times of the day) are not used.
Check the ferry schedule when the calculated route
includes ferry route.
On Canadian models, Highways is displayed as
Freeways.
Page 42 of 263

40
uuRoutinguUnverified Routing
System Setup
Unverified Routing
HHOMEuSettingsuNavigationuRouting tabuUnverified Routing
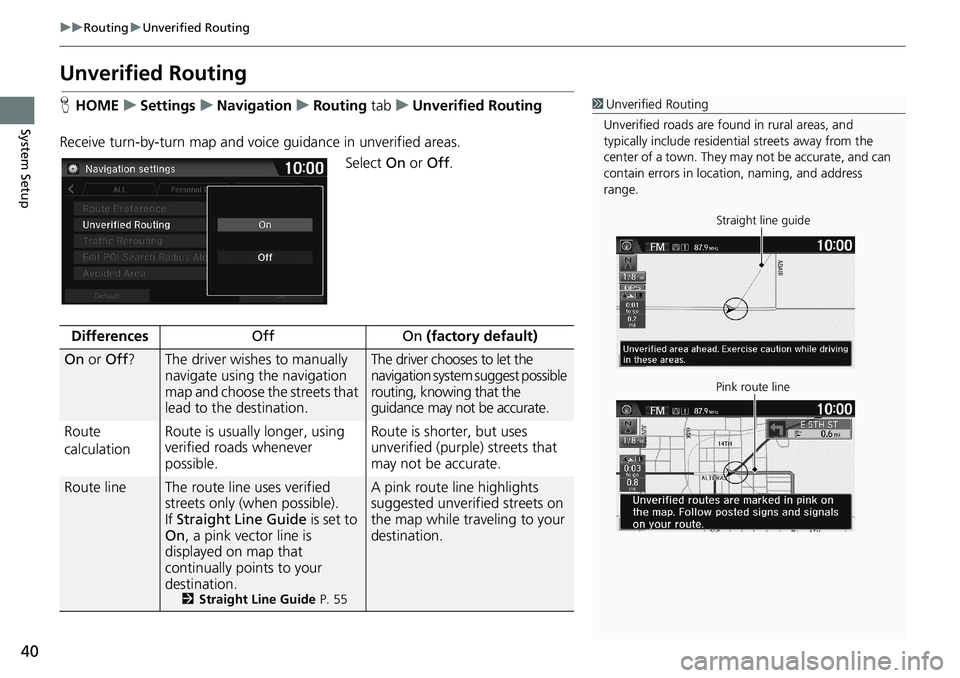
Receive turn-by-turn map and voice guidance in unverified areas.
Select On or Off.1Unverified Routing
Unverified roads are found in rural areas, and
typically include residential streets away from the
center of a town. They may not be accurate, and can
contain errors in location, naming, and address
range.
Straight line guide
Pink route line
DifferencesOff On (factory default)
On or Off?The driver wishes to manually
navigate using the navigation
map and choose the streets that
lead to the destination.The driver chooses to let the
navigation system suggest possible
routing, knowing that the
guidance may not be accurate.
Route
calculationRoute is usually longer, using
verified roads whenever
possible.Route is shorter, but uses
unverified (purple) streets that
may not be accurate.
Route lineThe route line uses verified
streets only (when possible).
If Straight Line Guide is set to
On, a pink vector line is
displayed on map that
continually points to your
destination.
2Straight Line Guide P. 55
A pink route line highlights
suggested unverified streets on
the map while traveling to your
destination.
Page 46 of 263

44
uuRoutinguAvoided Area
System Setup
Avoided Area
HHOMEuSettingsuNavigationuRouting tabuAvoided Area
Specify up to five areas to avoid (e.g., road construction, closures), if possible, when
the system calculates routes to your destination.
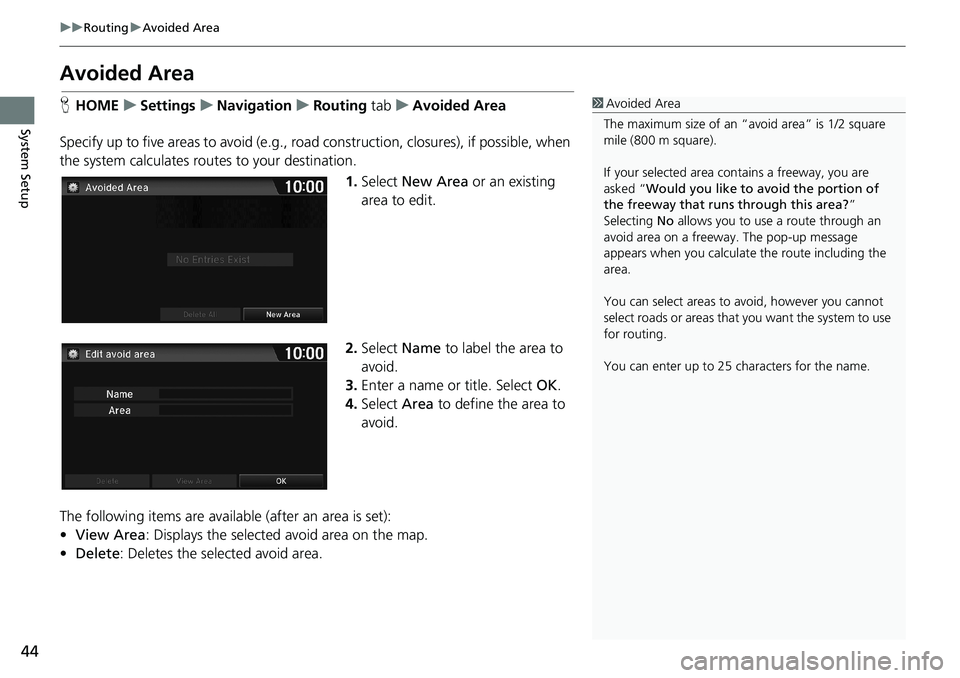
1.Select New Area or an existing
area to edit.
2.Select Name to label the area to
avoid.
3.Enter a name or title. Select OK.
4.Select Area to define the area to
avoid.
The following items are available (after an area is set):
•View Area: Displays the selected avoid area on the map.
•Delete: Deletes the selected avoid area.1Avoided Area
The maximum size of an “avoid area” is 1/2 square
mile (800 m square).
If your selected area contains a freeway, you are
asked “Would you like to avoid the portion of
the freeway that runs through this area?”
Selecting No allows you to use a route through an
avoid area on a freeway. The pop-up message
appears when you calculate the route including the
area.
You can select areas to avoid, however you cannot
select roads or areas that you want the system to use
for routing.
You can enter up to 25 characters for the name.
Page 47 of 263
45
uuRoutinguAvoided Area
System Setup
5.Select a method for specifying the
area.
The following items are available:
•Address: Specify the general area by entering an address.
2Address P. 82
•Map Input: Specify the general area by map input.
2Map Input P. 96
6.If you select Map Input, select
from Current Position, City or
State. Scroll the map to position
the cursor over your desired area,
adjusting the map scale as
necessary. Select OK.
uTo redo the area selection,
select BACK.
7.Select or to change the
size of the area you want to avoid.
Select OK.
8.Select OK.
uThe area you specify is
displayed in the list of areas to
avoid.
1Avoided Area
The map scale can be changed at 1/4 mile (400 m) or
less.
Avoid area
Page 48 of 263
46
System Setup
Guidance
HHOMEuSettingsuNavigationuGuidance tab
Choose various settings that determine the navigation system functionality during
route guidance.
Select an item.
The following items are available:
•Guidance Mode: Sets whether to display only the map screen or a split
map/guidance screen.
2Guidance Mode P. 47
•Enhanced Voice Guidance: Sets whether to read out certain routing points (if
stored in the database) during voice guidance.
On: Voice guidance includes certain routing points.
Off (factory default): Disables the feature.
Page 49 of 263
47
uuGuidanceuGuidance Mode
Continued
System Setup
Guidance Mode
HHOMEuSettingsuNavigationuGuidance tabuGuidance Mode
Select the display mode for the map and guidance screens.
1.Select an option.
2.Select OK.
The following items are available:
•1 (Map) (factory default): Displays only the map screen. When you approach a
guidance point, the next guidance point appears.1Guidance Mode
The guidance mode can also be selected from the
map menu, or selecting the orientation icon.
2Map Menu P. 105
You can also change the map orientation (north-up,
heading-up, or 3D).
2View (Map Orientation) P. 54
123
Near the next
guidance point Map screen Next Maneuver screen
Next guidance point
Page 50 of 263
48
uuGuidanceuGuidance Mode
System Setup
•2 (Direction List): Displays the map and direction list simultaneously on the map
screen. When you approach a guidance point, the next guidance point appears.
•3 (Next Maneuver): Displays the map and next guidance point simultaneously on
the map screen.
Near the next
guidance point Direction List screenNext Maneuver screen
Next guidance point
Guidance direction list
Near the next
guidance point Next Maneuver screenNext Maneuver screen
Next guidance point