2018 HONDA CLARITY PLUG-IN Front pa el
[x] Cancel search: Front pa elPage 479 of 591
477
uuMaintenance MinderTMuTo Use Maintenance MinderTM
Continued
Maintenance
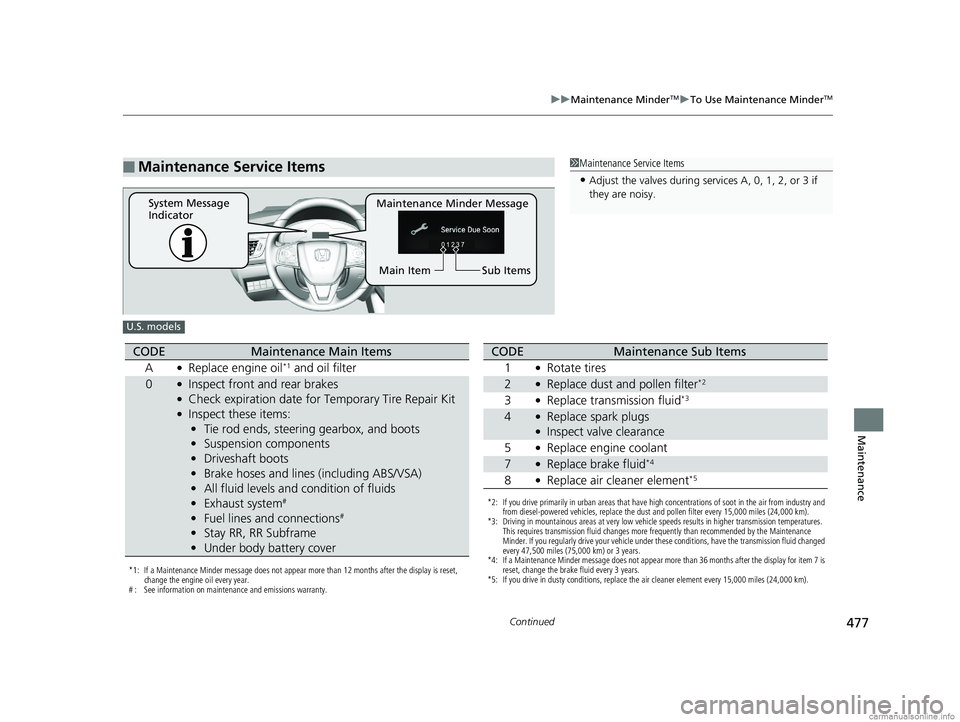
■Maintenance Service Items1Maintenance Service Items
•Adjust the valves during services A, 0, 1, 2, or 3 if
they are noisy.
Maintenance Minder Message
System Message
Indicator
Sub Items
Main Item
U.S. models
*1: If a Maintenance Minder message does not appear more than 12 months after the display is reset,
change the engine oil every year.
# : See information on maintenance and emissions warranty.
CODEMaintenance Main Items
A
●Replace engine oil*1 and oil filter
0●Inspect front and rear brakes●Check expiration date for Temporary Tire Repair Kit●Inspect these items: • Tie rod ends, steering gearbox, and boots
• Suspension components
• Driveshaft boots
• Brake hoses and lines (including ABS/VSA)
• All fluid levels and condition of fluids
• Exhaust system
#
•Fuel lines and connections#
•Stay RR, RR Subframe
• Under body battery cover
*2: If you drive primarily in urban areas that have high concentrations of soot in the air from industry and
from diesel-powered vehicles, replace the dust and pollen filter every 15,000 miles (24,000 km).
*3: Driving in mountainous areas at very low vehicle speeds results in higher transmission temperatures.
This requires transmission fluid changes more frequently than recommended by the Maintenance
Minder. If you regularly drive your vehicle under these conditions, have the transmission fluid changed
every 47,500 miles (75,000 km) or 3 years.
*4: If a Maintenance Minder message does not appear more than 36 months after the display for item 7 is reset, change the brake fluid every 3 years.
*5: If you drive in dusty conditions, replace the air cleaner element every 15,000 miles (24,000 km).
CODEMaintenance Sub Items
1
●Rotate tires
2●Replace dust and pollen filter*2
3●Replace transmission fluid*3
4●Replace spark plugs●Inspect valve clearance
5
●Replace engine coolant
7●Replace brake fluid*4
8●Replace air cleaner element*5
18 CLARITY PHEV CSS-31TRW6000.book 477 ページ 2017年12月25日 月曜日 午後2時22分
Page 480 of 591

478
uuMaintenance MinderTMuTo Use Maintenance MinderTM
Maintenance
1Maintenance Service Items
•Adjust the valves during services A, 9, 1, 2, or 3 if
they are noisy.
Canadian models
*1: If a Maintenance Minder message does not appear more than 12 months after the display is reset,
change the engine oil every year.
*2: If you drive primarily in urban areas that have high concentrations of soot in the air from industry and from diesel-powered vehicles, replace the dust and pollen filter every 24,000 km (15,000 miles).
*3: Driving in mountainous areas at very low vehicle speeds results in higher transmission temperatures.
This requires transmission fluid changes more frequently than recommended by the Maintenance
Minder. If you regularly drive your vehicle under these conditions, have the transmission fluid changed
every 75,000 km (47,500 miles) or 3 years.
*4: If a Maintenance Minder message does not appear more than 36 months after the display for item 7 is reset, change the brake fluid every 3 years.
*5: If you drive in dusty conditions, replace the air cleaner element every 24,000 km (15,000 miles).
# : See information on maintenance and emissions warranty.
CODEMaintenance Main Items
A
●Replace engine oil*1 and oil filter
CODEMaintenance Sub Items
1
●Rotate tires
2●Replace dust and pollen filter*2
3●Replace transmission fluid*3
4●Replace spark plugs●Inspect valve clearance
5
●Replace engine coolant
7●Replace brake fluid*4
8●Replace air cleaner element*5
9●Service front and rear brakes●Check expiration date for Temporary Tire Repair Kit●Inspect these items: • Tie rod ends, steering gearbox, and boots
• Suspension components
• Driveshaft boots
• Brake hoses and lines (including ABS/VSA)
• All fluid levels and condition of fluids
• Exhaust system
#
•Fuel lines and connections#
•Stay RR, RR Subframe
• Under body battery cover
18 CLARITY PHEV CSS-31TRW6000.book 478 ページ 2017年12月25日 月曜日 午後2時22分
Page 483 of 591
481
uuMaintenance Under the Hood uOpening the Hood
Maintenance
Opening the Hood
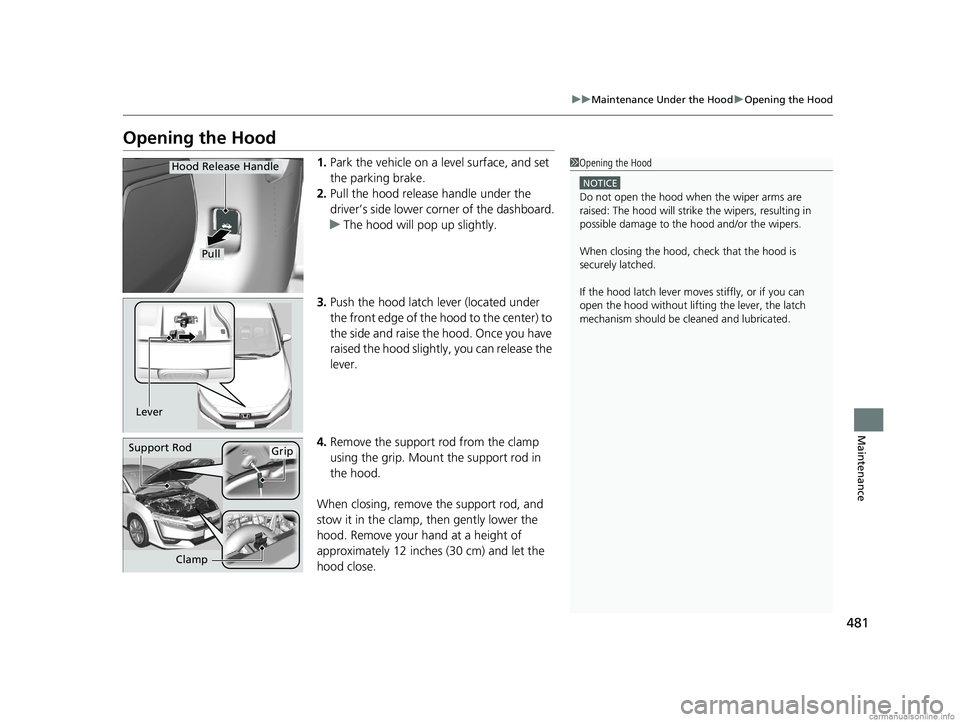
1. Park the vehicle on a level surface, and set
the parking brake.
2. Pull the hood release handle under the
driver’s side lower corner of the dashboard.
u The hood will pop up slightly.
3. Push the hood latch lever (located under
the front edge of the hood to the center) to
the side and raise the hood. Once you have
raised the hood slightly , you can release the
lever.
4. Remove the support rod from the clamp
using the grip. Mount the support rod in
the hood.
When closing, remove the support rod, and
stow it in the clamp, then gently lower the
hood. Remove your hand at a height of
approximately 12 inches (30 cm) and let the
hood close.1 Opening the Hood
NOTICE
Do not open the hood when the wiper arms are
raised: The hood will strike the wipers, resulting in
possible damage to the hood and/or the wipers.
When closing the hood, check that the hood is
securely latched.
If the hood latch lever moves stiffly, or if you can
open the hood without lifti ng the lever, the latch
mechanism should be cl eaned and lubricated.
Pull
Hood Release Handle
Lever
Support RodGrip
Clamp
18 CLARITY PHEV CSS-31TRW6000.book 481 ページ 2017年12月25日 月曜日 午後2時22分
Page 496 of 591
494
Maintenance
Replacing Light Bulbs
Headlights
Headlights are LED type. Have an authorized Honda Clarity Plug-In Hybrid dealer
inspect and replace the light assembly.
Front Turn Signal and Front Side Marker Lights
Front turn signal and front side marker lights are LED type. Have an authorized
Honda Clarity Plug-In Hybrid dealer inspect and replace the light assembly.
Parking/Daytime Running Lights
Parking/daytime running lights are LED type. Have an authorized Honda Clarity Plug-
In Hybrid dealer inspect a nd replace the light assembly.
1Headlights
The headlight aim is set by the factory, and does not
need to be adjusted. Howeve r, if you regularly carry
heavy items in the trunk, have the aiming readjusted
at an authorized Honda Clar ity Plug-In Hybrid dealer
or by a qualif ied technician.
18 CLARITY PHEV CSS-31TRW6000.book 494 ページ 2017年12月25日 月曜日 午後2時22分
Page 502 of 591

500
uuChecking and Maintaining Tires uTire and Loading Information Label
Maintenance
Tire and Loading Information Label
The label attached to the driver’s doorj amb provides necessary tire and loading
information.
Tire Labeling
The tires that came on your vehicle have a
number of markings. Those you should be
aware of are described as shown.
Whenever tires are replaced, they should be replaced with tires of the same size.
1 Tire and Loading Information Label
The tire and loading informat ion label attached to the
driver’s doorjamb contains:
aThe number of people your vehicle can carry.bThe total weight your vehicle can carry. Do not
exceed this weight.
cThe original tire sizes for front, rear, and spare, if
equipped.
dThe proper cold tire pressure for front, rear, and
spare, if equipped.
Label
Example
Example Tire Size
Tire
Identification
Number (TIN)
Maximum
Tire Load
Maximum
Tire Pressure
Tire Size
■Tire Sizes
1 Tire Sizes
Following is an example of tire size with an
explanation of what each component means.
235/45R18 94V
235: Tire width in millimeters.
45: Aspect ratio (the tire’s section height as a
percentage of its width).
R: Tire construction code (R indicates radial).
18: Rim diameter in inches.
94: Load index (a numerical code associated with the
maximum load the tire can carry).
V: Speed symbol (an alphab etical code indicating the
maximum speed rating).
18 CLARITY PHEV CSS-31TRW6000.book 500 ページ 2017年12月25日 月曜日 午後2時22分
Page 507 of 591
505
uuChecking and Maintaining Tires uTire and Wheel Replacement
Maintenance
Tire and Wheel Replacement
Replace your tires with radials of the same size, load range, speed rating, and
maximum cold tire pressure rating (as shown on the tire’s sidewall). Using tires of a
different size or construction can cause ce rtain vehicle systems such as the ABS and
Vehicle Stability Assist (VSA®) system to work incorrectly.
It is best to replace all four tires at the same time. If that isn’t possible, replace the
front or rear tires in pairs.
Make sure that the wheel’s specifications match those of the original wheels.1 Tire and Wheel Replacement
3WARNING
Installing improper tires on your vehicle can
affect handling and stability. This can cause
a crash in which you can be seriously hurt or
killed.
Always use the size and type of tires
recommended in this owner’s manual.
18 CLARITY PHEV CSS-31TRW6000.book 505 ページ 2017年12月25日 月曜日 午後2時22分
Page 508 of 591
506
uuChecking and Maintaining Tires uTire Rotation
Maintenance
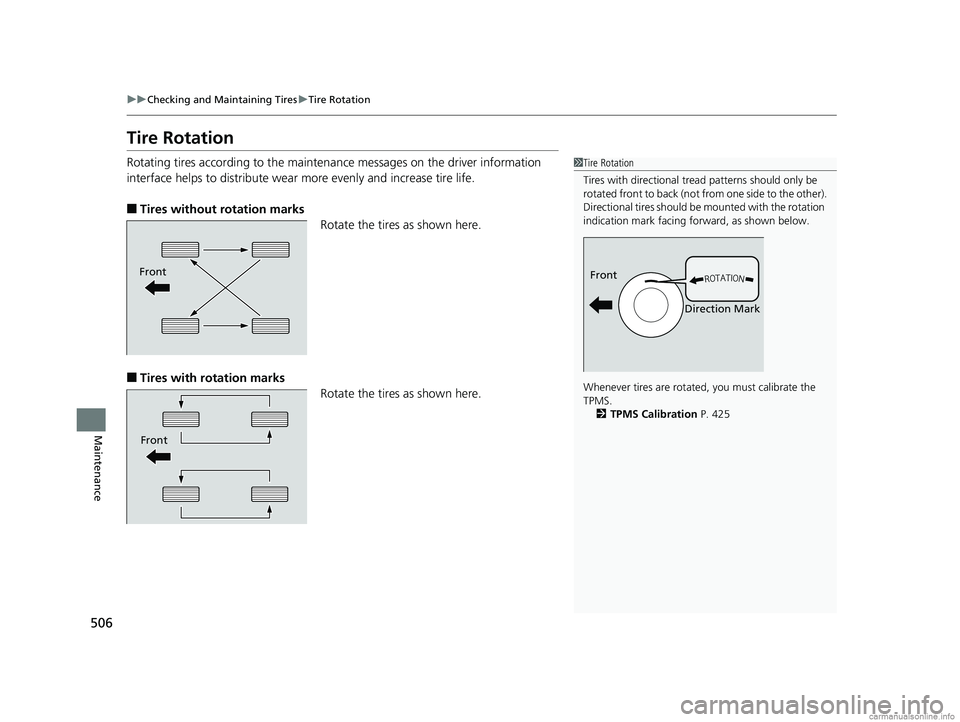
Tire Rotation
Rotating tires according to the maintena nce messages on the driver information
interface helps to distribute wear more evenly and increase tire life.
■Tires without rotation marks Rotate the tires as shown here.
■Tires with rotation marksRotate the tires as shown here.
1Tire Rotation
Tires with directional trea d patterns should only be
rotated front to back (not fr om one side to the other).
Directional tires should be mounted with the rotation
indication mark facing forward, as shown below.
Whenever tires are rotated, you must calibrate the
TPMS. 2 TPMS Calibration P. 425
Front
Direction MarkFront
Front
18 CLARITY PHEV CSS-31TRW6000.book 506 ページ 2017年12月25日 月曜日 午後2時22分
Page 509 of 591

507
uuChecking and Maintaining Tires uWinter Tires
Maintenance
Winter Tires
If driving on snowy or frozen roads, mount all season marked M+S tires, snow tires,
or tire chains; reduce speed; and maintain sufficient distance between vehicles when
driving.
Be particularly careful wh en operating the steering wheel or brakes to prevent
skidding.
Use tire chains, snow tires, or all season tires when necessary or according to the law.
When mounting, refer to the following points.
For winter tires:
• Select the size and load ranges that are the same as the original tires.
• Mount the tires to all four wheels.
For tire chains:
• Install them on the front tires only.
• Because your vehicle has limited tire clea rance, we strongly recommend using the
chains listed below:
• Follow the chain manufactur er’s instruction when installing. Mount them as
tightly as you can.
• Check that the chains do not touc h the brake lines or suspension.
• Drive slowly.
Cable-type: SCC Radial Chain SC1040
1Winter Tires
NOTICE
Traction devices that are th e wrong size or improperly
installed can damage your vehicle’s brake lines,
suspension, body, and wheels. Stop driving if they are
hitting any part of the vehicle.
When tire chains are mounted, follow the chain
manufacturer’s instructi ons regarding vehicle
operational limits.
If your vehicle is equipp ed with summer tires, be
aware that these tires are not designed for winter
driving conditions. For more information, contact an
authorized Honda Clarity Plug-In Hybrid dealer.
3WARNING
Using the wrong chains, or not properly
installing chains, can damage the brake
lines and cause a crash in which you can be
seriously injured or killed.
Follow all instructions in this owner’s
manual regarding the selection and use of
tire chains.
18 CLARITY PHEV CSS-31TRW6000.book 507 ページ 2017年12月25日 月曜日 午後2時22分