2018 HONDA CLARITY ELECTRIC warning lights
[x] Cancel search: warning lightsPage 25 of 559
23
Quick Reference Guide
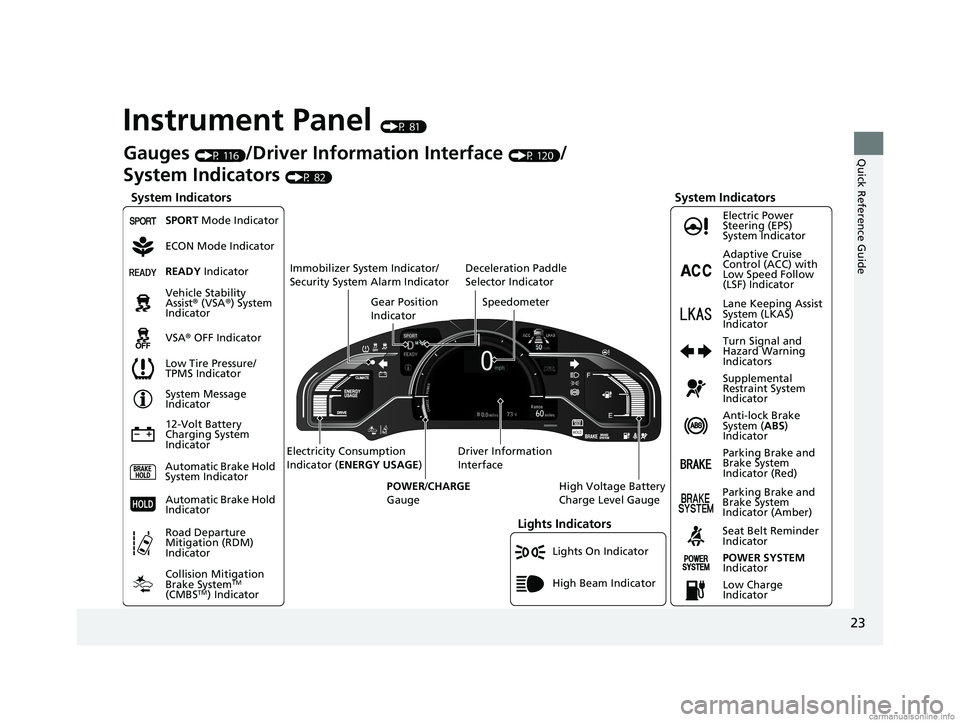
Instrument Panel (P 81)
Lights On Indicator
System Indicators
12-Volt Battery
Charging System
IndicatorAnti-lock Brake
System (
ABS)
Indicator
Vehicle Stability
Assist
® (VSA ®) System
Indicator
VSA ® OFF Indicator Electric Power
Steering (EPS)
System Indicator
Lights Indicators
High Beam Indicator
Seat Belt Reminder
Indicator
System Indicators
System Message
Indicator
Parking Brake and
Brake System
Indicator (Red) Supplemental
Restraint System
Indicator
Gauges (P 116)/Driver Information Interface (P 120)/
System Indicators
(P 82)
Low Tire Pressure/
TPMS Indicator Turn Signal and
Hazard Warning
Indicators
Speedometer
Automatic Brake Hold
System Indicator Parking Brake and
Brake System
Indicator (Amber)
SPORT Mode Indicator
Collision Mitigation
Brake System
TM
(CMBSTM) Indicator
Road Departure
Mitigation (RDM)
Indicator
Immobilizer System Indicator/
Security System Alarm Indicator
Automatic Brake Hold
IndicatorREADY Indicator
POWER SYSTEM
Indicator
Gear Position
Indicator
High Voltage Battery
Charge Level Gauge
Driver Information
Interface
Electricity Consumption
Indicator (
ENERGY USAGE )
POWER /CHARGE
Gauge
Low Charge
Indicator Adaptive Cruise
Control (ACC) with
Low Speed Follow
(LSF) Indicator
Lane Keeping Assist
System (LKAS)
Indicator
Deceleration Paddle
Selector Indicator
ECON Mode Indicator
18 CLARITY ELECTRIC CSS-31TRV6100.book 23 ページ 2018年2月5日 月曜日 午後12時0分
Page 96 of 559
94
uuIndicators u
Instrument Panel
IndicatorNameOn/BlinkingExplanationMessage
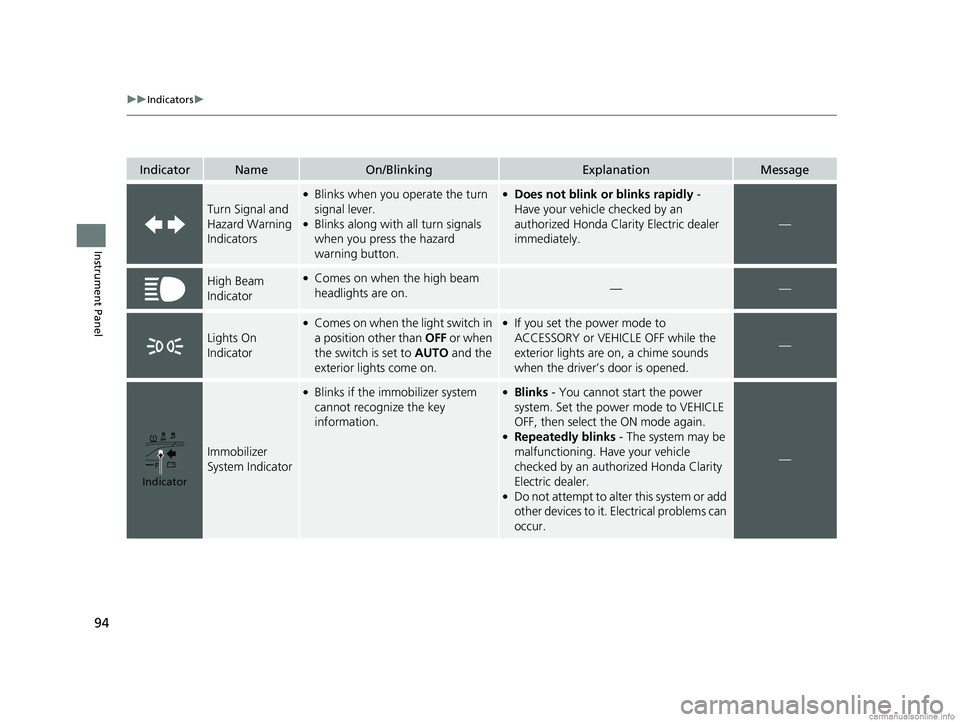
Turn Signal and
Hazard Warning
Indicators
●Blinks when you operate the turn
signal lever.
●Blinks along with all turn signals
when you press the hazard
warning button.
●Does not blink or blinks rapidly -
Have your vehicle checked by an
authorized Honda Clarity Electric dealer
immediately.
—
High Beam
Indicator●Comes on when the high beam
headlights are on.——
Lights On
Indicator
●Comes on when the light switch in
a position other than OFF or when
the switch is set to AUTO and the
exterior lights come on.●If you set the power mode to
ACCESSORY or VEHICLE OFF while the
exterior lights are on, a chime sounds
when the driver’s door is opened.
—
Immobilizer
System Indicator
●Blinks if the immobilizer system
cannot recognize the key
information.●Blinks - You cannot start the power
system. Set the power mode to VEHICLE
OFF, then select the ON mode again.
●Repeatedly blinks - The system may be
malfunctioning. Have your vehicle
checked by an author ized Honda Clarity
Electric dealer.
●Do not attempt to alter this system or add
other devices to it. Electrical problems can
occur.
—
Indicator
18 CLARITY ELECTRIC CSS-31TRV6100.book 94 ページ 2018年2月5日 月曜日 午後12時0分
Page 180 of 559
178
uuInterior Lights/Interior Convenience Items uInterior Convenience Items
Controls
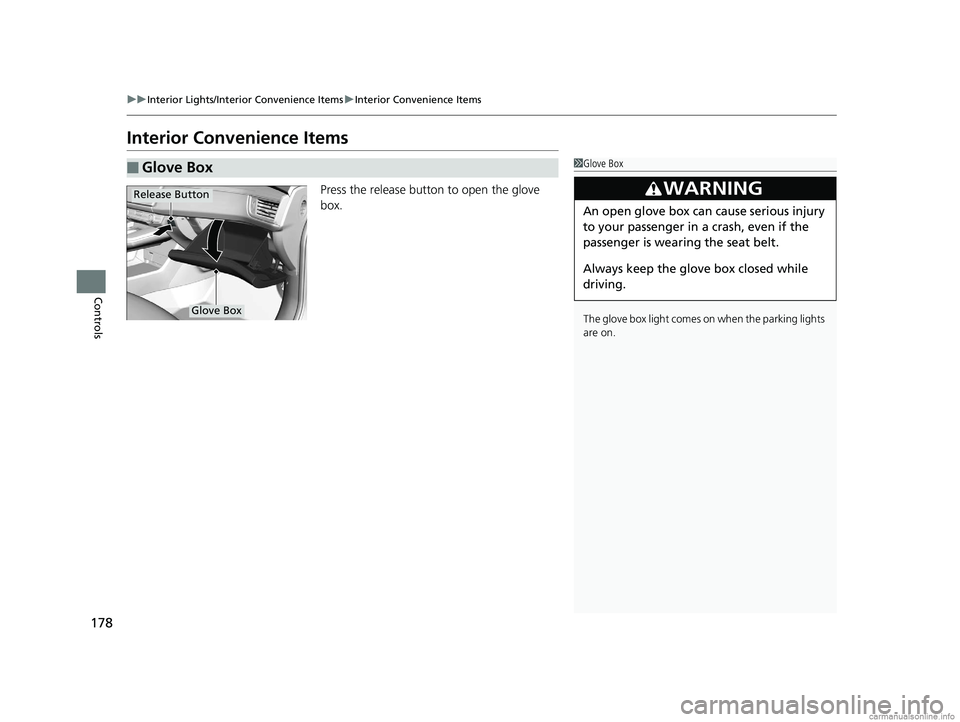
Interior Convenience Items
Press the release button to open the glove
box.
■Glove Box1Glove Box
The glove box light comes on when the parking lights
are on.
3WARNING
An open glove box can cause serious injury
to your passenger in a crash, even if the
passenger is wearing the seat belt.
Always keep the glove box closed while
driving.
Glove Box
Release Button
18 CLARITY ELECTRIC CSS-31TRV6100.book 178 ページ 2018年2月5日 月曜日 午後12時0分
Page 186 of 559
uuInterior Lights/Interior Convenience Items uInterior Convenience Items
184
Controls
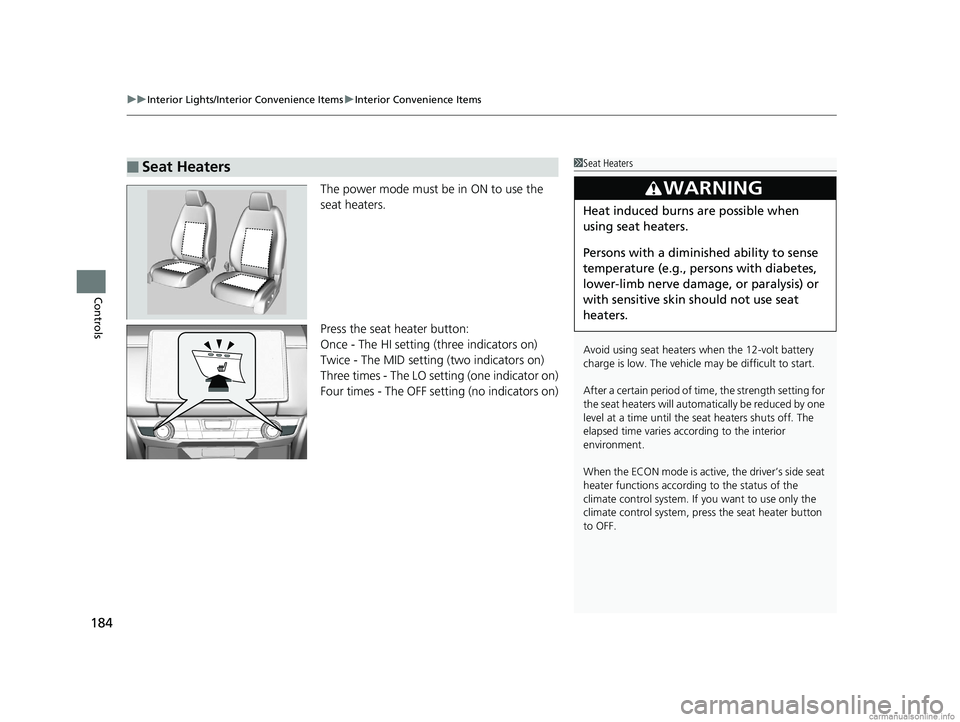
The power mode must be in ON to use the
seat heaters.
Press the seat heater button:
Once - The HI setting (three indicators on)
Twice - The MID setting (two indicators on)
Three times - The LO setting (one indicator on)
Four times - The OFF se tting (no indicators on)
■Seat Heaters1Seat Heaters
Avoid using seat heaters when the 12-volt battery
charge is low. The vehicle may be difficult to start.
After a certain period of time, the strength setting for
the seat heaters will automatically be reduced by one
level at a time until the seat heaters shuts off. The
elapsed time varies according to the interior
environment.
When the ECON mode is active, the driver’s side seat
heater functions accordi ng to the status of the
climate control system. If you want to use only the
climate control system, press the seat heater button
to OFF.
3WARNING
Heat induced burns are possible when
using seat heaters.
Persons with a diminished ability to sense
temperature (e.g., persons with diabetes,
lower-limb nerve damage, or paralysis) or
with sensitive skin should not use seat
heaters.
18 CLARITY ELECTRIC CSS-31TRV6100.book 184 ページ 2018年2月5日 月曜日 午後12時0分
Page 194 of 559
uuClimate Control System uUsing Automatic Climate Control
192
Controls
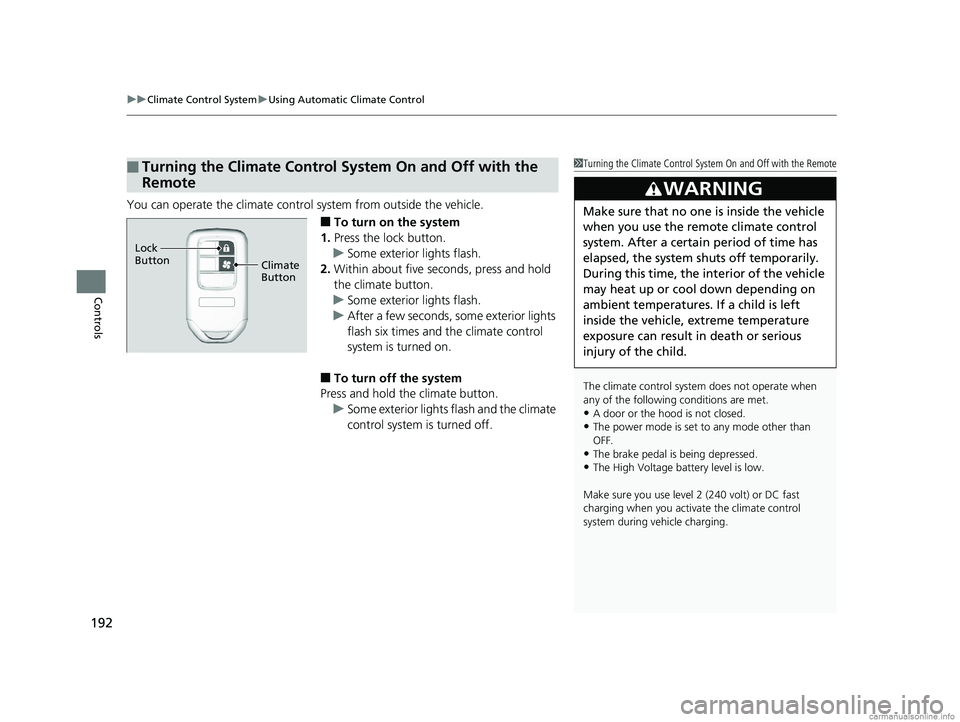
You can operate the climate contro l system from outside the vehicle.
■To turn on the system
1. Press the lock button.
u Some exterior lights flash.
2. Within about five seconds, press and hold
the climate button.
u Some exterior lights flash.
u After a few seconds, some exterior lights
flash six times and the climate control
system is turned on.
■To turn off the system
Press and hold the climate button.
u Some exterior lights flash and the climate
control system is turned off.
■Turning the Climate Control System On and Off with the
Remote1Turning the Climate Control System On and Off with the Remote
The climate control system does not operate when
any of the following conditions are met.
•A door or the hood is not closed.
•The power mode is set to any mode other than
OFF.
•The brake pedal is being depressed.
•The High Voltage battery level is low.
Make sure you use level 2 (240 volt) or DC fast
charging when you activate the climate control
system during vehicle charging.
3WARNING
Make sure that no one is inside the vehicle
when you use the remote climate control
system. After a certain period of time has
elapsed, the system sh uts off temporarily.
During this time, the in terior of the vehicle
may heat up or cool down depending on
ambient temperatures. If a child is left
inside the vehicle, extreme temperature
exposure can result in death or serious
injury of the child.
Climate
Button
Lock
Button
18 CLARITY ELECTRIC CSS-31TRV6100.book 192 ページ 2018年2月5日 月曜日 午後12時0分
Page 391 of 559
389
uuWhen Driving uAdaptive Cruise Control (ACC) with Low Speed Follow (LSF)
Continued
Driving
Adaptive Cruise Control (ACC) with Low Speed
Follow (LSF)
Helps maintain a constant vehicle speed an d a set following-interval behind a vehicle
detected ahead of yours and, if the detect ed vehicle comes to a stop, can decelerate
and stop your ve hicle, without you having to keep your foot on the brake or the
accelerator.
When ACC with LSF slows your vehicle by applying the brakes, your vehicle's brake
lights will illuminate.
1 Adaptive Cruise Control (ACC) with Low Speed Follow (LSF)
Important Reminder
As with any system, there are limits to ACC with LSF.
Use the brake pedal whenever necessary, and always
keep a safe interval betw een your vehicle and other
vehicles.
Be careful not to severely impact the radar sensor
cover.
3WARNING
Improper use of ACC wi th LSF can lead to a
crash.
Use ACC with LSF only when driving on
expressways or freeways and in good
weather conditions.
3WARNING
ACC with LSF has limite d braking capability
and may not stop your vehicle in time to
avoid a collision with a vehicle that quickly
stops in front of you.
Always be prepared to apply the brake
pedal if the conditions require.
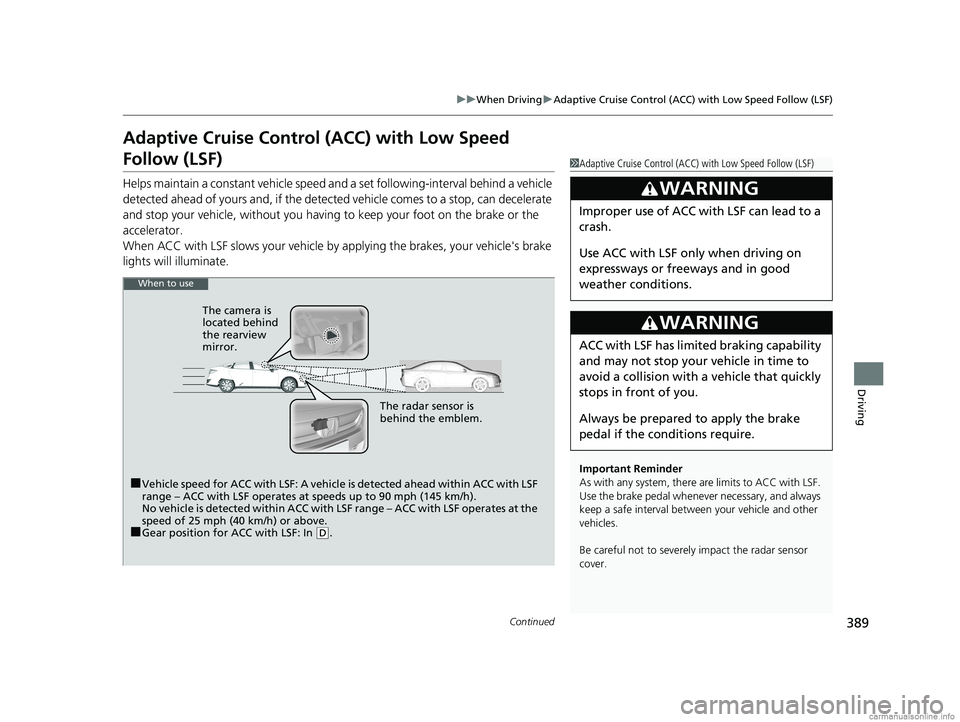
When to use
■Vehicle speed for ACC with LSF: A vehicle is detected ahead within ACC with LSF
range – ACC with LSF operates at speeds up to 90 mph (145 km/h).
No vehicle is detected within ACC with LSF range – ACC with LSF operates at the
speed of 25 mph (40 km/h) or above.
■Gear position for ACC with LSF: In ( D. The radar sensor is
behind the emblem.
The camera is
located behind
the rearview
mirror.
18 CLARITY ELECTRIC CSS-31TRV6100.book 389 ページ 2018年2月5日 月曜日 午後12時0分
Page 426 of 559
uuBraking uBrake System
424
Driving
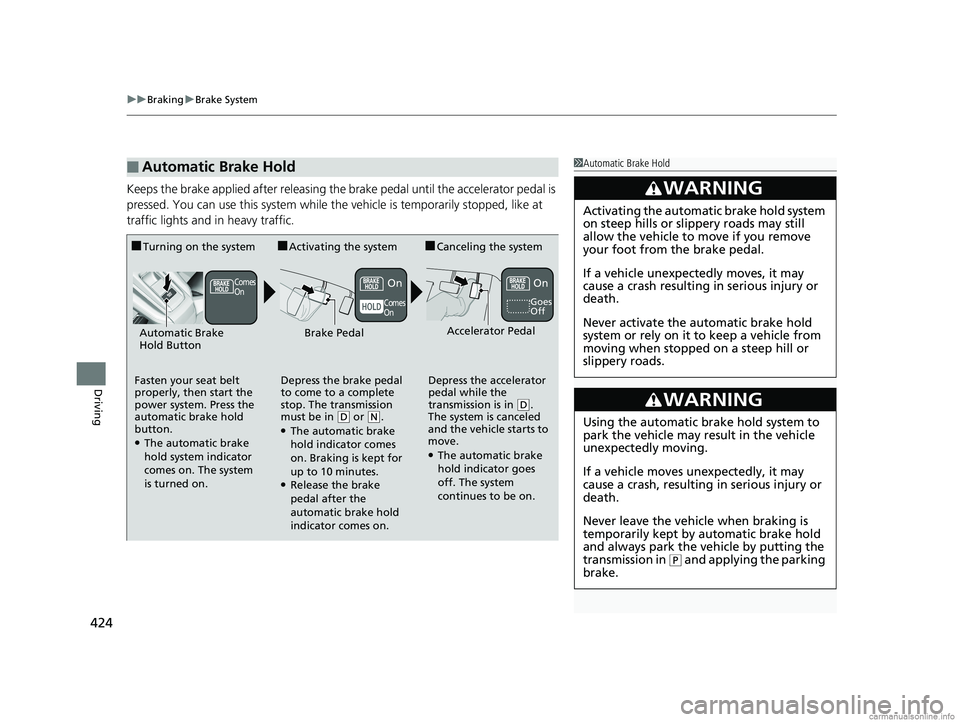
Keeps the brake applied after releasing the brake pedal until the accelerator pedal is
pressed. You can use this system while the vehicle is temporarily stopped, like at
traffic lights and in heavy traffic.
■Automatic Brake Hold1Automatic Brake Hold
3WARNING
Activating the automatic brake hold system
on steep hills or slippery roads may still
allow the vehicle to move if you remove
your foot from the brake pedal.
If a vehicle unexpectedly moves, it may
cause a crash resulting in serious injury or
death.
Never activate the automatic brake hold
system or rely on it to keep a vehicle from
moving when stopped on a steep hill or
slippery roads.
3WARNING
Using the automatic brake hold system to
park the vehicle may result in the vehicle
unexpectedly moving.
If a vehicle moves unexpectedly, it may
cause a crash, resulting in serious injury or
death.
Never leave the vehicle when braking is
temporarily kept by automatic brake hold
and always park the vehicle by putting the
transmission in
( P and applying the parking
brake.
■Turning on the system
Fasten your seat belt
properly, then start the
power system. Press the
automatic brake hold
button.
●The automatic brake
hold system indicator
comes on. The system
is turned on.
■Activating the system
Depress the brake pedal
to come to a complete
stop. The transmission
must be in
( D or (N.●The automatic brake
hold indicator comes
on. Braking is kept for
up to 10 minutes.
●Release the brake
pedal after the
automatic brake hold
indicator comes on.
■Canceling the system
Depress the accelerator
pedal while the
transmission is in
( D.
The system is canceled
and the vehicle starts to
move.
●The automatic brake
hold indicator goes
off. The system
continues to be on.
Accelerator PedalBrake PedalAutomatic Brake
Hold Button
Goes
Off
Comes
On
Comes
OnOnOn
18 CLARITY ELECTRIC CSS-31TRV6100.book 424 ページ 2018年2月5日 月曜日 午後12時0分
Page 500 of 559
498
Handling the Unexpected
If a Tire Goes Flat
Temporarily Repairing a Flat Tire
If the tire has a large cut or is otherwise severely damaged, you will need to have the
vehicle towed. If the tire only has a smal l puncture, from a nail for instance, you can
use the temporary tire repair kit so that you can drive to the nearest service station
for a more permanent repair.
If a tire goes flat while driving, grasp the steering wheel firmly, and brake gradually
to reduce speed. Then stop in a safe place.
1. Park the vehicle on a firm, level, and non-slippery surface and apply the parking
brake.
2. Change the gear position to
(P.
3. Turn on the hazard warning lights an d set the power mode to VEHICLE OFF
(LOCK).
1 Temporarily Repairing a Flat Tire
The kit should not be used in the following situations.
Instead, contact an authorized Honda Clarity Electric
dealer or a roadside assistance to have the vehicle
towed.
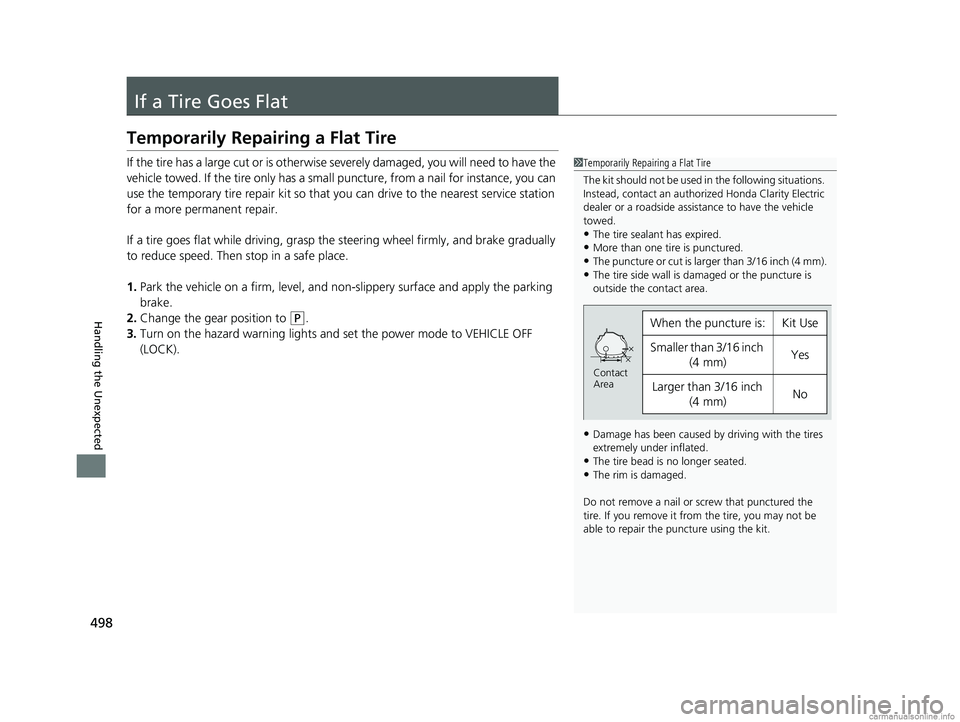
•The tire sealant has expired.•More than one tire is punctured.
•The puncture or cut is larger than 3/16 inch (4 mm).
•The tire side wall is da maged or the puncture is
outside the contact area.
•Damage has been caused by driving with the tires
extremely under inflated.
•The tire bead is no longer seated.•The rim is damaged.
Do not remove a nail or screw that punctured the
tire. If you remove it from the tire, you may not be
able to repair the puncture using the kit.
When the puncture is:Kit Use
Smaller than 3/16 inch (4 mm)Yes
Larger than 3/16 inch
(4 mm)No
Contact
Area
18 CLARITY ELECTRIC CSS-31TRV6100.book 498 ページ 2018年2月5日 月曜日 午後12時0分