Page 409 of 559
Continued407
uuWhen Driving uLane Keeping Assist System (LKAS)
Driving
3. Keep your vehicle near the center of the
lane while driving.
u The dotted outer lines change to solid
ones once the system starts operating
after detecting the left and right lane
markings.
To cancel the LKAS:
Press the MAIN or LKAS button.
The LKAS is turned off every time you turn the
power system off, even if you turned it on the
last time you drove the vehicle.
■To Cancel1 To Cancel
Pressing the MAIN button also turns ACC with LSF
on and off.
MAIN Button
LKAS Button
18 CLARITY ELECTRIC CSS-31TRV6100.book 407 ページ 2018年2月5日 月曜日 午後12時0分
Page 416 of 559

414
uuWhen Driving uTire Pressure Monitoring System (TPMS)
Driving
Tire Pressure Monitoring System (TPMS)
Instead of directly measuring the pressu re in each tire, the TPMS on this vehicle
monitors and compares the rolling radius and rotational characteristics of each
wheel and tire while you are driving to determine if one or more tires are
significantly under-inflated. This will caus e the low tire pressure/TPMS indicator to
come on and a message to appear on the driver information interface.
You must start TPMS calibration every time you:
• Adjust the pressure in one or more tires.
• Rotate the tires.
• Replace one or more tires.
Before calibrating the TPMS:
• Set the cold tire pressu re in all four tires.
2Checking Tires P. 475
Make sure:
•The vehicle is at a complete stop.
• The gear position is in
(P.
• The power mode is in ON.
■TPMS Calibration
1Tire Pressure Monitoring System (TPMS)
The system does not monitor the tires when driving
at low speed.
Conditions such as low ambient temperature and
altitude change directly a ffect tire pressure and can
trigger the low tire pressure/TPMS indicator to come on.
Tire pressure checked and inflated in:
•Warm weather can beco me under-inflated in
colder weather.
•Cold weather can become over-inflated in warmer
weather.
The low tire pressure/TPMS indicator will not come
on as a result of over inflation.
The TPMS may not function pr operly if tire type and
size are mixed. Make sure to use the same size and
type of tire. 2 Checking and Maintaining Tires P. 475
The low tire pressure/TPMS indicator may come on
with a delay or may not come on at all when:
•You rapidly accelerate, decelerate, or turn the
steering wheel.
•You drive on snowy or slippery roads.
•Tire chains are used.
The low tire pressure/TPMS indicator may come on
under the following conditions:
•There is a heavier and uneve n load on the tires than
the condition at calibration.
•Tire chains are used.
18 CLARITY ELECTRIC CSS-31TRV6100.book 414 ページ 2018年2月5日 月曜日 午後12時0分
Page 421 of 559

419
uuWhen Driving uLaneWatchTM
Driving
■Customizing the La neWatch settings
You can customize the following items using the audio/information screen.
• Show with Turn Signal : Selects whether LaneWatch monitor comes on when
you operate the turn signal light lever.
• Display Time after Turn Signal Off : Changes the length of time the LaneWatch
display stays on after you pull the turn signal lever back.
• Reference Line : Selects whether the reference lines appear on the LaneWatch
monitor.
• Display : Allows for display adjustments of items, such as brightness, contrast and
black level. This setting is part of the System setup group.
2Customized Features P. 296
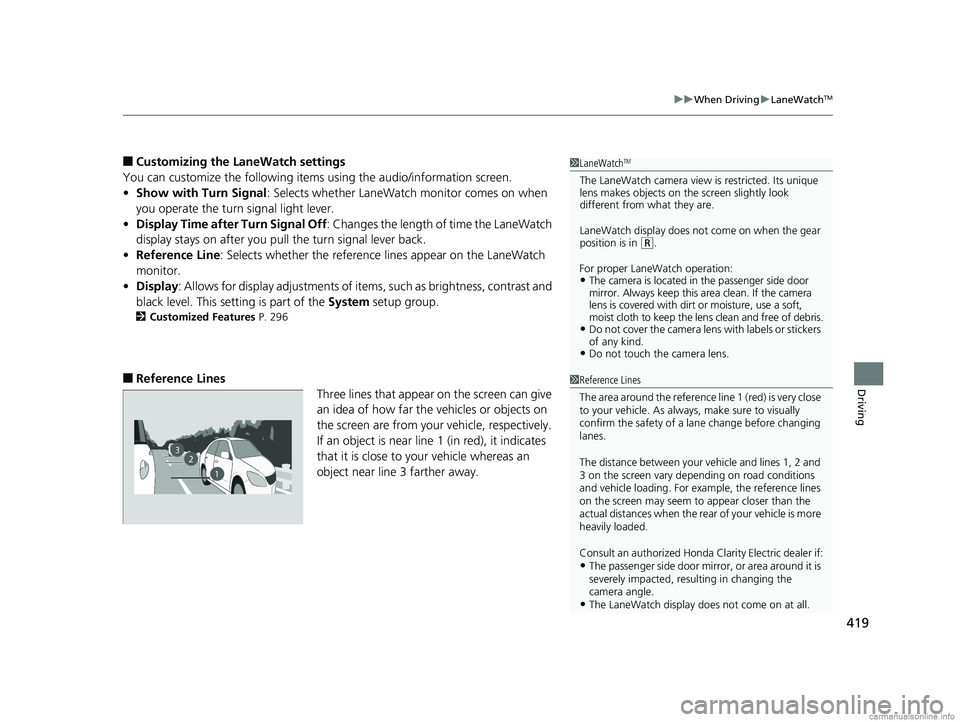
■Reference Lines
Three lines that appear on the screen can give
an idea of how far the vehicles or objects on
the screen are from your vehicle, respectively.
If an object is near line 1 (in red), it indicates
that it is close to your vehicle whereas an
object near line 3 farther away.
1LaneWatchTM
The LaneWatch camera view is restricted. Its unique
lens makes objects on the screen slightly look
different from what they are.
LaneWatch display does not come on when the gear
position is in
( R.
For proper LaneWatch operation:
•The camera is located in the passenger side door
mirror. Always keep this area clean. If the camera
lens is covered with dirt or moisture, use a soft,
moist cloth to keep the lens clean and free of debris.
•Do not cover the camera lens with labels or stickers
of any kind.
•Do not touch the camera lens.
23
1
1Reference Lines
The area around the reference li ne 1 (red) is very close
to your vehicle. As always, make sure to visually
confirm the safety of a la ne change before changing
lanes.
The distance betwee n your vehicle and lines 1, 2 and
3 on the screen vary depending on road conditions
and vehicle loading. For ex ample, the reference lines
on the screen may seem to appear closer than the
actual distances when the rear of your vehicle is more
heavily loaded.
Consult an authorized Honda Clarity Electric dealer if:
•The passenger side door mirr or, or area around it is
severely impacted, resulting in changing the
camera angle.
•The LaneWatch display doe s not come on at all.
18 CLARITY ELECTRIC CSS-31TRV6100.book 419 ページ 2018年2月5日 月曜日 午後12時0分
Page 441 of 559
439
uuMulti-View Rear Camera uAbout Your Multi-View Rear Camera
Driving
You can view three different camera mo des on the rearview display. Touch the
appropriate icon to switch the mode. : Wide view mode
: Normal view mode
: Top down view mode
• If the last used viewing mode was Wide or Normal view mode, the same mode is
selected the next time you put the transmission into
(R.
• If Top down view mode was last used before you turned off the power system,
Wide view mode is selected next time you turn the power on and put the
transmission into
(R.
• If Top down view mode was last used more than 10 seconds after you change
from
(R, Wide view mode is selected the ne xt time you put the transmission into
(R.
18 CLARITY ELECTRIC CSS-31TRV6100.book 439 ページ 2018年2月5日 月曜日 午後12時0分
Page 452 of 559

450
uuCharging uControl Box
Driving
If charging does not start, even if the READY indicator comes on, and the charging
connector is plugged in, perform one of the following solutions.
■What to do when you cannot start charging
CauseSolution
The timer has been set, but the start time is in the
future.
Start charging using the smart entry remote.
Press and hold the charge lid releas e button on the smart entry remote.
u The charge indicator on the charge lid comes on when charging starts.
Change the customized setting of the charge timer to OFF using the driver
information interface.
u The timer setting will be canceled.
2Using a Timer P. 454
The 12-volt battery is weaken.Check the 12-volt battery condition. If necessary, charge the battery.
The power mode is set to ON.Set the power mode to ACCESS ORY or VEHICLE OFF (LOCK).
The charging connector is not properly attached
to the vehicle’s inlet.Disengage the connector from the inlet.
Align and insert the connector into the inlet until you hear a click.
Charging with AC 120 V (Level 1) or AC 240 V (Level 2)
18 CLARITY ELECTRIC CSS-31TRV6100.book 450 ページ 2018年2月5日 月曜日 午後12時0分
Page 515 of 559

513
uuPower System Won’t StartuEmergency Power System Off
Handling the Unexpected
Emergency Power System Off
The POWER button may be used to turn the power system off due to an emergency
situation even while driving. If you must tu rn the power system off, do either of the
following operations:
• Press and hold the POWER button for about two seconds.
• Firmly press the POWER button three times.
The steering wheel will not lock. However, because turning off the power system
disables the power assist the power syst em provides to the steering and braking
systems, it will require significantly more physical effort and time to steer and slow
the vehicle. Use both feet on the brake pe dal to slow down the vehicle and stop
immediately in a safe place.
The gear position auto matically changes to
(P after the vehicle comes to a complete
stop. Then, the power mode changes to VEHICLE OFF.
1 Emergency Power System Off
Do not press the button while driving unless it is
absolutely necessary for the power system to be
turned off.
18 CLARITY ELECTRIC CSS-31TRV6100.book 513 ページ 2018年2月5日 月曜日 午後12時0分