Page 319 of 559
317
uuCustomized Features u
Continued
Features
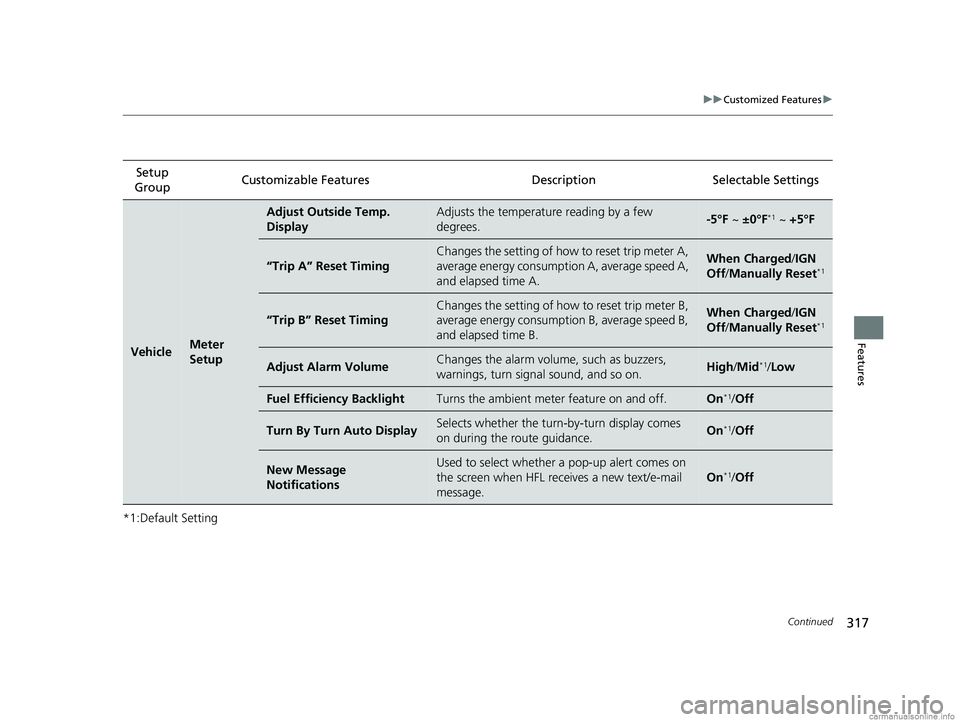
*1:Default SettingSetup
Group Customizable Features Description Selectable Settings
VehicleMeter
Setup
Adjust Outside Temp.
DisplayAdjusts the temperature reading by a few
degrees.-5°F ~
±0°F*1 ~ +5°F
“Trip A” Reset Timing
Changes the setting of how to reset trip meter A,
average energy consumpti on A, average speed A,
and elapsed time A.When Charged/ IGN
Off /Manually Reset*1
“Trip B” Reset Timing
Changes the setting of how to reset trip meter B,
average energy consumption B, average speed B,
and elapsed time B.When Charged/ IGN
Off /Manually Reset*1
Adjust Alarm VolumeChanges the alarm volu me, such as buzzers,
warnings, turn signal sound, and so on.High /Mid*1/ Low
Fuel Efficiency BacklightTurns the ambient meter feature on and off.On*1/Off
Turn By Turn Auto DisplaySelects whether the turn -by-turn display comes
on during the route guidance.On*1/ Off
New Message
NotificationsUsed to select whether a pop-up alert comes on
the screen when HFL receives a new text/e-mail
message.
On*1/Off
18 CLARITY ELECTRIC CSS-31TRV6100.book 317 ページ 2018年2月5日 月曜日 午後12時0分
Page 321 of 559
319
uuCustomized Features u
Continued
Features
*1:Default SettingSetup
Group Customizable Features Description Selectable Settings
VehicleLighting
Setup
Interior Light Dimming
TimeChanges the length of time the interior lights stay
on after you close the doors.15seconds
/
30seconds*1/
60seconds
Headlight Auto Off TimerChanges the length of time the exterior lights
stay on after you clos e the driver’s door.
0seconds/
15seconds*1/
30seconds /
60seconds
Auto Light SensitivityChanges the timing for th e headlights to come
on.Max /High /Mid*1/
Low/ Min
Auto Interior Illumination
SensitivityChanges the sensitivity of the brightness of the
instrument panel when the headlight switch is in
the AUTO position.Max/High /Mid*1/
Low/ Min
Auto Headlight ON With
Wiper ONChanges the settings for the wiper operation
when the headlights automa tically come on while
the headlight switch is in the AUTO position.
On*1/Off
18 CLARITY ELECTRIC CSS-31TRV6100.book 319 ページ 2018年2月5日 月曜日 午後12時0分
Page 322 of 559
320
uuCustomized Features u
Features
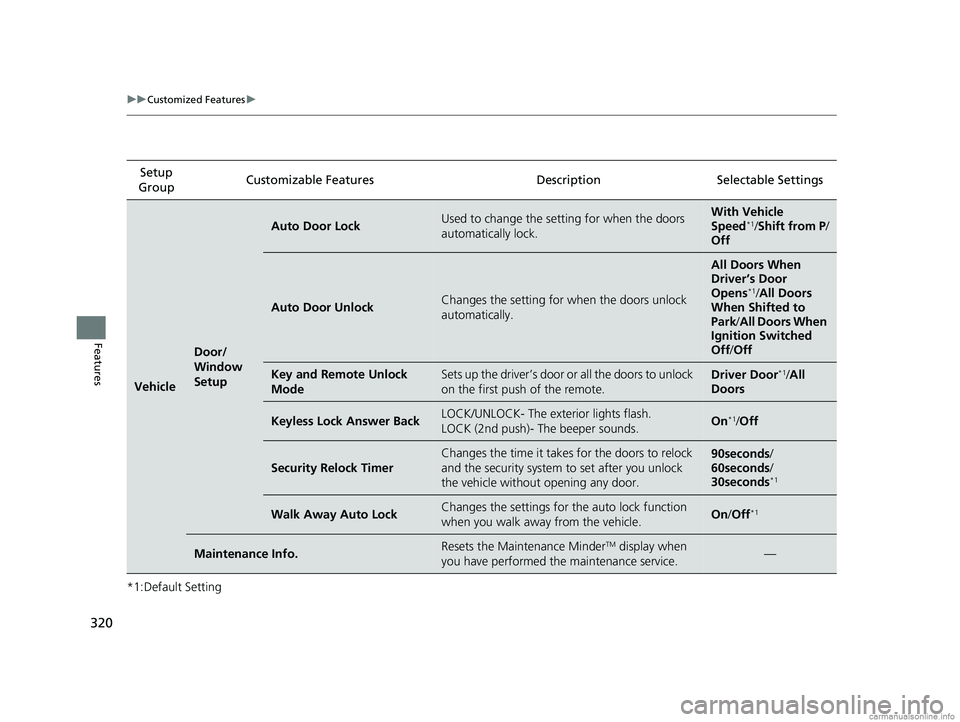
*1:Default SettingSetup
Group Customizable Features Desc
ription Selectable Settings
Vehicle
Door/
Window
Setup
Auto Door LockUsed to change the setting for when the doors
automatically lock.With Vehicle
Speed*1/ Shift from P /
Off
Auto Door UnlockChanges the setting for when the doors unlock
automatically.
All Doors When
Driver’s Door
Opens
*1/ All Doors
When Shifted to
Park/ All Doors When
Ignition Switched
Off /Off
Key and Remote Unlock
ModeSets up the driver’s door or all the doors to unlock
on the first push of the remote.Driver Door*1/All
Doors
Keyless Lock Answer BackLOCK/UNLOCK- The exterior lights flash.
LOCK (2nd push)- The beeper sounds.On*1/ Off
Security Relock Timer
Changes the time it takes for the doors to relock
and the security system to set after you unlock
the vehicle without opening any door.90seconds /
60seconds /
30seconds
*1
Walk Away Auto LockChanges the settings for the auto lock function
when you walk away from the vehicle.On /Off*1
Maintenance Info.Resets the Maintenance MinderTM display when
you have performed the maintenance service.—
18 CLARITY ELECTRIC CSS-31TRV6100.book 320 ページ 2018年2月5日 月曜日 午後12時0分
Page 327 of 559
325Continued
Features
Bluetooth® HandsFreeLink ®
Bluetooth® HandsFreeLink ® (HFL) allows you to place and receive phone calls using
your vehicle’s audio system, without handling your cell phone.
Using HFL
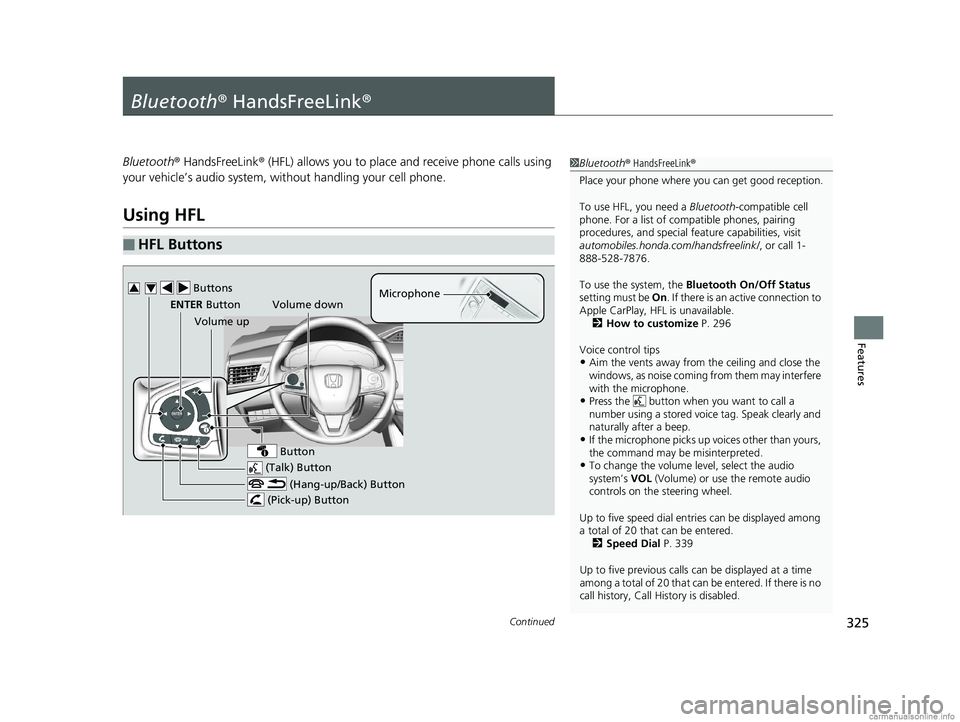
■HFL Buttons
1 Bluetooth ® HandsFreeLink ®
Place your phone where y ou can get good reception.
To use HFL, you need a Bluetooth-compatible cell
phone. For a list of compatible phones, pairing
procedures, and special fe ature capabilities, visit
automobiles.honda.com /handsfreelink/, or call 1-
888-528-7876.
To use the system, the Bluetooth On/Off Status
setting must be On . If there is an active connection to
Apple CarPlay, H FL is unavailable.
2 How to customize P. 296
Voice control tips
•Aim the vents away from the ceiling and close the
windows, as noise coming fr om them may interfere
with the microphone.
•Press the button when you want to call a
number using a stored voic e tag. Speak clearly and
naturally after a beep.
•If the microphone picks up vo ices other than yours,
the command may be misinterpreted.
•To change the volume level, select the audio
system’s VOL (Volume) or use the remote audio
controls on the steering wheel.
Up to five speed dial entries can be displayed among
a total of 20 that can be entered. 2 Speed Dial P. 339
Up to five previous calls can be displayed at a time
among a total of 20 that can be entered. If there is no
call history, Call History is disabled. (Talk) Button
Volume up Microphone
(Hang-up/Back) Button
(Pick-up) Button
ENTER Button
Button
Buttons34
Volume down
18 CLARITY ELECTRIC CSS-31TRV6100.book 325 ページ 2018年2月5日 月曜日 午後12時0分
Page 336 of 559
uuBluetooth ® HandsFreeLink ®u HFL Menus
334
Features
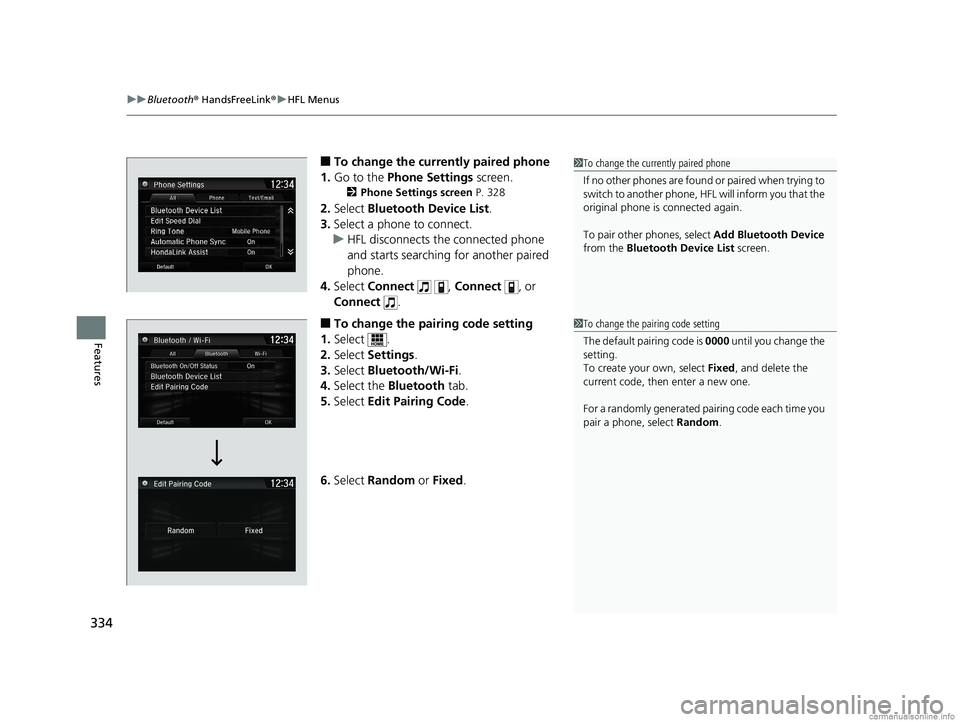
■To change the currently paired phone
1. Go to the Phone Settings screen.
2Phone Settings screen P. 328
2.Select Bluetooth Device List .
3. Select a phone to connect.
u HFL disconnects the connected phone
and starts searching for another paired
phone.
4. Select Connect , Connect , or
Connect .
■To change the pairing code setting
1. Select .
2. Select Settings .
3. Select Bluetooth/Wi-Fi .
4. Select the Bluetooth tab.
5. Select Edit Pairing Code .
6. Select Random or Fixed .
1To change the currently paired phone
If no other phones are found or paired when trying to
switch to another phone, HFL will inform you that the
original phone is connected again.
To pair other phones, select Add Bluetooth Device
from the Bluetooth Device List screen.
1To change the pairing code setting
The default pair ing code is 0000 until you change the
setting.
To create your own, select Fixed, and delete the
current code, then enter a new one.
For a randomly generated pa iring code each time you
pair a phone , select Random .
18 CLARITY ELECTRIC CSS-31TRV6100.book 334 ページ 2018年2月5日 月曜日 午後12時0分
Page 358 of 559
uuBluetooth ® HandsFreeLink ®u HFL Menus
356
Features
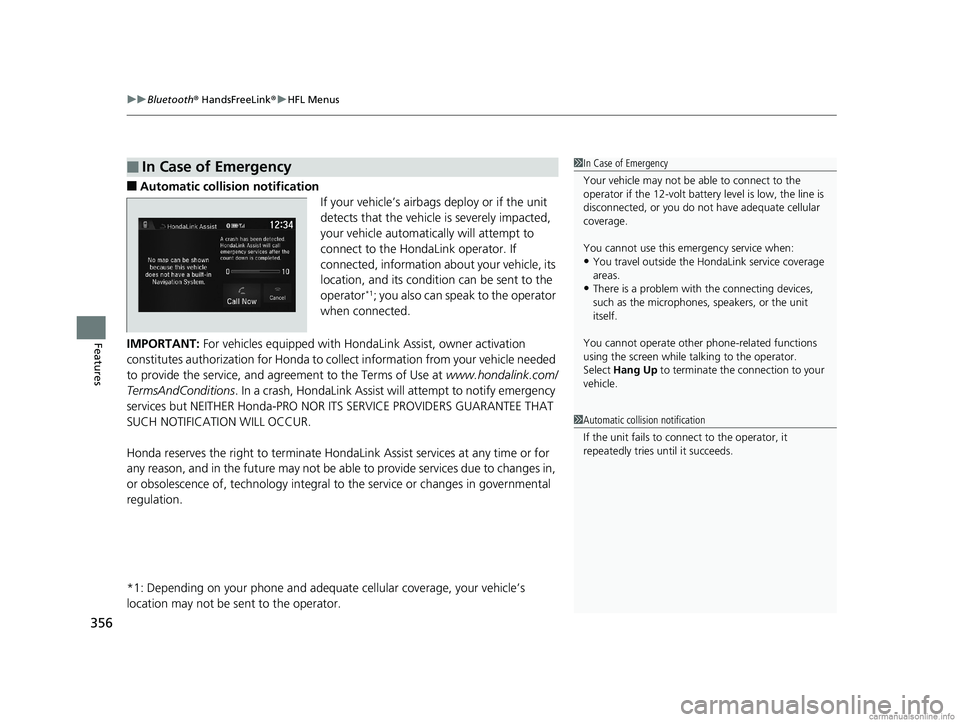
■Automatic collisi on notification
If your vehicle’s airbags deploy or if the unit
detects that the vehicle is severely impacted,
your vehicle automatically will attempt to
connect to the HondaLink operator. If
connected, information about your vehicle, its
location, and its condition can be sent to the
operator
*1; you also can speak to the operator
when connected.
IMPORTANT: For vehicles equipped with Hond aLink Assist, owner activation
constitutes authorization for Honda to co llect information from your vehicle needed
to provide the service, and agr eement to the Terms of Use at www.hondalink.com/
TermsAndConditions . In a crash, HondaLink Assist w ill attempt to notify emergency
services but NEITHER Honda-PRO NOR ITS SERVICE PROVIDERS GUARANTEE THAT
SUCH NOTIFICATION WILL OCCUR.
Honda reserves the right to terminate HondaLink Assist services at any time or for
any reason, and in the future may not be ab le to provide services due to changes in,
or obsolescence of, technology integral to the service or changes in governmental
regulation.
*1: Depending on your phone and adequate cellular coverage, your vehicle’s
location may not be sent to the operator.
■In Case of Emergency1 In Case of Emergency
Your vehicle may not be able to connect to the
operator if the 12-volt battery level is low, the line is
disconnected, or you do not have adequate cellular
coverage.
You cannot use this emergency service when:
•You travel outside the HondaLink service coverage
areas.
•There is a problem with the connecting devices,
such as the microphones, speakers, or the unit
itself.
You cannot operate othe r phone-related functions
using the screen while talking to the operator.
Select Hang Up to terminate the connection to your
vehicle.
1 Automatic collision notification
If the unit fails to connect to the operator, it
repeatedly tries until it succeeds.
18 CLARITY ELECTRIC CSS-31TRV6100.book 356 ページ 2018年2月5日 月曜日 午後12時0分
Page 381 of 559
379
uuWhen Driving uDeceleration Paddle Selector
Continued
Driving
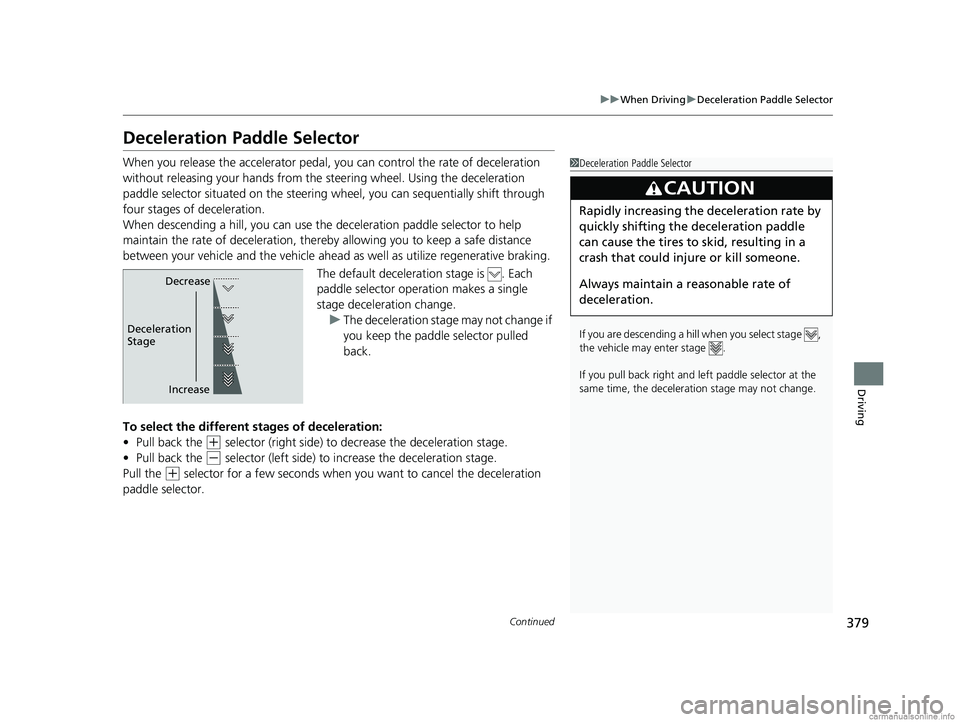
Deceleration Paddle Selector
When you release the accelerator pedal, yo u can control the rate of deceleration
without releasing your hands from the steering wheel. Using the deceleration
paddle selector situated on the steering wheel, you can sequentially shift through
four stages of deceleration.
When descending a hill, you can use the deceleration paddle selector to help
maintain the rate of deceleration, thereb y allowing you to keep a safe distance
between your vehicle and the vehicle ahead as well as utilize regenerative braking.
The default deceleration stage is . Each
paddle selector operation makes a single
stage deceleration change. u The deceleration stag e may not change if
you keep the paddle selector pulled
back.
To select the different stages of deceleration:
• Pull back the
(+ selector (right side) to decrease the deceleration stage.
• Pull back the
(- selector (left side) to increase the deceleration stage.
Pull the
(+ selector for a few seconds when you want to cancel the deceleration
paddle selector.
1 Deceleration Paddle Selector
If you are descending a hill when you select stage ,
the vehicle may enter stage .
If you pull back right and le ft paddle selector at the
same time, the deceleration stage may not change.
3CAUTION
Rapidly increasing the deceleration rate by
quickly shifting the deceleration paddle
can cause the tires to skid, resulting in a
crash that could injure or kill someone.
Always maintain a reasonable rate of
deceleration.
Increase
Decrease
Deceleration
Stage
18 CLARITY ELECTRIC CSS-31TRV6100.book 379 ページ 2018年2月5日 月曜日 午後12時0分
Page 400 of 559
398
uuWhen Driving uAdaptive Cruise Control (ACC) with Low Speed Follow (LSF)
Driving
Press the (interval) button to change the
ACC with LSF following-interval.
Each time you press the button, the following-
interval (the interval behind a vehicle detected
ahead of you) setting cycles through extra
long, long, middle, and short following-
intervals.
Determine the most appropriate following-
interval setting based on your specific driving
conditions. Be sure to adhere to any
following-interval requ irements set by local
regulation.
■To Set or Change Following-Interval
Interval Button
18 CLARITY ELECTRIC CSS-31TRV6100.book 398 ページ 2018年2月5日 月曜日 午後12時0分