2018 GMC TERRAIN center console
[x] Cancel search: center consolePage 5 of 20

5
KEYLESS (PUSHBUTTON) START
AUTO ENGINE STOP/START OPERATION
F Optional equipment
Starting the Engine
With the vehicle in Park or Neutral, press the brake pedal and then press the ENGINE START/STOP button to start the engine. The green indicator on the button will illuminate.
Note: The transmitter must be in the vehicle to turn on the ignition. If the transmitter battery is weak, place the transmitter in the driver’s-side cupholder in the center console to enable the engine to start. Replace the transmitter battery as soon as possible.
Stopping the Engine/Off
Shift to Park and press the ENGINE START/STOP button to turn off the engine.
Power will be available for 10 minutes to operate the audio system until\
the driver’s door is opened and to operate the windows and sunroofF until any door is opened.
Accessory Mode
With the engine off and the brake pedal NOT depressed, press the ENGINE START/STOP
button to place the ignition system in the accessory mode. The amber ind\
icator on the button will illuminate.
See Driving and Operating in your Owner’s Manual.
An automatic stop/start system has been integrated with the engine to he\
lp conserve fuel. While driving, when the brake pedal is applied and the vehicle is at a complet\
e stop, the automatic stop/start system may turn off the engine, depending on operating condit\
ions. When the engine is off, the tachometer gauge will read AUTO STOP. Upon releasing the bra\
ke pedal or applying the accelerator pedal, the engine will restart. After parking the vehicle an\
d turning off the engine, the tachometer gauge will read OFF.
The engine may remain running or restart if:
• A minimum vehicle speed is not reached.
• The engine or transmission is not at the required operating temperature.
• The outside temperature is not in the required operating range.
• The transmission is in any gear other than Drive (D).
• The battery charge is low.
• The climate control system requires the engine to run based on the curre\
nt settings.
• The Auto Stop time is greater than 2 minutes.
See Driving and Operating in your Owner’s Manual.
Page 6 of 20

6
ELECTRIC PARKING BRAKE
ELECTRONIC PRECISION SHIFT TRANSMISSION
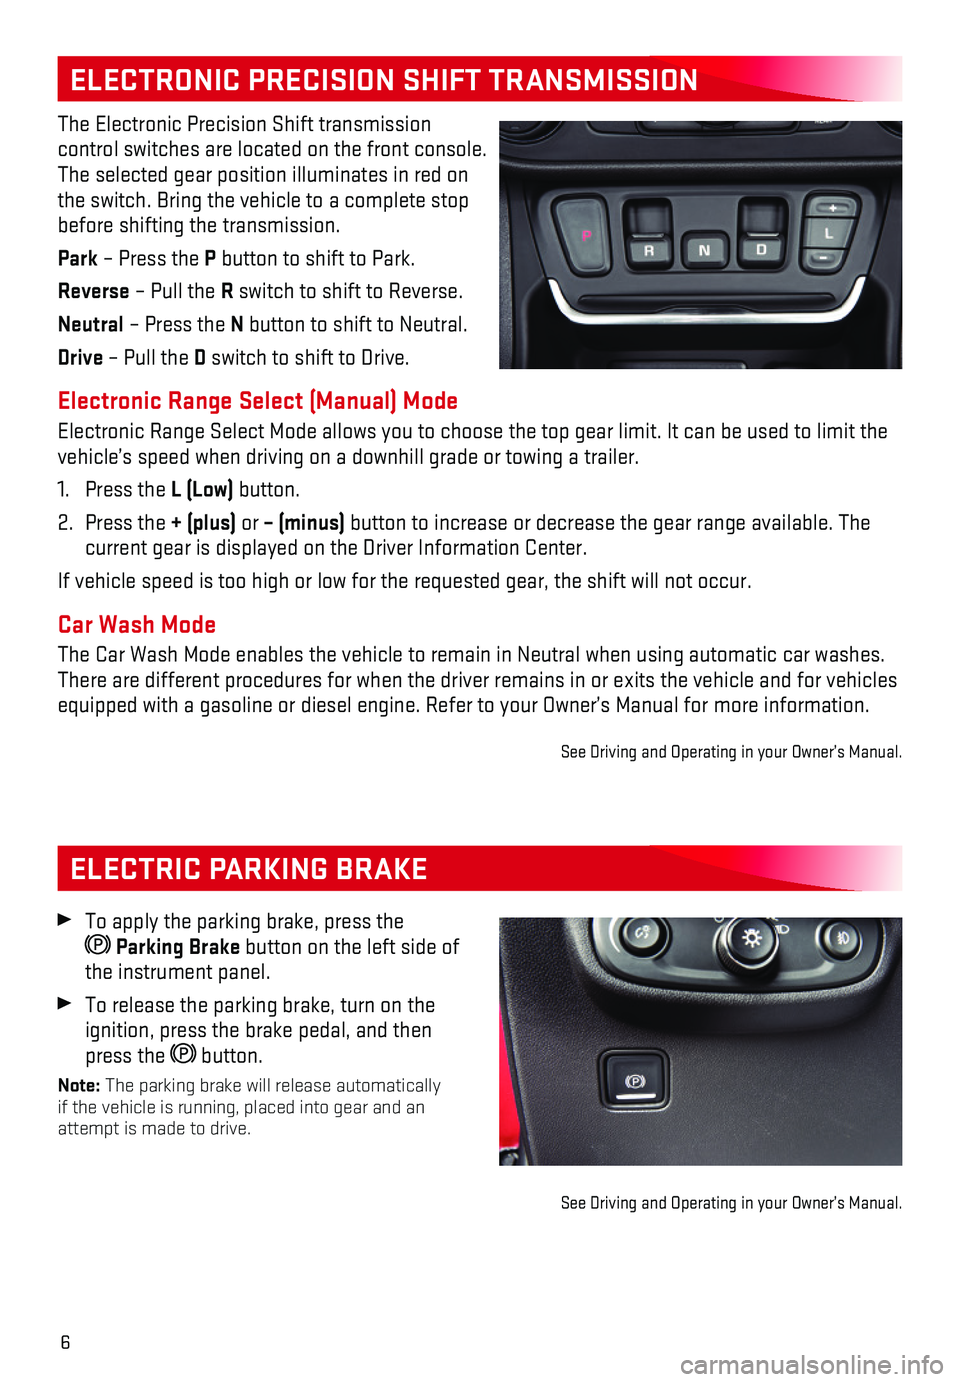
The Electronic Precision Shift transmission
control switches are located on the front console. The selected gear position illuminates in red on the switch. Bring the vehicle to a complete stop before shifting the transmission.
Park – Press the P button to shift to Park.
Reverse – Pull the R switch to shift to Reverse.
Neutral – Press the N button to shift to Neutral.
Drive – Pull the D switch to shift to Drive.
Electronic Range Select (Manual) Mode
Electronic Range Select Mode allows you to choose the top gear limit. It\
can be used to limit the vehicle’s speed when driving on a downhill grade or towing a trailer.\
1. Press the L (Low) button.
2. Press the + (plus) or – (minus) button to increase or decrease the gear range available. The current gear is displayed on the Driver Information Center.
If vehicle speed is too high or low for the requested gear, the shift wi\
ll not occur.
Car Wash Mode
The Car Wash Mode enables the vehicle to remain in Neutral when using au\
tomatic car washes. There are different procedures for when the driver remains in or exits t\
he vehicle and for vehicles equipped with a gasoline or diesel engine. Refer to your Owner’s Manu\
al for more information.
See Driving and Operating in your Owner’s Manual.
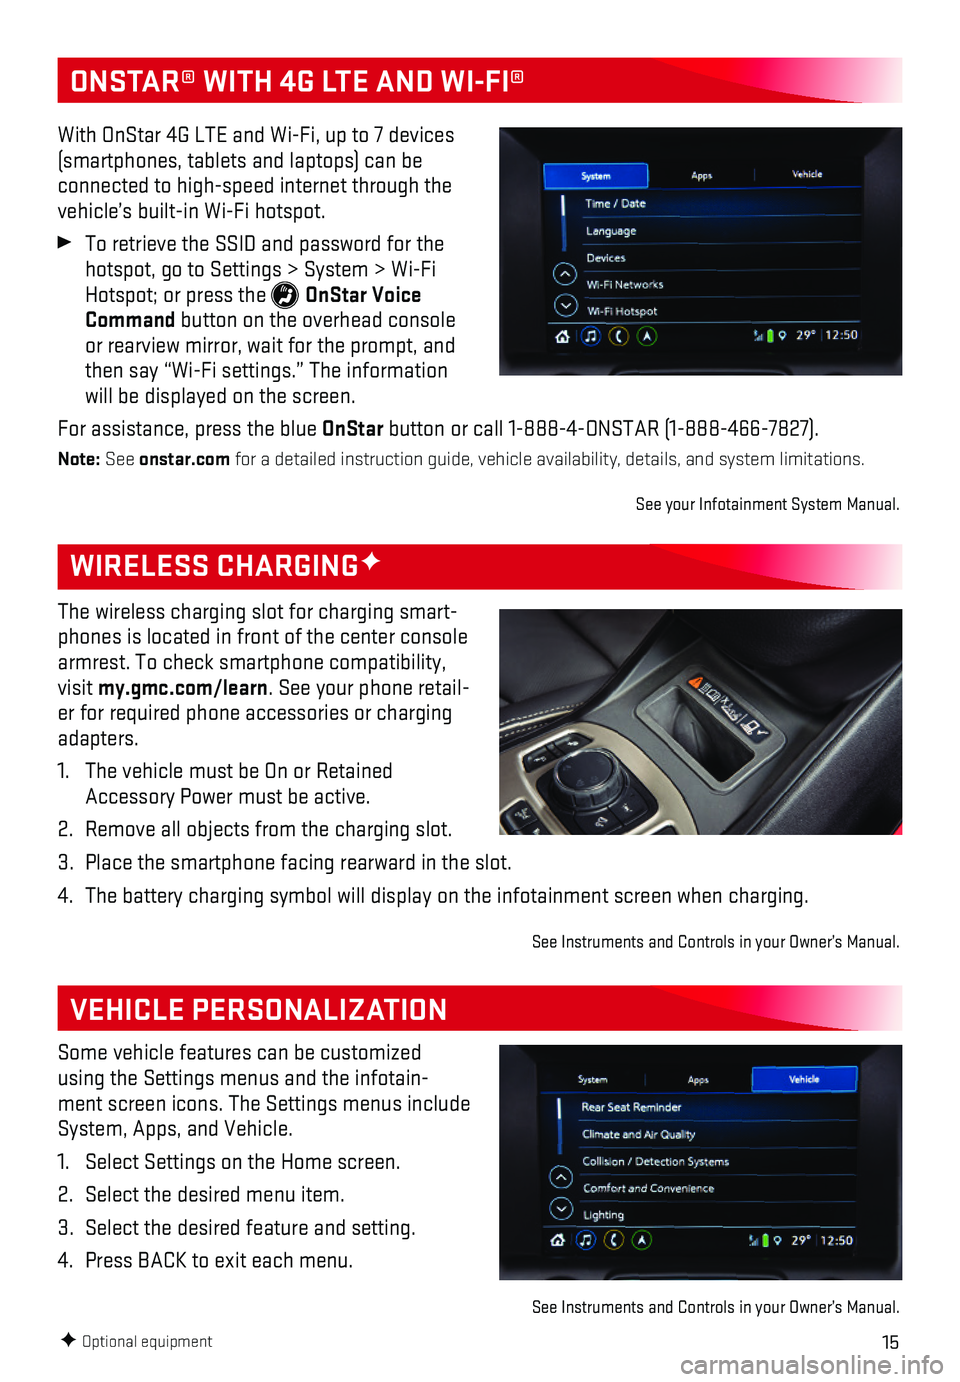
To apply the parking brake, press the
Parking Brake button on the left side of the instrument panel.
To release the parking brake, turn on the ignition, press the brake pedal, and then press the button.
Note: The parking brake will release automatically if the vehicle is running, placed into gear and an attempt is made to drive.
See Driving and Operating in your Owner’s Manual.
Page 15 of 20

15F Optional equipment
WIRELESS CHARGINGF
VEHICLE PERSONALIZATION
The wireless charging slot for charging smart-phones is located in front of the center console armrest. To check smartphone compatibility, visit my.gmc.com/learn. See your phone retail-er for required phone accessories or charging adapters.
1. The vehicle must be On or Retained Accessory Power must be active.
2. Remove all objects from the charging slot.
3. Place the smartphone facing rearward in the slot.
4. The battery charging symbol will display on the infotainment screen when\
charging.
See Instruments and Controls in your Owner’s Manual.
Some vehicle features can be customized using the Settings menus and the infotain-ment screen icons. The Settings menus include System, Apps, and Vehicle.
1. Select Settings on the Home screen.
2. Select the desired menu item.
3. Select the desired feature and setting.
4. Press BACK to exit each menu.
See Instruments and Controls in your Owner’s Manual.
ONSTAR® WITH 4G LTE AND WI-FI®
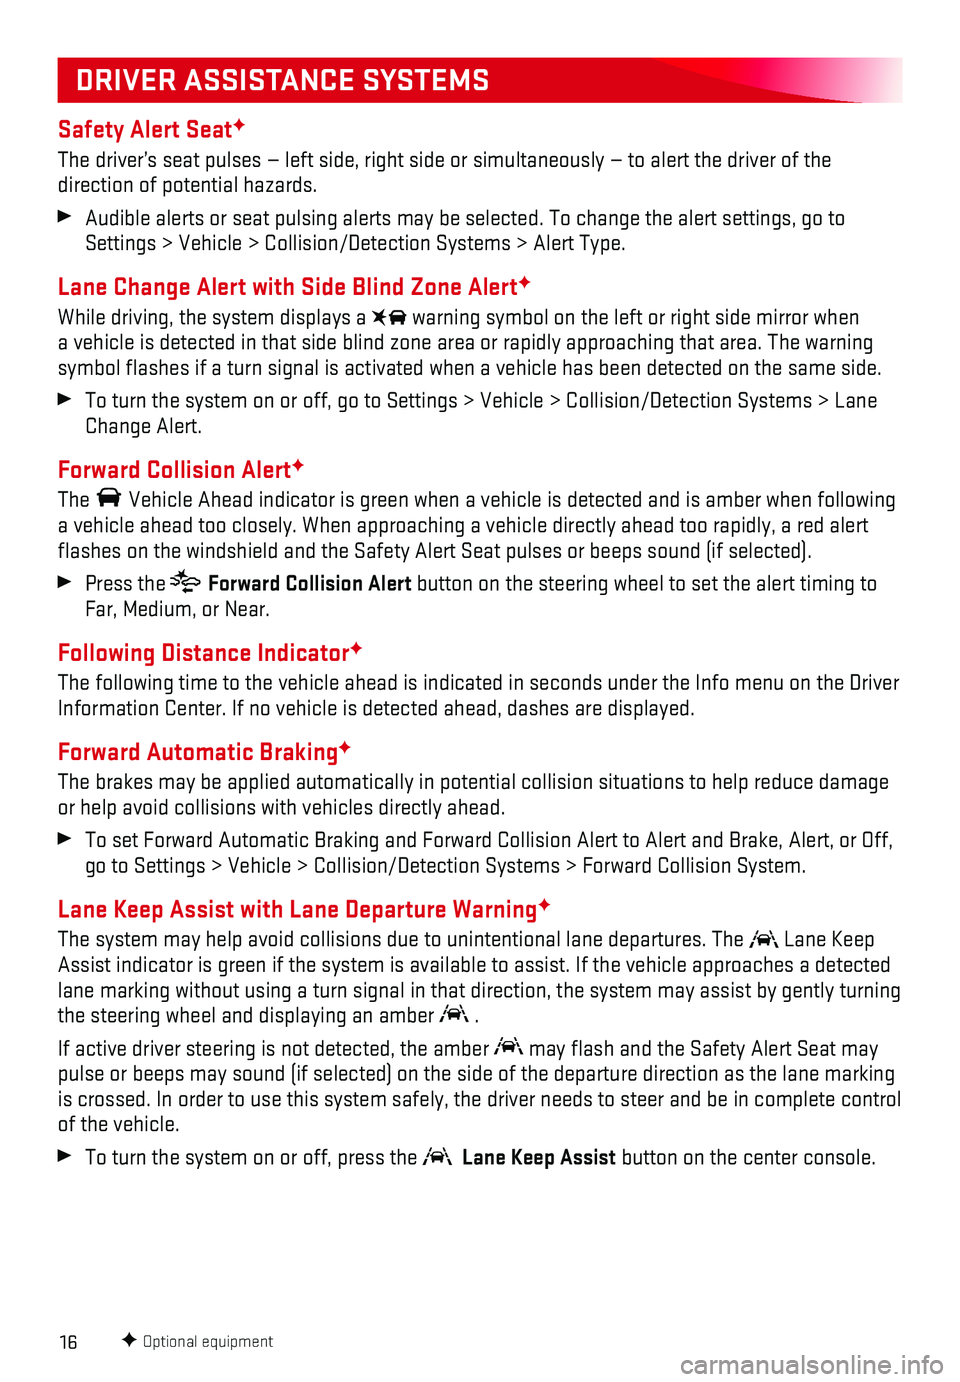
With OnStar 4G LTE and Wi-Fi, up to 7 devices (smartphones, tablets and laptops) can be connected to high-speed internet through the vehicle’s built-in Wi-Fi hotspot.
To retrieve the SSID and password for the hotspot, go to Settings > System > Wi-Fi Hotspot; or press the OnStar Voice Command button on the overhead console or rearview mirror, wait for the prompt, and then say “Wi-Fi settings.” The information will be displayed on the screen.
For assistance, press the blue OnStar button or call 1-888-4-ONSTAR (1-888-466-7827).
Note: See onstar.com for a detailed instruction guide, vehicle availability, details, and sy\
stem limitations.
See your Infotainment System Manual.
Page 16 of 20

16
Safety Alert SeatF
The driver’s seat pulses — left side, right side or simultaneously\
— to alert the driver of the
direction of potential hazards.
Audible alerts or seat pulsing alerts may be selected. To change the ale\
rt settings, go to Settings > Vehicle > Collision/Detection Systems > Alert Type.
Lane Change Alert with Side Blind Zone AlertF
While driving, the system displays a warning symbol on the left or right side mirror when a vehicle is detected in that side blind zone area or rapidly approachin\
g that area. The warning symbol flashes if a turn signal is activated when a vehicle has been d\
etected on the same side.
To turn the system on or off, go to Settings > Vehicle > Collision/Detec\
tion Systems > Lane Change Alert.
Forward Collision AlertF
The Vehicle Ahead indicator is green when a vehicle is detected and is ambe\
r when following a vehicle ahead too closely. When approaching a vehicle directly ahead t\
oo rapidly, a red alert flashes on the windshield and the Safety Alert Seat pulses or beeps so\
und (if selected).
Press the Forward Collision Alert button on the steering wheel to set the alert timing to Far, Medium, or Near.
Following Distance IndicatorF
The following time to the vehicle ahead is indicated in seconds under th\
e Info menu on the Driver Information Center. If no vehicle is detected ahead, dashes are displaye\
d.
Forward Automatic BrakingF
The brakes may be applied automatically in potential collision situation\
s to help reduce damage or help avoid collisions with vehicles directly ahead.
To set Forward Automatic Braking and Forward Collision Alert to Alert an\
d Brake, Alert, or Off, go to Settings > Vehicle > Collision/Detection Systems > Forward Collisi\
on System.
Lane Keep Assist with Lane Departure WarningF
The system may help avoid collisions due to unintentional lane departure\
s. The Lane Keep Assist indicator is green if the system is available to assist. If the v\
ehicle approaches a detected lane marking without using a turn signal in that direction, the system m\
ay assist by gently turning the steering wheel and displaying an amber .
If active driver steering is not detected, the amber may flash and the Safety Alert Seat may pulse or beeps may sound (if selected) on the side of the departure di\
rection as the lane marking is crossed. In order to use this system safely, the driver needs to stee\
r and be in complete control of the vehicle.
To turn the system on or off, press the Lane Keep Assist button on the center console.
F Optional equipment
DRIVER ASSISTANCE SYSTEMS
Page 17 of 20

17
DRIVER ASSISTANCE SYSTEMS
FrontF and Rear Vision Camera
When the vehicle is in Reverse, a view of the area behind the vehicle di\
splays on the infotainment screen. After shifting from Reverse to Drive, a view of the area in fron\
t of the vehicle displays. Vehicle speed must be below 5 mph.
Touch the Front or Rear Camera button on the camera screen to display either view.
Touch the Guidance Lines button on the camera screen to turn the guidelines on or off.
Surround VisionF
The Surround Vision system displays a bird’s-eye view of the area surrounding the vehicle on the infotainment screen when the vehicle is in Reverse or Drive below 5 mph.
FrontF and RearF Parking Assist
During low-speed parking maneuvers, the system provides “distance to closest object” information on the Driver Information Center, the Safety Alert Seat pulses or a beep sounds (if selected). When an object is very close, the Safety Alert Seat pulses 5 times or beeps sound (if selected).
Rear Cross Traffic AlertF
When the vehicle is in Reverse, the system warns of traffic coming in either direction by displaying a red alert on the infotain-ment screen and pulsing the left or right side of the Safety Alert Seat or sounding beeps (if selected).
To turn only Rear Cross Traffic Alert on or off, go to Settings > Vehi\
cle > Collision/Detection Systems > Rear Cross Traffic Alert.
To turn Front and Rear Parking Assist and Rear Cross Traffic Alert on \
or off, press the Parking Assist button on the center console.
Automatic Parking AssistF
Automatic Parking Assist steers the vehicle to help park in parallel and\
perpendicular spaces. You must still shift gears and control the brakes and accelerator.
1. Press the Automatic Parking Assist button on the center console. A beep sounds and a parking assist display is shown on the infotainment screen. The system w\
ill begin searching for a large enough parking space.
2. Once a space is found, shift the vehicle into Reverse to engage automati\
c steering.
3. Remove your hands from the steering wheel and accelerate or brake as req\
uired. Directions are displayed on the infotainment screen. Parking Complete is displayed \
and a beep sounds when the parking maneuver is complete.
See Driving and Operating in your Owner’s Manual.
F Optional equipment
Page 18 of 20

18
The Traction Select system automatically adjusts various vehicle control systems based on driving preferences, weather and road conditions.
Rotate the Driver Mode Control knob on the center console to the desired mode.
FWD Models:
Tour
Snow
Tow/HaulF
AWD Models:
Tour
All-Wheel Drive
Off-Road
Tow/HaulF
The AWD indicator will illuminate when an all-wheel drive mode is select\
ed.
See Driving and Operating in your Owner’s Manual.
TRACTION SELECT SYSTEM
CRUISE CONTROL
Setting Cruise Control
1. Press the On/Off button. The Cruise Control symbol will illuminate in white on the instrument cluster.
2. When traveling at the desired speed, press the SET– button to set the speed. The symbol will illuminate in green on the instru-ment cluster.
Adjusting Cruise Control
RES+ Resume/Accelerate
Press to resume a set speed. When the system is active, press to increase speed.
SET– Set/Coast
When the system is active, press to decrease speed.
Cancel
Press the button, or press the brake pedal, to cancel the cruise control without e\
rasing the set speed from memory. The set speed is erased when Cruise Control or the ve\
hicle ignition is turned off.
See Driving and Operating in your Owner’s Manual.
F Optional equipment
Page 19 of 20

19
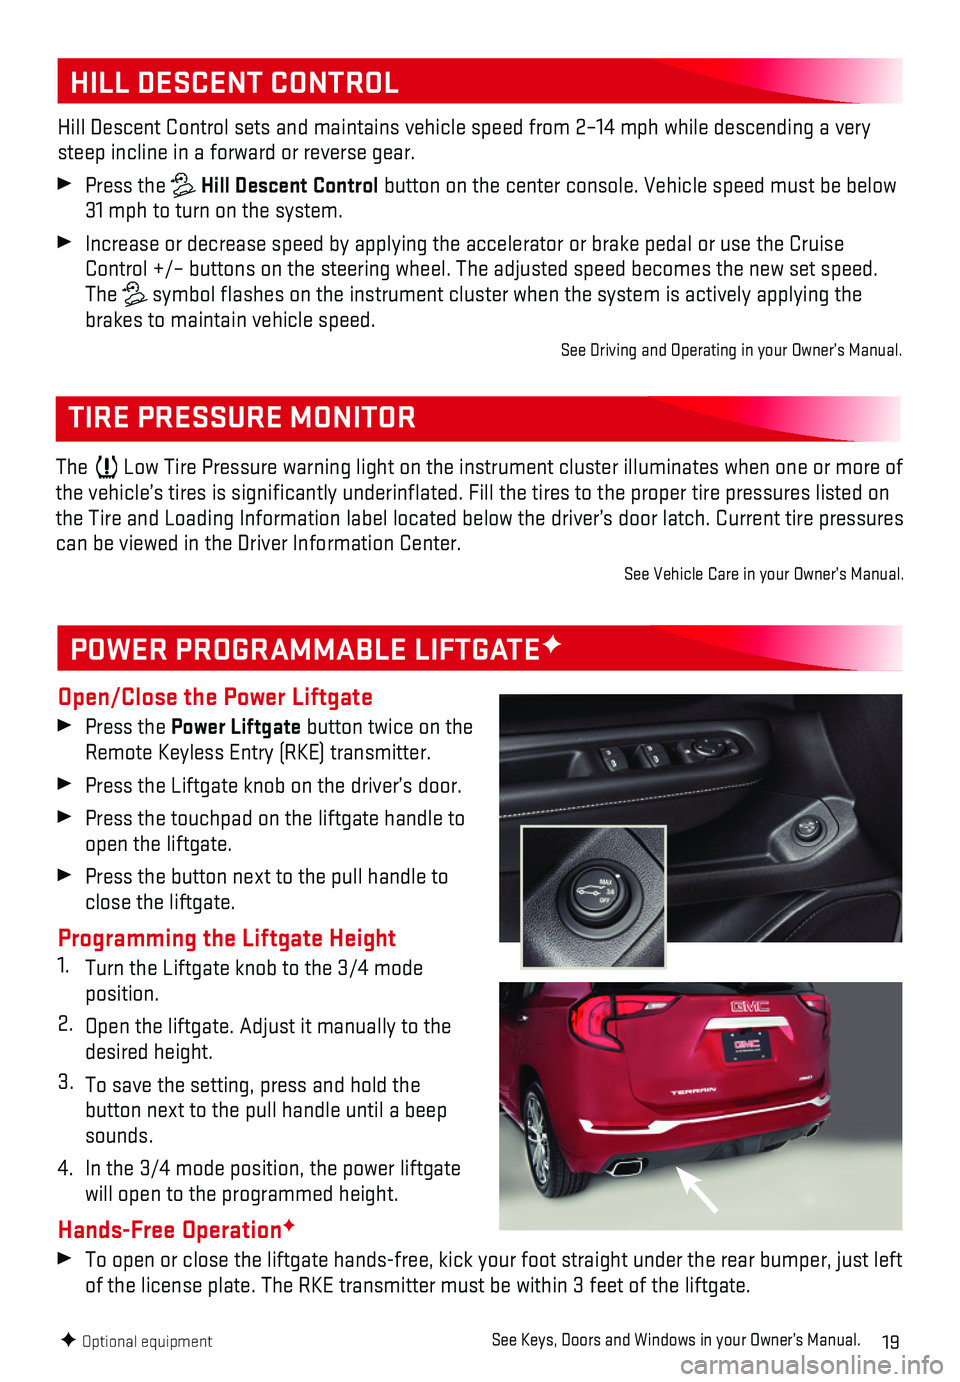
Open/Close the Power Liftgate
Press the Power Liftgate button twice on the Remote Keyless Entry (RKE) transmitter.
Press the Liftgate knob on the driver’s door.
Press the touchpad on the liftgate handle to open the liftgate.
Press the button next to the pull handle to close the liftgate.
Programming the Liftgate Height1. Turn the Liftgate knob to the 3/4 mode position.
2. Open the liftgate. Adjust it manually to the desired height.
3. To save the setting, press and hold the
button next to the pull handle until a beep sounds.
4. In the 3/4 mode position, the power liftgate will open to the programmed height.
Hands-Free OperationF
To open or close the liftgate hands-free, kick your foot straight under \
the rear bumper, just left of the license plate. The RKE transmitter must be within 3 feet of the l\
iftgate.
POWER PROGRAMMABLE LIFTGATEF
TIRE PRESSURE MONITOR
HILL DESCENT CONTROL
Hill Descent Control sets and maintains vehicle speed from 2–14 mph w\
hile descending a very steep incline in a forward or reverse gear.
Press the Hill Descent Control button on the center console. Vehicle speed must be below 31 mph to turn on the system.
Increase or decrease speed by applying the accelerator or brake pedal or\
use the Cruise Control +/– buttons on the steering wheel. The adjusted speed becomes\
the new set speed. The symbol flashes on the instrument cluster when the system is actively a\
pplying the brakes to maintain vehicle speed.
See Driving and Operating in your Owner’s Manual.
F Optional equipment
The Low Tire Pressure warning light on the instrument cluster illuminates wh\
en one or more of the vehicle’s tires is significantly underinflated. Fill the tire\
s to the proper tire pressures listed on the Tire and Loading Information label located below the driver’s doo\
r latch. Current tire pressures can be viewed in the Driver Information Center.
See Vehicle Care in your Owner’s Manual.
See Keys, Doors and Windows in your Owner’s Manual.