2018 FORD FOCUS light
[x] Cancel search: lightPage 208 of 473
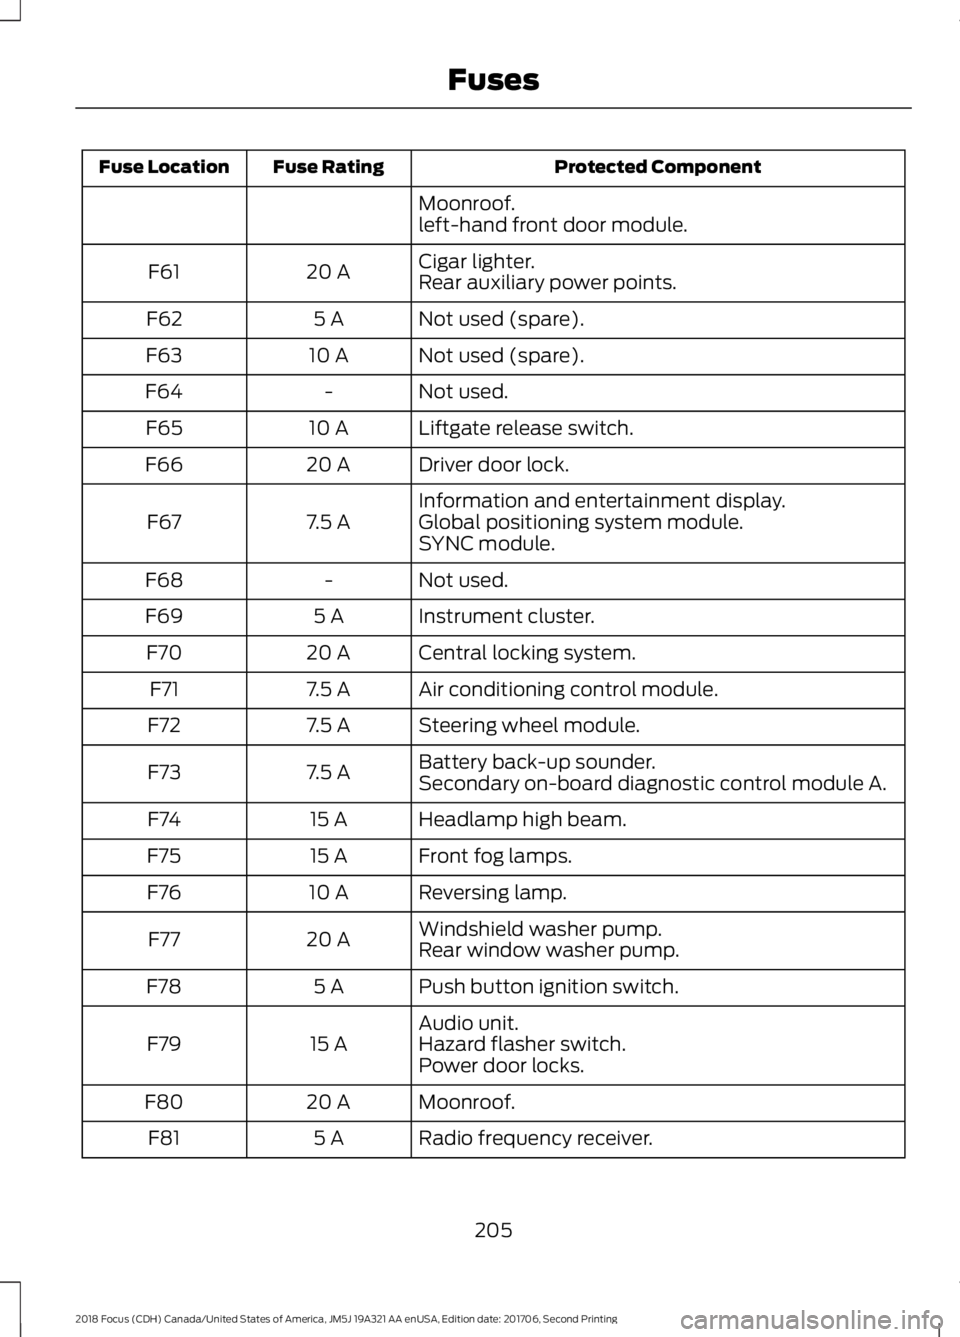
Protected ComponentFuse RatingFuse Location
Moonroof.left-hand front door module.
Cigar lighter.20 AF61Rear auxiliary power points.
Not used (spare).5 AF62
Not used (spare).10 AF63
Not used.-F64
Liftgate release switch.10 AF65
Driver door lock.20 AF66
Information and entertainment display.7.5 AF67Global positioning system module.SYNC module.
Not used.-F68
Instrument cluster.5 AF69
Central locking system.20 AF70
Air conditioning control module.7.5 AF71
Steering wheel module.7.5 AF72
Battery back-up sounder.7.5 AF73Secondary on-board diagnostic control module A.
Headlamp high beam.15 AF74
Front fog lamps.15 AF75
Reversing lamp.10 AF76
Windshield washer pump.20 AF77Rear window washer pump.
Push button ignition switch.5 AF78
Audio unit.15 AF79Hazard flasher switch.Power door locks.
Moonroof.20 AF80
Radio frequency receiver.5 AF81
2052018 Focus (CDH) Canada/United States of America, JM5J 19A321 AA enUSA, Edition date: 201706, Second PrintingFuses
Page 220 of 473

Under certain conditions, the enginecooling fan may continue to run for severalminutes after you switch your vehicle off.
ENGINE COOLANT CHECK
WARNINGS
Never remove the coolant reservoircap when the engine is running orhot.
Do not put coolant in the windshieldwasher reservoir. If sprayed on thewindshield, coolant could make itdifficult to see through the windshield.
To reduce the risk of personal injury,make sure the engine is cool beforeunscrewing the coolant pressurerelief cap. The cooling system is underpressure. Steam and hot liquid can comeout forcefully when you loosen the capslightly.
Do not add coolant further than theMAX mark.
When the engine is cold, check theconcentration and level of the coolant atthe intervals listed in the scheduledmaintenance information. See ScheduledMaintenance (page 409).
Note:Make sure that the coolant level isbetween the MIN and MAX marks on thecoolant reservoir.
Note: Coolant expands when it is hot. Thelevel may extend beyond the MAX mark.
Maintain coolant concentration within48% to 50%, which equates to a freezepoint between -29°F (-34°C) and -35°F(-37°C). Coolant concentration should bechecked using a refractometer. We do notrecommend the use of hydrometers orcoolant test strips for measuring coolantconcentration.
Adding Coolant
WARNINGS
Do not add engine coolant when theengine is hot. Failure to follow thisinstruction could result in personalinjury.
Never remove the coolant reservoircap when the engine is running orhot.
Note: Automotive fluids are notinterchangeable. Take care not to putengine coolant in the windshield washerfluid reservoir or windshield washer fluid inthe engine coolant reservoir.
Note: Do not use stop leak pellets, coolingsystem sealants, or non-specified additivesas they can cause damage to the enginecooling or heating systems. Resultingcomponent damage may not be covered bythe vehicle Warranty.
It is very important to use predilutedcoolant approved to the correctspecification in order to avoid plugging thesmall passageways in the engine coolingsystem. See Capacities andSpecifications (page 268). Do not mixdifferent colors or types of coolant in yourvehicle. Mixing of engine coolants or usingan incorrect coolant may harm the engineor cooling system components and maynot be covered by the vehicle Warranty.
Note:If prediluted coolant is not available,use the approved concentrated coolantdiluting it to 50/50 with distilled water. SeeCapacities and Specifications (page 268).Using water that has not been deionisedmay contribute to deposit formation,corrosion and plugging of the small coolingsystem passageways.
2172018 Focus (CDH) Canada/United States of America, JM5J 19A321 AA enUSA, Edition date: 201706, Second PrintingMaintenance
Page 221 of 473
Note: Coolants marketed for all makes andmodels may not be approved to Fordspecifications and may cause damage tothe cooling system. Resulting componentdamage may not be covered by the vehicleWarranty.
If the coolant level is at or below theminimum mark, add prediluted coolantimmediately.
To top up the coolant level do thefollowing:
1.Unscrew the cap slowly. Any pressureescapes as you unscrew the cap.
2.Add prediluted coolant approved tothe correct specification. SeeCapacities and Specifications (page268).
3.Add enough prediluted coolant toreach the correct level.
4.Replace the coolant reservoir cap, turnit clockwise until you feel a strongresistance.
5.Check the coolant level in the coolantreservoir the next few times you driveyour vehicle. If necessary, add enoughprediluted engine coolant to bring thecoolant level to the correct level.
If you have to add more than 1.1 qt (1 L) ofengine coolant per month, have yourvehicle checked as soon as possible.Operating an engine with a low level ofcoolant can result in engine overheatingand possible engine damage.
Note:During normal vehicle operation, thecoolant may change color from orange topink or light red. As long as the coolant isclear and uncontaminated, this color changedoes not indicate the coolant has degradednor does it require the coolant to be drained,the system to be flushed, or the coolant tobe replaced.
In case of emergency, you can add a largeamount of water without engine coolantin order to reach a vehicle service location.In this instance, qualified personnel:
1.Must drain the cooling system.
2.Chemically clean the coolant system.
3.Refill with engine coolant as soon aspossible.
Water alone, without engine coolant, cancause engine damage from corrosion,overheating or freezing.
Do not use the following as a coolantsubstitute:
•Alcohol.
•Methanol.
•Brine.
•Any coolant mixed with alcohol ormethanol antifreeze.
Alcohol and other liquids can cause enginedamage from overheating or freezing.
Do not add extra inhibitors or additives tothe coolant. These can be harmful andcompromise the corrosion protection ofthe coolant.
Recycled Coolant
We do not recommend the use of recycledcoolant as an approved recycling processis not yet available.
Dispose of used engine coolant in anappropriate manner. Follow yourcommunity's regulations and standardsfor recycling and disposing of automotivefluids.
2182018 Focus (CDH) Canada/United States of America, JM5J 19A321 AA enUSA, Edition date: 201706, Second PrintingMaintenance
Page 225 of 473
WASHER FLUID CHECK
When adding fluid, use a mixture of washerfluid and water to help prevent freezingand improve the cleaning capability. Forinformation on fluid dilution follow themanufacturer's instructions.
Note:The reservoir supplies the front andrear washer systems.
CHANGING THE 12V BATTERY
WARNINGS
Batteries normally produce explosivegases which can cause personalinjury. Therefore, do not allowflames, sparks or lighted substances tocome near the battery. When working nearthe battery, always shield your face andprotect your eyes. Always provide correctventilation.
When lifting a plastic-cased battery,excessive pressure on the end wallscould cause acid to flow through thevent caps, resulting in personal injury anddamage to the vehicle or battery. Lift thebattery with a battery carrier or with yourhands on opposite corners.
Keep batteries out of reach ofchildren. Batteries contain sulfuricacid. Avoid contact with skin, eyes orclothing. Shield your eyes when workingnear the battery to protect against possiblesplashing of acid solution. In case of acidcontact with skin or eyes, flushimmediately with water for a minimum of15 minutes and get prompt medicalattention. If acid is swallowed, call aphysician immediately.
Battery posts, terminals and relatedaccessories contain lead and leadcompounds. Wash hands afterhandling.
Your vehicle has a Motorcraft®maintenance-free battery which normallydoes not require additional water duringits life of service.
Note:If your vehicle's battery has a coveror shield, make sure it is reinstalled after thebattery has been cleaned or replaced.
Note:See an authorized dealer for lowvoltage battery access, testing, orreplacement.
When a low voltage battery replacementis necessary, see an authorized dealer toreplace the low voltage battery with a Fordrecommended replacement low voltagebattery that matches the electricalrequirements of the vehicle.
To ensure proper operation of the batterymanagement system (BMS), do not allowa technician to connect any electricaldevice ground connection directly to thelow voltage battery negative post. Aconnection at the low voltage batterynegative post can cause inaccuratemeasurements of the battery conditionand potential incorrect system operation.
Note:If a person adds electrical orelectronic accessories or components to thevehicle, the accessories or components mayadversely affect the low voltage batteryperformance and durability and may alsoaffect the performance of other electricalsystems in the vehicle.
For longer, trouble-free operation, keep thetop of the battery clean and dry. Also,make certain the battery cables are alwaystightly fastened to the battery terminals.
If you see any corrosion on the battery orterminals, remove the cables from theterminals and clean with a wire brush. Youcan neutralize the acid with a solution ofbaking soda and water.
2222018 Focus (CDH) Canada/United States of America, JM5J 19A321 AA enUSA, Edition date: 201706, Second PrintingMaintenance
Page 227 of 473
Service Position
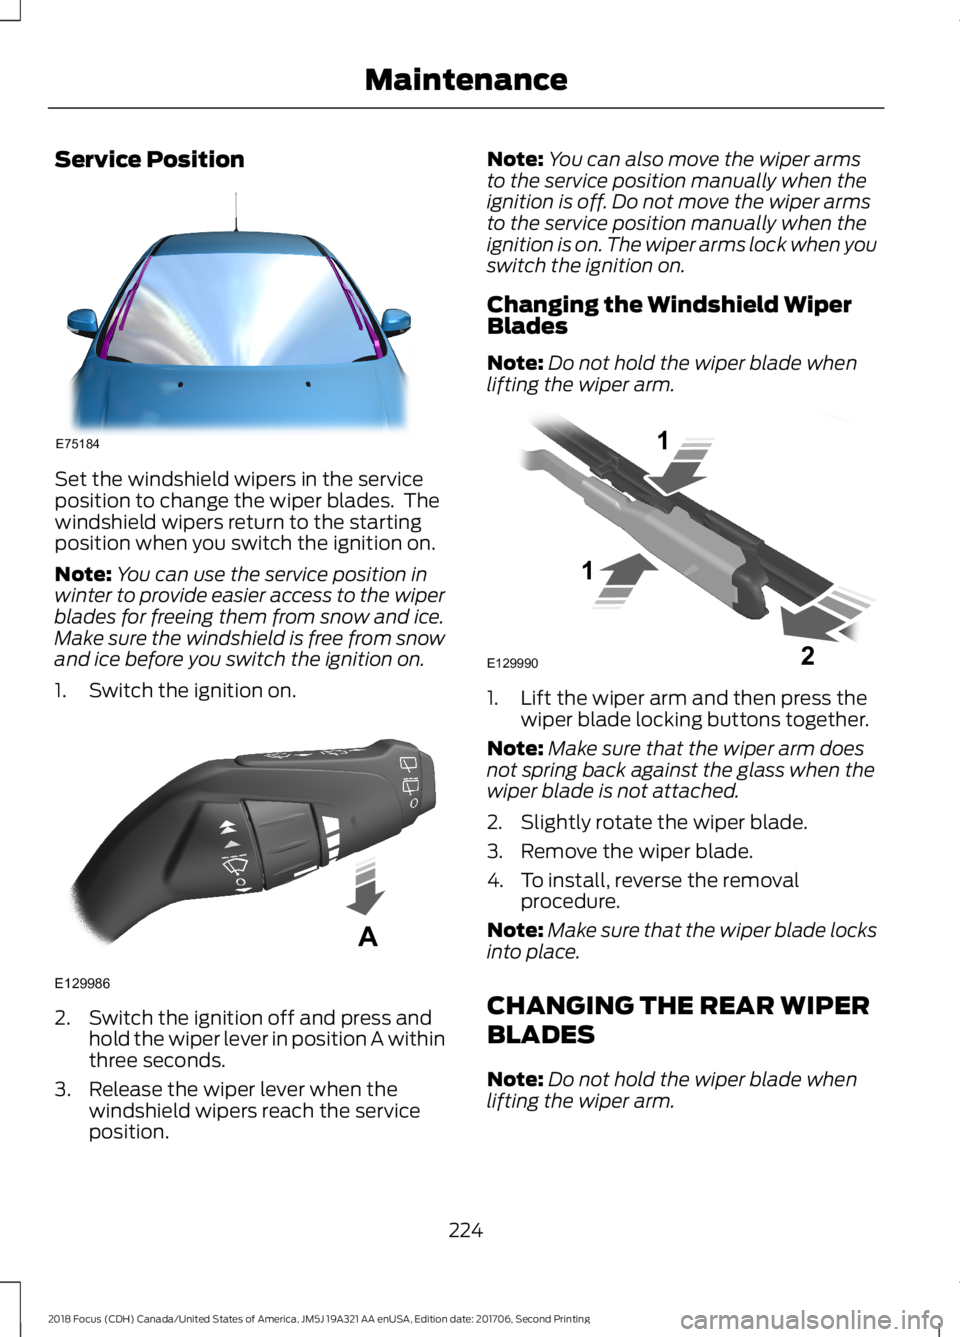
Set the windshield wipers in the serviceposition to change the wiper blades. Thewindshield wipers return to the startingposition when you switch the ignition on.
Note:You can use the service position inwinter to provide easier access to the wiperblades for freeing them from snow and ice.Make sure the windshield is free from snowand ice before you switch the ignition on.
1.Switch the ignition on.
2.Switch the ignition off and press andhold the wiper lever in position A withinthree seconds.
3.Release the wiper lever when thewindshield wipers reach the serviceposition.
Note:You can also move the wiper armsto the service position manually when theignition is off. Do not move the wiper armsto the service position manually when theignition is on. The wiper arms lock when youswitch the ignition on.
Changing the Windshield WiperBlades
Note:Do not hold the wiper blade whenlifting the wiper arm.
1.Lift the wiper arm and then press thewiper blade locking buttons together.
Note:Make sure that the wiper arm doesnot spring back against the glass when thewiper blade is not attached.
2.Slightly rotate the wiper blade.
3.Remove the wiper blade.
4.To install, reverse the removalprocedure.
Note:Make sure that the wiper blade locksinto place.
CHANGING THE REAR WIPER
BLADES
Note:Do not hold the wiper blade whenlifting the wiper arm.
2242018 Focus (CDH) Canada/United States of America, JM5J 19A321 AA enUSA, Edition date: 201706, Second PrintingMaintenanceE75184 E129986A E129990112
Page 228 of 473
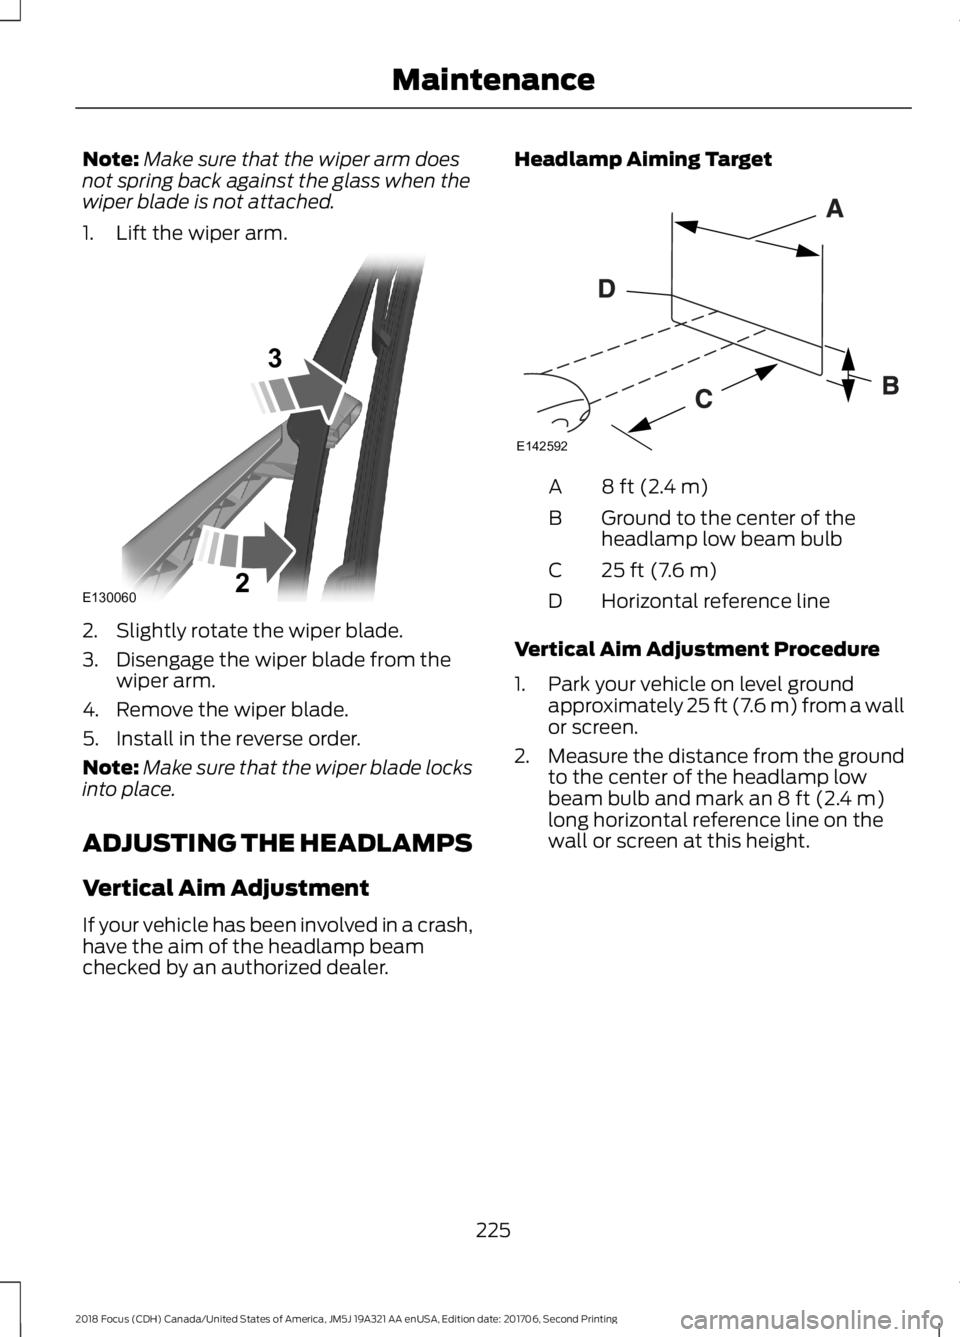
Note:Make sure that the wiper arm doesnot spring back against the glass when thewiper blade is not attached.
1.Lift the wiper arm.
2.Slightly rotate the wiper blade.
3.Disengage the wiper blade from thewiper arm.
4.Remove the wiper blade.
5.Install in the reverse order.
Note:Make sure that the wiper blade locksinto place.
ADJUSTING THE HEADLAMPS
Vertical Aim Adjustment
If your vehicle has been involved in a crash,have the aim of the headlamp beamchecked by an authorized dealer.
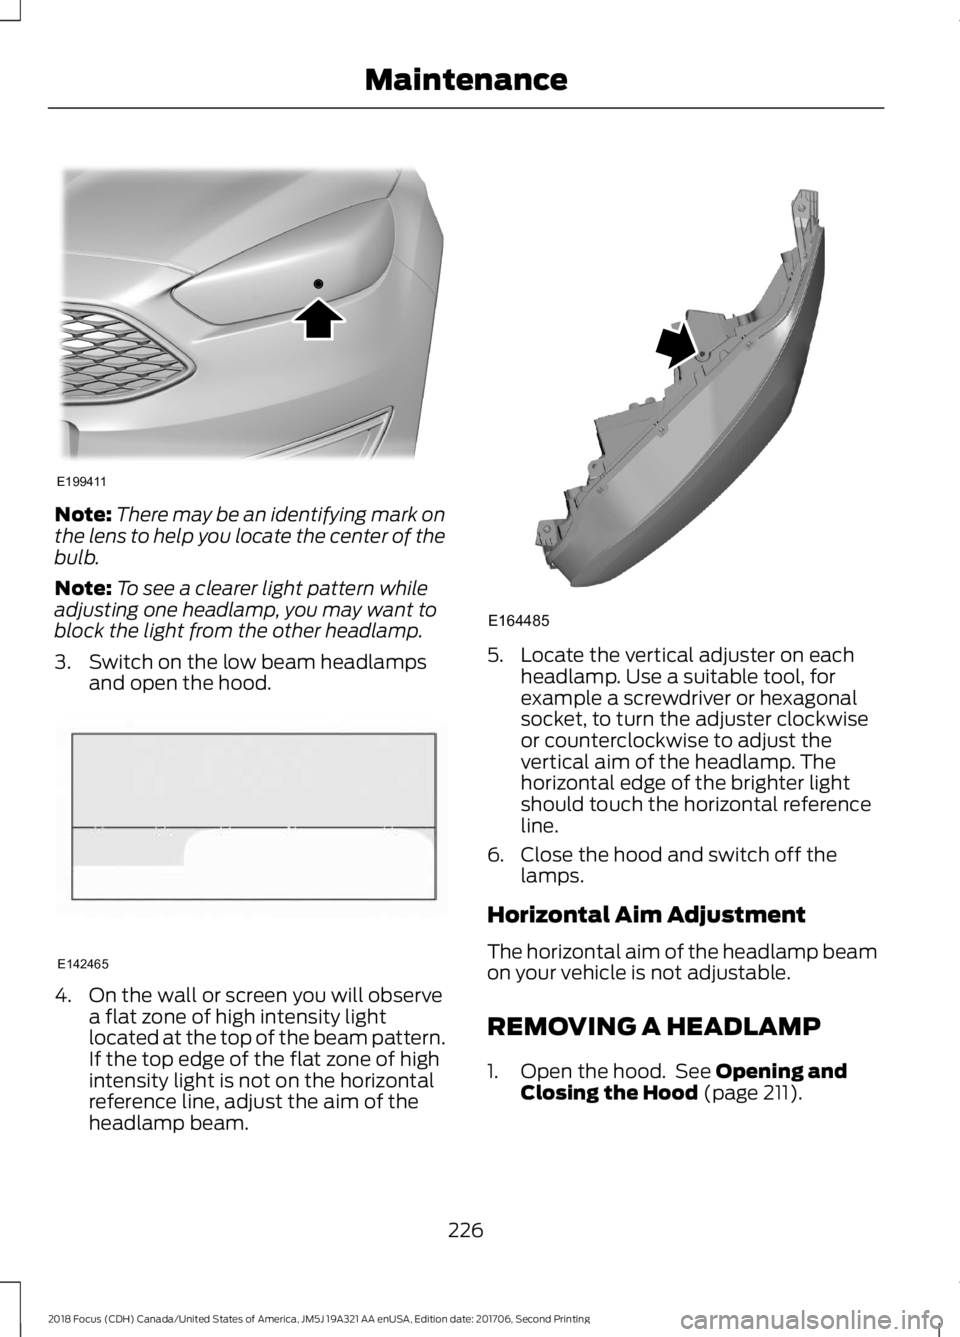
Headlamp Aiming Target
8 ft (2.4 m)A
Ground to the center of theheadlamp low beam bulbB
25 ft (7.6 m)C
Horizontal reference lineD
Vertical Aim Adjustment Procedure
1.Park your vehicle on level groundapproximately 25 ft (7.6 m) from a wallor screen.
2.Measure the distance from the groundto the center of the headlamp lowbeam bulb and mark an 8 ft (2.4 m)long horizontal reference line on thewall or screen at this height.
2252018 Focus (CDH) Canada/United States of America, JM5J 19A321 AA enUSA, Edition date: 201706, Second PrintingMaintenanceE13006032 E142592
Page 229 of 473
Note:There may be an identifying mark onthe lens to help you locate the center of thebulb.
Note:To see a clearer light pattern whileadjusting one headlamp, you may want toblock the light from the other headlamp.
3.Switch on the low beam headlampsand open the hood.
4.On the wall or screen you will observea flat zone of high intensity lightlocated at the top of the beam pattern.If the top edge of the flat zone of highintensity light is not on the horizontalreference line, adjust the aim of theheadlamp beam.
5.Locate the vertical adjuster on eachheadlamp. Use a suitable tool, forexample a screwdriver or hexagonalsocket, to turn the adjuster clockwiseor counterclockwise to adjust thevertical aim of the headlamp. Thehorizontal edge of the brighter lightshould touch the horizontal referenceline.
6.Close the hood and switch off thelamps.
Horizontal Aim Adjustment
The horizontal aim of the headlamp beamon your vehicle is not adjustable.
REMOVING A HEADLAMP
1.Open the hood. See Opening andClosing the Hood (page 211).
2262018 Focus (CDH) Canada/United States of America, JM5J 19A321 AA enUSA, Edition date: 201706, Second PrintingMaintenanceE199411 E142465 E164485
Page 235 of 473
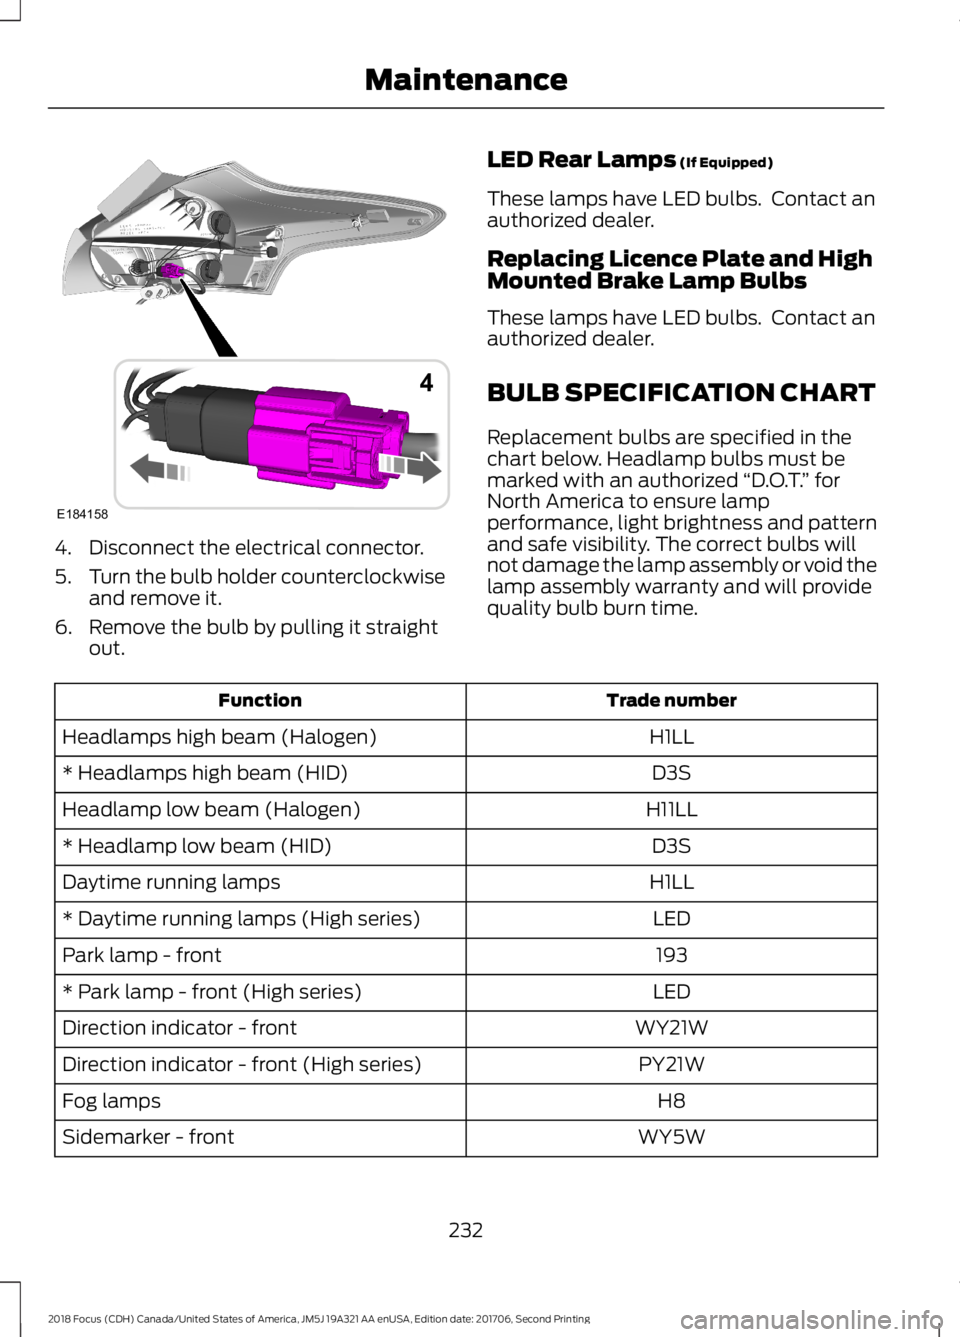
4.Disconnect the electrical connector.
5.Turn the bulb holder counterclockwiseand remove it.
6.Remove the bulb by pulling it straightout.
LED Rear Lamps (If Equipped)
These lamps have LED bulbs. Contact anauthorized dealer.
Replacing Licence Plate and HighMounted Brake Lamp Bulbs
These lamps have LED bulbs. Contact anauthorized dealer.
BULB SPECIFICATION CHART
Replacement bulbs are specified in thechart below. Headlamp bulbs must bemarked with an authorized “D.O.T.” forNorth America to ensure lampperformance, light brightness and patternand safe visibility. The correct bulbs willnot damage the lamp assembly or void thelamp assembly warranty and will providequality bulb burn time.
Trade numberFunction
H1LLHeadlamps high beam (Halogen)
D3S* Headlamps high beam (HID)
H11LLHeadlamp low beam (Halogen)
D3S* Headlamp low beam (HID)
H1LLDaytime running lamps
LED* Daytime running lamps (High series)
193Park lamp - front
LED* Park lamp - front (High series)
WY21WDirection indicator - front
PY21WDirection indicator - front (High series)
H8Fog lamps
WY5WSidemarker - front
2322018 Focus (CDH) Canada/United States of America, JM5J 19A321 AA enUSA, Edition date: 201706, Second PrintingMaintenanceE1841584