2018 FORD FOCUS ECU
[x] Cancel search: ECUPage 262 of 473
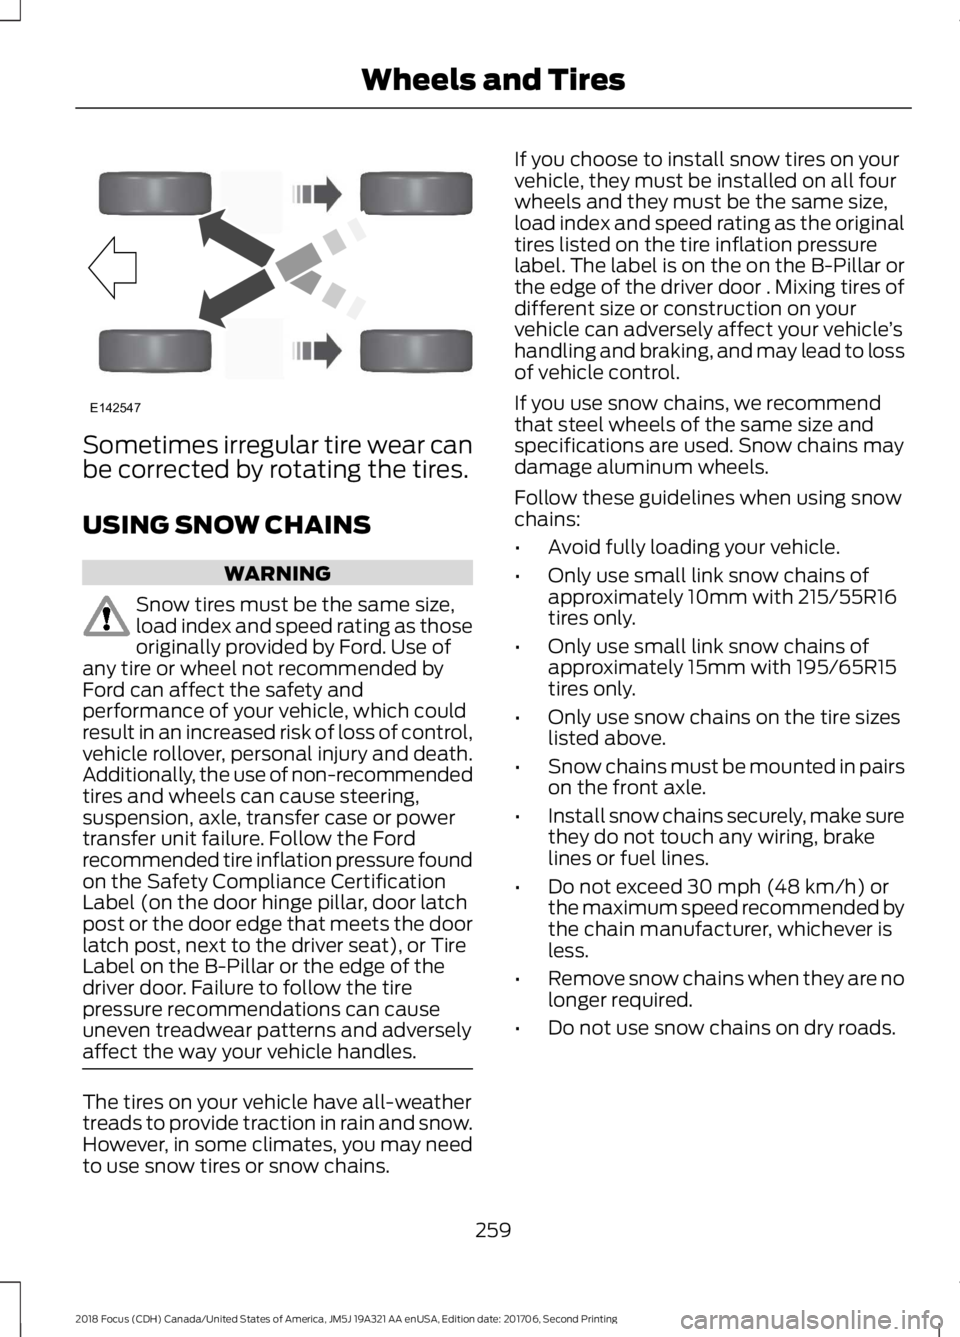
Sometimes irregular tire wear canbe corrected by rotating the tires.
USING SNOW CHAINS
WARNING
Snow tires must be the same size,load index and speed rating as thoseoriginally provided by Ford. Use ofany tire or wheel not recommended byFord can affect the safety andperformance of your vehicle, which couldresult in an increased risk of loss of control,vehicle rollover, personal injury and death.Additionally, the use of non-recommendedtires and wheels can cause steering,suspension, axle, transfer case or powertransfer unit failure. Follow the Fordrecommended tire inflation pressure foundon the Safety Compliance CertificationLabel (on the door hinge pillar, door latchpost or the door edge that meets the doorlatch post, next to the driver seat), or TireLabel on the B-Pillar or the edge of thedriver door. Failure to follow the tirepressure recommendations can causeuneven treadwear patterns and adverselyaffect the way your vehicle handles.
The tires on your vehicle have all-weathertreads to provide traction in rain and snow.However, in some climates, you may needto use snow tires or snow chains.
If you choose to install snow tires on yourvehicle, they must be installed on all fourwheels and they must be the same size,load index and speed rating as the originaltires listed on the tire inflation pressurelabel. The label is on the on the B-Pillar orthe edge of the driver door . Mixing tires ofdifferent size or construction on yourvehicle can adversely affect your vehicle’shandling and braking, and may lead to lossof vehicle control.
If you use snow chains, we recommendthat steel wheels of the same size andspecifications are used. Snow chains maydamage aluminum wheels.
Follow these guidelines when using snowchains:
•Avoid fully loading your vehicle.
•Only use small link snow chains ofapproximately 10mm with 215/55R16tires only.
•Only use small link snow chains ofapproximately 15mm with 195/65R15tires only.
•Only use snow chains on the tire sizeslisted above.
•Snow chains must be mounted in pairson the front axle.
•Install snow chains securely, make surethey do not touch any wiring, brakelines or fuel lines.
•Do not exceed 30 mph (48 km/h) orthe maximum speed recommended bythe chain manufacturer, whichever isless.
•Remove snow chains when they are nolonger required.
•Do not use snow chains on dry roads.
2592018 Focus (CDH) Canada/United States of America, JM5J 19A321 AA enUSA, Edition date: 201706, Second PrintingWheels and TiresE142547
Page 267 of 473
When driving with one of the dissimilarspare tires listed above, do not:
•Exceed 50 mph (80 km/h).
•Load the vehicle beyond maximumvehicle load rating listed on the SafetyCompliance Label.
•Tow a trailer.
•Use snow chains on the end of thevehicle with the dissimilar spare tire.
•Use more than one dissimilar spare tireat a time.
•Use commercial car washingequipment.
•Try to repair the dissimilar spare tire.
Use of one of the dissimilar spare tireslisted above at any one wheel location canlead to impairment of the following:
•Handling, stability and brakingperformance.
•Comfort and noise.
•Ground clearance and parking at curbs.
•Winter weather driving capability.
•Wet weather driving capability.
•All-wheel driving capability.
3.Full-size dissimilar spare withoutlabel on wheel
When driving with the full-size dissimilarspare wheel and tire assembly, do not:
•Exceed 70 mph (113 km/h).
•Use more than one dissimilar sparewheel and tire assembly at a time.
•Use commercial car washingequipment.
•Use snow chains on the end of thevehicle with the dissimilar spare wheeland tire assembly.
The usage of a full-size dissimilar sparewheel and tire assembly can lead toimpairment of the following:
•Handling, stability and brakingperformance.
•Comfort and noise.
•Ground clearance and parking at curbs.
•Winter weather driving capability.
•Wet weather driving capability.
•All-wheel driving capability.
When driving with the full-size dissimilarspare wheel and tire assembly, additionalcaution should be given to:
•Towing a trailer.
•Driving vehicles equipped with acamper body.
•Driving vehicles with a load on thecargo rack.
Drive cautiously when using a full-sizedissimilar spare wheel and tire assemblyand seek service as soon as possible.
Tire Change Procedure
WARNINGS
Do not get under a vehicle that is onlysupported by a vehicle jack.
When you install a wheel, alwaysremove any corrosion, dirt or foreignmaterials present on the mountingsurfaces of the wheel or the surface of thewheel hub, brake drum or brake disc thatcontacts the wheel. Make sure to secureany fasteners that attach the rotor to thehub so they do not interfere with themounting surfaces of the wheel. Installingwheels without correct metal-to-metalcontact at the wheel mounting surfacescan cause the wheel nuts to loosen andthe wheel to come off while your vehicleis in motion, resulting in loss of vehiclecontrol, personal injury or death.
2642018 Focus (CDH) Canada/United States of America, JM5J 19A321 AA enUSA, Edition date: 201706, Second PrintingWheels and Tires
Page 268 of 473

WARNINGS
Make sure there is no grease or oil onthe threads or the surface betweenthe wheel lugs and nuts. This cancause the lug nuts to loosen while driving.
When one of the front wheels is offthe ground, the transmission alonewill not prevent the vehicle frommoving or slipping off the jack, even if thetransmission is in park (P).
To help prevent your vehicle frommoving when changing a wheel, shiftthe transmission into park (P), setthe parking brake and use an appropriateblock or wheel chock to secure the wheeldiagonally opposite to the wheel beingchanged. For example, when changing thefront left wheel, place an appropriate blockor wheel chock on the right rear wheel.
Do not attempt to change a tire onthe side of the vehicle close tomoving traffic. Pull far enough off theroad to avoid the danger of being hit whenoperating the jack or changing the wheel.
Always use the jack provided asoriginal equipment with your vehicle.If using a jack other than the oneprovided, make sure the jack capacity isadequate for the vehicle weight, includingany vehicle cargo or modifications. If youare unsure if the jack capacity is adequate,contact the authorized dealer.
Make sure all passengers are out ofyour vehicle.
1.Park on a level surface, set the parkingbrake and activate the hazard flashers.
2.Place the transmission in park (P)(automatic transmission) or neutral(N) (manual transmission) and turnthe engine off.
3.Remove the carpeted wheel cover.
4.Remove the spare tire bolt securing thespare tire by turning itcounterclockwise.
5.Remove the spare tire from the sparetire compartment
6.Remove the retaining bolt securing thejack by turning it counterclockwise.
7.Remove the jack.
8.Block the diagonally opposite wheel.
9.Loosen each wheel lug nut one-halfturn counterclockwise, but do notremove them until the wheel is raisedoff the ground.
10.The vehicle jacking points are shownhere, and are depicted on the warninglabel on the jack.Note: Jack at thespecified locations to avoid damageto the vehicle.
11.Indentations in the sills show thelocation of the jacking points.
2652018 Focus (CDH) Canada/United States of America, JM5J 19A321 AA enUSA, Edition date: 201706, Second PrintingWheels and TiresE142551 E145908
Page 269 of 473
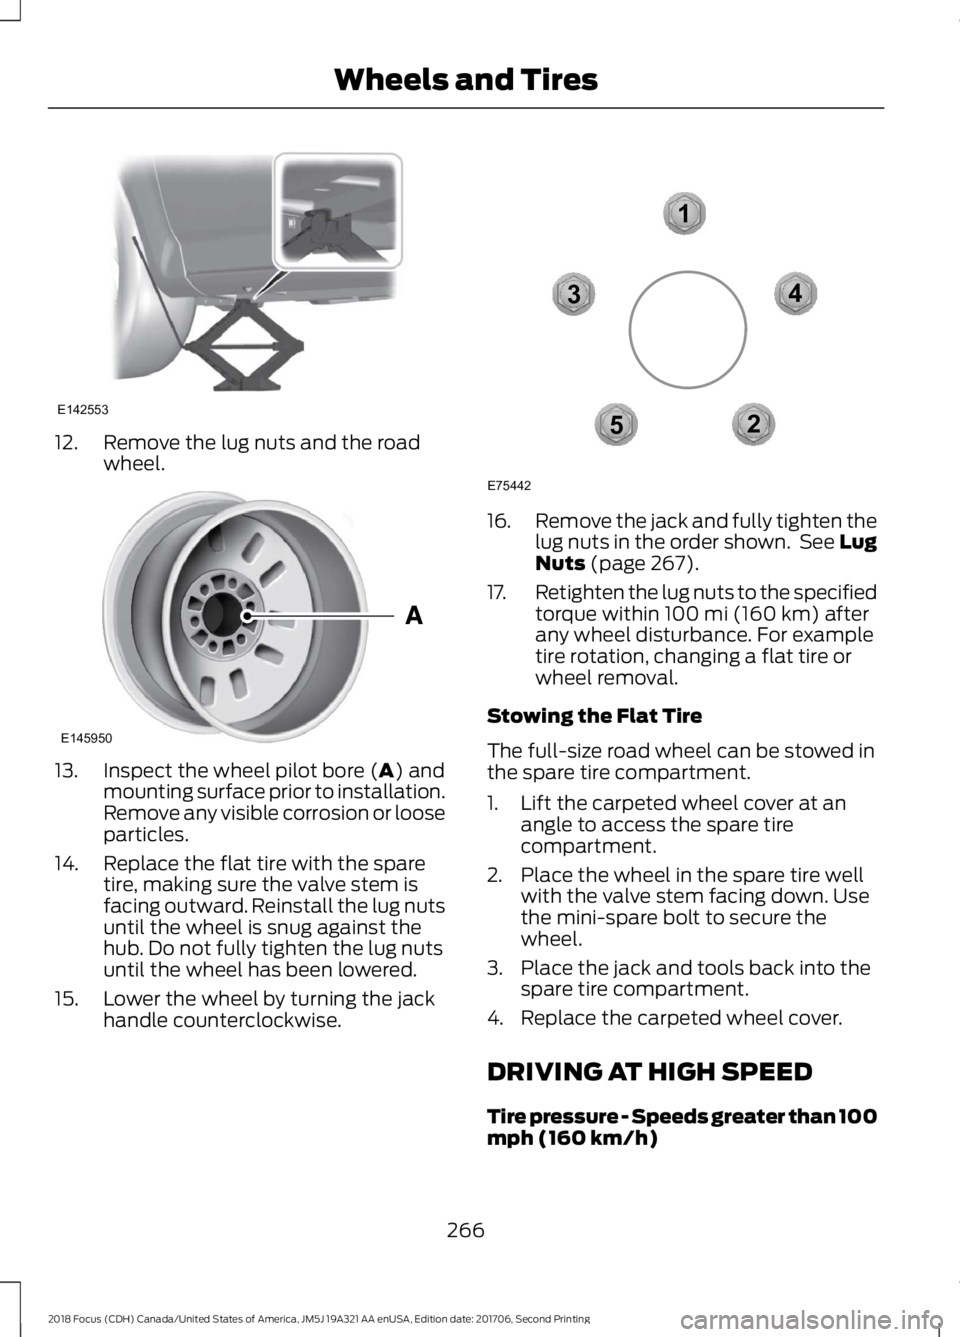
12.Remove the lug nuts and the roadwheel.
13.Inspect the wheel pilot bore (A) andmounting surface prior to installation.Remove any visible corrosion or looseparticles.
14.Replace the flat tire with the sparetire, making sure the valve stem isfacing outward. Reinstall the lug nutsuntil the wheel is snug against thehub. Do not fully tighten the lug nutsuntil the wheel has been lowered.
15.Lower the wheel by turning the jackhandle counterclockwise.
16.Remove the jack and fully tighten thelug nuts in the order shown. See LugNuts (page 267).
17.Retighten the lug nuts to the specifiedtorque within 100 mi (160 km) afterany wheel disturbance. For exampletire rotation, changing a flat tire orwheel removal.
Stowing the Flat Tire
The full-size road wheel can be stowed inthe spare tire compartment.
1.Lift the carpeted wheel cover at anangle to access the spare tirecompartment.
2.Place the wheel in the spare tire wellwith the valve stem facing down. Usethe mini-spare bolt to secure thewheel.
3.Place the jack and tools back into thespare tire compartment.
4.Replace the carpeted wheel cover.
DRIVING AT HIGH SPEED
Tire pressure - Speeds greater than 100mph (160 km/h)
2662018 Focus (CDH) Canada/United States of America, JM5J 19A321 AA enUSA, Edition date: 201706, Second PrintingWheels and TiresE142553 E145950 12345E75442
Page 289 of 473
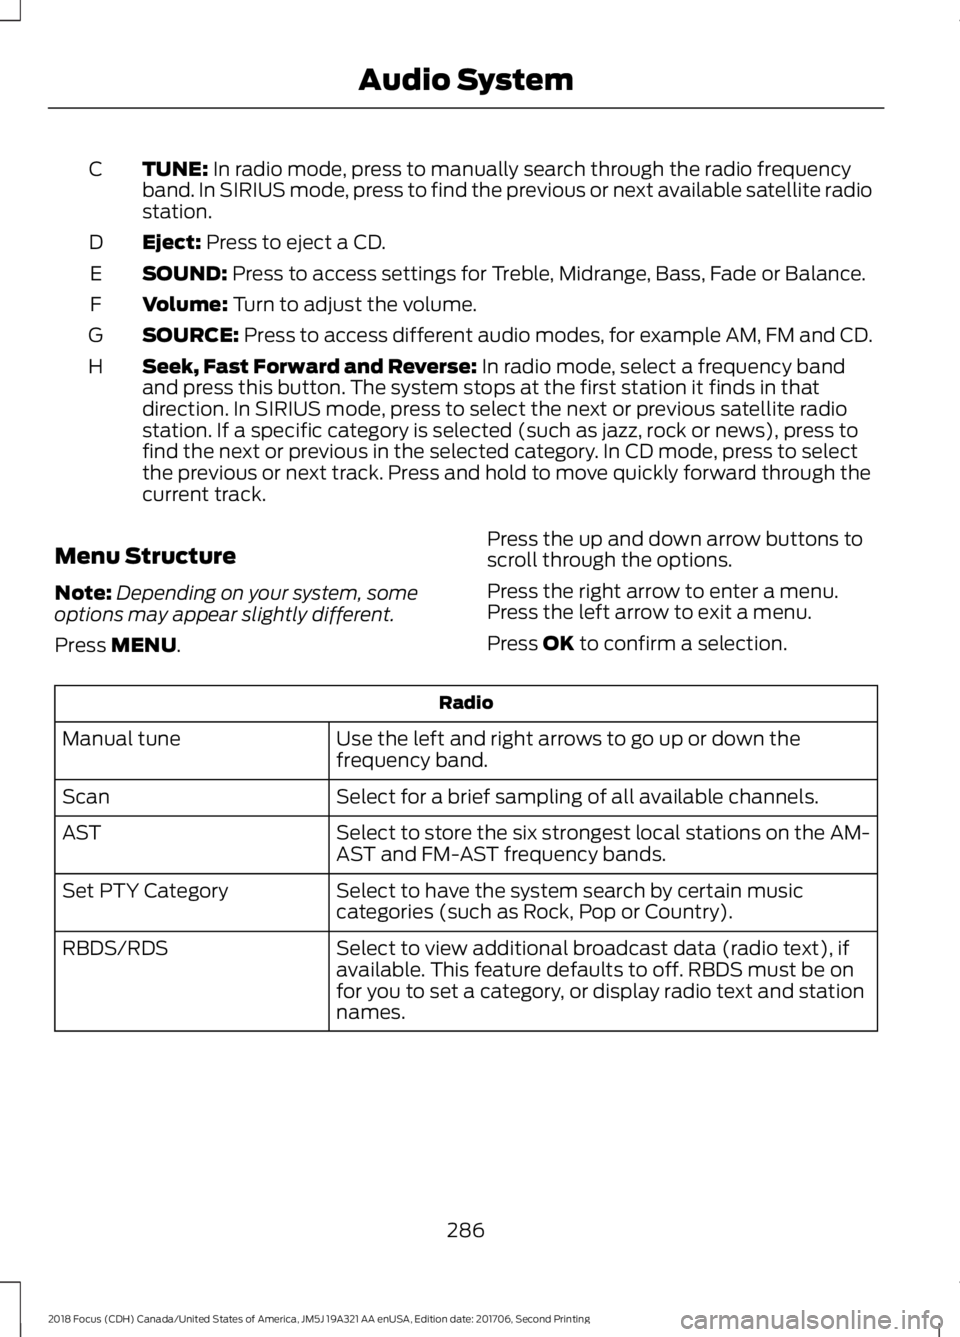
TUNE: In radio mode, press to manually search through the radio frequencyband. In SIRIUS mode, press to find the previous or next available satellite radiostation.
C
Eject: Press to eject a CD.D
SOUND: Press to access settings for Treble, Midrange, Bass, Fade or Balance.E
Volume: Turn to adjust the volume.F
SOURCE: Press to access different audio modes, for example AM, FM and CD.G
Seek, Fast Forward and Reverse: In radio mode, select a frequency bandand press this button. The system stops at the first station it finds in thatdirection. In SIRIUS mode, press to select the next or previous satellite radiostation. If a specific category is selected (such as jazz, rock or news), press tofind the next or previous in the selected category. In CD mode, press to selectthe previous or next track. Press and hold to move quickly forward through thecurrent track.
H
Menu Structure
Note:Depending on your system, someoptions may appear slightly different.
Press MENU.
Press the up and down arrow buttons toscroll through the options.
Press the right arrow to enter a menu.Press the left arrow to exit a menu.
Press OK to confirm a selection.
Radio
Use the left and right arrows to go up or down thefrequency band.Manual tune
Select for a brief sampling of all available channels.Scan
Select to store the six strongest local stations on the AM-AST and FM-AST frequency bands.AST
Select to have the system search by certain musiccategories (such as Rock, Pop or Country).Set PTY Category
Select to view additional broadcast data (radio text), ifavailable. This feature defaults to off. RBDS must be onfor you to set a category, or display radio text and stationnames.
RBDS/RDS
2862018 Focus (CDH) Canada/United States of America, JM5J 19A321 AA enUSA, Edition date: 201706, Second PrintingAudio System
Page 313 of 473
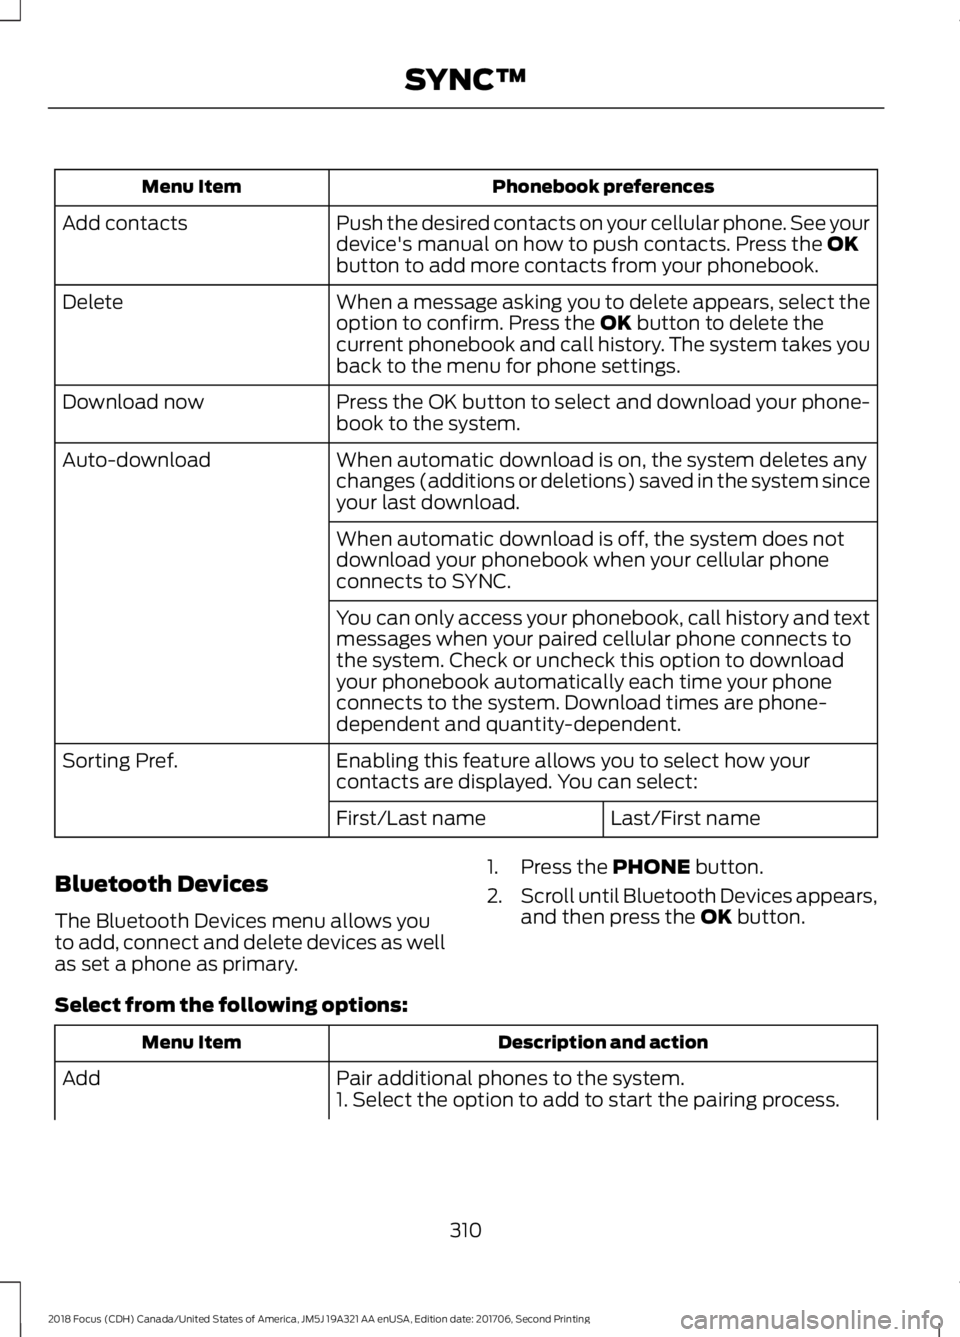
Phonebook preferencesMenu Item
Push the desired contacts on your cellular phone. See yourdevice's manual on how to push contacts. Press the OKbutton to add more contacts from your phonebook.
Add contacts
When a message asking you to delete appears, select theoption to confirm. Press the OK button to delete thecurrent phonebook and call history. The system takes youback to the menu for phone settings.
Delete
Press the OK button to select and download your phone-book to the system.Download now
When automatic download is on, the system deletes anychanges (additions or deletions) saved in the system sinceyour last download.
Auto-download
When automatic download is off, the system does notdownload your phonebook when your cellular phoneconnects to SYNC.
You can only access your phonebook, call history and textmessages when your paired cellular phone connects tothe system. Check or uncheck this option to downloadyour phonebook automatically each time your phoneconnects to the system. Download times are phone-dependent and quantity-dependent.
Enabling this feature allows you to select how yourcontacts are displayed. You can select:Sorting Pref.
Last/First nameFirst/Last name
Bluetooth Devices
The Bluetooth Devices menu allows youto add, connect and delete devices as wellas set a phone as primary.
1.Press the PHONE button.
2.Scroll until Bluetooth Devices appears,and then press the OK button.
Select from the following options:
Description and actionMenu Item
Pair additional phones to the system.Add1. Select the option to add to start the pairing process.
3102018 Focus (CDH) Canada/United States of America, JM5J 19A321 AA enUSA, Edition date: 201706, Second PrintingSYNC™
Page 314 of 473
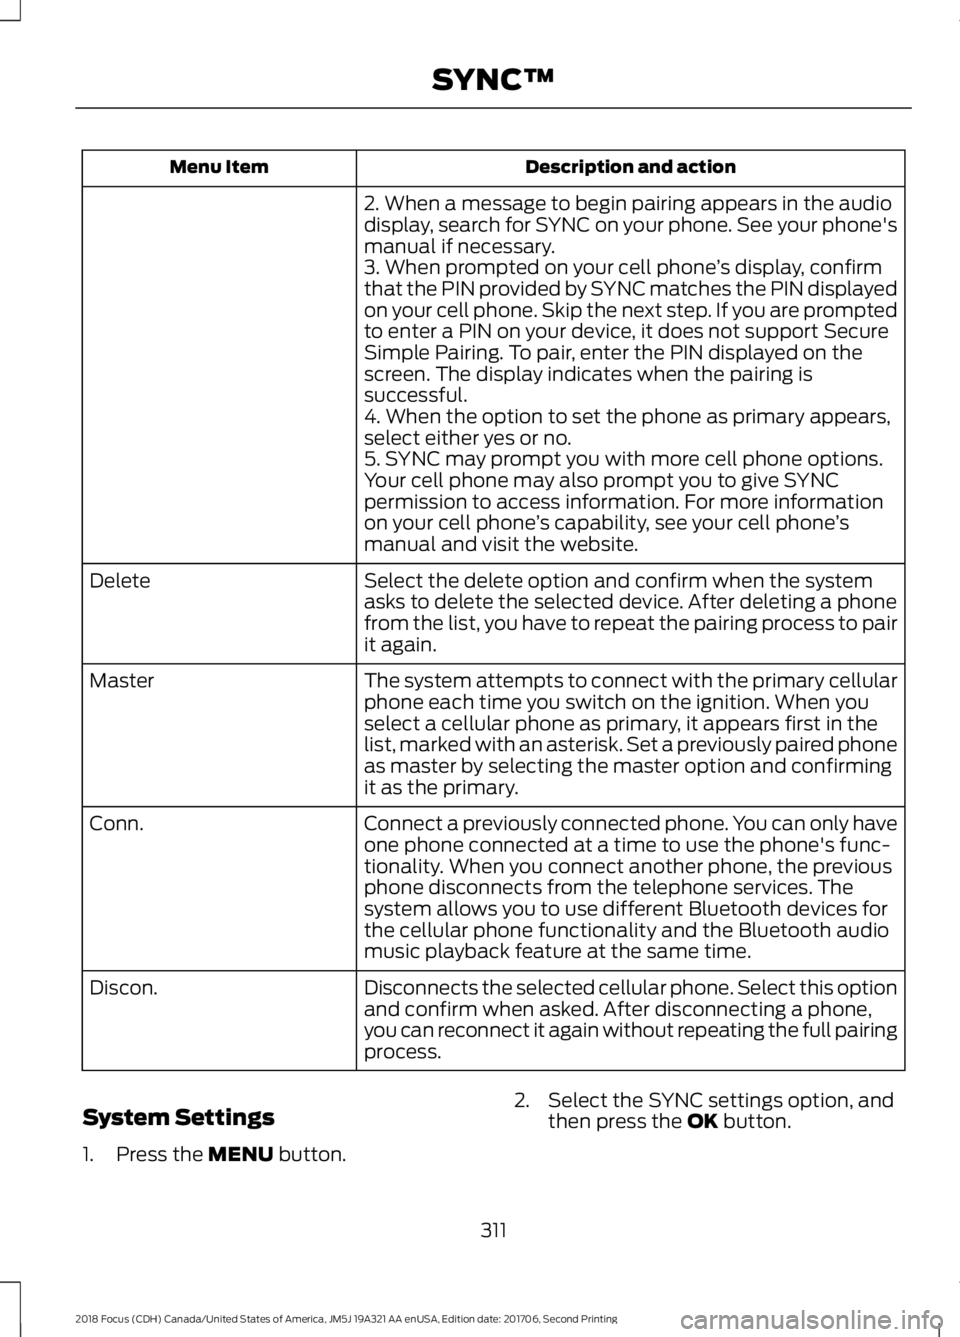
Description and actionMenu Item
2. When a message to begin pairing appears in the audiodisplay, search for SYNC on your phone. See your phone'smanual if necessary.3. When prompted on your cell phone’s display, confirmthat the PIN provided by SYNC matches the PIN displayedon your cell phone. Skip the next step. If you are promptedto enter a PIN on your device, it does not support SecureSimple Pairing. To pair, enter the PIN displayed on thescreen. The display indicates when the pairing issuccessful.4. When the option to set the phone as primary appears,select either yes or no.5. SYNC may prompt you with more cell phone options.Your cell phone may also prompt you to give SYNCpermission to access information. For more informationon your cell phone’s capability, see your cell phone’smanual and visit the website.
Select the delete option and confirm when the systemasks to delete the selected device. After deleting a phonefrom the list, you have to repeat the pairing process to pairit again.
Delete
The system attempts to connect with the primary cellularphone each time you switch on the ignition. When youselect a cellular phone as primary, it appears first in thelist, marked with an asterisk. Set a previously paired phoneas master by selecting the master option and confirmingit as the primary.
Master
Connect a previously connected phone. You can only haveone phone connected at a time to use the phone's func-tionality. When you connect another phone, the previousphone disconnects from the telephone services. Thesystem allows you to use different Bluetooth devices forthe cellular phone functionality and the Bluetooth audiomusic playback feature at the same time.
Conn.
Disconnects the selected cellular phone. Select this optionand confirm when asked. After disconnecting a phone,you can reconnect it again without repeating the full pairingprocess.
Discon.
System Settings
1.Press the MENU button.
2.Select the SYNC settings option, andthen press the OK button.
3112018 Focus (CDH) Canada/United States of America, JM5J 19A321 AA enUSA, Edition date: 201706, Second PrintingSYNC™
Page 316 of 473
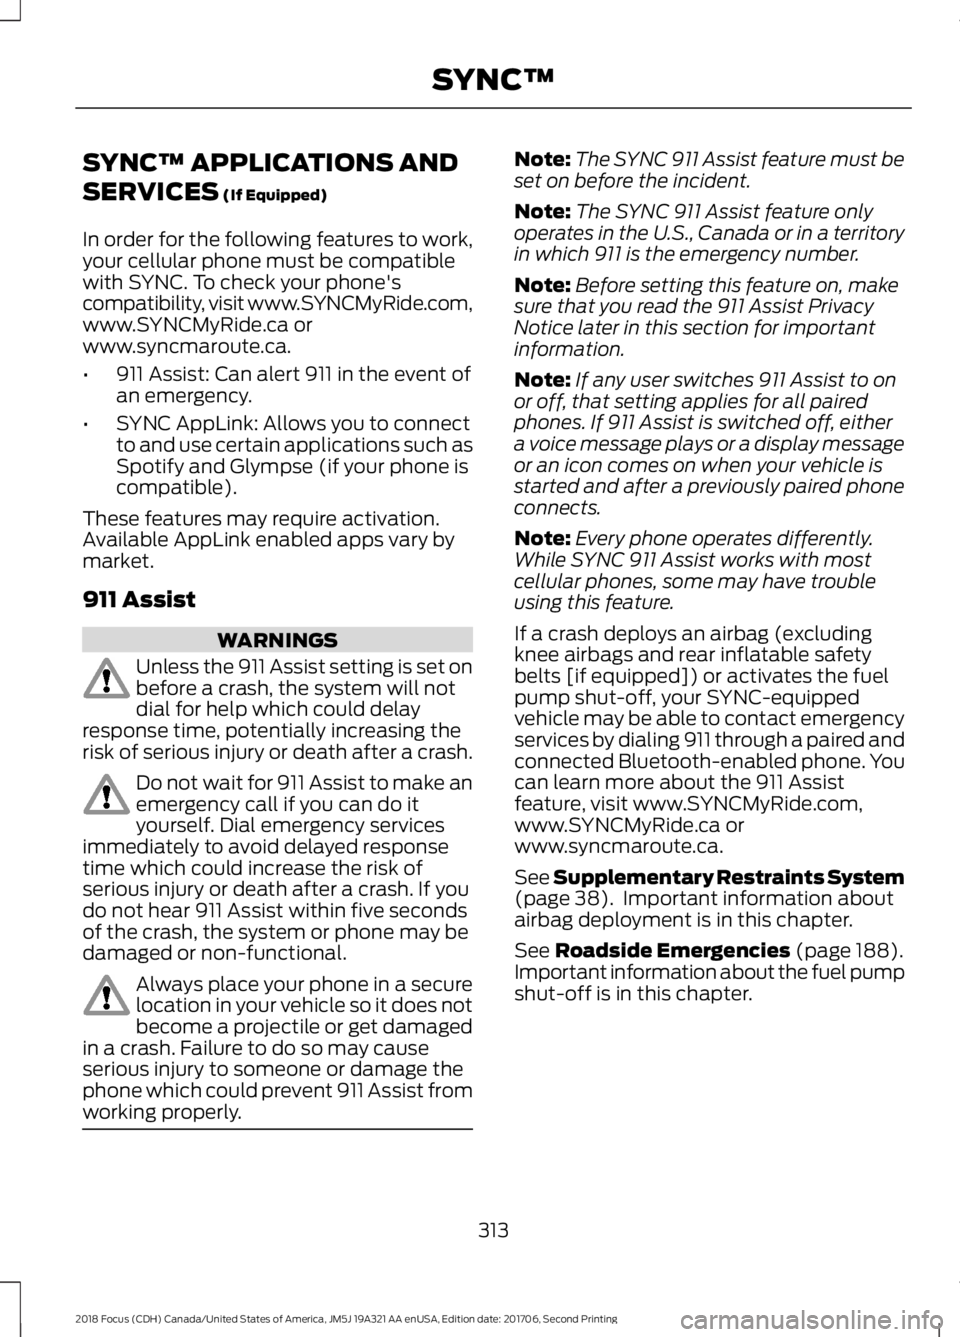
SYNC™ APPLICATIONS AND
SERVICES (If Equipped)
In order for the following features to work,your cellular phone must be compatiblewith SYNC. To check your phone'scompatibility, visit www.SYNCMyRide.com,www.SYNCMyRide.ca orwww.syncmaroute.ca.
•911 Assist: Can alert 911 in the event ofan emergency.
•SYNC AppLink: Allows you to connectto and use certain applications such asSpotify and Glympse (if your phone iscompatible).
These features may require activation.Available AppLink enabled apps vary bymarket.
911 Assist
WARNINGS
Unless the 911 Assist setting is set onbefore a crash, the system will notdial for help which could delayresponse time, potentially increasing therisk of serious injury or death after a crash.
Do not wait for 911 Assist to make anemergency call if you can do ityourself. Dial emergency servicesimmediately to avoid delayed responsetime which could increase the risk ofserious injury or death after a crash. If youdo not hear 911 Assist within five secondsof the crash, the system or phone may bedamaged or non-functional.
Always place your phone in a securelocation in your vehicle so it does notbecome a projectile or get damagedin a crash. Failure to do so may causeserious injury to someone or damage thephone which could prevent 911 Assist fromworking properly.
Note:The SYNC 911 Assist feature must beset on before the incident.
Note:The SYNC 911 Assist feature onlyoperates in the U.S., Canada or in a territoryin which 911 is the emergency number.
Note:Before setting this feature on, makesure that you read the 911 Assist PrivacyNotice later in this section for importantinformation.
Note:If any user switches 911 Assist to onor off, that setting applies for all pairedphones. If 911 Assist is switched off, eithera voice message plays or a display messageor an icon comes on when your vehicle isstarted and after a previously paired phoneconnects.
Note:Every phone operates differently.While SYNC 911 Assist works with mostcellular phones, some may have troubleusing this feature.
If a crash deploys an airbag (excludingknee airbags and rear inflatable safetybelts [if equipped]) or activates the fuelpump shut-off, your SYNC-equippedvehicle may be able to contact emergencyservices by dialing 911 through a paired andconnected Bluetooth-enabled phone. Youcan learn more about the 911 Assistfeature, visit www.SYNCMyRide.com,www.SYNCMyRide.ca orwww.syncmaroute.ca.
See Supplementary Restraints System(page 38). Important information aboutairbag deployment is in this chapter.
See Roadside Emergencies (page 188).Important information about the fuel pumpshut-off is in this chapter.
3132018 Focus (CDH) Canada/United States of America, JM5J 19A321 AA enUSA, Edition date: 201706, Second PrintingSYNC™