2018 FORD FOCUS clock
[x] Cancel search: clockPage 21 of 473
Use a child safety restraint (sometimescalled an infant carrier, convertible seat,or toddler seat) for infants, toddlers, orchildren weighing 40 lb (18 kg) or less(generally age four or younger).
Using Lap and Shoulder Belts
WARNINGS
Airbags can kill or injure a child in achild restraint. Never place arear-facing child restraint in front ofan active airbag. If you must use aforward-facing child restraint in the frontseat, move the seat upon which the childrestraint is installed all the way back.
Airbags can kill or injure a child in achild restraint. Properly restrainchildren 12 and under in the rear seatwhenever possible.
Depending on where you secure achild restraint, and depending on thechild restraint design, you may blockaccess to certain seatbelt buckleassemblies and LATCH lower anchors,rendering those features potentiallyunusable. To avoid risk of injury, make sureoccupants only use seating positionswhere they are able to be properlyrestrained.
When installing a child safety restraint withcombination lap and shoulder belts:
•Use the correct seatbelt buckle for thatseating position.
•Insert the belt tongue into the properbuckle until you hear a snap and feel itlatch. Make sure the tongue is securelyfastened in the buckle.
•Keep the buckle release buttonpointing up and away from the safetyrestraint, with the tongue between thechild restraint and the release button,to prevent accidental unbuckling.
•Place the vehicle seat upon which thechild restraint will be installed in theupright position.
•Put the seatbelt in the automaticlocking mode. See Step 5. This vehicledoes not require the use of a lockingclip.
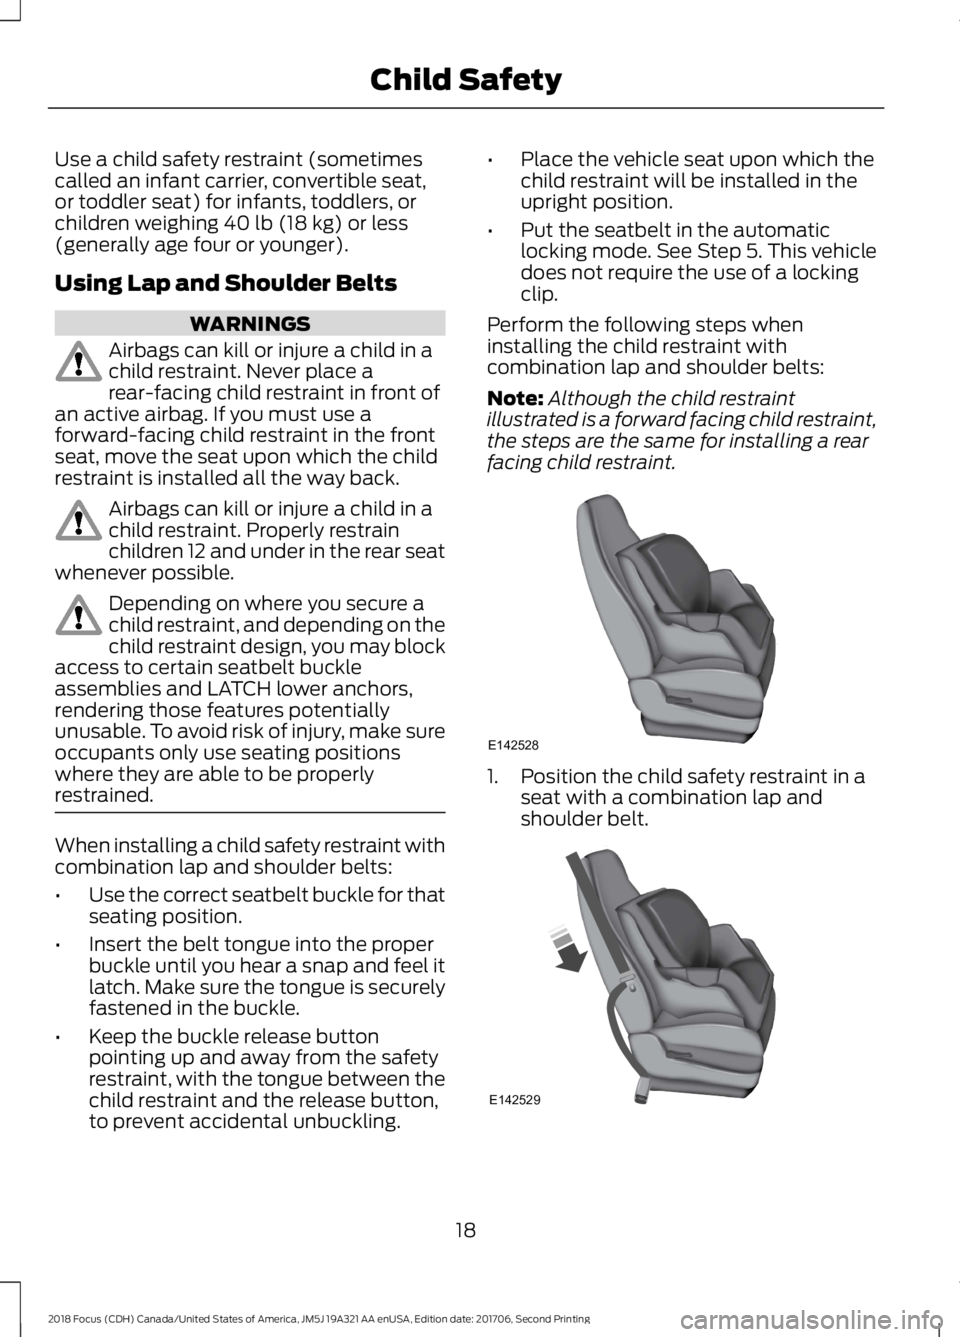
Perform the following steps wheninstalling the child restraint withcombination lap and shoulder belts:
Note:Although the child restraintillustrated is a forward facing child restraint,the steps are the same for installing a rearfacing child restraint.
1.Position the child safety restraint in aseat with a combination lap andshoulder belt.
182018 Focus (CDH) Canada/United States of America, JM5J 19A321 AA enUSA, Edition date: 201706, Second PrintingChild SafetyE142528 E142529
Page 22 of 473
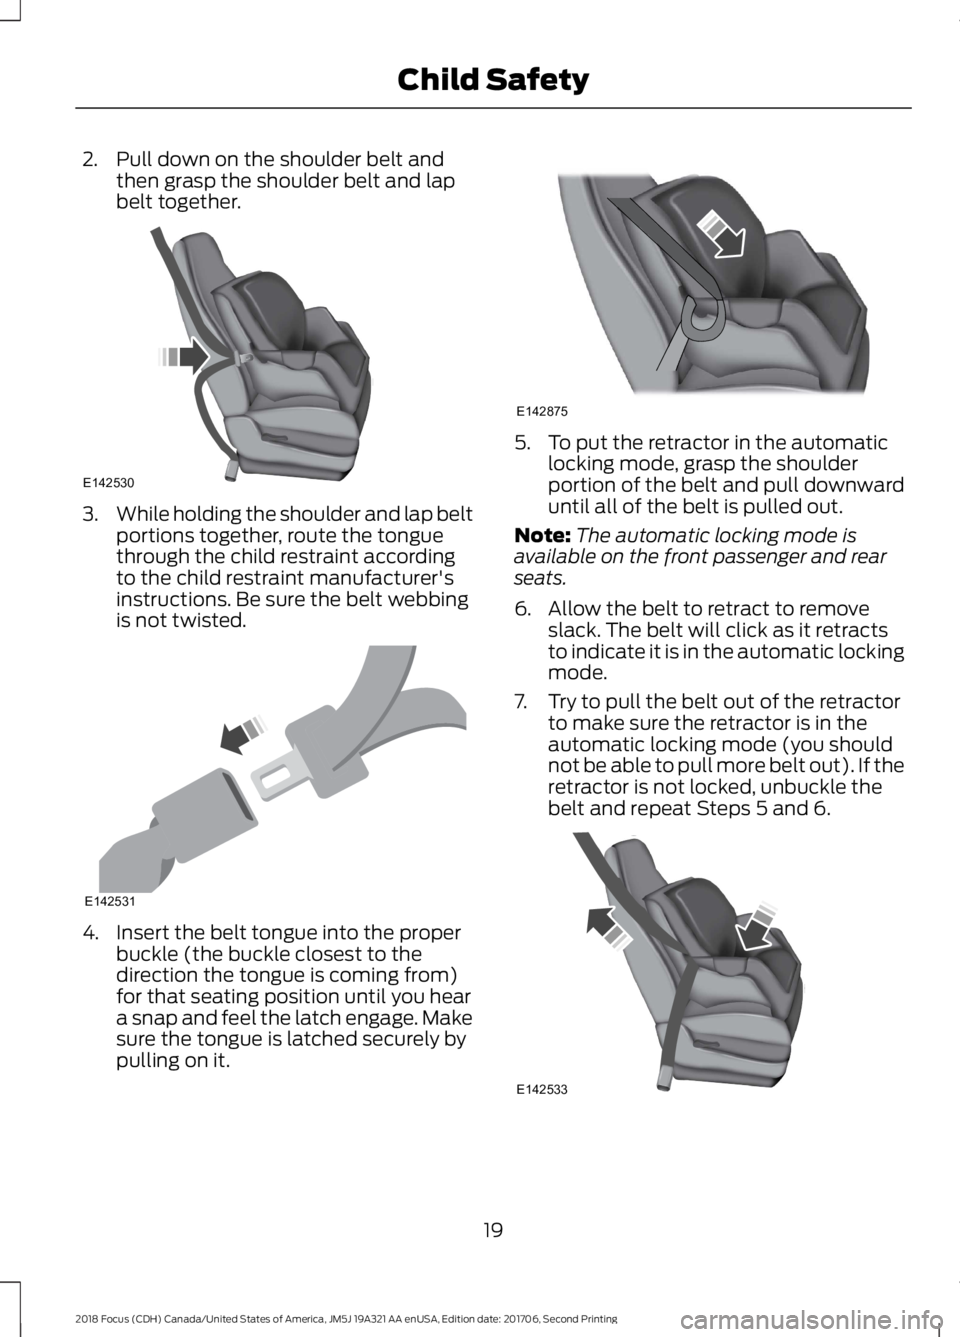
2.Pull down on the shoulder belt andthen grasp the shoulder belt and lapbelt together.
3.While holding the shoulder and lap beltportions together, route the tonguethrough the child restraint accordingto the child restraint manufacturer'sinstructions. Be sure the belt webbingis not twisted.
4.Insert the belt tongue into the properbuckle (the buckle closest to thedirection the tongue is coming from)for that seating position until you heara snap and feel the latch engage. Makesure the tongue is latched securely bypulling on it.
5.To put the retractor in the automaticlocking mode, grasp the shoulderportion of the belt and pull downwarduntil all of the belt is pulled out.
Note:The automatic locking mode isavailable on the front passenger and rearseats.
6.Allow the belt to retract to removeslack. The belt will click as it retractsto indicate it is in the automatic lockingmode.
7.Try to pull the belt out of the retractorto make sure the retractor is in theautomatic locking mode (you shouldnot be able to pull more belt out). If theretractor is not locked, unbuckle thebelt and repeat Steps 5 and 6.
192018 Focus (CDH) Canada/United States of America, JM5J 19A321 AA enUSA, Edition date: 201706, Second PrintingChild SafetyE142530 E142531 E142875 E142533
Page 31 of 473
The childproof locks are located on therear edge of each rear door and must beset separately for each door.
Left-Hand Side
Turn counterclockwise to lock andclockwise to unlock.
Right-Hand Side
Turn clockwise to lock andcounterclockwise to unlock.
282018 Focus (CDH) Canada/United States of America, JM5J 19A321 AA enUSA, Edition date: 201706, Second PrintingChild Safety
Page 32 of 473
PRINCIPLE OF OPERATION
WARNINGS
Always drive and ride with yourseatback upright and the lap beltsnug and low across the hips.
To reduce the risk of injury, makesure children sit where they can beproperly restrained.
Never let a passenger hold a child onhis or her lap while your vehicle ismoving. The passenger cannotprotect the child from injury in a crash.
All occupants of your vehicle,including the driver, should alwaysproperly wear their seatbelts, evenwhen an airbag supplemental restraintsystem is provided. Failure to properly wearyour seatbelts could seriously increase therisk of injury or death.
It is extremely dangerous to ride in acargo area, inside or outside of avehicle. In a crash, people riding inthese areas are more likely to be seriouslyinjured or killed. Do not allow people to ridein any area of your vehicle that is notequipped with seats and seatbelts. Be sureeveryone in your vehicle is in a seat andusing a seatbelt properly.
In a rollover crash, an unbeltedperson is significantly more likely todie than a person wearing a seatbelt.
Each seating position in your vehiclehas a specific seatbelt assemblywhich is made up of one buckle andone tongue that are designed to be usedas a pair. 1) Use the shoulder belt on theoutside shoulder only. Never wear theshoulder belt under the arm. 2) Neverswing the seatbelt around your neck overthe inside shoulder. 3) Never use a singlebelt for more than one person.
WARNINGS
When possible, all children 12 yearsold and under should be properlyrestrained in a rear seating position.Failure to follow this could seriouslyincrease the risk of injury or death.
Seatbelts and seats can become hotin a vehicle that has been closed upin sunny weather; they could burn asmall child. Check seat covers and bucklesbefore you place a child anywhere nearthem.
Front and rear seat occupants,including pregnant women, shouldwear seatbelts for optimumprotection in an accident.
All seating positions in your vehicle havelap and shoulder seatbelts. All occupantsof the vehicle should always properly weartheir seatbelts, even when an airbagsupplemental restraint system is provided.
The seatbelt system consists of:
•Lap and shoulder seatbelts.
•Shoulder seatbelt with automaticlocking mode, (except driver seatbelt).
•Height adjuster at the front outboardseating positions.
•Seatbelt pretensioner at the frontoutboard seating positions.
•Belt tension sensor at the frontoutboard passenger seating position.
· Seatbelt warning light andchime.
· Crash sensors and monitoringsystem with readiness indicator.
292018 Focus (CDH) Canada/United States of America, JM5J 19A321 AA enUSA, Edition date: 201706, Second PrintingSeatbeltsE71880 E67017
Page 35 of 473
3.Let the seatbelt retract.
Note:As the seatbelt retracts, you will heara clicking sound. This indicates the seatbeltis now in the automatic locking mode.
Disengaging Automatic Locking Mode
Unbuckle the combination lap andshoulder belt and allow it to retractcompletely to disengage the automaticlocking mode and return the seatbelt tothe vehicle sensitive mode.
SEATBELT HEIGHT
ADJUSTMENT
WARNING
Position the seatbelt height adjusterso that the seatbelt rests across themiddle of your shoulder. Failure toadjust the seatbelt correctly could reduceits effectiveness and increase the risk ofinjury in a crash.
Adjust the height of the shoulder belt sothe belt rests across the middle of yourshoulder.
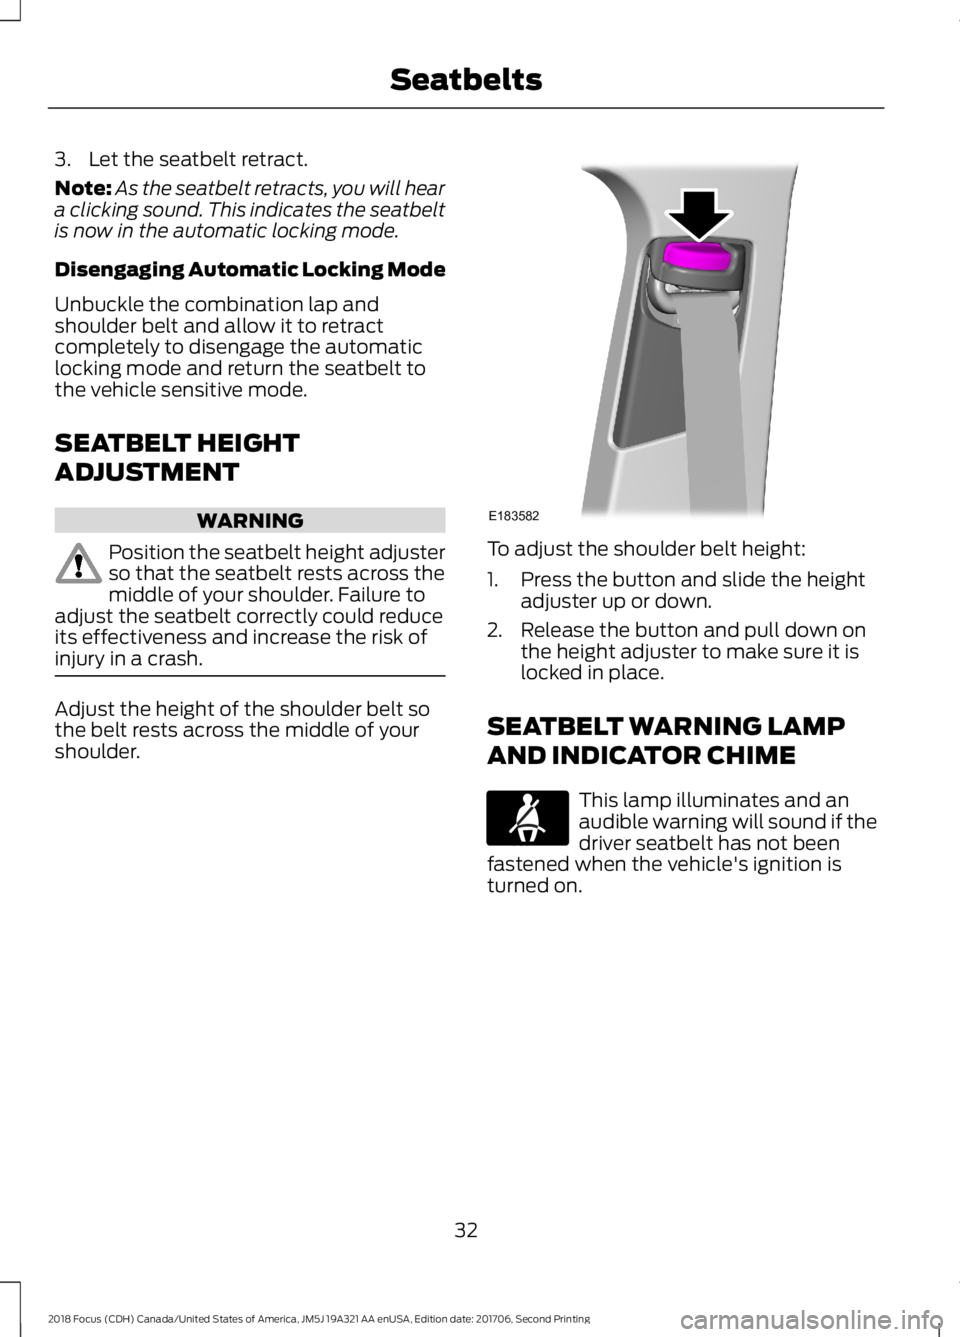
To adjust the shoulder belt height:
1.Press the button and slide the heightadjuster up or down.
2.Release the button and pull down onthe height adjuster to make sure it islocked in place.
SEATBELT WARNING LAMP
AND INDICATOR CHIME
This lamp illuminates and anaudible warning will sound if thedriver seatbelt has not beenfastened when the vehicle's ignition isturned on.
322018 Focus (CDH) Canada/United States of America, JM5J 19A321 AA enUSA, Edition date: 201706, Second PrintingSeatbeltsE183582 E71880
Page 219 of 473
WARNINGS
Do not remove the filler cap whenthe engine is running.
Do not use supplemental engine oiladditives because they are unnecessaryand could lead to engine damage that maynot be covered by the vehicle Warranty.
Only use oils certified for gasoline enginesby the American Petroleum Institute (API).An oil with this trademark symbolconforms to the current engine andemission system protection standards andfuel economy requirements of theInternational Lubricants SpecificationAdvisory Committee (ILSAC).
To top up the engine oil level do thefollowing:
1.Clean the area surrounding the engineoil filler cap before you remove it.
2.Remove the engine oil filler cap. SeeUnder Hood Overview (page 213).Turn it counterclockwise and removeit.
3.Add engine oil that meets Fordspecifications. See Capacities andSpecifications (page 274). SeeCapacities and Specifications (page277). You may have to use a funnel topour the engine oil into the opening.
4.Recheck the oil level.
5.If the oil level is correct, replace thedipstick and make sure it is fully seated.
6.Replace the engine oil filler cap. Turnit clockwise until you feel a strongresistance.
Note: Do not add oil further than themaximum mark. Oil levels above themaximum mark may cause engine damage.
Note:Make sure you install the oil filler capcorrectly.
Note:Soak up any spillage with anabsorbent cloth immediately.
OIL CHANGE INDICATOR
RESET (If Equipped)
Only reset the system after changing theengine oil and oil filter.
Resetting the Oil Life MonitoringSystem
1.Switch the ignition on. Do not start theengine.
2.Fully press the accelerator and brakepedals at the same time.
3.Keep the accelerator and brake pedalsfully pressed.
4.After three seconds, a messageappears confirming that the reset is inprogress.
5.After 25 seconds, a message appearsconfirming that the reset is complete.
6.Release the accelerator and brakepedals.
7.Switch the ignition off.
ENGINE COOLING FAN
WARNING
Keep your hands and clothing clearof the engine cooling fan.
2162018 Focus (CDH) Canada/United States of America, JM5J 19A321 AA enUSA, Edition date: 201706, Second PrintingMaintenanceE142732
Page 221 of 473
Note: Coolants marketed for all makes andmodels may not be approved to Fordspecifications and may cause damage tothe cooling system. Resulting componentdamage may not be covered by the vehicleWarranty.
If the coolant level is at or below theminimum mark, add prediluted coolantimmediately.
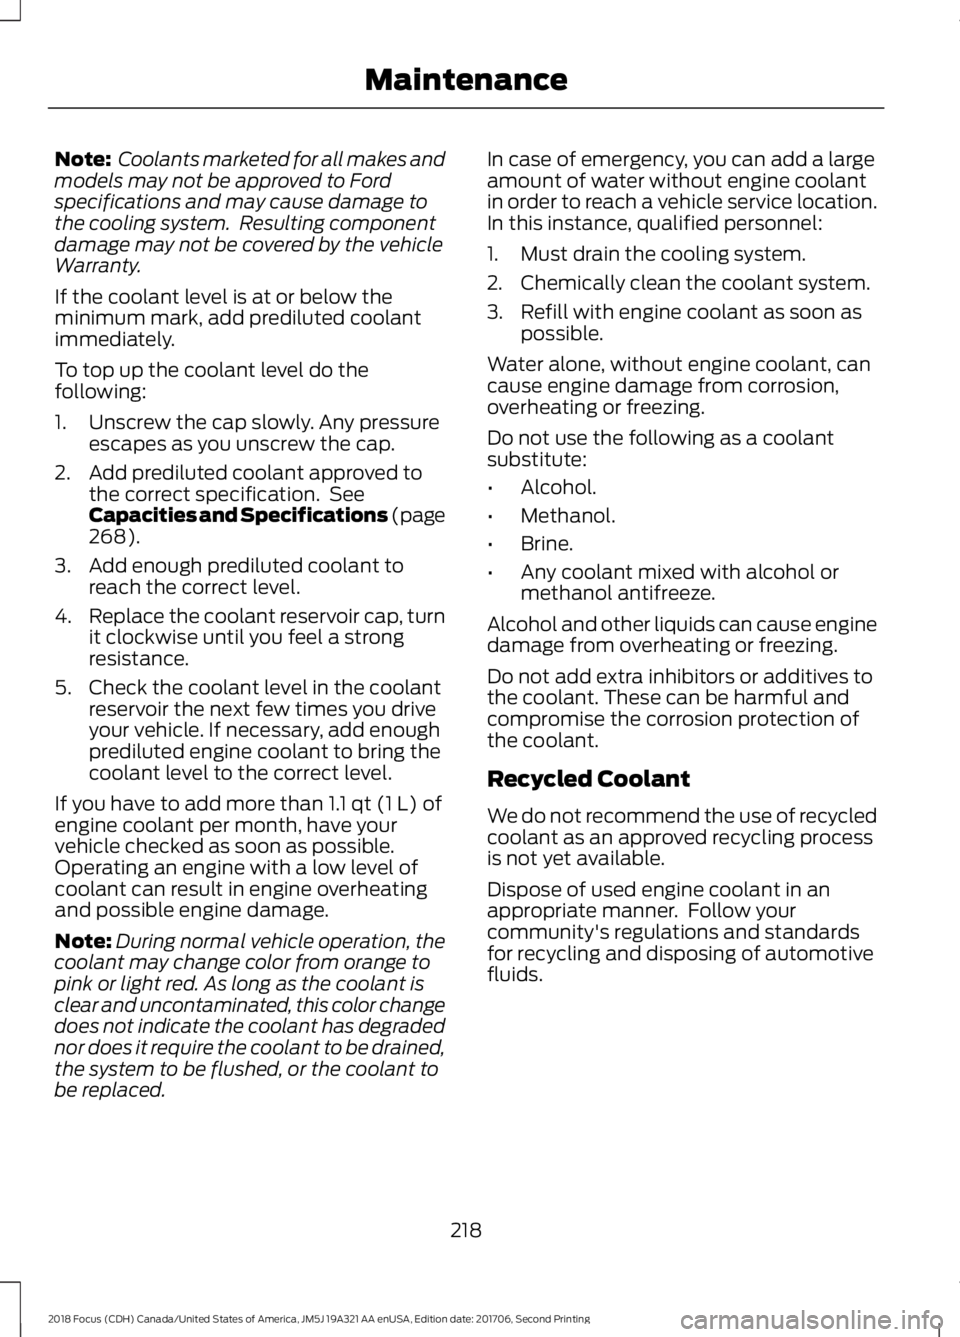
To top up the coolant level do thefollowing:
1.Unscrew the cap slowly. Any pressureescapes as you unscrew the cap.
2.Add prediluted coolant approved tothe correct specification. SeeCapacities and Specifications (page268).
3.Add enough prediluted coolant toreach the correct level.
4.Replace the coolant reservoir cap, turnit clockwise until you feel a strongresistance.
5.Check the coolant level in the coolantreservoir the next few times you driveyour vehicle. If necessary, add enoughprediluted engine coolant to bring thecoolant level to the correct level.
If you have to add more than 1.1 qt (1 L) ofengine coolant per month, have yourvehicle checked as soon as possible.Operating an engine with a low level ofcoolant can result in engine overheatingand possible engine damage.
Note:During normal vehicle operation, thecoolant may change color from orange topink or light red. As long as the coolant isclear and uncontaminated, this color changedoes not indicate the coolant has degradednor does it require the coolant to be drained,the system to be flushed, or the coolant tobe replaced.
In case of emergency, you can add a largeamount of water without engine coolantin order to reach a vehicle service location.In this instance, qualified personnel:
1.Must drain the cooling system.
2.Chemically clean the coolant system.
3.Refill with engine coolant as soon aspossible.
Water alone, without engine coolant, cancause engine damage from corrosion,overheating or freezing.
Do not use the following as a coolantsubstitute:
•Alcohol.
•Methanol.
•Brine.
•Any coolant mixed with alcohol ormethanol antifreeze.
Alcohol and other liquids can cause enginedamage from overheating or freezing.
Do not add extra inhibitors or additives tothe coolant. These can be harmful andcompromise the corrosion protection ofthe coolant.
Recycled Coolant
We do not recommend the use of recycledcoolant as an approved recycling processis not yet available.
Dispose of used engine coolant in anappropriate manner. Follow yourcommunity's regulations and standardsfor recycling and disposing of automotivefluids.
2182018 Focus (CDH) Canada/United States of America, JM5J 19A321 AA enUSA, Edition date: 201706, Second PrintingMaintenance
Page 226 of 473

When a battery replacement is required,the battery should only be replaced witha Ford recommended replacement batterythat matches the electrical requirementsof the vehicle.
Because your vehicle’s engine iselectronically-controlled by a computer,some engine control settings aremaintained by power from the low voltagebattery. Some engine computer settings,like the idle trim and fuel trim strategy,optimize the driveability and performanceof the engine. Some other computersettings, like the clock and radio stationpresets, are also maintained in memory bypower from the low voltage battery. Whena technician disconnects and connects thelow voltage battery, these settings areerased. Complete the following procedurein order to restore the settings:
1.With the vehicle at a complete stop,set the parking brake.
2.Shift into park (P).
3.Switch off all accessories.
4.Fully press the brake pedal and startthe vehicle.
5.Run the engine until it reaches normaloperating temperature. While theengine is warming up, complete thefollowing: Reset the clock. See AudioSystem (page 281). Reset the powerwindows bounce-back feature. SeeWindows and Mirrors (page 82).Reset the radio station presets. SeeAudio System (page 281).
6.Allow the engine to idle for at least oneminute. If the engine turns off, pressthe accelerator pedal to start theengine.
7.While the engine is running, press thebrake pedal and shift into neutral (N).
8.Allow the engine to run for at least oneminute by pressing on the acceleratorpedal.
9.Drive the vehicle at least 12 mi (20 km)to completely relearn the idle and fueltrim strategy.
Note:If you do not allow the engine torelearn the idle and fuel trim strategy, theidle quality of your vehicle may be adverselyaffected until the engine computereventually relearns the idle trim and fueltrim strategy.
Make sure that you dispose of old batteriesin an environmentally friendly way. Seekadvice from your local authority aboutrecycling old batteries.
CHECKING THE WIPER
BLADES
Run the tip of your fingers over the edge ofthe blade to check for roughness.
Clean the wiper blades with washer fluidor water applied with a soft sponge orcloth.
CHANGING THE FRONT WIPER
BLADES
Note: If streaks or smears appear on thewindshield, clean the windshield and thewiper blades. If that does not resolve theissue, install new wiper blades.
2232018 Focus (CDH) Canada/United States of America, JM5J 19A321 AA enUSA, Edition date: 201706, Second PrintingMaintenanceE142463