2018 FORD F-450 clock
[x] Cancel search: clockPage 346 of 660

For vehicles with overflow coolant systems
with a non-pressurized cap on the coolant
recovery system, add coolant to the
coolant recovery reservoir when the engine
is cool. Add prediluted coolant to the
maximum level. For all vehicles which have
a coolant degas system with a pressurized
cap, or if it is necessary to remove the
coolant pressure relief cap on the radiator,
follow these steps to add engine coolant:
1. Turn the engine off and let it cool.
2. Unscrew the cap slowly. Any pressure
escapes as you unscrew the cap.
3. Fill the coolant reservoir slowly with prediluted engine coolant to within the
minimum and maximum range on the
engine coolant reservoir. If you
removed the radiator cap in an
overflow system, fill the radiator until
the coolant is visible and the radiator
is almost full. If coolant is added to
bring the level within the minimum and
maximum range when the engine is not
cold, the system may remain under
filled.
4. Replace the coolant reservoir cap, turn
it clockwise until you feel a strong
resistance.
5. Check the coolant level in the coolant reservoir the next few times you drive
your vehicle. If necessary, add enough
prediluted engine coolant to bring the
coolant level to the proper level.
Note: If prediluted coolant is not available,
use the approved antifreeze concentrate
diluting it to 50/50 with distilled water. See
Capacities and Specifications (page 432).
Using water that has not been deionized
may contribute to deposit formation,
corrosion or plugging of the small cooling
system passageways. If you have to add more than 1.1 qt (1 L) of
engine coolant per month, have your
vehicle checked as soon as possible.
Operating an engine with a low level of
coolant can result in engine overheating
and possible engine damage.
Note: During normal vehicle operation, the
coolant may change color from orange to
pink or light red. As long as the coolant is
clear and uncontaminated, this color change
does not indicate the coolant has degraded
nor does it require the coolant to be drained,
the system to be flushed, or the coolant to
be replaced.
Note: In case of emergency, you can add a
large amount of water without coolant in
order to reach a vehicle service location.
Water alone, without coolant, can cause
engine damage from corrosion, overheating
or freezing. When you reach a service
location, you must have the cooling system
drained, flushed and refilled using the
correct specification prediluted coolant or
antifreeze concentrate. See
Capacities and
Specifications (page 432).
Do not use the following as a coolant
substitute:
• Alcohol.
• Methanol.
• Brine.
• Any coolant mixed with alcohol or
methanol antifreeze.
Alcohol and other liquids can cause engine
damage from overheating or freezing.
Do not add extra inhibitors or non-specified
additives to the coolant. These can be
harmful and compromise the corrosion
protection of the coolant.
343
Super Duty (TFE) Canada/United States of America, enUSA, Edition date: 201709, Second Printing Maintenance
Page 347 of 660

Engine and Secondary Cooling
System Refill Procedure
The following procedure should be used
when refilling the engine or secondary
cooling systems after it has been drained
or become extremely low:
1. Before you remove the cap, turn the
engine off and let it cool.
2. When the engine is cool, wrap a thick cloth around the cap. Slowly turn cap
counterclockwise until pressure begins
to release.
3. Step back while the pressure releases.
4. When you are sure that all the pressure
has been released, use the cloth to turn
it counterclockwise and remove the
cap.
5. Slowly add prediluted engine coolant to the coolant reservoir until the
coolant level is within the minimum
and maximum range as listed on the
reservoir.
6. Reinstall the pressure relief cap.
7. Start and run the engine at 2000 rpm for 2 minutes.
8. Shut engine off, and remove the pressure relief cap as previously
outlined.
9. If required, add prediluted engine coolant to the coolant reservoir until
the coolant level is within the minimum
and maximum range as listed on the
reservoir.
10. Engine cooling system: Repeat
Step 5 until the coolant level has
stabilized (is no longer dropping after
each step) and the upper radiator
hose at the radiator is warm to the
touch (indicating that the engine
thermostat is open and coolant is
flowing through the radiator). 11.
Check the secondary cooling system.
Repeat Step 5 until the coolant level
has stabilized (is no longer dropping
after each step) and the lower
passenger side of the secondary
radiator is warm to the touch
(indicating secondary thermostat is
open and coolant is flowing through
the entire system).
12. Reinstall the pressure relief cap. Shut
the engine off and let it cool.
13. Check the coolant level in the reservoir before you drive your vehicle
the next few times.
14. If necessary, add prediluted engine coolant to the coolant reservoir until
the coolant level is within the
minimum and maximum range as
listed on the reservoir. After any
coolant has been added, check the
coolant concentration.
Recycled Coolant
We do not recommend the use of recycled
coolant as an approved recycling process
is not yet available.
Dispose of used engine coolant in an
appropriate manner. Follow your
community ’s regulations and standards
for recycling and disposing of automotive
fluids.
Severe Climates
If you drive in extremely cold climates:
• It may be necessary to increase the
coolant concentration above 50%.
• A coolant concentration of 60%
provides improved freeze point
protection. Coolant concentrations
above 60% decrease the overheat
protection characteristics of the
coolant and may cause engine
damage.
344
Super Duty (TFE) Canada/United States of America, enUSA, Edition date: 201709, Second Printing Maintenance
Page 355 of 660
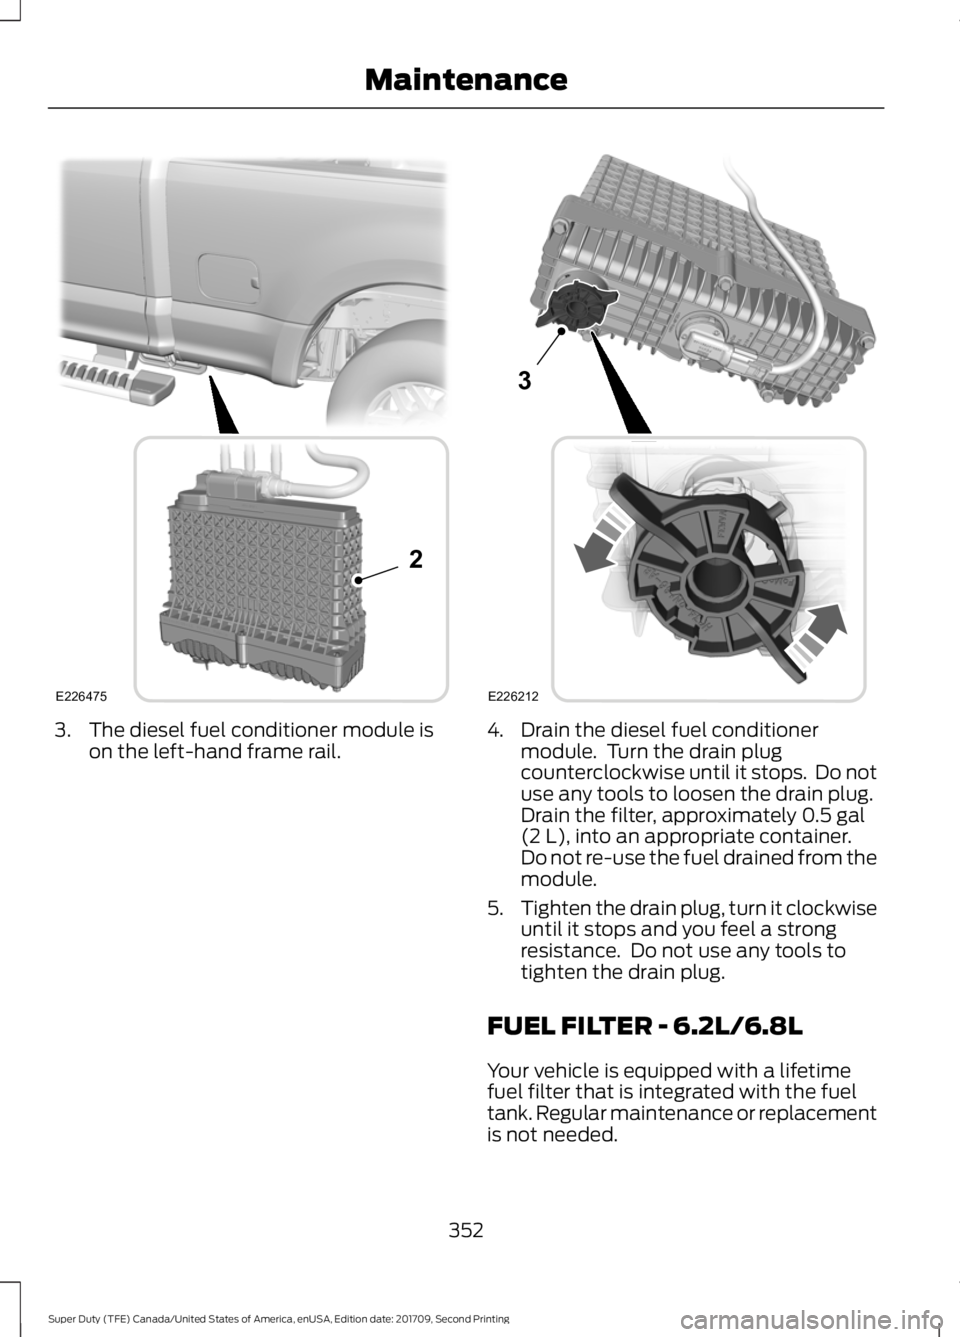
3. The diesel fuel conditioner module is
on the left-hand frame rail. 4. Drain the diesel fuel conditioner
module. Turn the drain plug
counterclockwise until it stops. Do not
use any tools to loosen the drain plug.
Drain the filter, approximately 0.5 gal
(2 L), into an appropriate container.
Do not re-use the fuel drained from the
module.
5. Tighten the drain plug, turn it clockwise
until it stops and you feel a strong
resistance. Do not use any tools to
tighten the drain plug.
FUEL FILTER - 6.2L/6.8L
Your vehicle is equipped with a lifetime
fuel filter that is integrated with the fuel
tank. Regular maintenance or replacement
is not needed.
352
Super Duty (TFE) Canada/United States of America, enUSA, Edition date: 201709, Second Printing MaintenanceE226475
2 3
E226212
Page 357 of 660

5. Run the engine until it reaches normal
operating temperature. While the
engine is warming up, complete the
following: Reset the clock. Reset the
power windows bounce-back feature.
See Windows and Mirrors (page 98).
Reset the radio station presets. See
Audio System (page 445).
6. Allow the engine to idle for at least one
minute.
7. Drive the vehicle at least 10 mi (16 km)
to completely relearn the idle trim and
fuel trim strategy.
Note: If you do not allow the engine to
relearn the idle and fuel trim strategy, the
idle quality of your vehicle may be adversely
affected until the engine computer
eventually relearns the idle trim and fuel
trim strategy.
Note: For flexible fuel vehicles, if you are
operating on E85, you may experience poor
starts or an inability to start the engine and
driveability problems until the fuel trim and
ethanol content have been relearned.
Make sure that you dispose of old batteries
in an environmentally friendly way. Seek
advice from your local authority about
recycling old batteries.
If storing your vehicle for more than 30
days without recharging the battery, we
recommend that you disconnect the
battery cables to maintain battery charge
for quick starting.
Battery Management System
(If
Equipped)
The battery management system monitors
battery conditions and takes actions to
extend battery life. If excessive battery
drain is detected, the system temporarily
disables some electrical systems to
protect the battery. Systems included are:
•
Heated rear window.
• Heated seats.
• Climate control.
• Heated steering wheel.
• Audio unit.
• Navigation system.
A message may appear in the information
displays to alert you that battery
protection actions are active. These
messages are only for notification that an
action is taking place, and not intended to
indicate an electrical problem or that the
battery requires replacement.
After battery replacement, or in some
cases after charging the battery with an
external charger, the battery management
system requires eight hours of vehicle sleep
time to relearn the battery state of charge.
During this time your vehicle must remain
fully locked with the ignition switched off.
Note: Prior to relearning the battery state
of charge, the battery management system
may temporarily disable some electrical
systems.
Electrical Accessory Installation
To make sure the battery management
system works correctly, do not connect an
electrical device ground connection
directly to the battery negative post. This
can cause inaccurate measurements of
the battery condition and potential
incorrect system operation.
Note: If you add electrical accessories or
components to the vehicle, it may adversely
affect battery performance and durability.
This may also affect the performance of
other electrical systems in the vehicle.
354
Super Duty (TFE) Canada/United States of America, enUSA, Edition date: 201709, Second Printing Maintenance
Page 359 of 660
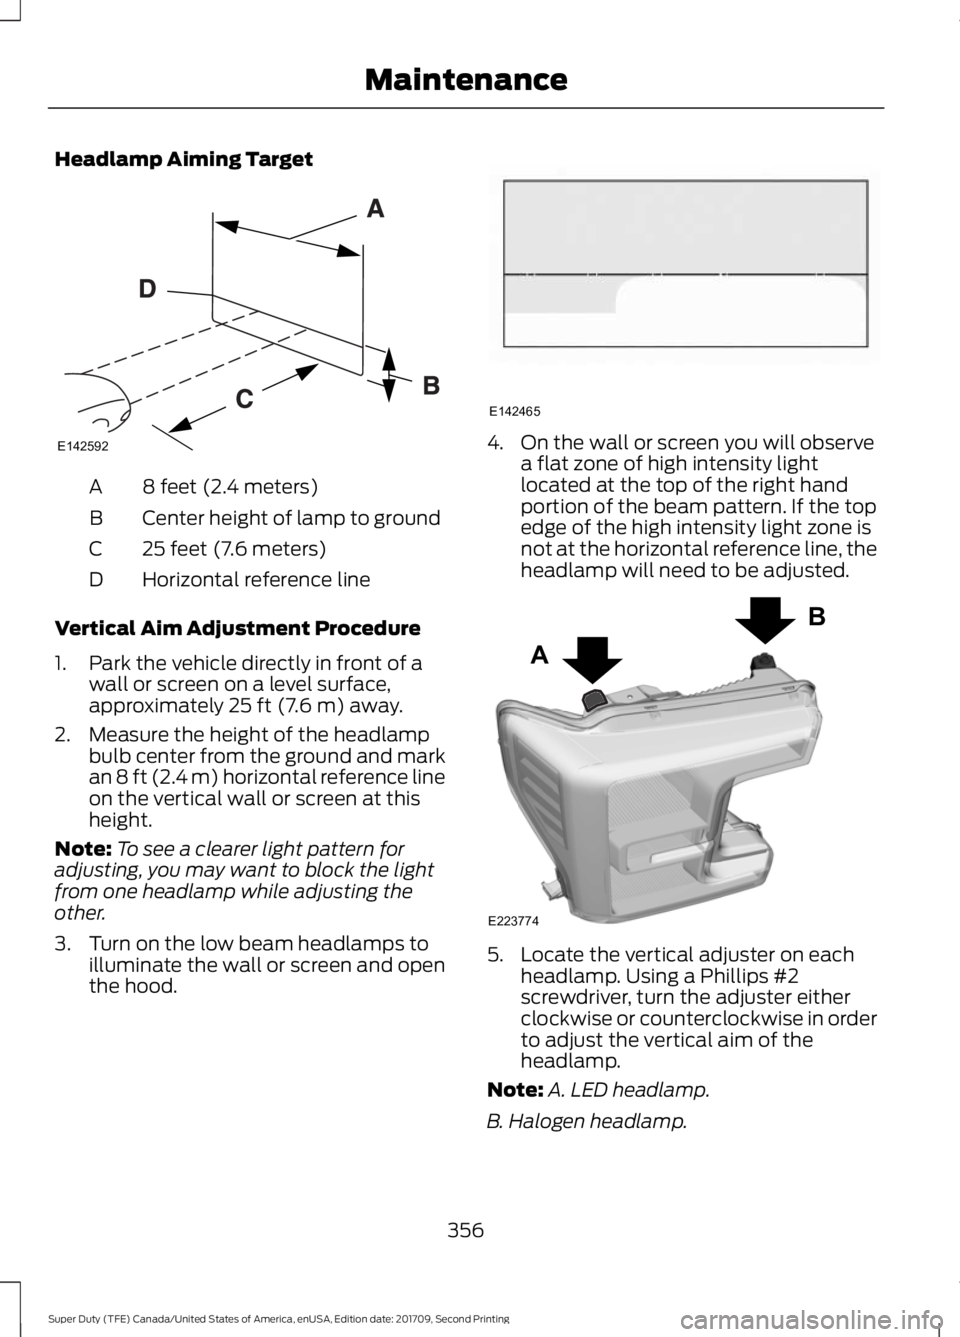
Headlamp Aiming Target
8 feet (2.4 meters)
A
Center height of lamp to ground
B
25 feet (7.6 meters)
C
Horizontal reference line
D
Vertical Aim Adjustment Procedure
1. Park the vehicle directly in front of a wall or screen on a level surface,
approximately 25 ft (7.6 m) away.
2. Measure the height of the headlamp bulb center from the ground and mark
an
8 ft (2.4 m) horizontal reference line
on the vertical wall or screen at this
height.
Note: To see a clearer light pattern for
adjusting, you may want to block the light
from one headlamp while adjusting the
other.
3. Turn on the low beam headlamps to illuminate the wall or screen and open
the hood. 4. On the wall or screen you will observe
a flat zone of high intensity light
located at the top of the right hand
portion of the beam pattern. If the top
edge of the high intensity light zone is
not at the horizontal reference line, the
headlamp will need to be adjusted. 5. Locate the vertical adjuster on each
headlamp. Using a Phillips #2
screwdriver, turn the adjuster either
clockwise or counterclockwise in order
to adjust the vertical aim of the
headlamp.
Note: A. LED headlamp.
B. Halogen headlamp.
356
Super Duty (TFE) Canada/United States of America, enUSA, Edition date: 201709, Second Printing MaintenanceE142592 E142465 A
B
E223774
Page 360 of 660
6. Repeat steps 3 thru 5 to adjust the
other headlamp.
7. Close the hood and turn off the lamps.
Horizontal Aim Adjustment
Horizontal aim is not required for this
vehicle and is not adjustable.
CHANGING A BULB WARNINGS
Switch the lamps and the ignition off.
Failure to follow this warning could
result in serious personal injury.
Bulbs become hot when in use. Let
them cool down before you remove
them.
Use the correct specification bulb. See
Bulb Specification Chart (page 360).
Install in the reverse order unless otherwise
stated.
Front Park and Direction Indicator
Lamp Bulbs
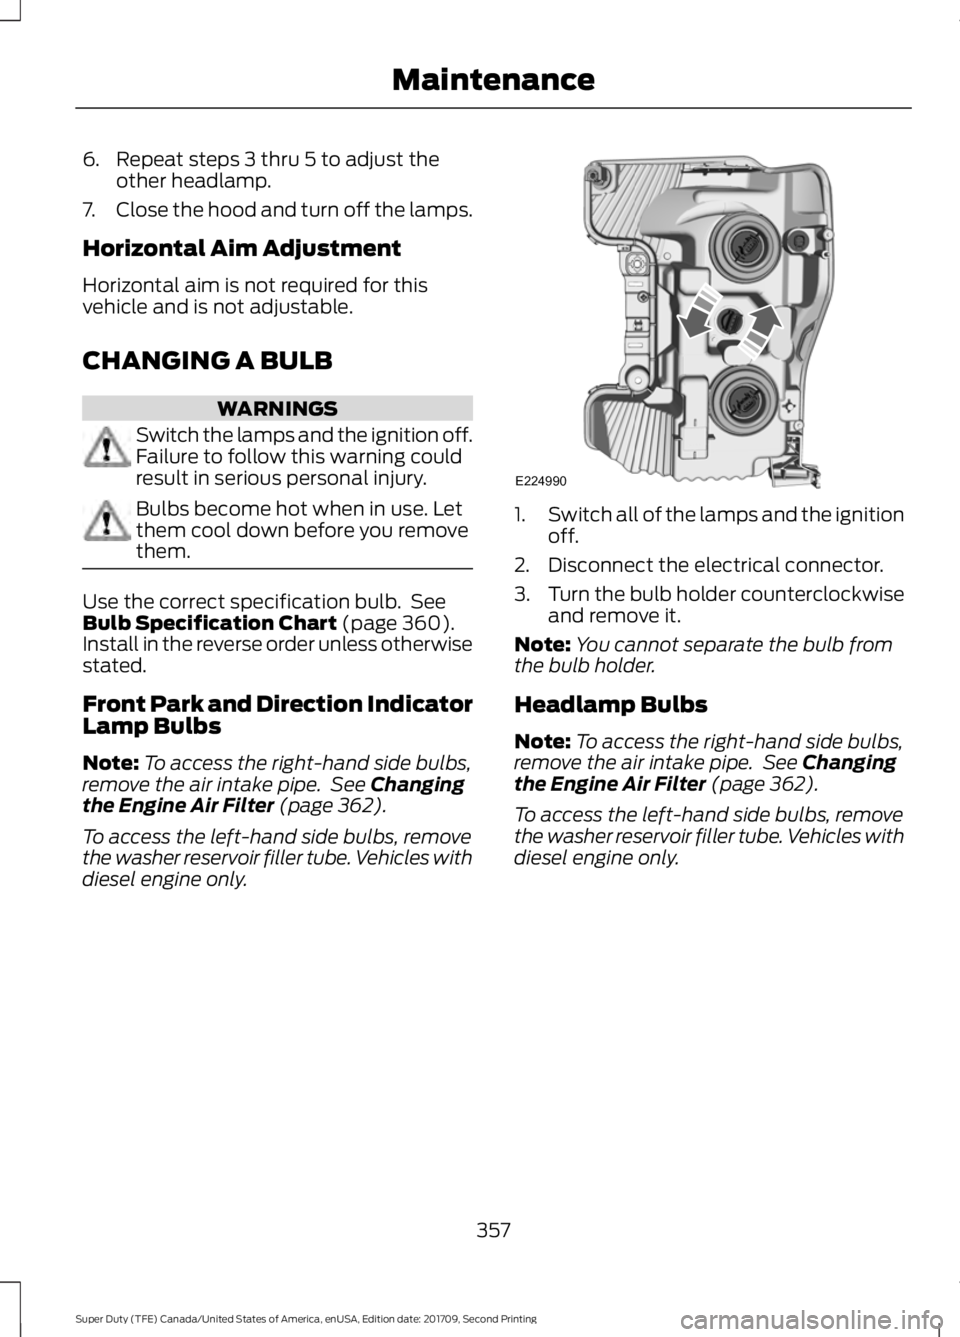
Note: To access the right-hand side bulbs,
remove the air intake pipe. See
Changing
the Engine Air Filter (page 362).
To access the left-hand side bulbs, remove
the washer reservoir filler tube. Vehicles with
diesel engine only. 1.
Switch all of the lamps and the ignition
off.
2. Disconnect the electrical connector.
3. Turn the bulb holder counterclockwise
and remove it.
Note: You cannot separate the bulb from
the bulb holder.
Headlamp Bulbs
Note: To access the right-hand side bulbs,
remove the air intake pipe. See
Changing
the Engine Air Filter (page 362).
To access the left-hand side bulbs, remove
the washer reservoir filler tube. Vehicles with
diesel engine only.
357
Super Duty (TFE) Canada/United States of America, enUSA, Edition date: 201709, Second Printing MaintenanceE224990
Page 361 of 660
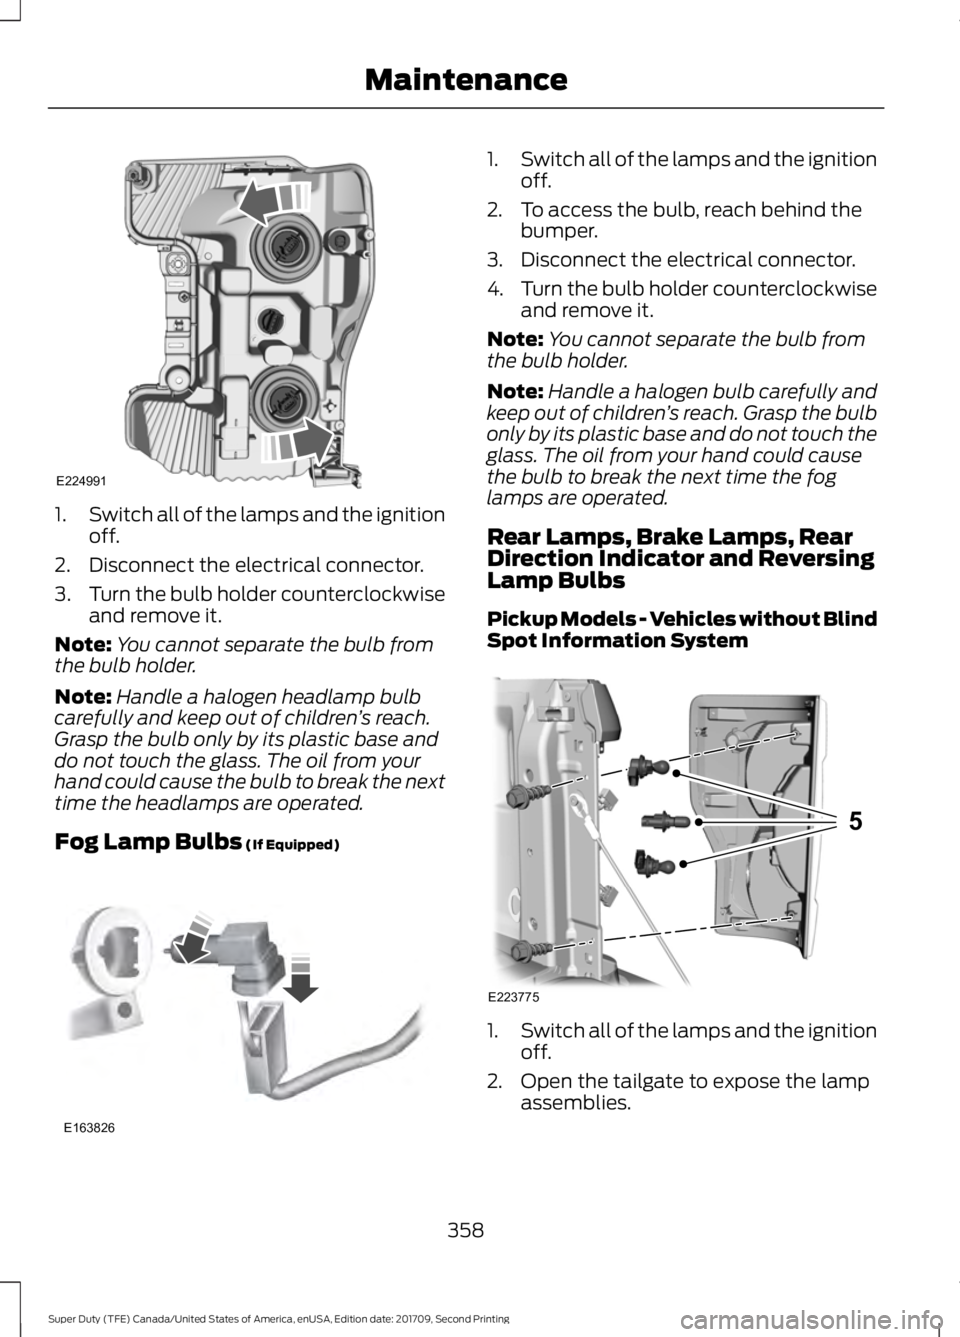
1.
Switch all of the lamps and the ignition
off.
2. Disconnect the electrical connector.
3. Turn the bulb holder counterclockwise
and remove it.
Note: You cannot separate the bulb from
the bulb holder.
Note: Handle a halogen headlamp bulb
carefully and keep out of children ’s reach.
Grasp the bulb only by its plastic base and
do not touch the glass. The oil from your
hand could cause the bulb to break the next
time the headlamps are operated.
Fog Lamp Bulbs (If Equipped) 1.
Switch all of the lamps and the ignition
off.
2. To access the bulb, reach behind the bumper.
3. Disconnect the electrical connector.
4. Turn the bulb holder counterclockwise
and remove it.
Note: You cannot separate the bulb from
the bulb holder.
Note: Handle a halogen bulb carefully and
keep out of children ’s reach. Grasp the bulb
only by its plastic base and do not touch the
glass. The oil from your hand could cause
the bulb to break the next time the fog
lamps are operated.
Rear Lamps, Brake Lamps, Rear
Direction Indicator and Reversing
Lamp Bulbs
Pickup Models - Vehicles without Blind
Spot Information System 1.
Switch all of the lamps and the ignition
off.
2. Open the tailgate to expose the lamp assemblies.
358
Super Duty (TFE) Canada/United States of America, enUSA, Edition date: 201709, Second Printing MaintenanceE224991 E163826 E223775
5
Page 362 of 660
3. Remove the bolts from the tail lamp
assembly and carefully pull the lamp
assembly from the tailgate pillar by
releasing the two retaining tabs.
4. Turn the bulb holder counterclockwise
and remove it.
5. Remove the bulb by pulling it straight out.
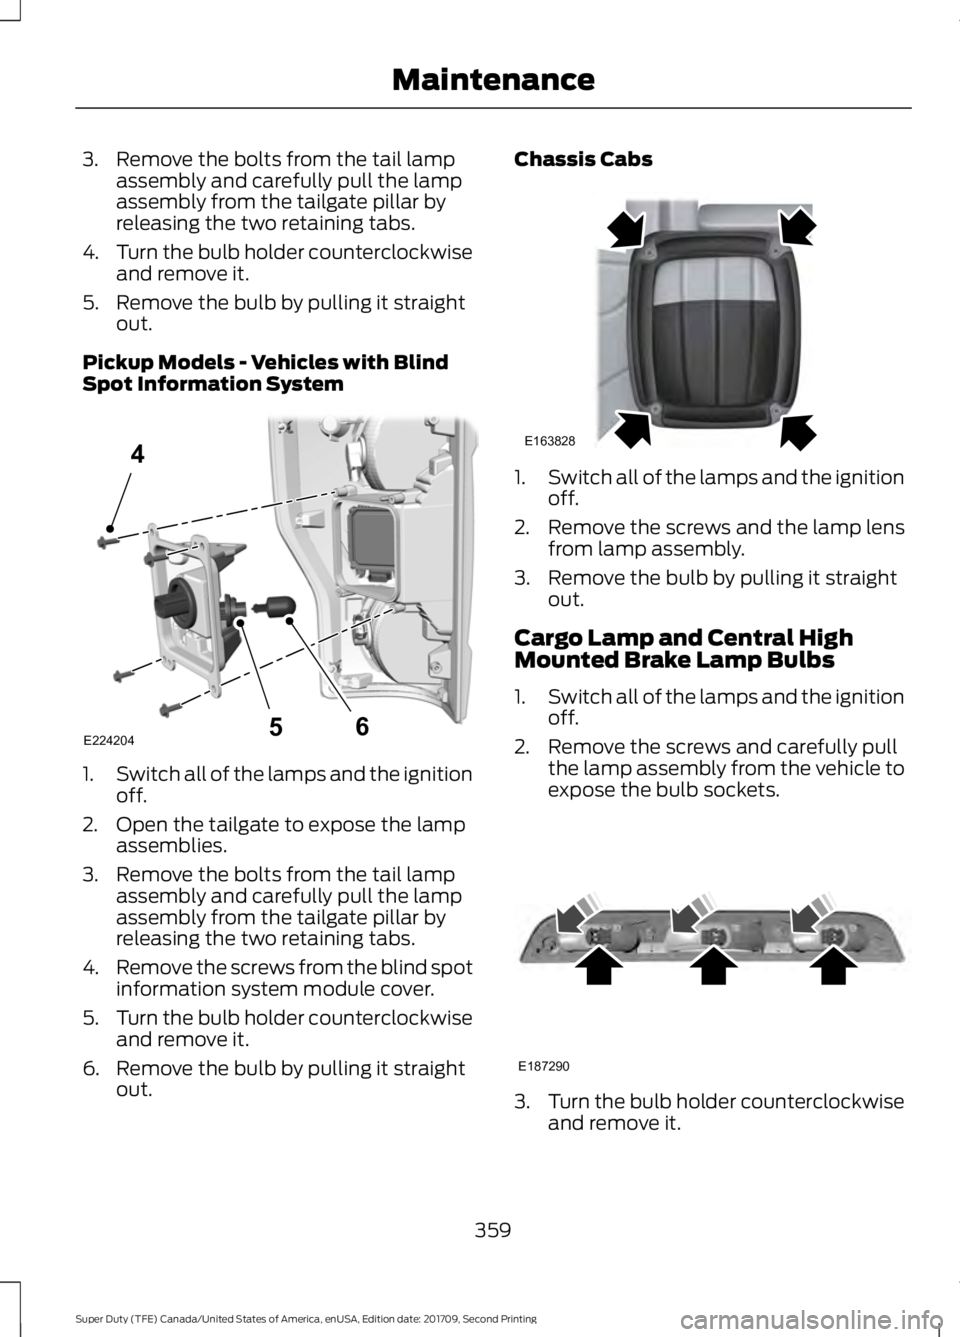
Pickup Models - Vehicles with Blind
Spot Information System 1.
Switch all of the lamps and the ignition
off.
2. Open the tailgate to expose the lamp assemblies.
3. Remove the bolts from the tail lamp assembly and carefully pull the lamp
assembly from the tailgate pillar by
releasing the two retaining tabs.
4. Remove the screws from the blind spot
information system module cover.
5. Turn the bulb holder counterclockwise
and remove it.
6. Remove the bulb by pulling it straight out. Chassis Cabs
1.
Switch all of the lamps and the ignition
off.
2. Remove the screws and the lamp lens from lamp assembly.
3. Remove the bulb by pulling it straight out.
Cargo Lamp and Central High
Mounted Brake Lamp Bulbs
1. Switch all of the lamps and the ignition
off.
2. Remove the screws and carefully pull the lamp assembly from the vehicle to
expose the bulb sockets. 3.
Turn the bulb holder counterclockwise
and remove it.
359
Super Duty (TFE) Canada/United States of America, enUSA, Edition date: 201709, Second Printing MaintenanceE224204
4
65 E163828 E187290