2018 FORD EXPEDITION tow
[x] Cancel search: towPage 92 of 571

GENERAL INFORMATION
Condensation in the Exterior Front
Lamps and Rear Lamps
Exterior front lamps and rear lamps have
vents to accommodate normal changes
in air pressure.
Condensation can be a natural by-product
of this design. When moist air enters the
lamp assembly through the vents, there is
a possibility that condensation can occur
when the temperature is cold. When
normal condensation occurs, a fine mist
can form on the interior of the lens. The
fine mist eventually clears and exits
through the vents during normal operation.
Clearing time may take as long as 48 hours
under dry weather conditions.
Examples of acceptable condensation are:
•
The presence of a fine mist (no streaks,
drip marks or large droplets).
• A fine mist covers less than 50% of the
lens.
Examples of unacceptable condensation
are:
• A water puddle inside the lamp.
• Streaks, drip marks or large droplets
present on the interior of the lens.
If you see any unacceptable condensation,
have your vehicle checked by an authorized
dealer. LIGHTING CONTROL Lamps off.
A
Parking lamps, instrument panel
lamps, license plate lamps and
rear lamps.
B
Headlamps.
C
Headlamp High Beam Push the lever away from you to
switch the high beam on.
Push the lever forward again or pull the
lever toward you to switch the high beams
off.
89
Expedition (TB8) Canada/United States of America, enUSA, Edition date: 201708, Third-Printing- LightingE142449 E167827
Page 93 of 571

Flashing the Headlamp High Beam
Slightly pull the lever toward you and
release it to flash the headlamps.
AUTOLAMPS
WARNING: The system does not
relieve you of your responsibility to drive
with due care and attention. You may
need to override the system if it does not
turn the headlamps on in low visibility
conditions, for example daytime fog. When the lighting control is in the
autolamps position, the headlamps turn
on in low light situations, or when the
wipers turn on. The headlamps remain on for a period of
time after you switch the ignition off. Use
the information display controls to adjust
the period of time that the headlamps
remain on.
Note:
If you switch the autolamps on, you
cannot switch the high beams on until the
system turns the low beams on.
Windshield Wiper Activated
Headlamps
When you switch the autolamps on, the
headlamps turn on within 10 seconds of
switching the wipers on. They turn off
approximately 60 seconds after you switch
the windshield wipers off.
The headlamps do not turn on with the
wipers:
• During a single wipe.
• When using the windshield washers.
• If the wipers are in intermittent mode.
Note: If you switch the autolamps and the
autowipers on, the headlamps turn on when
the windshield wipers continuously operate.
INSTRUMENT LIGHTING
DIMMER 90
Expedition (TB8) Canada/United States of America, enUSA, Edition date: 201708, Third-Printing- LightingE163268 E142451 E231828
Page 94 of 571

Press repeatedly or press and hold until
you reach the desired level.
HEADLAMP EXIT DELAY
After you switch the ignition off, you can
switch the headlamps on by pulling the
direction indicator lever toward you. You
will hear a short tone. The headlamps will
switch off automatically after three
minutes with any door open or 30 seconds
after the last door has been closed. You
can cancel this feature by pulling the
direction indicator toward you again or
switching the ignition on.
DAYTIME RUNNING LAMPS (IF
EQUIPPED) WARNING:
The daytime running
lamps system does not activate the rear
lamps and may not provide adequate
lighting during low visibility driving
conditions. Make sure you switch the
headlamps on, as appropriate, during all
low visibility conditions. Failure to do so
may result in a crash.
Type One - Conventional (Non-
Configurable)
The daytime running lamps turn on when:
1. Switching the ignition on.
2. The transmission is not in park (P) for vehicles with automatic transmissions,
or releasing the parking brake for
vehicles with manual transmissions.
3. The lighting control is in the off, parking
lamp or autolamps positions.
4. The headlamps are off. Type Two - Configurable
Switch the daytime running lamps on or
off using the information display. See
Information Displays
(page 111).
The daytime running lamps turn on when:
1. The lamps are on in the information display.
2. Switching the ignition on.
3. The transmission is not in park (P) for vehicles with automatic transmissions,
or releasing the parking brake for
vehicles with manual transmissions.
4. The lighting control is in the autolamps
position.
5. The headlamps are off.
The other lighting control switch positions
do not turn on the daytime running lamps.
If the daytime running lamps are off in the
information display, the lamps stay off in
all switch positions.
AUTOMATIC HIGH BEAM
CONTROL WARNING:
The system does not
relieve you of your responsibility to drive
with due care and attention. You may
need to override the system if it does not
turn the high beams on or off.
The system turns on high beams if it is dark
enough and no other traffic is present. If it
detects an approaching vehicle ’s
headlamps or tail lamps, or street lighting
ahead, the system turns off high beams
before they can distract other road users.
Low beams remain on.
Note: The system may not operate properly
if the sensor is blocked. Keep the windshield
free from obstruction or damage.
91
Expedition (TB8) Canada/United States of America, enUSA, Edition date: 201708, Third-Printing- Lighting
Page 101 of 571

Vehicles With Keyless Entry
WARNING: Take care when using
global closing. In an emergency, touch a
door handle lock sensor to stop.
Note: Global closing can be switched on
using the driver ’s door handle. Global
opening and closing can also be switched
on using the buttons on the passive key.
To close all the windows and the
moonroof, press and hold the driver ’s door
handle for at least three seconds. The
bounce-back function is also on during
global closing.
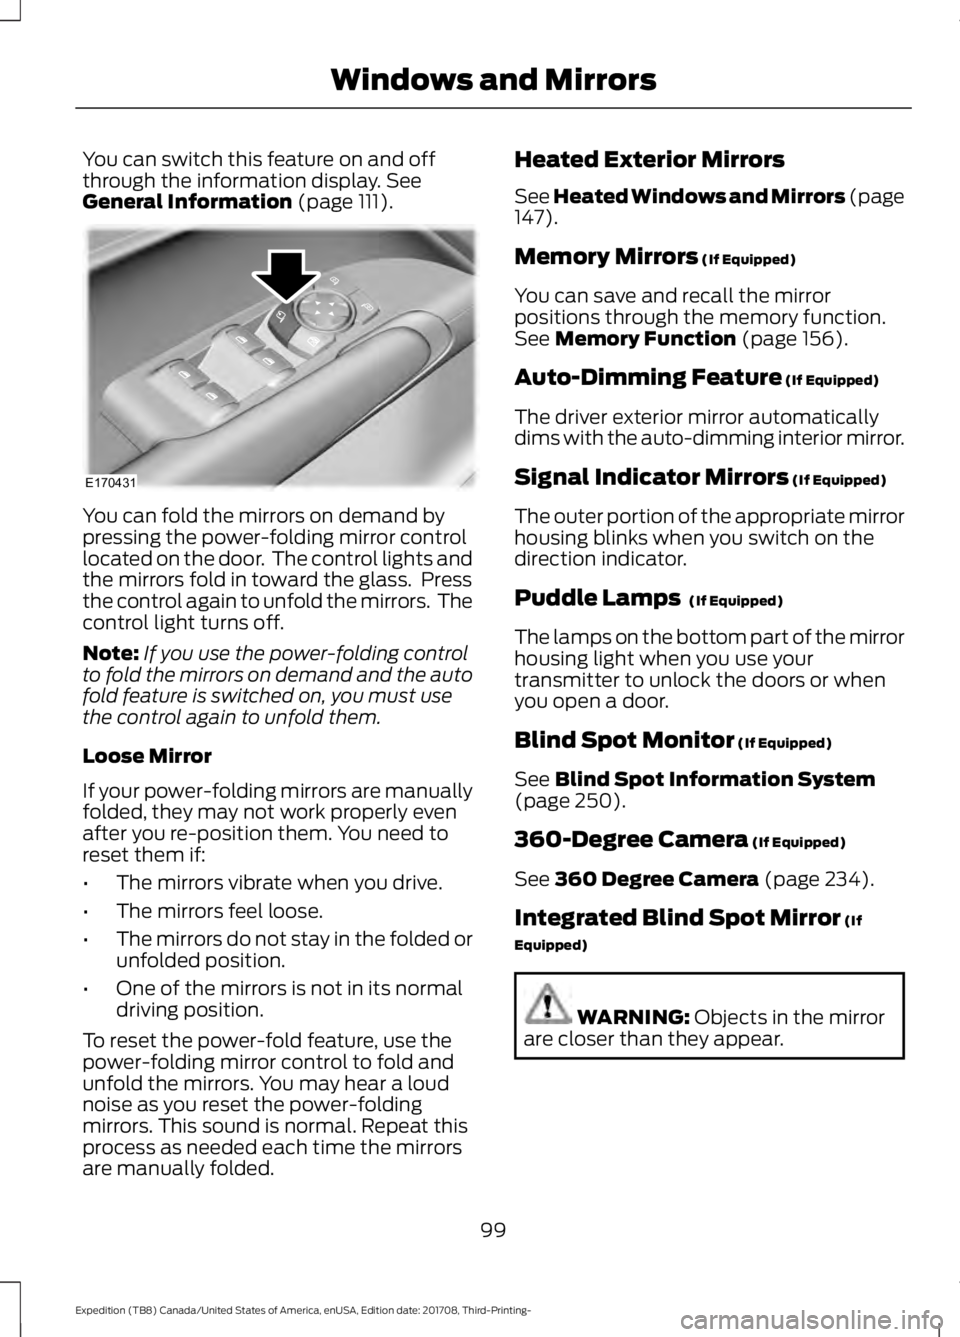
EXTERIOR MIRRORS
Power Exterior Mirrors WARNING:
Do not adjust the
mirrors when your vehicle is moving. This
could result in the loss of control of your
vehicle, serious personal injury or death.
Note: Do not use an ice scraper on the
mirror glass or housing. Left-hand mirror.
A
Right-hand mirror.
B
Adjustment control.
C
Window lockout.
D
Power-folding mirror control.
E
To adjust a mirror:
1. Select the mirror you want to adjust. The control will light.
2. Adjust the position of the mirror.
3. Press the mirror control again.
Fold-Away Exterior Mirrors
Push the mirror toward the door window
glass. Make sure that you fully engage the
mirror in its support when returning it to its
original position.
Auto-Folding Mirrors
(If Equipped)
The exterior mirrors automatically fold in
toward the glass after you place the
transmission into park (P), turn off the
vehicle, open and close the driver's side
door and lock the vehicle. The exterior
mirrors automatically unfold and return to
their driving position after you unlock the
vehicle and open and close the driver's side
door.
98
Expedition (TB8) Canada/United States of America, enUSA, Edition date: 201708, Third-Printing- Windows and MirrorsE87384 E176219
Page 102 of 571

You can switch this feature on and off
through the information display. See
General Information (page 111). You can fold the mirrors on demand by
pressing the power-folding mirror control
located on the door. The control lights and
the mirrors fold in toward the glass. Press
the control again to unfold the mirrors. The
control light turns off.
Note:
If you use the power-folding control
to fold the mirrors on demand and the auto
fold feature is switched on, you must use
the control again to unfold them.
Loose Mirror
If your power-folding mirrors are manually
folded, they may not work properly even
after you re-position them. You need to
reset them if:
• The mirrors vibrate when you drive.
• The mirrors feel loose.
• The mirrors do not stay in the folded or
unfolded position.
• One of the mirrors is not in its normal
driving position.
To reset the power-fold feature, use the
power-folding mirror control to fold and
unfold the mirrors. You may hear a loud
noise as you reset the power-folding
mirrors. This sound is normal. Repeat this
process as needed each time the mirrors
are manually folded. Heated Exterior Mirrors
See Heated Windows and Mirrors (page
147).
Memory Mirrors
(If Equipped)
You can save and recall the mirror
positions through the memory function.
See
Memory Function (page 156).
Auto-Dimming Feature
(If Equipped)
The driver exterior mirror automatically
dims with the auto-dimming interior mirror.
Signal Indicator Mirrors
(If Equipped)
The outer portion of the appropriate mirror
housing blinks when you switch on the
direction indicator.
Puddle Lamps
(If Equipped)
The lamps on the bottom part of the mirror
housing light when you use your
transmitter to unlock the doors or when
you open a door.
Blind Spot Monitor
(If Equipped)
See
Blind Spot Information System
(page 250).
360-Degree Camera
(If Equipped)
See
360 Degree Camera (page 234).
Integrated Blind Spot Mirror
(If
Equipped) WARNING:
Objects in the mirror
are closer than they appear.
99
Expedition (TB8) Canada/United States of America, enUSA, Edition date: 201708, Third-Printing- Windows and MirrorsE170431
Page 104 of 571

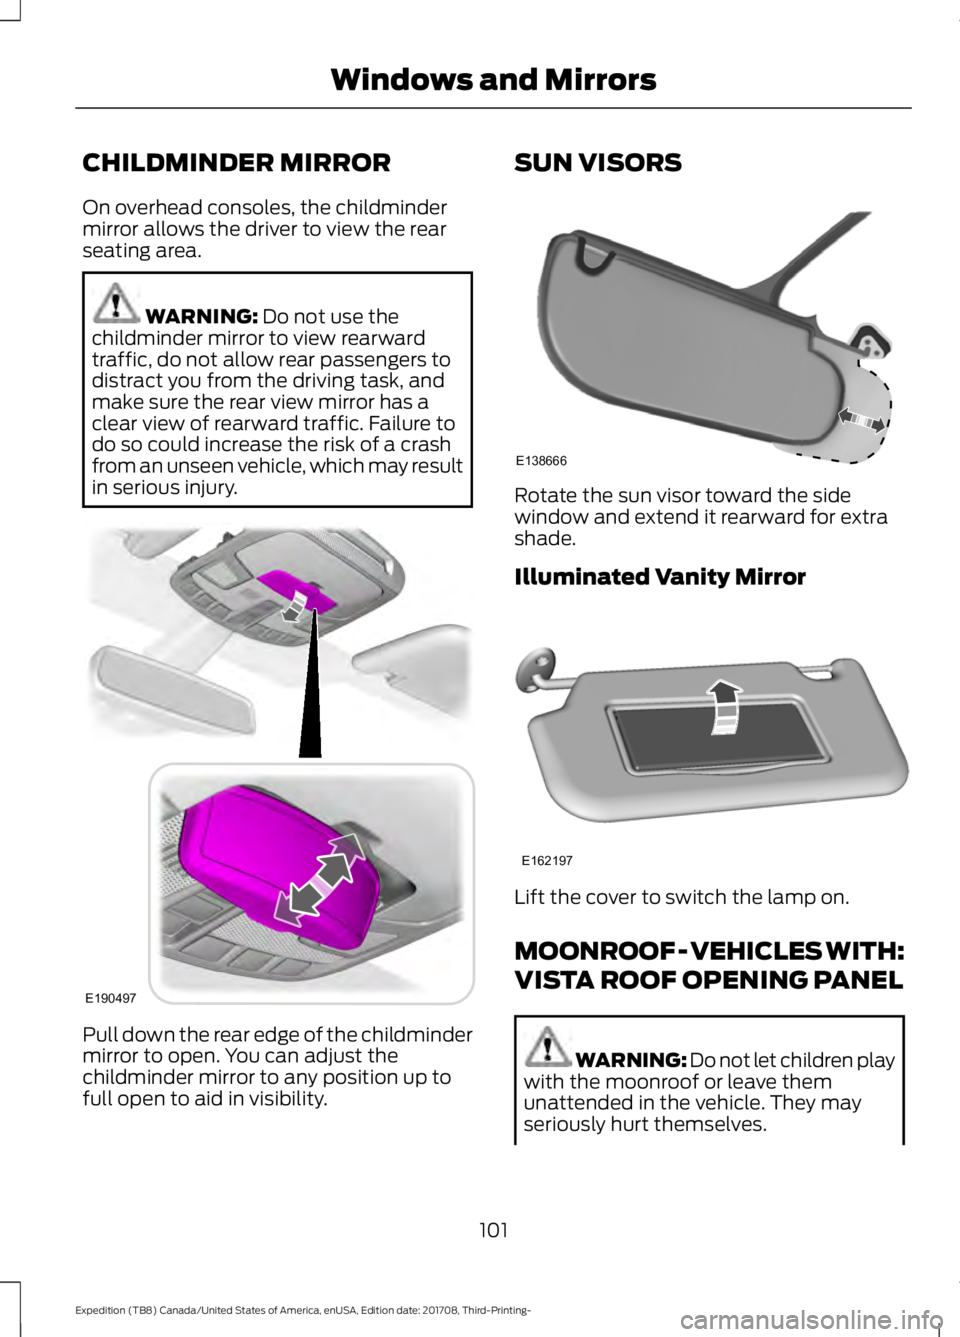
CHILDMINDER MIRROR
On overhead consoles, the childminder
mirror allows the driver to view the rear
seating area.
WARNING: Do not use the
childminder mirror to view rearward
traffic, do not allow rear passengers to
distract you from the driving task, and
make sure the rear view mirror has a
clear view of rearward traffic. Failure to
do so could increase the risk of a crash
from an unseen vehicle, which may result
in serious injury. Pull down the rear edge of the childminder
mirror to open. You can adjust the
childminder mirror to any position up to
full open to aid in visibility. SUN VISORS
Rotate the sun visor toward the side
window and extend it rearward for extra
shade.
Illuminated Vanity Mirror
Lift the cover to switch the lamp on.
MOONROOF - VEHICLES WITH:
VISTA ROOF OPENING PANEL
WARNING: Do not let children play
with the moonroof or leave them
unattended in the vehicle. They may
seriously hurt themselves.
101
Expedition (TB8) Canada/United States of America, enUSA, Edition date: 201708, Third-Printing- Windows and MirrorsE190497 E138666 E162197
Page 109 of 571

Engine Coolant Temperature
Gauge
WARNING: Do not remove the
coolant reservoir cap when the cooling
system is hot. Wait 10 minutes for the
cooling system to cool down. Cover the
coolant reservoir cap with a thick cloth
to prevent the possibility of scalding and
slowly remove the cap. Failure to follow
this instruction could result in personal
injury.
Indicates engine coolant temperature. At
normal operating temperature, the level
indicator is in the normal range. If the
engine coolant temperature exceeds the
normal range, stop your vehicle as soon as
possible, switch off the engine and let the
engine cool.
Fuel Gauge
The fuel gauge indicates about how much
fuel is in the fuel tank.
The arrow adjacent to the fuel pump
symbol indicates on which side of your
vehicle the fuel filler door is located.
Note: The fuel gauge may vary slightly
when your vehicle is moving or on a slope.
Low Fuel Reminder
A low fuel level reminder displays and
sounds when the distance to empty
reaches
75 mi (120 km) to empty for
MyKey, and at 50 mi (80 km), 25 mi
(40 km), 10 mi (20 km) and 0 mi (0 km)
for all vehicle keys.
Note: The low fuel reminder can appear at
different fuel gauge positions depending on
fuel economy conditions. This variation is
normal. Transmission Fluid Temperature
Gauge
Indicates transmission fluid temperature.
At normal operating temperature, the level
indicator is in the normal range. If the
transmission fluid temperature exceeds
the normal range, stop your vehicle as soon
as possible and verify the airflow is not
restricted by snow or debris blocking
airflow through the grille.
Special operating conditions such as
snowplowing, towing, or off-road use may
cause higher than normal operating
temperatures. See
Special Operating
Conditions Scheduled Maintenance
(page
504).
To lower the transmission temperature
into the normal range, alter the severity of
your driving conditions. Operating the
transmission for extended periods with the
gauge in the higher than normal area may
cause internal transmission damage. If the
gauge continues to show high
temperatures, see an authorized dealer.
Turbo Boost Gauge
(If Equipped)
Indicates the amount of manifold air
pressure in the engine.
WARNING LAMPS AND
INDICATORS
The following warning lamps and
indicators alert you to a vehicle condition
that may become serious. Some lamps
illuminate when you start your vehicle to
make sure they work. If any lamps remain
on after starting your vehicle, refer to the
respective system warning lamp for further
information.
Note: Some warning indicators appear in
the information display and operate the
same as a warning lamp but do not
illuminate when you start your vehicle.
106
Expedition (TB8) Canada/United States of America, enUSA, Edition date: 201708, Third-Printing- Instrument Cluster
Page 113 of 571

Stability Control and Traction
Control Indicator
Flashes during operation.
If it does not illuminate when you
switch the ignition on, or remains
on when the engine is running, this
indicates a malfunction. Have your vehicle
checked as soon as possible.
Note: The system automatically turns off
if there is a malfunction.
See Using Stability Control (page 217).
Stability Control and Traction
Control Off Warning Lamp It illuminates when you switch
the system off.
Tow Haul Indicator Illuminates when the tow/haul
feature has been activated. If the
light flashes steadily, have the
system serviced immediately, damage to
the transmission could occur.
AUDIBLE WARNINGS AND
INDICATORS
Key in Ignition Warning Chime
Sounds when you leave the key in the
ignition and the driver door open.
Headlamps On Warning Chime
Sounds when the headlamps or parking
lamps are on, the ignition is off (the key is
not in the ignition) and the driver door is
open. Parking Brake On Warning Chime
Sounds when you have left the parking
brake on and drive your vehicle. If the
warning chime remains on after you have
released the parking brake, have the
system checked by an authorized dealer
immediately.
Direction Indicator Chime
Sounds when you leave the direction
indicator on after signaling a turn and
driving the vehicle more than 1.5 miles (2.4
km).
110
Expedition (TB8) Canada/United States of America, enUSA, Edition date: 201708, Third-Printing- Instrument ClusterE138639 E130458 E246592