2018 FORD EXPEDITION wheel
[x] Cancel search: wheelPage 378 of 571
as possible. Use of any tire or wheel not
recommended by Ford can affect the
safety and performance of your vehicle,
which could result in an increased risk of
loss of vehicle control, vehicle rollover,
personal injury and death.
WARNING: When one of the front
wheels is off the ground, the
transmission alone will not prevent the
vehicle from moving or slipping off the
jack, even if the transmission is in park
(P). WARNING:
To help prevent your
vehicle from moving when changing a
wheel, shift the transmission into park
(P), set the parking brake and use an
appropriate block or wheel chock to
secure the wheel diagonally opposite to
the wheel being changed. For example,
when changing the front left wheel,
place an appropriate block or wheel
chock on the right rear wheel. WARNING:
Do not attempt to
change a tire on the side of the vehicle
close to moving traffic. Pull far enough
off the road to avoid the danger of being
hit when operating the jack or changing
the wheel. WARNING:
Always use the jack
provided as original equipment with your
vehicle. If using a jack other than the one
provided, make sure the jack capacity is
adequate for the vehicle weight,
including any vehicle cargo or
modifications. If you are unsure if the jack
capacity is adequate, contact the
authorized dealer. WARNING:
Switch off the running
boards before jacking or placing any
object under your vehicle. Never place
your hand between the extended running
board and your vehicle. A moving running
board may cause injury. WARNING:
Only use the spare
wheel carrier to stow the wheel provided
with your vehicle. Other wheel sizes
could cause the spare wheel carrier to
fail if it does not fit securely or is too
heavy. 1. Park the vehicle on firm, level ground
and activate the hazard flashers.
2. Apply the parking brake, place the transmission in park (P) and switch the
ignition off.
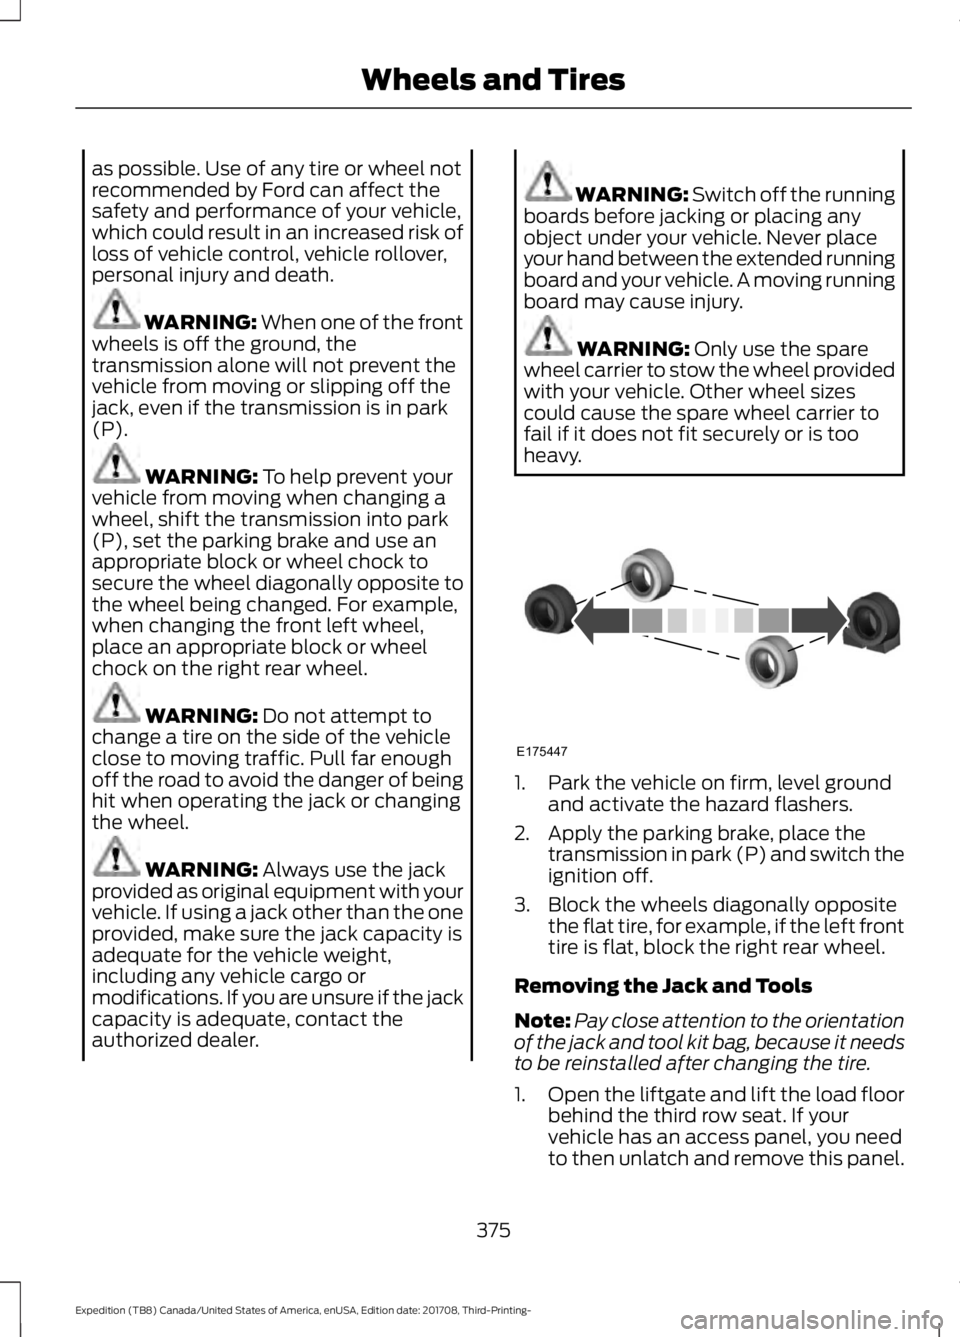
3. Block the wheels diagonally opposite the flat tire, for example, if the left front
tire is flat, block the right rear wheel.
Removing the Jack and Tools
Note: Pay close attention to the orientation
of the jack and tool kit bag, because it needs
to be reinstalled after changing the tire.
1. Open the liftgate and lift the load floor
behind the third row seat. If your
vehicle has an access panel, you need
to then unlatch and remove this panel.
375
Expedition (TB8) Canada/United States of America, enUSA, Edition date: 201708, Third-Printing- Wheels and TiresE175447
Page 379 of 571
2. Remove the wing nut by turning it
counterclockwise.
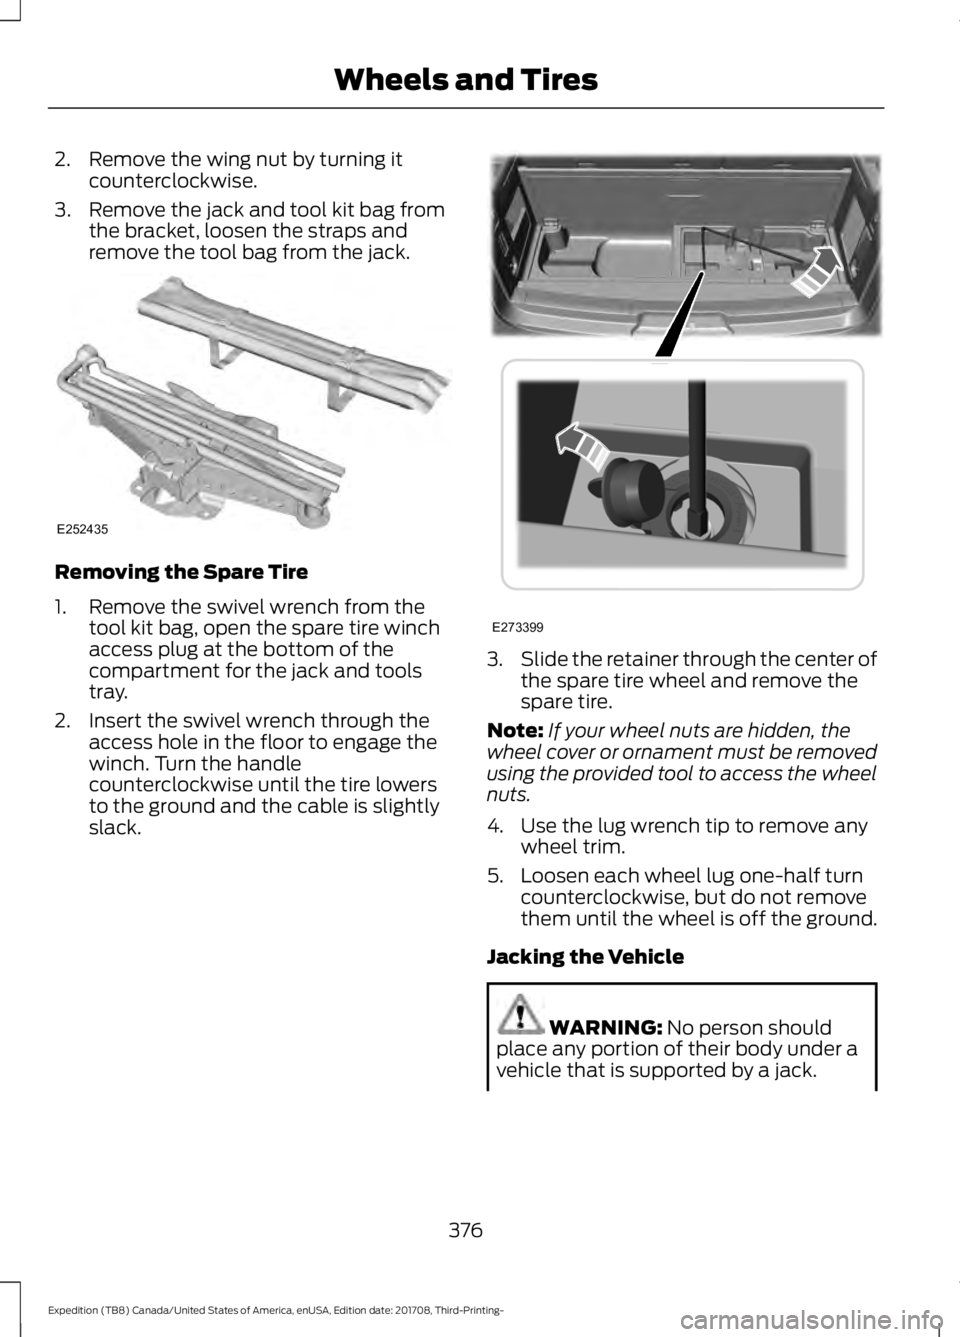
3. Remove the jack and tool kit bag from the bracket, loosen the straps and
remove the tool bag from the jack. Removing the Spare Tire
1. Remove the swivel wrench from the
tool kit bag, open the spare tire winch
access plug at the bottom of the
compartment for the jack and tools
tray.
2. Insert the swivel wrench through the access hole in the floor to engage the
winch. Turn the handle
counterclockwise until the tire lowers
to the ground and the cable is slightly
slack. 3.
Slide the retainer through the center of
the spare tire wheel and remove the
spare tire.
Note: If your wheel nuts are hidden, the
wheel cover or ornament must be removed
using the provided tool to access the wheel
nuts.
4. Use the lug wrench tip to remove any wheel trim.
5. Loosen each wheel lug one-half turn counterclockwise, but do not remove
them until the wheel is off the ground.
Jacking the Vehicle WARNING: No person should
place any portion of their body under a
vehicle that is supported by a jack.
376
Expedition (TB8) Canada/United States of America, enUSA, Edition date: 201708, Third-Printing- Wheels and TiresE252435 E273399
Page 380 of 571
WARNING: Do not get under a
vehicle that is only supported by a
vehicle jack. WARNING:
Check that the vehicle
jack is not damaged or deformed and
the thread is lubricated and clean. WARNING: The jack supplied with
this vehicle is only intended for changing
wheels. Do not use the vehicle jack other
than when you are changing a wheel in
an emergency. WARNING:
The jack should be
used on level firm ground wherever
possible. WARNING:
Never place anything
between the vehicle jack and the ground. WARNING:
Never place anything
between the vehicle jack and your
vehicle. WARNING:
It is recommended
that the wheels of the vehicle be
chocked, and that no person should
remain in a vehicle that is being jacked. WARNING:
Failure to follow these
guidelines could result in an increased
risk of loss of vehicle control, injury or
death.
Note: The jack does not require
maintenance or additional lubrication over
the service life of your vehicle.
Note: Jack at the specified locations to
avoid damaging your vehicle.
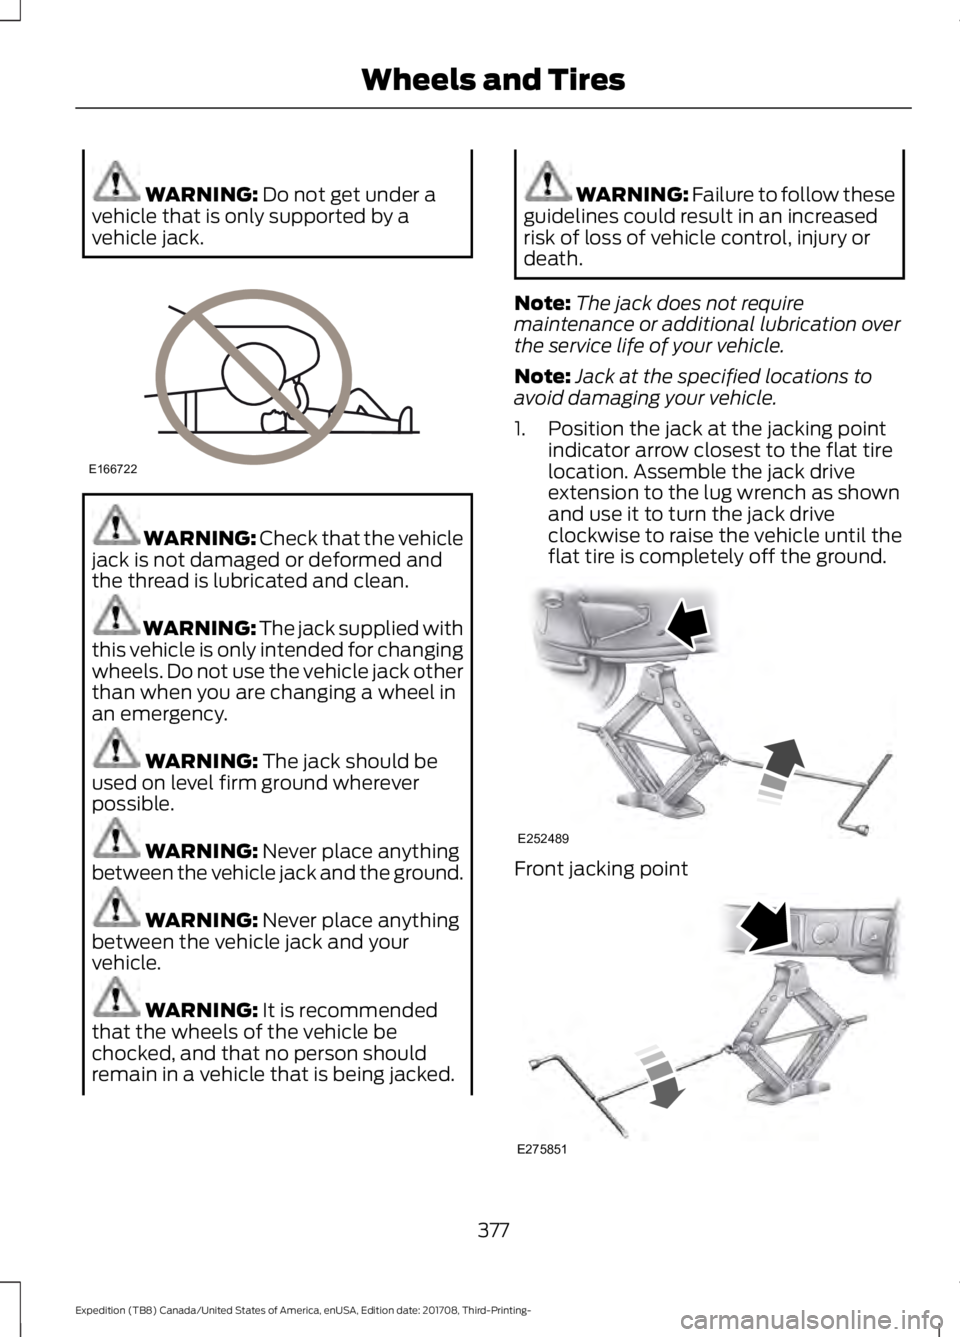
1. Position the jack at the jacking point indicator arrow closest to the flat tire
location. Assemble the jack drive
extension to the lug wrench as shown
and use it to turn the jack drive
clockwise to raise the vehicle until the
flat tire is completely off the ground. Front jacking point
377
Expedition (TB8) Canada/United States of America, enUSA, Edition date: 201708, Third-Printing- Wheels and TiresE166722 E252489 E275851
Page 381 of 571
Rear jacking point
1. Remove the lug nuts with the lug
wrench. Replace the flat tire with the
spare tire, making sure the valve stem
is facing outward.
2. Reinstall the lug nuts until the wheel is
snug against the hub. Do not fully
tighten the lug nuts until the wheel has
been lowered.
3. Completely lower the vehicle by turning
the jack drive counterclockwise.
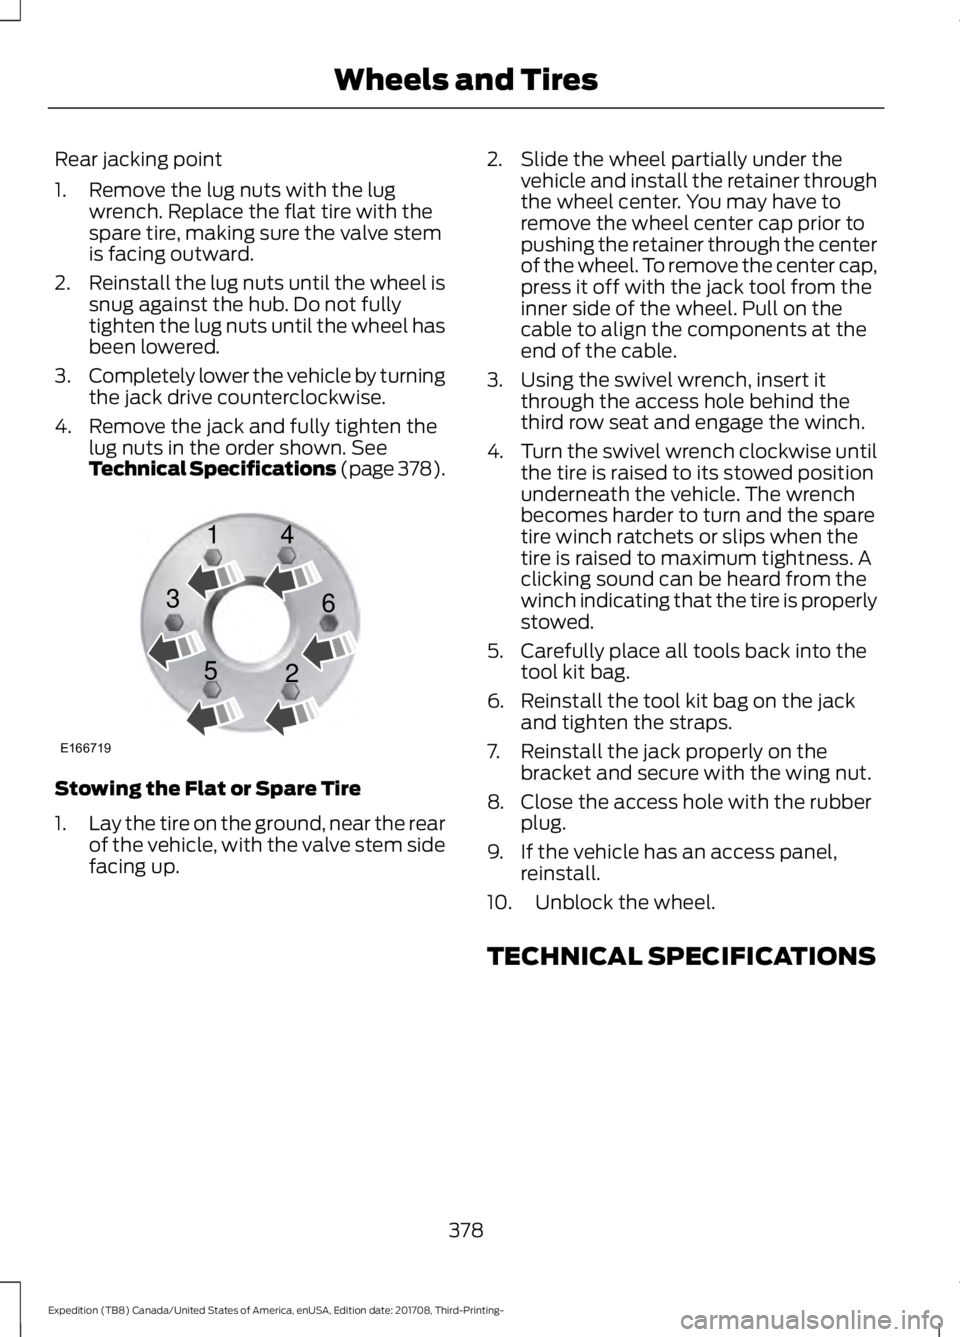
4. Remove the jack and fully tighten the lug nuts in the order shown. See
Technical Specifications (page 378). Stowing the Flat or Spare Tire
1.
Lay the tire on the ground, near the rear
of the vehicle, with the valve stem side
facing up. 2. Slide the wheel partially under the
vehicle and install the retainer through
the wheel center. You may have to
remove the wheel center cap prior to
pushing the retainer through the center
of the wheel. To remove the center cap,
press it off with the jack tool from the
inner side of the wheel. Pull on the
cable to align the components at the
end of the cable.
3. Using the swivel wrench, insert it through the access hole behind the
third row seat and engage the winch.
4. Turn the swivel wrench clockwise until
the tire is raised to its stowed position
underneath the vehicle. The wrench
becomes harder to turn and the spare
tire winch ratchets or slips when the
tire is raised to maximum tightness. A
clicking sound can be heard from the
winch indicating that the tire is properly
stowed.
5. Carefully place all tools back into the tool kit bag.
6. Reinstall the tool kit bag on the jack and tighten the straps.
7. Reinstall the jack properly on the bracket and secure with the wing nut.
8. Close the access hole with the rubber plug.
9. If the vehicle has an access panel, reinstall.
10. Unblock the wheel.
TECHNICAL SPECIFICATIONS
378
Expedition (TB8) Canada/United States of America, enUSA, Edition date: 201708, Third-Printing- Wheels and TiresE166719
1
3
5 4
6
2
Page 382 of 571
Wheel Lug Nut Torque Specifications
WARNING: When you install a wheel, always remove any corrosion, dirt or foreign
materials present on the mounting surfaces of the wheel or the surface of the wheel
hub, brake drum or brake disc that contacts the wheel. Make sure to secure any fasteners
that attach the rotor to the hub so they do not interfere with the mounting surfaces of
the wheel. Installing wheels without correct metal-to-metal contact at the wheel
mounting surfaces can cause the wheel nuts to loosen and the wheel to come off while
your vehicle is in motion, resulting in loss of vehicle control, personal injury or death. lb.ft (Nm)
1
Bolt Size
150 lb.ft (204 Nm)
M14 x 1.5
1 Torque specifications are for nut and bolt threads free of dirt and rust. Use only our
recommended replacement fasteners.
Retighten the lug nuts to the specified torque within 100 miles (160 kilometers) after any
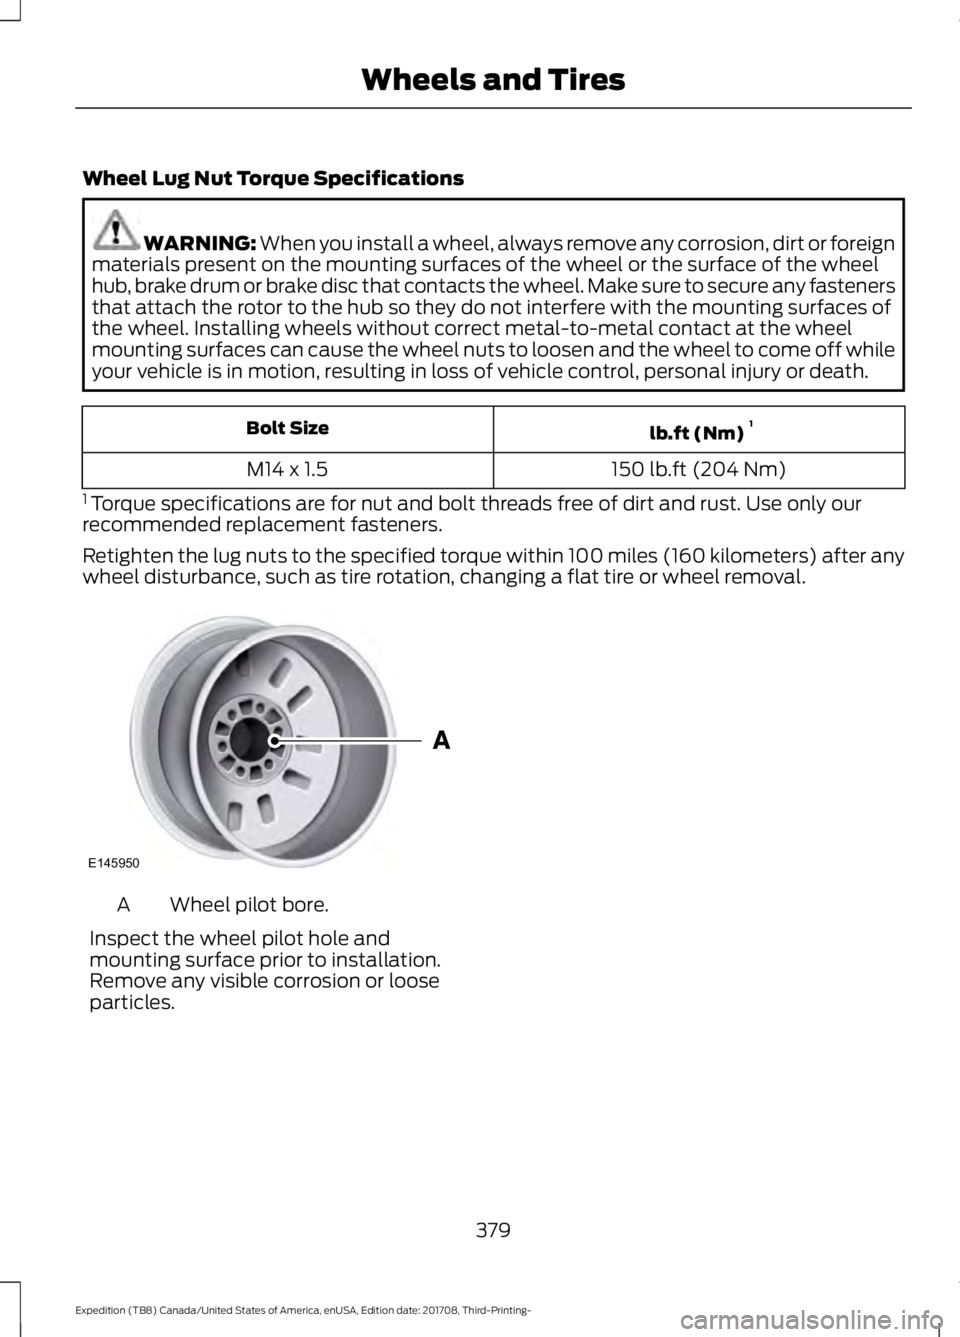
wheel disturbance, such as tire rotation, changing a flat tire or wheel removal. Wheel pilot bore.
A
Inspect the wheel pilot hole and
mounting surface prior to installation.
Remove any visible corrosion or loose
particles.
379
Expedition (TB8) Canada/United States of America, enUSA, Edition date: 201708, Third-Printing- Wheels and TiresE145950
Page 403 of 571
things, this profile may contain data about
your cellular phone book, text messages
(read and unread), and call history,
including history of calls when your cellular
phone was not connected to the system.
In addition, if you connect a media device,
the system creates and retains an index of
supported media content. The system also
records a short development log of
approximately 10 minutes of all recent
system activity. The log profile and other
system data may be used to improve the
system and help diagnose any problems
that may occur.
The cellular profile, media device index,
and development log will remain in the
vehicle unless you delete them and are
generally accessible only in the vehicle
when the cellular phone or media player
is connected. If you no longer plan to use
the system or the vehicle, we recommend
you perform a Master Reset to erase all
stored information.
System data cannot be accessed without
special equipment and access to the
vehicle's SYNC module. Ford Motor
Company and Ford of Canada will not
access the system data for any purpose
other than as described absent consent, a
court order, or where required by law
enforcement, other government
authorities, or other third parties acting
with lawful authority. Other parties may
seek to access the information
independently of Ford Motor Company and
Ford of Canada. For further privacy
information, see the section on 911 Assist.
See SYNC™ Applications and Services
(page 403).
USING VOICE RECOGNITION
This system helps you control many
features using voice commands. This
allows you to keep your hands on the
wheel and focus on what is around you.
Initiating a Voice Session Press the voice button. A list of
available voice commands
appears in the display.
Global Voice Commands
These voice commands are always
available. You can say them at any time. Global voice commands
Gives you available commands you can use
on the current screen.
Help
Gives you a list of possible voice
commands.
List of Commands
This command ends the voice session. You
can also cancel a session by pressing seek
up, seek down, or holding the voice button
for two or more seconds.
Cancel
400
Expedition (TB8) Canada/United States of America, enUSA, Edition date: 201708, Third-Printing- SYNC™E142599
Page 406 of 571
7. When prompted on your cell phone
’s
display, confirm that the PIN provided
by SYNC matches the PIN displayed
on your cell phone. Your phone is now
paired and the display indicates that
the pairing was successful. If you are
prompted to enter a PIN on your device,
enter the PIN displayed on the screen.
The display indicates when the pairing
is successful.
Depending on your phone's capability and
your market, the system may prompt you
with questions, such as setting the current
phone as the primary phone and
downloading your phonebook.
Using Voice Commands Make sure to switch on your
phone's Bluetooth feature
before starting the search. See
your device's manual if necessary.
Press the voice button and when
prompted say: Action and Descrip-
tion
Voice Command
Follow the instruc-
tions on the audio
display.
Pair Phone
Phone Voice Commands Press the voice button. You can
do things like place a phone call
and access text messages.
When prompted, say a command. See the
following table for example commands. Voice Command
___ List of Commands
Help
Call ___
Dial ___
Text Messages
__ is a dynamic listing, meaning that it
could be the name of anything, such as a
contact or phone number.
Phone Controls
Use the phone buttons on your steering
wheel to answer, reject, or hang up a call.
Accessing Features through the
Phone Menu
You can access your call history,
phonebook, sent text messages, as well
as access phone and system settings.
1. Press the PHONE button to enter the
phone menu.
2. Scroll through the menu to view contacts, text messages, and the
phone dialer.
SYNC™ APPLICATIONS AND
SERVICES
• 911 Assist: Can alert 911 in the event of
an emergency.
• SYNC AppLink: Allows you to connect
to and use certain applications (if your
phone is compatible).
These features may require activation.
Available AppLink enabled apps vary by
market.
403
Expedition (TB8) Canada/United States of America, enUSA, Edition date: 201708, Third-Printing- SYNC™E142599 E142599
Page 408 of 571
•
A connected Bluetooth enabled phone
must have adequate network coverage,
battery power and signal strength.
• The vehicle must have battery power
and be located in the U.S., Canada or
in a territory in which 911 is the
emergency number.
In the Event of a Crash
Not all crashes deploy an airbag or activate
the fuel pump shut-off (the triggers for 911
Assist). If a connected cell phone sustains
damage or loses its connection to SYNC
during a crash, SYNC searches for and tries
to connect to a previously paired cell
phone; SYNC then attempts to call the
emergency services.
Before making the call:
• SYNC provides a short window of time
(about 10 seconds) to cancel the call.
If you fail to cancel the call, SYNC
attempts to dial 911.
• SYNC says the following, or a similar
message: "SYNC will attempt to call
911, to cancel the call, press Cancel on
your screen or press and hold the
phone button on your steering wheel".
If you do not cancel the call, and SYNC
makes a successful call, a pre-recorded
message plays for the 911 operator, and
then the occupant(s) in your vehicle are
able to talk with the operator. Be prepared
to provide your name, phone number and
location immediately, because not all 911
systems are capable of receiving this
information electronically.
911 Assist May Not Work If
• Your cellular phone or 911 Assist
hardware sustains damage in a crash.
• The vehicle's battery or the SYNC
system has no power.
• The phone(s) thrown from your vehicle
are the ones paired and connected to
the system. 911 Assist Privacy Notice
When you switch on 911 Assist, it may
disclose to emergency services that your
vehicle has been in a crash involving the
deployment of an airbag or activation of
the fuel pump shut-off. Certain versions or
updates to 911 Assist may also be capable
of electronically or verbally disclosing to
911 operators your vehicle location or other
details about your vehicle or crash to assist
911 operators to provide the most
appropriate emergency services. If you do
not want to disclose this information, do
not switch the feature on.
SYNC Mobile Apps
The system enables voice and steering
wheel control of SYNC AppLink enabled
smartphone apps. When an app is running
through AppLink, you can control main
features of the app through voice
commands and steering wheel controls.
Note:
You must pair and connect your
smartphone to SYNC to access AppLink.
Note: iPhone users need to connect the
phone to the USB port.
Note: Android users need to connect the
phone to SYNC using Bluetooth.
Note: For information on available apps,
supported smartphone devices and
troubleshooting tips please visit the Ford
website
Note: Availability of SYNC AppLink enabled
Apps will vary by region.
Note: Make sure you have an active
account for the app that you have
downloaded. Some apps work
automatically with no setup. Other apps
want you to configure your personal settings
and personalize your experience by creating
stations or favorites. We recommend you
do this at home or outside of your vehicle.
405
Expedition (TB8) Canada/United States of America, enUSA, Edition date: 201708, Third-Printing- SYNC™