2018 FORD EXPEDITION transmission
[x] Cancel search: transmissionPage 328 of 571
GENERAL INFORMATION
Have your vehicle serviced regularly to help
maintain its roadworthiness and resale
value. There is a large network of
authorized dealers that are there to help
you with their professional servicing
expertise. We believe that their specially
trained technicians are best qualified to
service your vehicle properly and expertly.
They are supported by a wide range of
highly specialized tools developed
specifically for servicing your vehicle.
If your vehicle requires professional service,
an authorized dealer can provide the
necessary parts and service. Check your
warranty information to find out which
parts and services are covered.
Use only recommended fuels, lubricants,
fluids and service parts conforming to
specifications. Motorcraft® parts are
designed and built to provide the best
performance in your vehicle.
Precautions
•
Do not work on a hot engine.
• Make sure that nothing gets caught in
moving parts.
• Do not work on a vehicle with the
engine running in an enclosed space,
unless you are sure you have enough
ventilation.
• Keep all open flames and other burning
material (such as cigarettes) away
from the battery and all fuel related
parts.
Working with the Engine Off
1. Set the parking brake and shift the transmission to park (P).
2. Switch off the engine.
3. Block the wheels. Working with the Engine On WARNING: To reduce the risk of
vehicle damage and personal burn
injuries, do not start your engine with the
air cleaner removed and do not remove
it while the engine is running.
1. Set the parking brake and shift the transmission to park (P).
2. Block the wheels.
OPENING AND CLOSING THE
HOOD
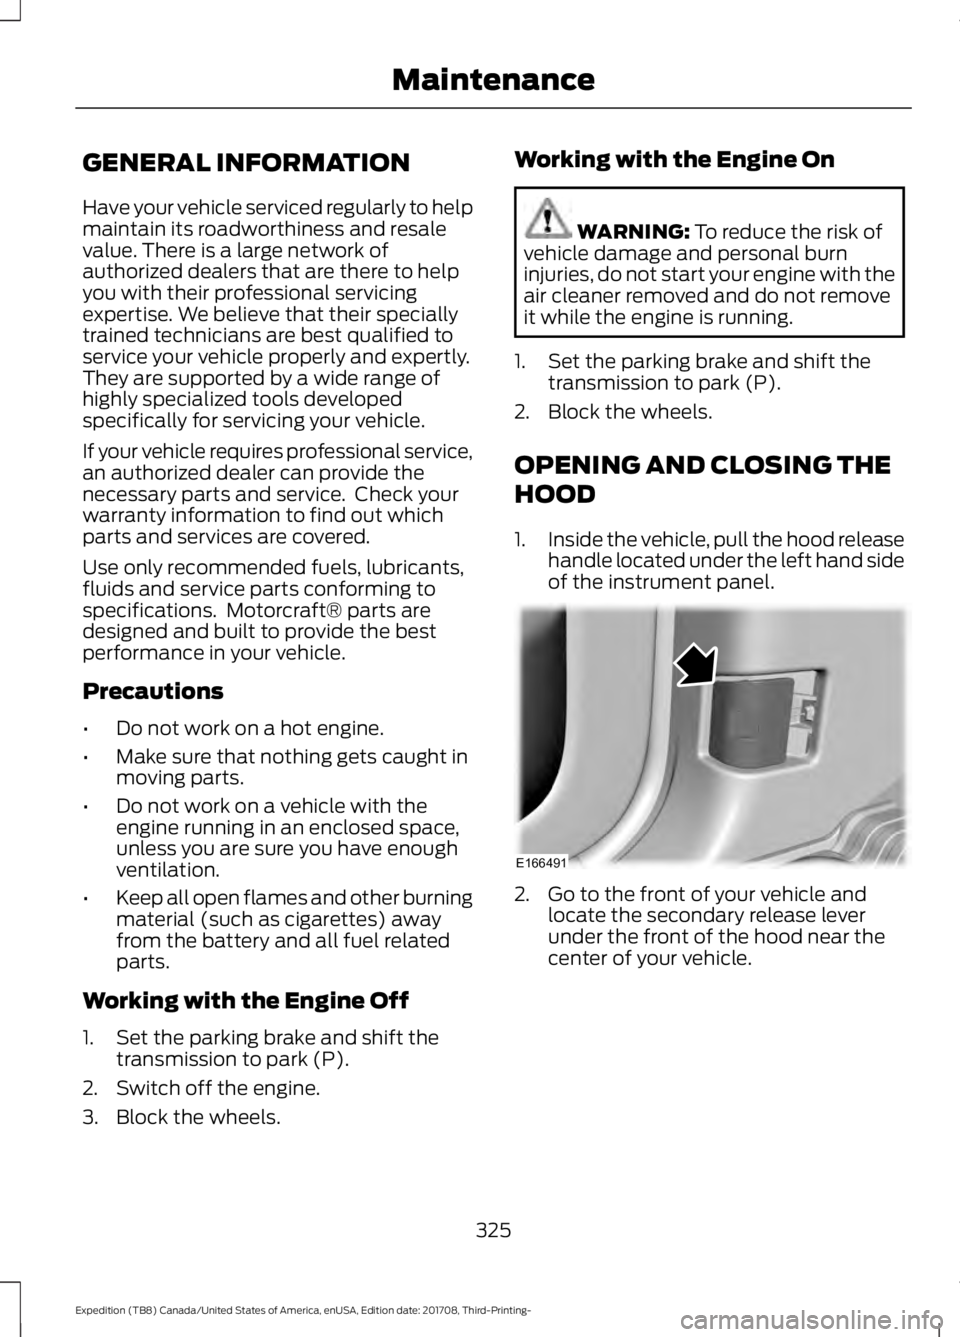
1. Inside the vehicle, pull the hood release
handle located under the left hand side
of the instrument panel. 2. Go to the front of your vehicle and
locate the secondary release lever
under the front of the hood near the
center of your vehicle.
325
Expedition (TB8) Canada/United States of America, enUSA, Edition date: 201708, Third-Printing- MaintenanceE166491
Page 330 of 571
Windshield washer fluid
reservoir. See Washer Fluid
Check (page 334).
A.
Power distribution box.
See
Changing a Fuse (page 323).
B.
Battery.
See Changing the 12V
Battery (page 335).
C.
Engine oil filler cap.
See Engine
Oil Check (page 327).
D.
Engine oil dipstick.
See Engine
Oil Dipstick (page 327).
E.
Brake fluid reservoir. See
Brake
Fluid Check (page 334).
F.
Air filter.
See Changing the
Engine Air Filter (page 343).
G.
Engine coolant reservoir. See
Engine Coolant Check
(page
329).
H.
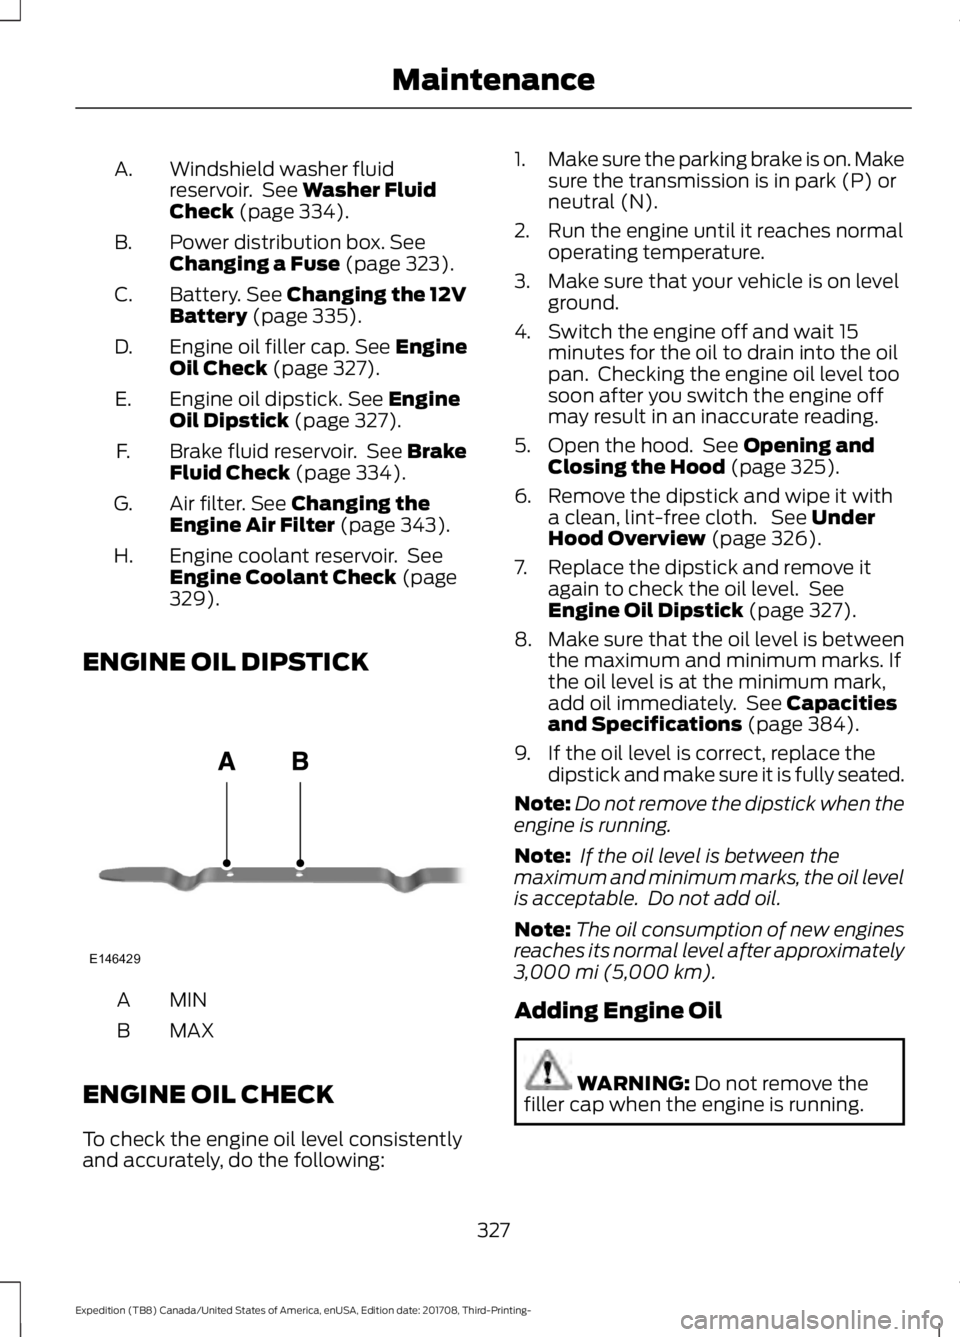
ENGINE OIL DIPSTICK MINA
MAX
B
ENGINE OIL CHECK
To check the engine oil level consistently
and accurately, do the following: 1.
Make sure the parking brake is on. Make
sure the transmission is in park (P) or
neutral (N).
2. Run the engine until it reaches normal operating temperature.
3. Make sure that your vehicle is on level ground.
4. Switch the engine off and wait 15 minutes for the oil to drain into the oil
pan. Checking the engine oil level too
soon after you switch the engine off
may result in an inaccurate reading.
5. Open the hood. See
Opening and
Closing the Hood (page 325).
6. Remove the dipstick and wipe it with a clean, lint-free cloth. See
Under
Hood Overview (page 326).
7. Replace the dipstick and remove it again to check the oil level. See
Engine Oil Dipstick
(page 327).
8. Make sure that the oil level is between
the maximum and minimum marks. If
the oil level is at the minimum mark,
add oil immediately. See
Capacities
and Specifications (page 384).
9. If the oil level is correct, replace the dipstick and make sure it is fully seated.
Note: Do not remove the dipstick when the
engine is running.
Note: If the oil level is between the
maximum and minimum marks, the oil level
is acceptable. Do not add oil.
Note: The oil consumption of new engines
reaches its normal level after approximately
3,000 mi (5,000 km)
.
Adding Engine Oil WARNING:
Do not remove the
filler cap when the engine is running.
327
Expedition (TB8) Canada/United States of America, enUSA, Edition date: 201708, Third-Printing- MaintenanceE146429
Page 336 of 571
1. Stop your vehicle as soon as it is safe
to do so. Fully apply the parking brake,
shift into park (P) or neutral (N).
2. Leave the engine running until the coolant temperature gauge needle
returns to the normal position. After
several minutes, if the temperature
does not drop, follow the remaining
steps.
3. Switch the engine off and wait for it to
cool. Check the coolant level.
4. If the coolant level is at or below the minimum mark, add prediluted coolant
immediately.
5. If the coolant level is normal, restart the engine and continue.
AUTOMATIC TRANSMISSION
FLUID CHECK
If required, have an authorized dealer check
and change the transmission fluid at the
correct service interval. See Scheduled
Maintenance (page 498).
The automatic transmission does not have
a transmission fluid dipstick.
Refer to your scheduled maintenance
information for scheduled intervals for fluid
checks and changes. Your transmission
does not consume fluid. However, if the
transmission slips, shifts slowly or if you
notice a sign of leaking fluid, contact an
authorized dealer.
Do not use supplemental transmission
fluid additives, treatments or cleaning
agents. The use of these materials may
affect transmission operation and result
in damage to internal transmission
components. TRANSFER CASE FLUID
CHECK
(IF EQUIPPED)
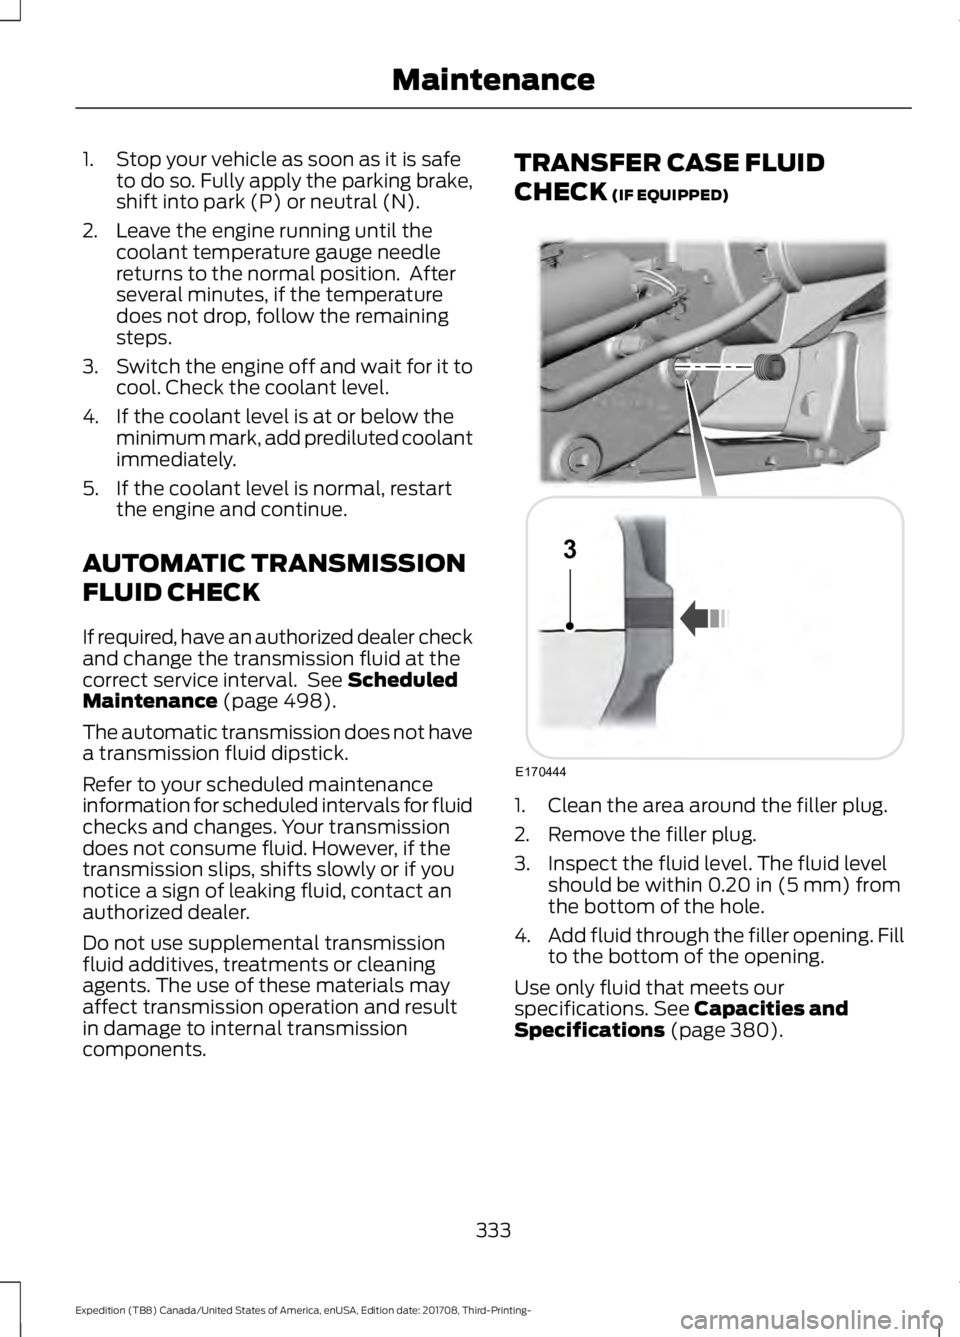
1. Clean the area around the filler plug.
2. Remove the filler plug.
3. Inspect the fluid level. The fluid level
should be within
0.20 in (5 mm) from
the bottom of the hole.
4. Add fluid through the filler opening. Fill
to the bottom of the opening.
Use only fluid that meets our
specifications.
See Capacities and
Specifications (page 380).
333
Expedition (TB8) Canada/United States of America, enUSA, Edition date: 201708, Third-Printing- MaintenanceE170444
3
Page 378 of 571
as possible. Use of any tire or wheel not
recommended by Ford can affect the
safety and performance of your vehicle,
which could result in an increased risk of
loss of vehicle control, vehicle rollover,
personal injury and death.
WARNING: When one of the front
wheels is off the ground, the
transmission alone will not prevent the
vehicle from moving or slipping off the
jack, even if the transmission is in park
(P). WARNING:
To help prevent your
vehicle from moving when changing a
wheel, shift the transmission into park
(P), set the parking brake and use an
appropriate block or wheel chock to
secure the wheel diagonally opposite to
the wheel being changed. For example,
when changing the front left wheel,
place an appropriate block or wheel
chock on the right rear wheel. WARNING:
Do not attempt to
change a tire on the side of the vehicle
close to moving traffic. Pull far enough
off the road to avoid the danger of being
hit when operating the jack or changing
the wheel. WARNING:
Always use the jack
provided as original equipment with your
vehicle. If using a jack other than the one
provided, make sure the jack capacity is
adequate for the vehicle weight,
including any vehicle cargo or
modifications. If you are unsure if the jack
capacity is adequate, contact the
authorized dealer. WARNING:
Switch off the running
boards before jacking or placing any
object under your vehicle. Never place
your hand between the extended running
board and your vehicle. A moving running
board may cause injury. WARNING:
Only use the spare
wheel carrier to stow the wheel provided
with your vehicle. Other wheel sizes
could cause the spare wheel carrier to
fail if it does not fit securely or is too
heavy. 1. Park the vehicle on firm, level ground
and activate the hazard flashers.
2. Apply the parking brake, place the transmission in park (P) and switch the
ignition off.
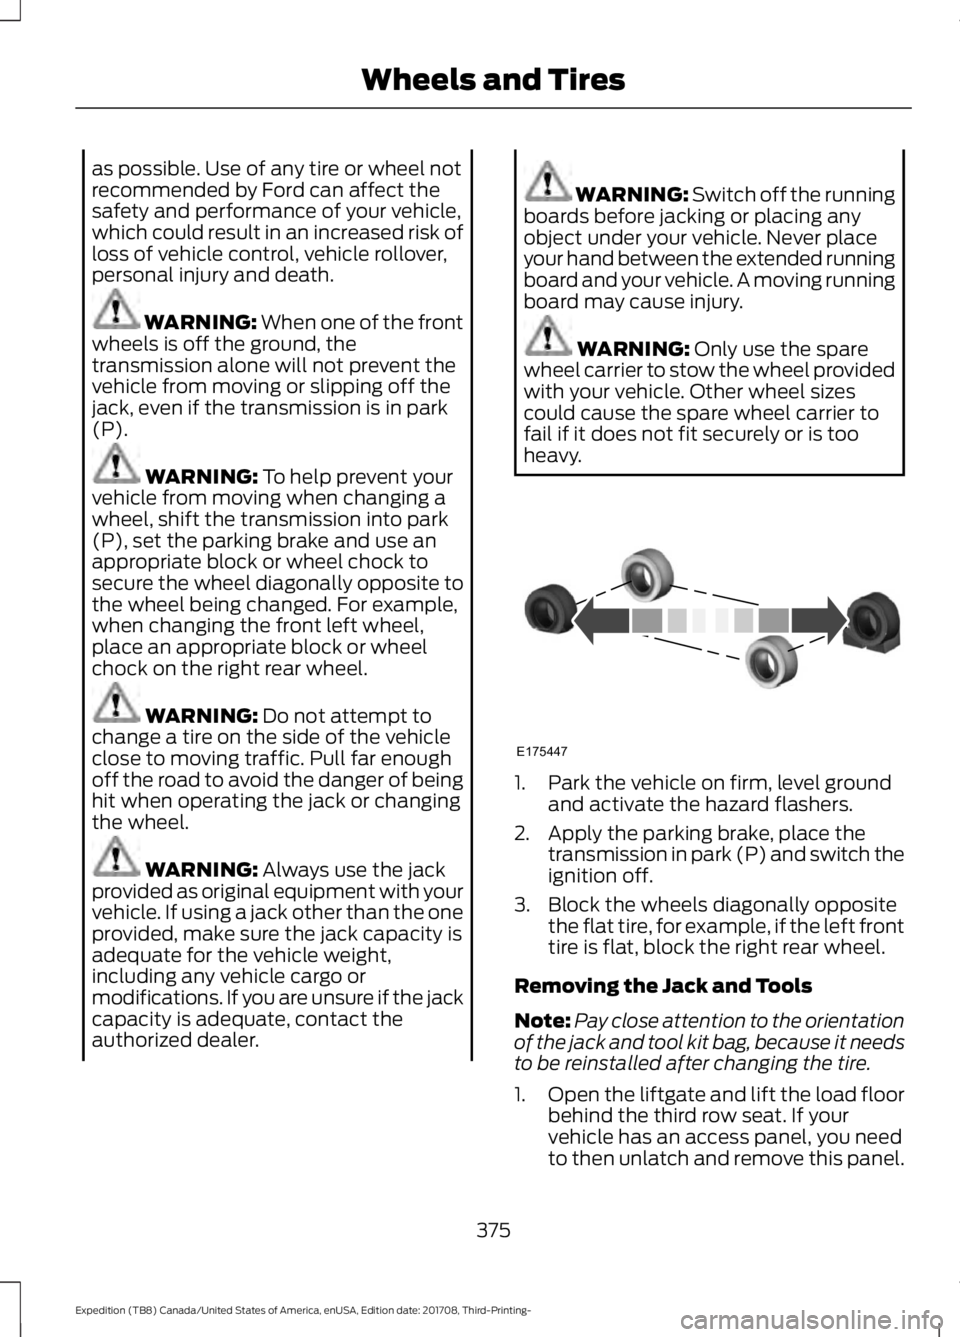
3. Block the wheels diagonally opposite the flat tire, for example, if the left front
tire is flat, block the right rear wheel.
Removing the Jack and Tools
Note: Pay close attention to the orientation
of the jack and tool kit bag, because it needs
to be reinstalled after changing the tire.
1. Open the liftgate and lift the load floor
behind the third row seat. If your
vehicle has an access panel, you need
to then unlatch and remove this panel.
375
Expedition (TB8) Canada/United States of America, enUSA, Edition date: 201708, Third-Printing- Wheels and TiresE175447
Page 383 of 571

ENGINE SPECIFICATIONS
3.5L EcoBoost
Engine
214
Cubic inches
1-4-2-5-3-6
Firing order
Coil on plug
Ignition system
10.5:1
Compression ratio
0.028 in (0.7 mm) - 0.031 in (0.8 mm)
Spark plug gap
Drivebelt Routing MOTORCRAFT PARTS
Part Number
Component
FA-1883
Air filter element.
FP-79
Cabin air filter.
FL-500-S
Oil filter.
BAGM-94RH7-800
Battery.
SP-550
Spark plugs.
FT-202
Transmission filter.
380
Expedition (TB8) Canada/United States of America, enUSA, Edition date: 201708, Third-Printing- Capacities and SpecificationsE250666
Page 386 of 571
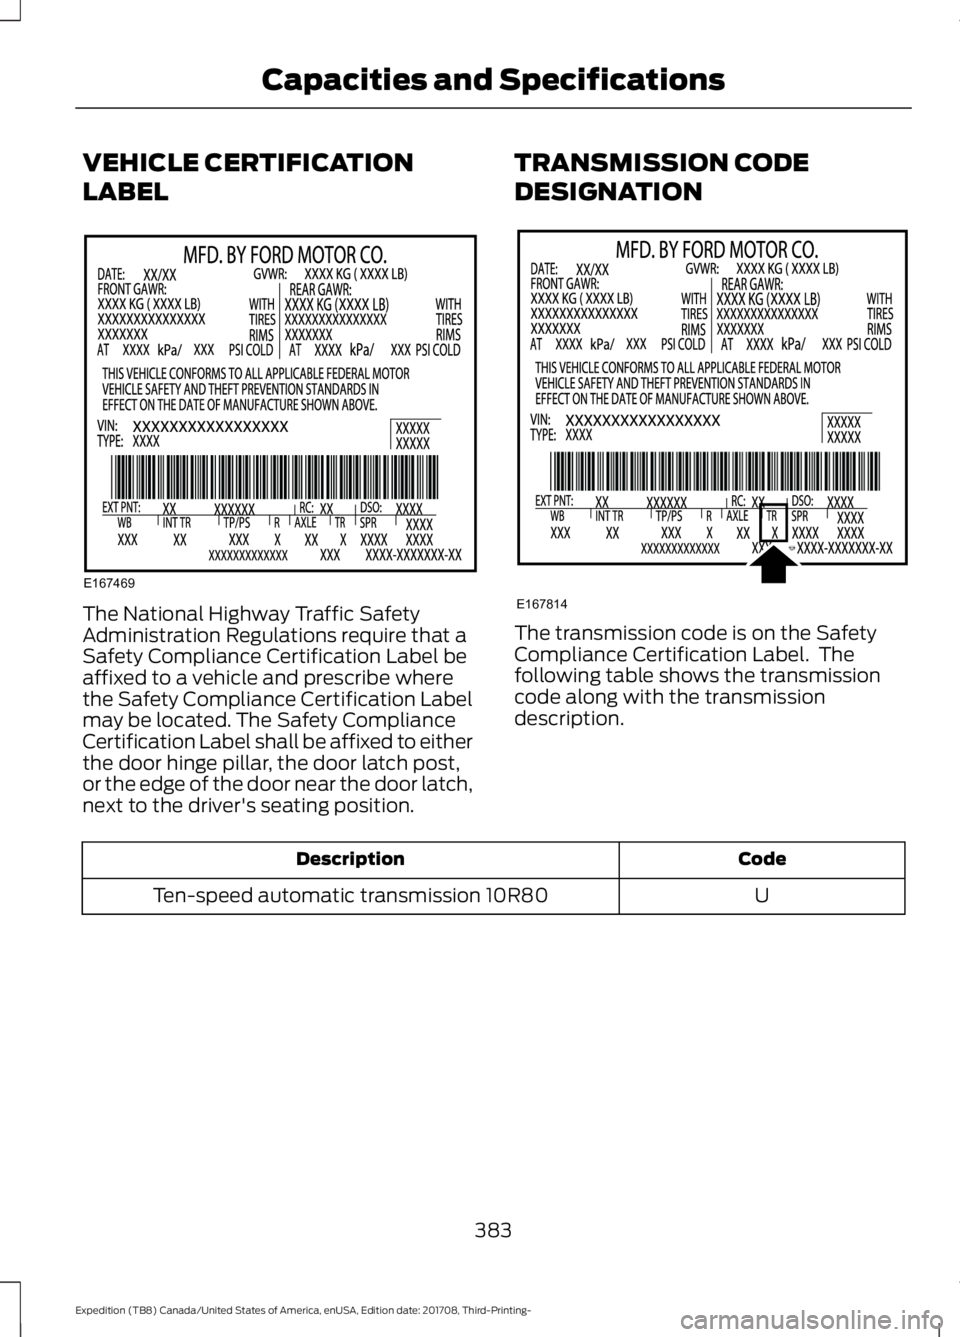
VEHICLE CERTIFICATION
LABEL
The National Highway Traffic Safety
Administration Regulations require that a
Safety Compliance Certification Label be
affixed to a vehicle and prescribe where
the Safety Compliance Certification Label
may be located. The Safety Compliance
Certification Label shall be affixed to either
the door hinge pillar, the door latch post,
or the edge of the door near the door latch,
next to the driver's seating position.
TRANSMISSION CODE
DESIGNATION The transmission code is on the Safety
Compliance Certification Label. The
following table shows the transmission
code along with the transmission
description.
Code
Description
U
Ten-speed automatic transmission 10R80
383
Expedition (TB8) Canada/United States of America, enUSA, Edition date: 201708, Third-Printing- Capacities and SpecificationsE167469 E167814
Page 387 of 571
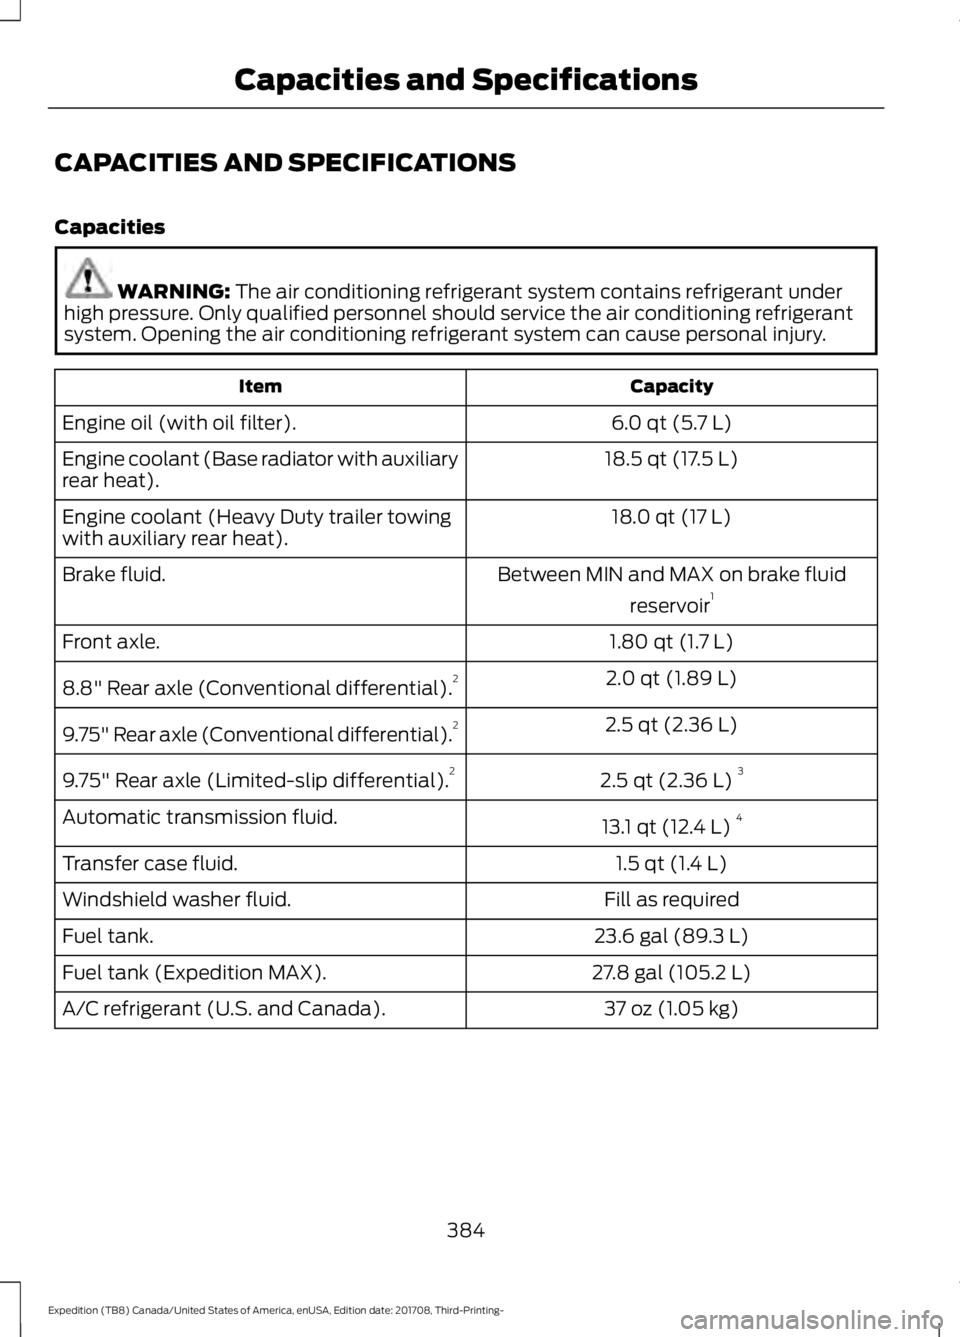
CAPACITIES AND SPECIFICATIONS
Capacities
WARNING: The air conditioning refrigerant system contains refrigerant under
high pressure. Only qualified personnel should service the air conditioning refrigerant
system. Opening the air conditioning refrigerant system can cause personal injury. Capacity
Item
6.0 qt (5.7 L)
Engine oil (with oil filter).
18.5 qt (17.5 L)
Engine coolant (Base radiator with auxiliary
rear heat).
18.0 qt (17 L)
Engine coolant (Heavy Duty trailer towing
with auxiliary rear heat).
Between MIN and MAX on brake fluidreservoir1
Brake fluid.
1.80 qt (1.7 L)
Front axle.
2.0 qt (1.89 L)
8.8" Rear axle (Conventional differential). 2
2.5 qt (2.36 L)
9.75" Rear axle (Conventional differential). 2
2.5 qt (2.36 L)3
9.75" Rear axle (Limited-slip differential). 2
13.1 qt (12.4 L)4
Automatic transmission fluid.
1.5 qt (1.4 L)
Transfer case fluid.
Fill as required
Windshield washer fluid.
23.6 gal (89.3 L)
Fuel tank.
27.8 gal (105.2 L)
Fuel tank (Expedition MAX).
37 oz (1.05 kg)
A/C refrigerant (U.S. and Canada).
384
Expedition (TB8) Canada/United States of America, enUSA, Edition date: 201708, Third-Printing- Capacities and Specifications
Page 388 of 571
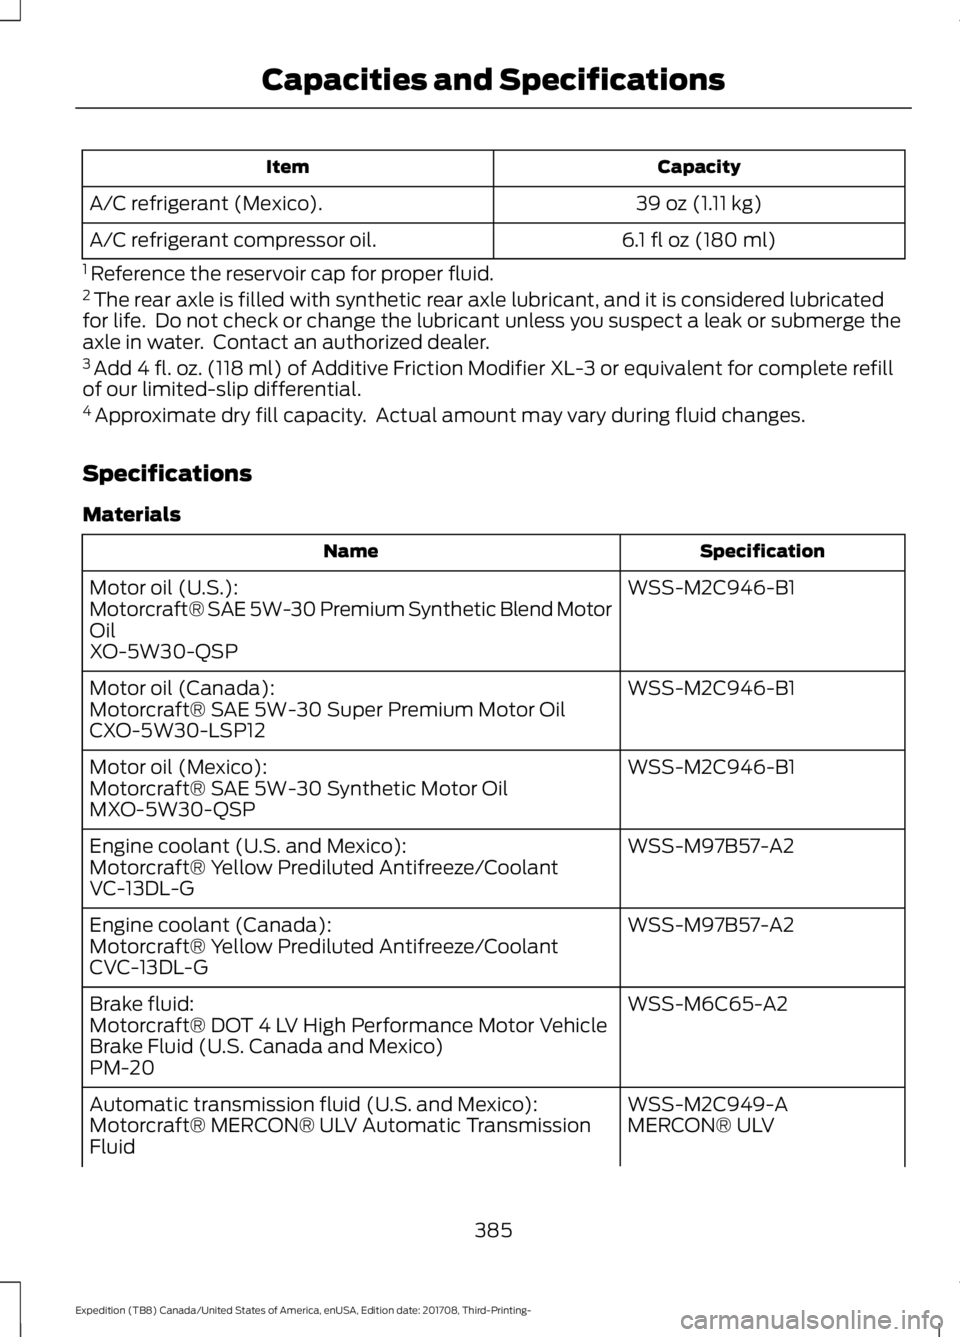
Capacity
Item
39 oz (1.11 kg)
A/C refrigerant (Mexico).
6.1 fl oz (180 ml)
A/C refrigerant compressor oil.
1 Reference the reservoir cap for proper fluid.
2 The rear axle is filled with synthetic rear axle lubricant, and it is considered lubricated
for life. Do not check or change the lubricant unless you suspect a leak or submerge the
axle in water. Contact an authorized dealer.
3 Add 4 fl. oz. (118 ml) of Additive Friction Modifier XL-3 or equivalent for complete refill
of our limited-slip differential.
4 Approximate dry fill capacity. Actual amount may vary during fluid changes.
Specifications
Materials Specification
Name
WSS-M2C946-B1
Motor oil (U.S.):
Motorcraft® SAE 5W-30 Premium Synthetic Blend Motor
Oil
XO-5W30-QSP
WSS-M2C946-B1
Motor oil (Canada):
Motorcraft® SAE 5W-30 Super Premium Motor Oil
CXO-5W30-LSP12
WSS-M2C946-B1
Motor oil (Mexico):
Motorcraft® SAE 5W-30 Synthetic Motor Oil
MXO-5W30-QSP
WSS-M97B57-A2
Engine coolant (U.S. and Mexico):
Motorcraft® Yellow Prediluted Antifreeze/Coolant
VC-13DL-G
WSS-M97B57-A2
Engine coolant (Canada):
Motorcraft® Yellow Prediluted Antifreeze/Coolant
CVC-13DL-G
WSS-M6C65-A2
Brake fluid:
Motorcraft® DOT 4 LV High Performance Motor Vehicle
Brake Fluid (U.S. Canada and Mexico)
PM-20
WSS-M2C949-A
Automatic transmission fluid (U.S. and Mexico):
MERCON® ULV
Motorcraft® MERCON® ULV Automatic Transmission
Fluid
385
Expedition (TB8) Canada/United States of America, enUSA, Edition date: 201708, Third-Printing- Capacities and Specifications