Page 121 of 244

IMPORTANT Look after the LPG
adapter carefully so that it does not get
damaged.
IMPORTANT Only use LPG for motor
vehicles.
Fuel - Vehicle
compatibility
identification Graphic
symbol for informing
consumers in
accordance with
EN16942
The symbols shown below facilitated
recognising the correct fuel type to be
used on your car.
Before proceeding with refuelling, check
the symbols inside the fuel filler flap
(where provided) and compare them
with the symbols shown on the fuel
pump (where provided).
Symbols for petrol powered cars
E5: Unleaded petrol containing up to
2.7% (m/m) oxygen and with maximum
5.0% (V/V) ethanol compliant with
EN228E10: Unleaded petrol containing up to
3.7% (m/m) oxygen and with maximum
10.0% (V/V) ethanol compliant with
EN228
Symbols for diesel powered cars
B7: Diesel containing up to 7% (V/V) of
FAME (Fatty Acid Methyl Esters)
compliant with theEN590specification
B10: Diesel containing up to 10% (V/V)
of FAME (Fatty Acid Methyl Esters)
compliant with theEN16734
specification
Symbols for petrol/LPG bi-fuel cars
E5: Unleaded petrol containing up to
2.7% (m/m) oxygen and with maximum
5.0% (V/V) ethanol compliant with
EN228
E10: Unleaded petrol containing up to
3.7% (m/m) oxygen and with maximum
10.0% (V/V) ethanol compliant with
EN228LPG: Automotive LPG compliant with
EN589
WARNING
124)Do not apply any object/plug to the
end of the filler which is not provided for
the car. The use of non-compliant
objects/plugs could cause a pressure
increase inside the tank, resulting in
dangerous situations.
125)Do not bring naked flames or lit
cigarettes near to the fuel filler: fire risk.
Keep your face away from the fuel filler to
prevent breathing in harmful vapours.
126)Do not use a mobile phone near the
refuelling pump: risk of fire.
IMPORTANT
48)For diesel engines, only use diesel fuel
for motor vehicles in accordance with EN
590 European specifications. The use of
other products or mixtures may damage
the engine beyond repair and consequently
invalidate the warranty, due to the damage
caused. If you accidentally introduce other
types of fuel into the tank, do not start the
engine. Empty the tank. If the engine has
been run for even an extremely limited
amount of time, you must not only drain the
fuel tank, but the rest of the supply circuit
as well.
119
Page 122 of 244
IN AN EMERGENCY
A punctured tyre or a burnt-out bulb?
At times, a problem may interfere with
our journey.
The pages on emergencies can help
you to deal with critical situations
independently and with calm.
In an emergency we recommend that
you call the freephone number found in
the Warranty Booklet.
It is also possible to call the national or
international universal freephone
number to search for the nearest Fiat
Dealership.HAZARD WARNING LIGHTS.....121
BULB REPLACEMENT.........121
REPLACING FUSES..........128
CHANGING A WHEEL.........134
FIX&GO AUTOMATIC KIT.......138
EMERGENCY STARTING.......141
FUEL CUT-OFF SYSTEM.......142
AUTOMATIC TRANSMISSION. . . .145
TOWING THE VEHICLE........147
120
IN AN EMERGENCY
Page 123 of 244

HAZARD WARNING
LIGHTS
CONTROL
Press the fig. 110 button to switch the
lights on/off.
When the hazard warning lights are on,
the
andwarning lights flash.
IMPORTANT The use of hazard warning
lights is governed by the highway code
of the country you are driving in:
comply with legal requirements.
Emergency braking
In the event of emergency braking the
hazard warning lights switch on
automatically as well as warning lights
andin the instrument panel.
The lights switch off automatically when
emergency braking ceases.
BULB
REPLACEMENT
127) 128) 129) 130)
49)
GENERAL
INSTRUCTIONS
Before replacing a bulb check the
contacts for oxidation;
replace blown bulbs with others of
the same type and power;
after replacing a headlight bulb,
always check its alignment;
when a light is not working, check
that the corresponding fuse is intact
before changing the bulb. For the
location of fuses, refer to the paragraph
"If a fuse blows" in this chapter.
IMPORTANT When the weather is cold
or damp or after heavy rain or washing,
the surface of headlights or rear lights
may steam up and/or form drops of
condensation on the inside. This is a
natural phenomenon due to the
difference in temperature and humidity
between the inside and the outside of
the glass which does not indicate a
fault and does not compromise the
normal operation of lighting devices.The mist disappears quickly when the
lights are turned on, starting from the
centre of the diffuser, extending
progressively towards the edges.
11008016J0001EM
121
Page 124 of 244
TYPES OF BULBS
The vehicle is equipped with the following bulbs
Glass bulbs (type 1): they are press-fitted. Pull to extract.
Bayonet-type bulbs (type 2): to remove them from their holder,
press the bulb and turn it anticlockwise, then extract it.
Halogen bulbs (type 3): to remove the bulb, pull the connector and
extract it.
Halogen bulbs (type 4): to remove the bulb, turn it anticlockwise.
Xenon gas discharge bulb (type 5):
(for versions/markets, where provided)
to remove the bulb, contact a Fiat Dealership.
122
IN AN EMERGENCY
Page 125 of 244
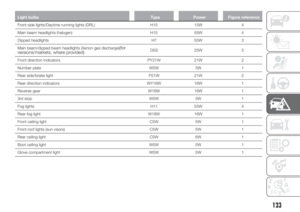
Light bulbs Type Power Figure reference
Front side lights/Daytime running lights (DRL) H15 15W 4
Main beam headlights (halogen) H15 55W 4
Dipped headlights H7 55W 3
Main beam/dipped beam headlights (Xenon gas discharge)
(for
versions/markets, where provided)D5S 25W 5
Front direction indicators PY21W 21W 2
Number plate W5W 5W 1
Rear side/brake light P21W 21W 2
Rear direction indicators WY16W 16W 1
Reverse gear W16W 16W 1
3rd stop W5W 5W 1
Fog lights H11 55W 4
Rear fog light W16W 16W 1
Front ceiling light C5W 5W 1
Front roof lights (sun visors) C5W 5W 1
Rear ceiling light C5W 6W 1
Boot ceiling light W5W 5W 1
Glove compartment light W5W 5W 1
123
Page 126 of 244

REPLACING AN
EXTERNAL BULB
Front bulb position
1. Dipped headlights
2. Fog lights
3. Main beam headlights/Daytime
running lights (DRL)
4. Direction indicator.
Dipped beam headlights
Right headlight
To replace the bulb 1 fig. 111, proceed
as follows:
steer the car wheels completely
inwards;
undo screw 1 fig. 112 using the
screwdriver provided and remove
inspection flap 2;
remove the rubber cap
disconnect the electrical connector;
extract the bulb, releasing it from the
retaining springs;
replace the new bulb and carry out
the procedure described previously in
reverse.
Left headlight
working from inside the engine
compartment, remove the rubber cap
from the dipped beam headlight bulb 1
fig. 111;
extract the bulb, releasing it from the
retaining springs;
disconnect the electrical connector
and replace the bulb 1 fig. 111;
reconnect the electrical connector to
the new bulb;
reposition the assembly in the seat;
refit the rubber cap.
IMPORTANT Only replace the bulb
when the engine is off. Also ensure that
the engine is cold, to prevent the risk of
burns.
Fog lights
To replace the bulbs, proceed as
follows:
11108026J0002EM
112P08026J004
113P08026J0012
124
IN AN EMERGENCY
Page 127 of 244

steer the car wheels completely
inwards;
undo screw 1 fig. 113 using the
screwdriver provided and remove
inspection flap 2;
turn the bulb-bulb holder assembly 1
fig. 114 anticlockwise and then remove
it sliding it outwards;
disconnect the electrical connector;
reconnect the connector to the new
assembly: then insert it, turning it
clockwise, ensuring that it locks
correctly;
finally, refit the inspection flap.
Main beam headlights/Daytime
running lights (DRL)
To replace the bulb 3 fig. 111, proceed
as follows:
working from inside the engine
compartment, remove rubber cap 1
fig. 115;
rotate the bulb-bulb holder assembly
anticlockwise and extract it;
disconnect the electrical connector
and replace the bulb-bulb holder
assembly 2;
reconnect the electrical connector to
the new assembly;
then insert the assembly in its
housing and turn it clockwise, making
sure that it is locked correctly;
refit the rubber cap 1.
IMPORTANT Only replace the bulb
when the engine is off. Also ensure that
the engine is cold, to prevent the risk of
burns.
Front direction indicators
To replace the bulb 4 fig. 111, proceed
as follows:
rotate the bulb-bulb holder assembly
anticlockwise;
replace the "bayonet-fitted" bulb;
then insert the bulb-bulb holder
assembly in its housing and turn it
clockwise, making sure that it is locked
correctly.
Side turn light
To replace the bulb, proceed as follows:
adjust the lens 1 fig. 116 to
compress in the internal clip 2, then pull
the cluster outwards;
turn the bulb holder 3 anticlockwise,
extract the press-fitted bulb 4 and
replace it;
refit the bulb holder 3 in the lens and
turn it clockwise;
refit the cluster making sure that the
internal clip 2 clicks into position.
11408026J0016EM11508026J0025EM
11608026J0005EM
125
Page 128 of 244
Versions with Xenon gas discharge
headlights
Main/dipped beam headlights
(for versions/markets, where provided)
For replacing these bulbs, contact a
Fiat Dealership.
Rear bulb position
1. Tail lights/Brake lights
2. Direction indicator
3. Reverse gear
4. Rear fog lightRear light cluster
To replace the bulbs, proceed as
follows:
open the rear lid and move the cover
on the inner trim 5 fig. 118;
disconnect the central electric
connector 6, operating on the
dedicated retainer, then unscrew the
screw 7 fig. 119;
remove the rear light cluster, pulling it
outwards as indicated in fig. 120;
to replace the rear fog light bulb, turn
the bulb holder 8 fig. 121 anticlockwise
and replace the bulb, extracting it from
its bulb holder;
to replace the other lamps, unscrew
the four fixing screws fig. 121 and
remove the bulb holder;
11708026J0006EM
11808026J0007EM
11908026J0008EM
12008026J0017EM
121P08026J0018
126
IN AN EMERGENCY