Page 41 of 272
Air flow distributed between footwell diffusers (hotter air) and central and side dashboard vents (cooler air). This
distribution mode is particularly useful in spring and autumn on sunny days.
Air flow distributed between the footwell vents and the windscreen and front side window defrosting/demisting vents.
This allows an adequate warming of the passenger compartment and prevents the windows from misting up.
C Display.
D MAX DEF function control button.
E System deactivation button.
F Compressor on/off control button.
G Air recirculation control button.
H Fan speed increase/decrease control buttons.
I Temperature increase/decrease control knob.
L Heated rear window and electric door mirror on/off button (for versions/markets, where provided).
39
Page 42 of 272

ELECTRIC WINDOWS
ELECTRIC FRONT
WINDOWS
(for versions/markets, where provided)
There are buttons on the driver side
door panel which control the following
functions, with the ignition key turned to
MAR:
TO: Opening/closing of left-hand
window
B: Opening/closing of right-hand
window
Push button A or B to open/close the
appropriate window.When one of the two buttons is
pressed briefly, the window moves in
steps; if the button is held down,
"continuous automatic" operation is
activated both for closing and opening.
Press button A or B again to stop the
window in its current position.
The electric windows are fitted with a
security system (where provided) that
can detect the presence of an obstacle
whilst the window is closing; when
this happens, the system kicks in and
the movement of the glass is
immediately reversed.
IMPORTANT With the ignition key at
STOP or removed, the electric windows
remain activated for about two minutes
and are deactivated as soon as a
door is opened.
28) 29)
FRONT AND REAR
ELECTRIC WINDOWS
(for versions/markets, where provided)
Driver side door
Five switches fig. 68 on the inner
armrest control the following with the
ignition key turned to MAR:
A left front window opening/closing;
B right front window opening/closing;
C left rear window opening/closing;
D right rear window opening/closing;
E inhibition of control switches on rear
doors.Passenger side and rear doors
(for versions/markets, where provided)
The switch controlling the
corresponding window is located on
the inner armrest of each door.
WINDOW OPENING/
CLOSING BY MEANS OF
A KEY WITH REMOTE
CONTROL
(for versions/markets, where provided)
The windows can be opened/closed by
holding the unlock
/ lockbuttons
on the remote control pressed,
respectively.
The windows move simultaneously as
long as the corresponding button is
held down; they will stop when they
reach the upper or lower end of travel
position, or the button is released.
67F0V0020
68F0V0175
40
KNOWING YOUR VEHICLE
Page 43 of 272

WARNING
28)Improper use of the electric windows
can be dangerous. Before and during their
operation, ensure that any passengers
are not at risk from the moving glass either
by personal objects getting caught in the
mechanism or by being hit by it directly.
29)When leaving the car, always remove
the ignition key to avoid the risk of injury
due to accidental operation of the electric
windows.
BONNET
Opening
Proceed as follows:
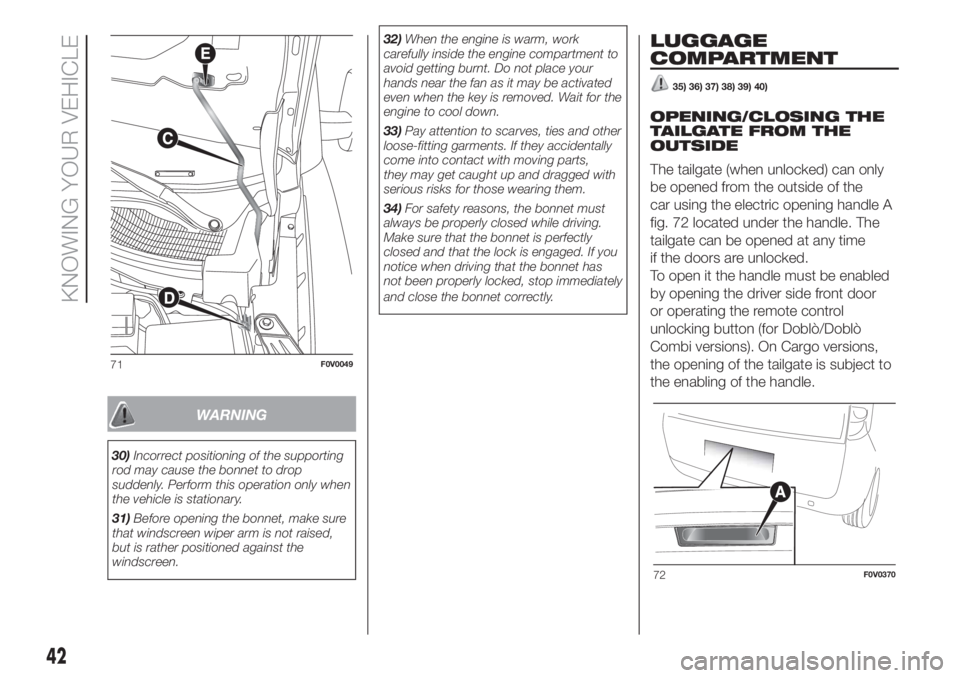
pull lever A fig. 69 in the direction
indicated by the arrow;
operate lever B fig. 70, lift the
bonnet and, at the same time, release
the supporting rod C fig. 71 from its
catch D, then insert the end of the rod
into housing E in the bonnet (large hole)
and push to safety position (small
hole), as shown in the figure.
30) 31) 32) 33)
Closing
Proceed as follows:
Hold the bonnet up with one hand
and with the other remove rod C from
housing E and fit it back into its catch
D;
Lower the bonnet to approximately
20 centimetres above the engine
compartment and let it come down.
Make sure that the bonnet is
completely closed and not just secured
in safety position. If it is not perfectly
closed, do not try to press the bonnet
down but open it and repeat the
procedure.
34)
69F0V0047
70F0V0048
41
Page 44 of 272

WARNING
30)Incorrect positioning of the supporting
rod may cause the bonnet to drop
suddenly. Perform this operation only when
the vehicle is stationary.
31)Before opening the bonnet, make sure
that windscreen wiper arm is not raised,
but is rather positioned against the
windscreen.32)When the engine is warm, work
carefully inside the engine compartment to
avoid getting burnt. Do not place your
hands near the fan as it may be activated
even when the key is removed. Wait for the
engine to cool down.
33)Pay attention to scarves, ties and other
loose-fitting garments. If they accidentally
come into contact with moving parts,
they may get caught up and dragged with
serious risks for those wearing them.
34)For safety reasons, the bonnet must
always be properly closed while driving.
Make sure that the bonnet is perfectly
closed and that the lock is engaged. If you
notice when driving that the bonnet has
not been properly locked, stop immediately
and close the bonnet correctly.
LUGGAGE
COMPARTMENT
35) 36) 37) 38) 39) 40)
OPENING/CLOSING THE
TAILGATE FROM THE
OUTSIDE
The tailgate (when unlocked) can only
be opened from the outside of the
car using the electric opening handle A
fig. 72 located under the handle. The
tailgate can be opened at any time
if the doors are unlocked.
To open it the handle must be enabled
by opening the driver side front door
or operating the remote control
unlocking button (for Doblò/Doblò
Combi versions). On Cargo versions,
the opening of the tailgate is subject to
the enabling of the handle.
71F0V0049
72F0V0370
42
KNOWING YOUR VEHICLE
Page 45 of 272

The handle is enabled after pressing the
third button on the remote control or
by operating the unlocking button from
the interior of the vehicle. Opening
can also take place by using the
mechanical key or the metal insert of
the remote control key in the driver side
door pawl.
7)
EMERGENCY OPENING
FROM THE INSIDE
In the event of an emergency, you can
open the boot from inside the vehicle
as follows:
open the sliding side door and fully
fold the rear seats;
from inside the boot, press lever A
fig. 74 and open the tailgate.EMERGENCY OPENING
OF THE SWING DOORS
FROM THE INSIDE
In the event of an emergency, you can
open the boot from inside the vehicle
as follows:
open the sliding side door and lower
the backrest of the rear seat to give
you access to the load compartment
(Doblò/Doblò Combi versions);
or
open the sliding side door (Cargo
versions);
use device A fig. 75 located on the
inside of the right-hand swing door;
open the left-hand swing door
by pulling on its handle (see "Doors" in
this section).REMOVING THE PARCEL
SHELF
The parcel shelf consists of two parts.
To remove it completely, proceed as
follows:
open the rear wing door; raise the
front part A fig. 76, unhooking pin A fig.
77 from its housing
raise rear part B fig. 76, unhooking
pins B and C fig. 77 from their
housings.
If the seat is completely folded down,
remove the parcel shelf as described
and store it horizontally between the
back of the front seats and the folded
rear seat.
To refit the parcel shelf, follow the same
procedure in reverse.73F0V0340
74F0V013575F0V0080
43
Page 46 of 272

EXTENDING THE BOOT
Versions with lever
Proceed as follows:
open the rear doors and remove the
parcel shelf (as described previously);
completely lower the rear seat head
restraints;
move the seat belt to the side,
making sure that it is fully extended and
not twisted;
lift backrest retainer lever A fig. 78
and fold the backrest forwards to
obtain a flat loading area. When you lift
the lever, you will see a red band;
to widen the load compartment
further, lift lever B fig. 79 on the side of
the cushion that will raise automatically;
intervene manually to fold seat and
backrest completely forward fig. 80.
Versions with tape
Lift the tape B fig. 81 placed by the
side of the cushion to release it;
then lift the cushion manually and
fold the seat and backrest all back fig.
80.
Both systems will be present on
vehicles with split rear seat. The tape
will be present on the smaller seat
portion and the lever will be present on
the larger seat portion.
Proceed as described above to fold
these seats.
On versions with backrest folded down
and parcel shelf folded down (for
versions/markets, where provided) a
load compartment can be created fig.
82.
In the low position, the parcel shelf can
support a maximum load of 70 kg on
a minimum bearing surface of 400 mm
× 400 mm fig. 83.
76F0V0136
77F0V0137
78F0V0127
79F0V0202
80F0V0203
44
KNOWING YOUR VEHICLE
Page 47 of 272

N.B. There are bands on the rear seats
under the cushion to attach the folded
seat to the front seat head restraint
rods.
SECURING YOUR LOAD
Hooks (various number, according to
version) are fixed to the floor fig. 84
- fig. 85 for easy securing load.
WARNING
35)If you are travelling in areas with few
filling stations and you want to transport
fuel in a spare tank, comply with the law by
using only an approved, suitably secured
tank. In the event of a collision the fire
risk is increased all the same.
36)Never exceed the maximum allowed
load in the luggage compartment, see
chapter “Technical specifications”. Also
make sure that the objects you place in the
luggage compartment have been properly
secured, to avoid them from being thrown
forward consequent to sudden braking and
injuring your passengers.
37)If you are travelling in areas with few
filling stations and you want to transport
fuel in a spare tank, comply with the law by
using only an approved, suitably secured
tank. In the event of a collision the fire
risk is increased all the same.
81F0V0213
82F0V0204
400mm400mm
70 kg
83F0V0212
84F0V0114
85F0V0122
45
Page 48 of 272

38)Never exceed the maximum allowed
load in the luggage compartment, see
chapter “Technical specifications”. Also
make sure that the objects you place in the
luggage compartment have been properly
secured, to avoid them from being thrown
forward consequent to sudden braking and
injuring your passengers.
39)You must not use the folded rear seat
to carry luggage. The load could be thrown
forward into the backrest of the front
seats, seriously injuring the occupants.
40)Make sure that the objects are
positioned carefully and secured to the
hooks on the floor to prevent them flung
forwards in the event of sharp braking and
causing injury to the passengers.
WARNING
7)To close the tailgate use handle B fig.
73. Do not try to close the tailgate by
pressing on the side shock absorbers C
fig. 73. Also be careful not to knock the
side shock absorbers when you load the
boot, to avoid damaging them.
HEADLIGHTS
HEADLIGHT ALIGNMENT
CORRECTOR
This device works with the ignition key
in the MAR position and the dipped
headlights on.
The vehicle tilts backwards when it is
loaded, raising the beam. The beams
must therefore be realigned in this case.
Headlight alignment
adjustment
Press
andfig. 86 on the
control panel.
The display located on the instrument
panel provides a visual warning of
the adjusted position.
Position 0 - one or two people in the
front seats.
Position 1 - five people.Position 2 - five people + load in the
luggage compartment.
Position 3 - driver + maximum
permitted load stowed in the luggage
compartment.
IMPORTANT Check the light beam
alignment every time the load
transported changes.
86F0V0506
46
KNOWING YOUR VEHICLE