2018 FIAT 500L navigation
[x] Cancel search: navigationPage 50 of 268

SETUP MENU
The Setup Menu includes the following
items:
Speedometer
Trip
Vehicle info
Audio
Telephone (for versions/markets,
where provided)
Navigation (for versions/markets,
where provided)
Alerts
Vehicle Settings
When the ignition key is turned to the
MAR-ON position, the display shows
the last Menu option active before
the engine was switched off.
NOTE With theUconnect™system,
some Menu items are shown and
managed on the display of the latter
and not on the instrument panel display
(refer to the Multimedia chapter or to
the supplement available online).
Vehicle Settings
This menu item allows you to change
the settings for:
"Display"
"Safety / Assistance"
"Safety"
“Oil level reset” (0.9 TwinAir Turbo
versions only)
Display
By selecting item "Display" you can
access the settings/information
regarding: “Dimmer” (for versions/
markets, where provided), “Screen
Setup”, “See phone”, “See navigation”,
“Reset trip B automatic".
Safety / Assistance
By selecting “Safety / Assistance" you
can access the settings/information
regarding: “City Brake Control” (for
versions/markets, where provided),
“Parking sensor volume”, “Buzzer
volume”.
Safety
By selecting item "Security" you can
access the settings/information
regarding: “Hill Holder” (for versions/
markets, where provided), “Passenger
AIRBAG” (for versions/markets, where
provided), “Seat belt buzzer”, “Speed
beep”.
Oil level reset
(0.9 TwinAir Turbo versions only)
By selecting this item you can reset the
engine oil top-up warning, which
appears about every 8000 km.
Proceed as follows to reset this warning
after topping up the engine oil:
briefly press theOKbutton on the
steering wheel: the display will show"Oil level reset";
pressto select "Yes" and reset
the top-up warning, or press
to
select “No” of you do not wish to reset
the warning.
IMPORTANT Failure to top up the
engine oil could result in a low level,
which could prevent normal car
operation and even cause it to stop.
TRIP COMPUTER
The Trip computer is used to display
information on car operation when the
key is turned to MAR.
The Trip computer comprises:
Instantaneous info(except LPG
and Natural Power versions): display of
“Range” and “Instantaneous
consumption" parameters
"Trip A" displays the following
values: “Travel Distance”, “Travel time”,
“Average fuel consumption” and
“Average speed”
"Trip B" displays the following
values: “Travel Distance”, “Travel time”,
“Average fuel consumption” and
“Average speed”
48
KNOWING THE INSTRUMENT PANEL
“Trip A” and “Trip B” monitor the car's
"complete missions" (trips) separately
from each other. The “Trip B” function
may be excluded.
Page 237 of 268

SUMMARY TABLE OF DISPLAY BUTTONS
Button Functions Mode
RadioAccess to the Radio mode Press button
MediaSource selection: USB/iPod, AUX,
Blu-
etooth®Press button
PhoneAccess to the Phone mode Press button
Uconnect™Access to the system functions (Audio, Media,
Phone, Radio,Uconnect™LIVE services, etc.)Press button
Nav
(*)Access to the Navigation menu Press button
SettingsAccess the settings menu Press button
TripAccess to the Trip menu Press button
(*)Uconnect™7" HD Nav LIVE versions only
235
Page 241 of 268
SWITCHING THE SYSTEM
ON/OFF
The system is switched on/off by
pressing the
button/knob.
Turn the button/knob clockwise to
increase the radio volume or
anticlockwise to decrease it. The
electronic volume adjustment control
rotates continuously (360°) in both
directions, without stop positions.
"TOUCH SCREEN"
FUNCTION
The system uses the "touch screen”
function; to interact with the different
functions, press the "graphic buttons"
displayed.
Confirming a selection: press the
"OK" button.
Return to the previous screen: press
the
(Delete) button or, depending
on the active screen,
/Done.
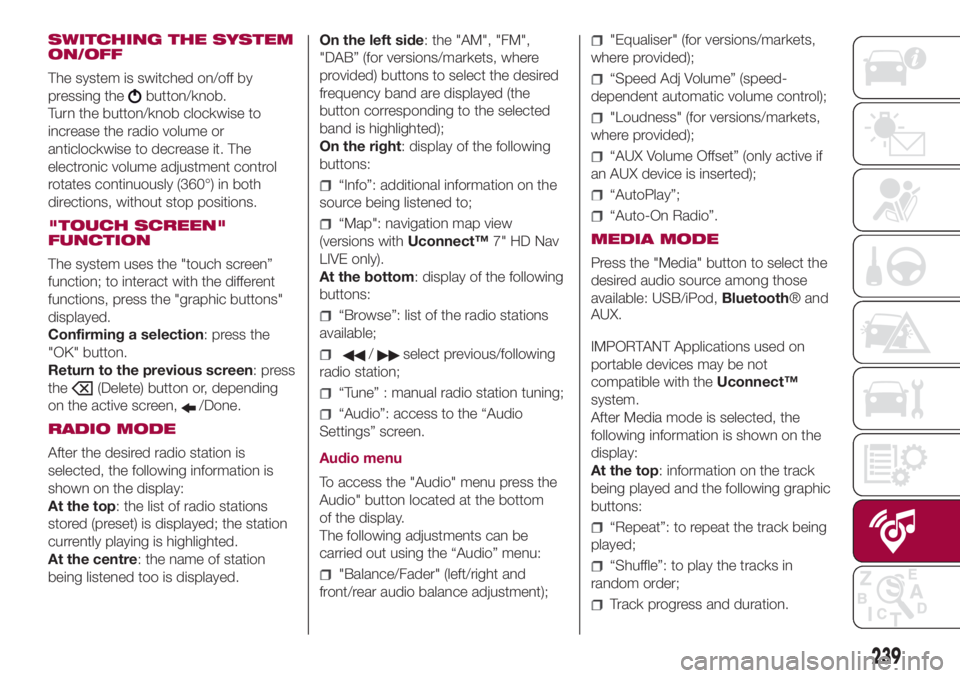
RADIO MODE
After the desired radio station is
selected, the following information is
shown on the display:
At the top: the list of radio stations
stored (preset) is displayed; the station
currently playing is highlighted.
At the centre: the name of station
being listened too is displayed.On the left side: the "AM", "FM",
"DAB” (for versions/markets, where
provided) buttons to select the desired
frequency band are displayed (the
button corresponding to the selected
band is highlighted);
On the right: display of the following
buttons:
“Info”: additional information on the
source being listened to;
“Map": navigation map view
(versions withUconnect™7" HD Nav
LIVE only).
At the bottom: display of the following
buttons:
“Browse”: list of the radio stations
available;
/select previous/following
radio station;
“Tune” : manual radio station tuning;
“Audio”: access to the “Audio
Settings” screen.
Audio menu
To access the "Audio" menu press the
Audio" button located at the bottom
of the display.
The following adjustments can be
carried out using the “Audio” menu:
"Balance/Fader" (left/right and
front/rear audio balance adjustment);
"Equaliser" (for versions/markets,
where provided);
“Speed Adj Volume” (speed-
dependent automatic volume control);
"Loudness" (for versions/markets,
where provided);
“AUX Volume Offset” (only active if
an AUX device is inserted);
“AutoPlay”;
“Auto-On Radio”.
MEDIA MODE
Press the "Media" button to select the
desired audio source among those
available: USB/iPod,Bluetooth® and
AUX.
IMPORTANT Applications used on
portable devices may be not
compatible with theUconnect™
system.
After Media mode is selected, the
following information is shown on the
display:
At the top: information on the track
being played and the following graphic
buttons:
“Repeat”: to repeat the track being
played;
“Shuffle”: to play the tracks in
random order;
Track progress and duration.
239
Page 242 of 268
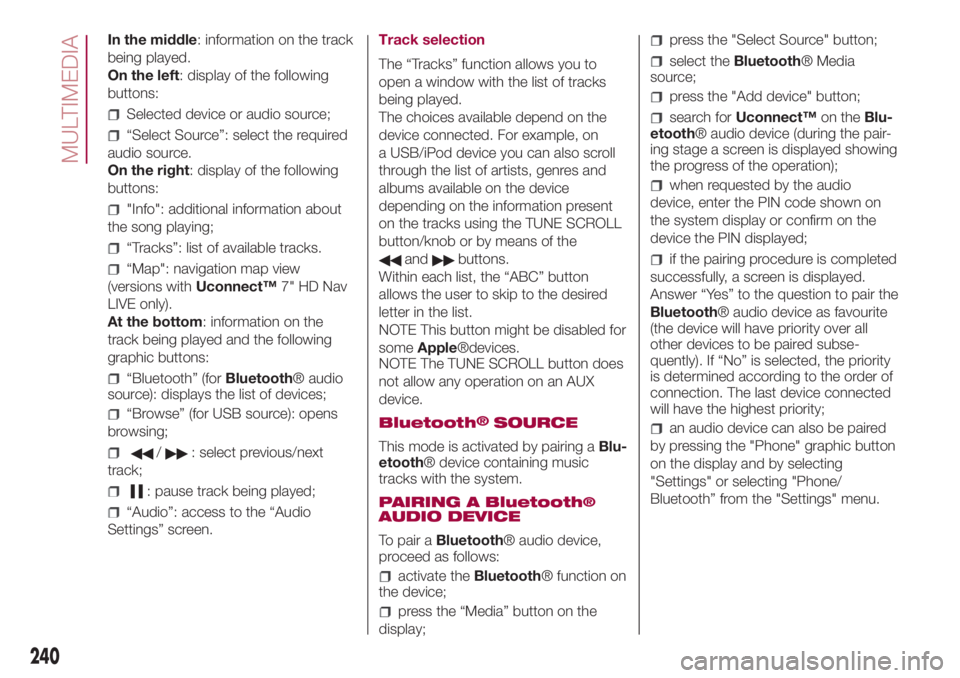
In the middle: information on the track
being played.
On the left: display of the following
buttons:
Selected device or audio source;
“Select Source”: select the required
audio source.
On the right: display of the following
buttons:
"Info": additional information about
the song playing;
“Tracks”: list of available tracks.
“Map": navigation map view
(versions withUconnect™7" HD Nav
LIVE only).
At the bottom: information on the
track being played and the following
graphic buttons:
“Bluetooth” (forBluetooth® audio
source): displays the list of devices;
“Browse” (for USB source): opens
browsing;
/: select previous/next
track;
: pause track being played;
“Audio”: access to the “Audio
Settings” screen.Track selection
The “Tracks” function allows you to
open a window with the list of tracks
being played.
The choices available depend on the
device connected. For example, on
a USB/iPod device you can also scroll
through the list of artists, genres and
albums available on the device
depending on the information present
on the tracks using the TUNE SCROLL
button/knob or by means of the
andbuttons.
Within each list, the “ABC” button
allows the user to skip to the desired
letter in the list.
NOTE This button might be disabled for
someApple®devices.
NOTE The TUNE SCROLL button does
not allow any operation on an AUX
device.
Bluetooth
®SOURCE
This mode is activated by pairing aBlu-
etooth® device containing music
tracks with the system.
PAIRING A Bluetooth
®AUDIO DEVICE
To pair aBluetooth® audio device,
proceed as follows:
activate theBluetooth® function on
the device;
press the “Media” button on the
display;
press the "Select Source" button;
select theBluetooth® Media
source;
press the "Add device" button;
search forUconnect™on theBlu-
etooth® audio device (during the pair-
ing stage a screen is displayed showing
the progress of the operation);
when requested by the audio
device, enter the PIN code shown on
the system display or confirm on the
device the PIN displayed;
if the pairing procedure is completed
successfully, a screen is displayed.
Answer “Yes” to the question to pair the
Bluetooth® audio device as favourite
(the device will have priority over all
other devices to be paired subse-
quently). If “No” is selected, the priority
is determined according to the order of
connection. The last device connected
will have the highest priority;
an audio device can also be paired
by pressing the "Phone" graphic button
on the display and by selecting
"Settings" or selecting "Phone/
Bluetooth” from the "Settings" menu.
240
MULTIMEDIA
Page 249 of 268
Interaction
After the setup procedure, on
connecting your smartphone to the
car's USB port, the application will run
automatically on theUconnect™
system. You can interact with Apple
CarPlay and Android Auto using the
steering wheel button
(long press of
the button), using the SCROLL TUNE
button/knob on the panel (to select and
confirm) or using theUconnect™
system touchscreen.
Navigation
If the system's “Nav” mode is already
active, or when a device is connected
to the car with a navigation session
in progress, theUconnect™display
shows a pop-up alert enabling the
driver to choose between system
navigation or navigation using
the smartphone.
The selection can be changed at any
time by accessing the chosen
navigation system and setting a new
destination.“AutoShow smartphone display on
connection" setting
Through theUconnect™system
settings, the user can decide to view
the smartphone screen on the
Uconnect™system display as soon
as the smartphone is connected via the
USB port.
When this function is set, each time a
connection is made via USB, the Apple
CarPlay or Android Auto apps will run
automatically on theUconnect™
system screen.
The "AutoShow smartphone display on
connection" item can be found in the
"Display" submenu. The function is
enabled by default.
Exiting the Android Auto and Apple
CarPlay apps
To end the Apple CarPlay or Android
Auto session, physically disconnect the
smartphone from the car's USB port."SETTINGS" MENU
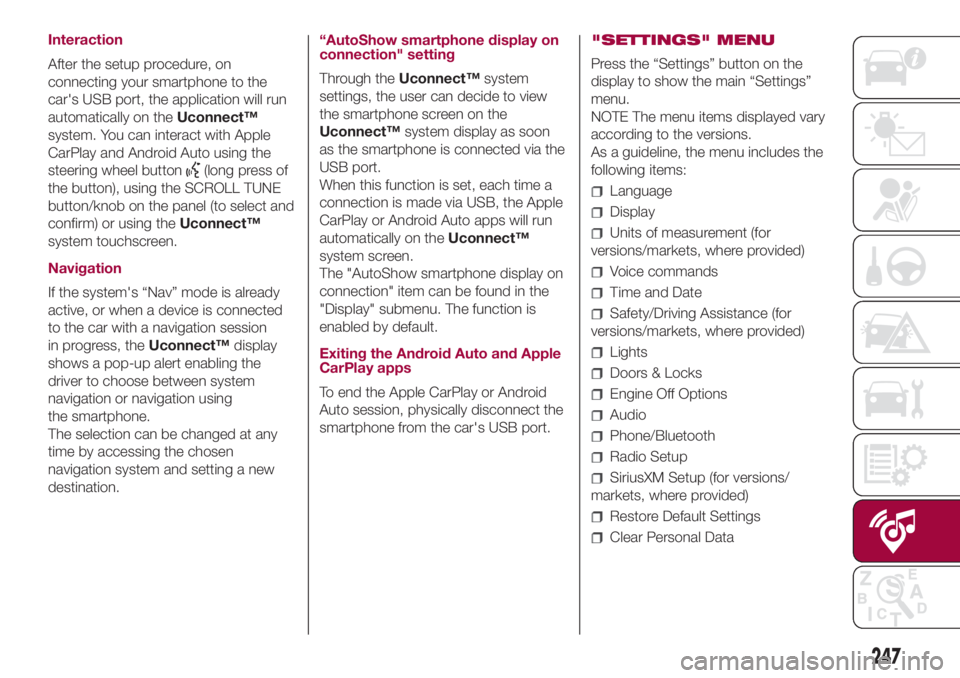
Press the “Settings” button on the
display to show the main “Settings”
menu.
NOTE The menu items displayed vary
according to the versions.
As a guideline, the menu includes the
following items:
Language
Display
Units of measurement (for
versions/markets, where provided)
Voice commands
Time and Date
Safety/Driving Assistance (for
versions/markets, where provided)
Lights
Doors & Locks
Engine Off Options
Audio
Phone/Bluetooth
Radio Setup
SiriusXM Setup (for versions/
markets, where provided)
Restore Default Settings
Clear Personal Data
247
Page 250 of 268
NAVIGATION
(versions with Uconnect™ 7" HD Nav
LIVE only)
Press the "Nav" button to show the
navigation map on the display.
NOTE The navigation system volume
can only be adjusted during navigation
when the system provides voice
indications.
Navigation main menu
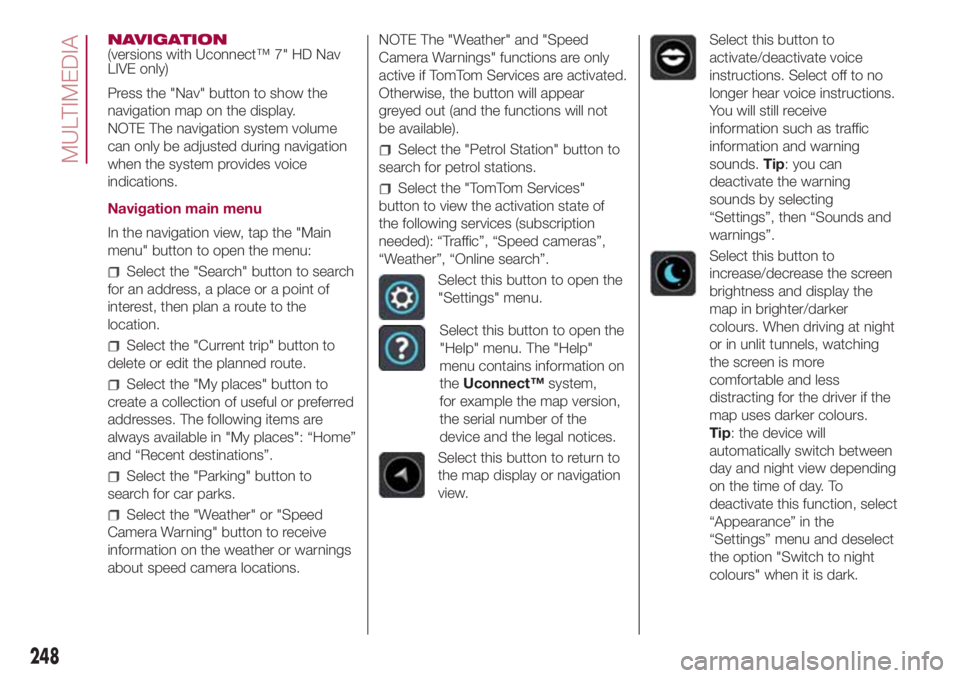
In the navigation view, tap the "Main
menu" button to open the menu:
Select the "Search" button to search
for an address, a place or a point of
interest, then plan a route to the
location.
Select the "Current trip" button to
delete or edit the planned route.
Select the "My places" button to
create a collection of useful or preferred
addresses. The following items are
always available in "My places": “Home”
and “Recent destinations”.
Select the "Parking" button to
search for car parks.
Select the "Weather" or "Speed
Camera Warning" button to receive
information on the weather or warnings
about speed camera locations.NOTE The "Weather" and "Speed
Camera Warnings" functions are only
active if TomTom Services are activated.
Otherwise, the button will appear
greyed out (and the functions will not
be available).
Select the "Petrol Station" button to
search for petrol stations.
Select the "TomTom Services"
button to view the activation state of
the following services (subscription
needed): “Traffic”, “Speed cameras”,
“Weather”, “Online search”.
Select this button to open the
"Settings" menu.
Select this button to open the
"Help" menu. The "Help"
menu contains information on
theUconnect™system,
for example the map version,
the serial number of the
device and the legal notices.
Select this button to return to
the map display or navigation
view.
Select this button to
activate/deactivate voice
instructions. Select off to no
longer hear voice instructions.
You will still receive
information such as traffic
information and warning
sounds.Tip: you can
deactivate the warning
sounds by selecting
“Settings”, then “Sounds and
warnings”.
Select this button to
increase/decrease the screen
brightness and display the
map in brighter/darker
colours. When driving at night
or in unlit tunnels, watching
the screen is more
comfortable and less
distracting for the driver if the
map uses darker colours.
Tip: the device will
automatically switch between
day and night view depending
on the time of day. To
deactivate this function, select
“Appearance” in the
“Settings” menu and deselect
the option "Switch to night
colours" when it is dark.
248
MULTIMEDIA
Page 251 of 268
Map update
To ensure optimal performance, the
navigation system must be updated
periodically. For this, the Mopar Map
Care service offers a new map update
every three months.
The updates can be downloaded from
the maps.mopar.eu website and
installed directly on theUnconnect™
system. All updates are free of charge
for 3 years from the start of the
warranty on the car.
The navigation system can also be
updated at the Fiat Dealership.
NOTE The dealer may charge for
updating the navigation system.VOICE COMMANDS
NOTE For languages not supported by
the system, voice commands are not
available.
To use the voice commands, press the
button on the steering wheel (”Voice”
button) and say out loud the command
you want to activate.
Global voice commands
The following voice commands can be
given after pressing the
button on
the steering wheel:
Help
Cancel
Repeat
Voice Prompts
Phone voice commands
The following voice commands can be
given after pressing the
button on
the steering wheel:
Call
Dial
Redial
Call back
Recent calls
Outgoing calls
Missed calls
Incoming Calls
PhoneBook
Search
Show SMS
Send an SMS
Show messages
Radio voice commands
The following voice commands can be
given after pressing the
button on
the steering wheel:
Tune to FM "frequency"
Tune to AM "frequency"
Tune to "radio name" FM
Media voice commands
The following voice commands can be
given after pressing the
button on
the steering wheel:
Play the tune...
Play album…
Play artist…
Play genre…
Play playlist…
Play podcast…
Play audiobook…
Select the source
View ..
249
Page 252 of 268
Navigation voice commands
(versions with Uconnect™ 7" HD Nav
LIVE only)
The following voice commands can be
given after pressing the
button on
the steering wheel:
Find "POI"
Navigate to “address”
Go to "city name" centre
Drive towards a town centre
Navigate home
Go via home
Cancel the route
Add current position to “My Places”
Display “My Places”
Navigate through a saved location
Recent Destinations
Navigate passing through a recent
destination
Zoom in
Zoom out
2D view
3D view
Report Speed Camera
Report risk area
MOPAR® CONNECT
(where provided)
These services let you keep your
vehicle under control at all times and
receive assistance in the event of
accident, theft or breakdown.
To have these services, install the
Mopar®ConnectDevice on your
vehicle from the country (list available
on the www.driveuconnect.eu website)
and request activation by following the
instructions received at the email
address given when your vehicle was
handed over to you.
To use the connected services, you
must download theUconnect™ LIVE
App or access the
www.driveuconnect.eu portal.
You can find all the details about the
services in theMopar® Connect sec-
tion of the www.driveuconnect.eu por-
tal.
PRIVACY MODE
Privacy mode lets you disable the “Find
car”, “Notify Area” and “Notify Speed”
services, which allow registered
customers to locate their cars, for a
fixed time.IMPORTANT Vehicle position tracing
remains active for the assistance
services, where provided, in the event
of accident or vehicle theft, but is not
visible to the customer.
PRIVACY MODE activation
procedure
Proceed as follows:
take note of the total odometer
reading;
make sure that the instrument panel
is off;
Send the following text message to
+393424112613: “PRIVACY
PRIVACY ZFA3340000P123456
12532). You can find the chassis
number in the registration document;
before starting the engine, wait
to receive the text message confirming
that Privacy mode has been activated
and indicating when it expires.
When you have received the
confirmation, you can start your trip in
the knowledge that the vehicle will
not be traced until the indicated expiry
time. If it expires while you are still
travelling, Privacy mode will be
extended until you turn off the engine
(instrument panel off).
250
MULTIMEDIA