Page 255 of 553
To Decrease Speed
While ACC is set, the set speed can be decreased by
pushing the SET(-)button.
The driver’s preferred units can be selected through the
instrument panel settings. Refer to “Getting To Know Your
Instrument Panel” for more information. The speed decre-
ment shown is dependant on the chosen speed unit of U.S.
(mph) or Metric (km/h):
U.S. Speed (mph)
• Pushing the SET (-)button once will result in a 1 mph
decrease in set speed. Each subsequent tap of the button
results in a decrease of 1 mph.
• If the button is continually pushed, the set speed will
continue to decrease in 5 mph decrements until the
button is released. The decrease in set speed is reflected
in the instrument cluster display.
Metric Speed (km/h)
• Pushing the SET (-)button once will result in a 1 km/h
decrease in set speed. Each subsequent tap of the button
results in a decrease of 1 km/h. •
If the button is continually pushed, the set speed will
continue to decrease in 10 km/h decrements until the
button is released. The decrease in set speed is reflected
in the instrument cluster display.
NOTE:
• When you override and push the SET (+)button or SET
(-) buttons, the new Set Speed will be the current speed
of the vehicle.
• When you use the SET (-)button to decelerate, if the
engine’s braking power does not slow the vehicle suffi-
ciently to reach the set speed, the brake system will
automatically slow the vehicle.
• The ACC system applies the brake down to a full stop
when following a target vehicle. If an ACC host vehicle
follows a target vehicle to a standstill, the host vehicle
will release the vehicle brakes two seconds after coming
to a full stop.
• The ACC system maintains set speed when driving up
hill and down hill. However, a slight speed change on
moderate hills is normal. In addition, downshifting may
occur while climbing uphill or descending downhill.
This is normal operation and necessary to maintain set
6
STARTING AND OPERATING 253
Page 304 of 553
WARNING!(Continued)
SiriusXM Guardian features and applications in this
vehicle. Only use Uconnect features and SiriusXM
Guardian services when it is safe to do so. Failure to do
so may result in an accident involving serious injury or
death.
NOTE:
• Your vehicle may be transmitting data as authorized by
the subscriber.
• The SOS and ASSIST buttons will only function if you
are connected to an operable LTE (voice/data) or 4G
(data) network. Other Uconnect services will only be
operable if your SiriusXM Guardian service is active and
you are connected to an operable LTE (voice/data) or 4G
(data) network.
ASSIST Call
The ASSIST Button is used to automatically connect you to
any one of the following support centers:
• Roadside Assistance – If you get a flat tire, or need a tow,
just push the ASSIST button and you’ll be connected to someone who can help. Roadside Assistance will know
what vehicle you’re driving and its location. Additional
fees may apply for roadside Assistance.
• SiriusXM Guardian Customer Care – In-vehicle support
for SiriusXM Guardian.
• Vehicle Customer Care – Total support for all other
vehicle issues.
SOS Call
1. Push the SOS Call button on the Rearview Mirror.
NOTE: In case the SOS Call button is pushed in error, there
will be a ten second delay before the SOS Call system
initiates a call to a SOS operator. To cancel the SOS Call
connection, push the SOS call button on the Rearview
Mirror or press the cancellation button on the Device
Screen. Termination of the SOS Call will turn off the green
LED light on the Rearview Mirror.
2. The LED light located between the ASSIST and SOS buttons on the Rearview Mirror will turn green once a
connection to a SOS operator has been made.
302 IN CASE OF EMERGENCY
Page 306 of 553
WARNING!
•If anyone in the vehicle could be in danger (e.g., fire
or smoke is visible, dangerous road conditions or
location), do not wait for voice contact from an
Emergency Services Agent. All occupants should exit
the vehicle immediately and move to a safe location.
• Never place anything on or near the vehicle’s oper-
able network and GPS antennas. You could prevent
operable network and GPS signal reception, which
can prevent your vehicle from placing an emergency
call. An operable network and GPS signal reception
is required for the SOS Call system to function
properly.
• The SOS Call system is embedded into the vehicle’s
electrical system. Do not add aftermarket electrical
equipment to the vehicle’s electrical system. This
may prevent your vehicle from sending a signal to
initiate an emergency call. To avoid interference that
can cause the SOS Call system to fail, never add
aftermarket equipment (e.g., two-way mobile radio,
CB radio, data recorder, etc.) to your vehicle’s electri-
cal system or modify the antennas on your vehicle. IF
YOUR VEHICLE LOSES BATTERY POWER FOR
(Continued)
WARNING! (Continued)
ANY REASON (INCLUDING DURING OR AFTER
AN ACCIDENT), THE UCONNECT FEATURES,
APPS AND SERVICES, AMONG OTHERS, WILL
NOT OPERATE.
• Modifications to any part of the SOS Call system
could cause the air bag system to fail when you need
it. You could be injured if the air bag system is not
there to help protect you.
SOS Call System Limitations
Vehicles sold in Mexico DO NOThave SOS Call system
capabilities.
SOS or other emergency line operators in Mexico may not
answer or respond to SOS system calls.
If the SOS Call system detects a malfunction, any of the
following may occur at the time the malfunction is de-
tected, and at the beginning of each ignition cycle:
• The Rearview Mirror light located between the ASSIST
and SOS buttons will continuously be illuminated red.
304 IN CASE OF EMERGENCY
Page 441 of 553
NOTE:
•FCA US LLC or your dealer may contact you directly
regarding software updates.
• To help further improve vehicle security and minimize
the potential risk of a security breach, vehicle owners
should:
• Routinely check www.driveuconnect.com/support/
software-update.html (U.S. Residents) or www.driveu-
connect.ca (Canadian Residents) to learn about avail-
able Uconnect software updates.
• Only connect and use trusted media devices (e.g.
personal mobile phones, USBs, CDs).
Privacy of any wireless and wired communications cannot
be assured. Third parties may unlawfully intercept infor-
mation and private communications without your consent.
For further information, refer to “Data Collection & Pri-
vacy” in your Uconnect Owner ’s Manual Supplement or
“Onboard Diagnostic System (OBD II) Cybersecurity” in
“Getting To Know Your Instrument Panel”.UCONNECT SETTINGS
The Uconnect system uses a combination of buttons on the
touchscreen and buttons on the faceplate located on the
center of the instrument panel that allows you to access
and change the customer programmable features.
CAUTION!
Do NOT attach any object to the touchscreen, doing so
can result in damage to the touchscreen.
10
MULTIMEDIA 439
Page 442 of 553
Uconnect 4 Buttons On Touchscreen And Buttons OnFaceplate
1 — Uconnect Buttons On The Touchscreen
2 — Uconnect Buttons On The Faceplate
Uconnect 4C/4C NAV Buttons On Touchscreen AndButtons On Faceplate
1 — Uconnect Buttons On The Touchscreen
2 — Uconnect Buttons On The Faceplate
440 MULTIMEDIA
Page 452 of 553
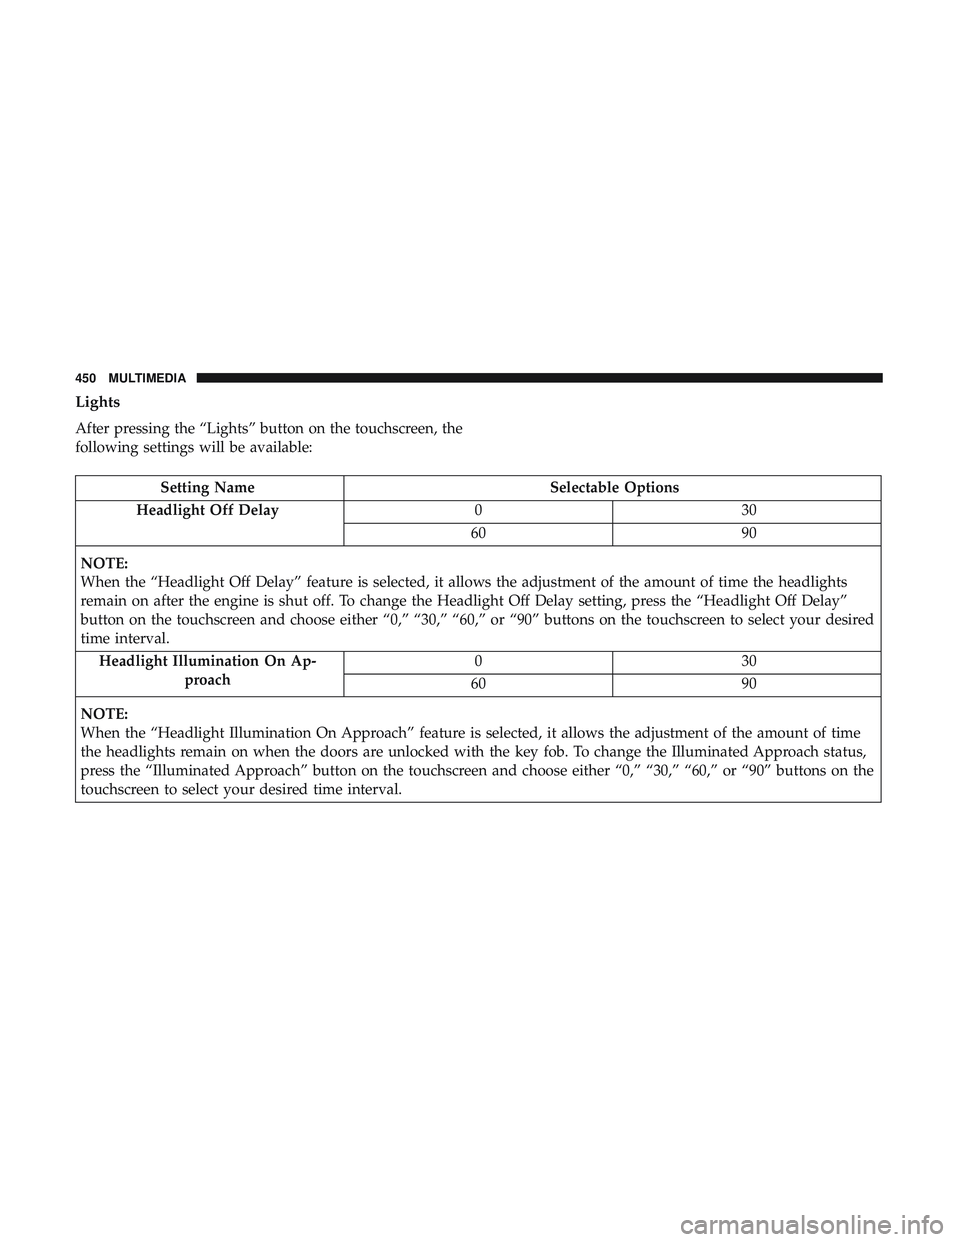
Lights
After pressing the “Lights” button on the touchscreen, the
following settings will be available:
Setting NameSelectable Options
Headlight Off Delay 030
60 90
NOTE:
When the “Headlight Off Delay” feature is selected, it allows the adjustment of the amount of time the headlights
remain on after the engine is shut off. To change the Headlight Off Delay setting, press the “Headlight Off Delay”
button on the touchscreen and choose either “0,” “30,” “60,” or “90” buttons on the touchscreen to select your desired
time interval. Headlight Illumination On Ap- proach 03
0
60 90
NOTE:
When the “Headlight Illumination On Approach” feature is selected, it allows the adjustment of the amount of time
the headlights remain on when the doors are unlocked with the key fob. To change the Illuminated Approach status,
press the “Illuminated Approach” button on the touchscreen and choose either “0,” “30,” “60,” or “90” buttons on the
touchscreen to select your desired time interval.
450 MULTIMEDIA
Page 455 of 553
Setting NameSelectable Options
Passive Entry — If Equipped On
Off
NOTE:
This feature allows you to lock and unlock the vehicle’s door(s) without having to push the key fob lock or unlock
buttons. It automatically unlocks the doors when the outside door handle is grabbed. Personal Settings Linked To Key Fob — IfEquipped On
Off
NOTE:
•This feature provides automatic recall of all settings stored to a memory location (driver ’s seat, exterior mirrors,
steering column position and radio station pre-sets) to enhance driver mobility when entering and exiting the ve-
hicle.
•The seat returns to the memorized seat location (if Personal Settings Linked to Key Fob is set to on) when the key
fob is used to unlock the door.10
MULTIMEDIA 453
Page 459 of 553

Compass CalibrationYe s
NOTE:
Press “Compass Calibration” on the touchscreen to enter calibration. To start calibration of the compass, press the
“Yes” button on the touchscreen and complete one or more 360-degree turns (in an area free from large metal or me-
tallic objects). A message will appear on the touchscreen when the compass has been successfully calibrated.
Keep magnetic materials away from the rear view mirror, such as Mobile Phones, Laptops and Radar Detectors. This
is where the compass module is located, and it can cause interference with the compass sensor, and it may give false
readings.
Audio
After pressing the “Audio” button on the touchscreen, the
following settings will be available:
Setting Name Selectable Options
Equalizer +-
NOTE:
When in the “Equalizer” display you may adjust the Bass, Mid and Treble settings. Adjust the settings with the “+”
and “–” buttons on the touchscreen or by selecting any point on the scale between the “+” and “–” buttons on the
touchscreen.
10
MULTIMEDIA 457