Page 495 of 553

When G-Force is selected, the following features will be
available:
•Vehicle Speed:
Measures the current speed of the vehicle in either mph
or km/h, starting at zero with no maximum value.
• Front G-Force:
Measures the force on the front of the vehicle.
• Right G-Force:
Measures the force on the right side of the vehicle.
• Left G-Forces:
Measures the force on the left of the vehicle. •
Rear G-Forces:
Measures the force on the rear of the vehicle.
NOTE: Front, Right, Left, and Rear G-Froces are all peak
values. These readings can be reset by clearing peak
G-Force on the instrument cluster
• Steering Wheel Angle
Steering Wheel Angle utilizes the steering angle sensor to
measure the degree of the steering wheel relative to zero.
The zero degree measurement indicates a steering wheel
straight ahead position. When the steering angle value is
negative, this indicates a turn to the left, and when the
steering angle value is positive, a turn to the right.
The friction circle display shows instantaneous G-Force as
a highlight and previous G-Force as dots within the circle.
The system records previous G-Force for three minutes. If
there are multiple samples at a given point, the color of the
dot will darken from blue to red. Vectors more frequent
will show in red; infrequent vectors will show in blue.
10
MULTIMEDIA 493
Page 507 of 553

The left-hand control is a rocker-type switch with a push-
button in the center. The function of the left-hand control is
different depending on which mode you are in.
The following describes the left-hand control operation in
each mode.
Radio Operation
Pushing the top of the switch will “Seek” up for the next
listenable station and pushing the bottom of the switch will
“Seek” down for the next listenable station.
The button located in the center of the left-hand control
will tune to the next preset station that you have pro-
grammed in the radio preset button.
Media Mode
Pushing the top of the switch once goes to the next track on
the selected media (AUX/USB/Bluetooth). Pushing the
bottom of the switch once goes to the beginning of the
current track, or to the beginning of the previous track if it
is within eight seconds after the current track begins to
play.
AUX/USB/MP3 CONTROL
This feature allows an external USB device to be plugged
into the USB port.
For further information, refer to the Uconnect Owner ’s
Manual Supplement.
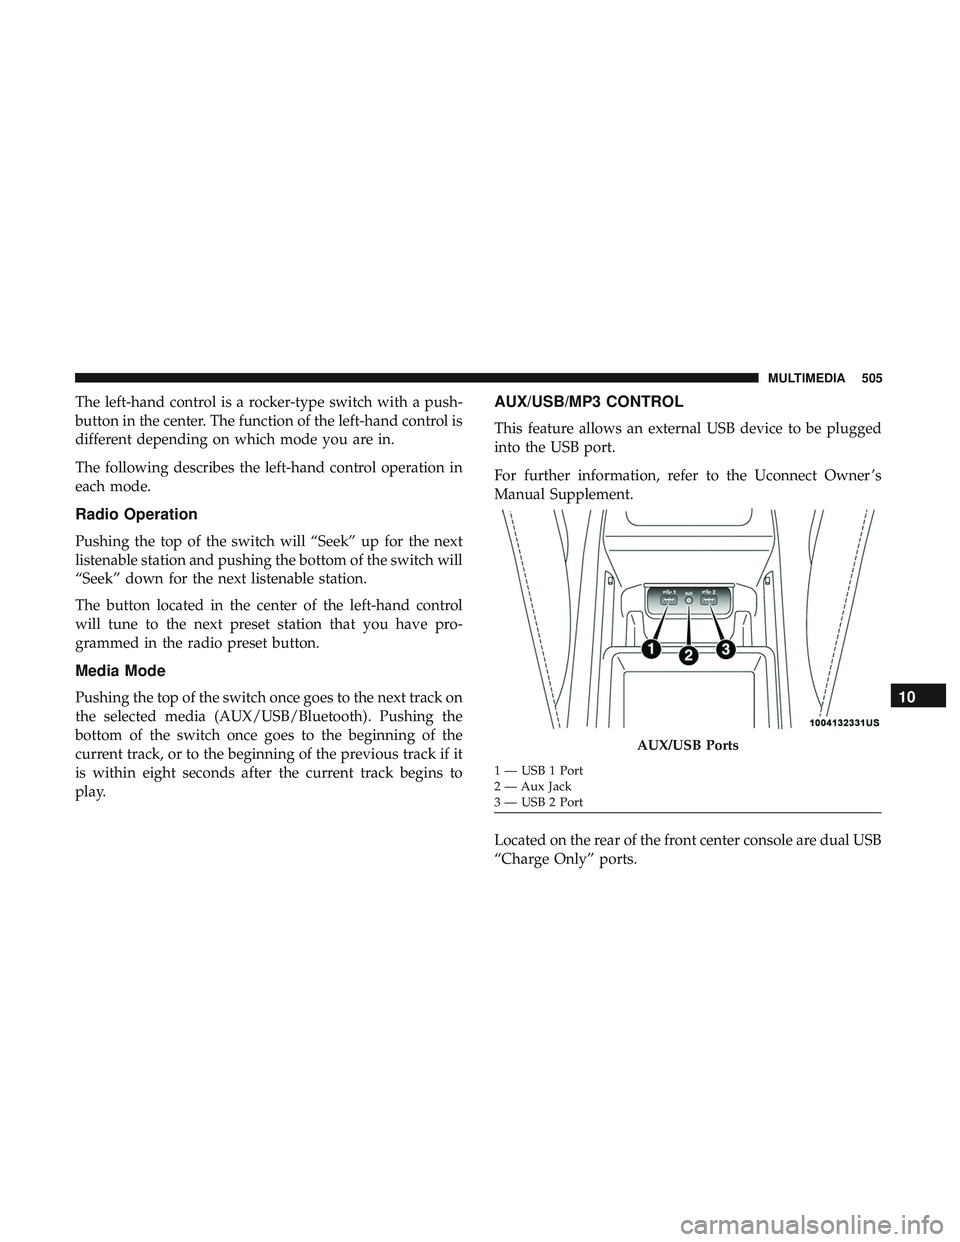
Located on the rear of the front center console are dual USB
“Charge Only” ports.
AUX/USB Ports
1 — USB 1 Port
2 — Aux Jack
3 — USB 2 Port
10
MULTIMEDIA 505
Page 514 of 553
Media
Uconnect offers connections via USB, Bluetooth and auxil-
iary ports (If Equipped). Voice operation is only available
for connected USB and AUX devices.
Push the VR button
. After the beep, say one of the
following commands and follow the prompts to switch
your media source or choose an artist.
• “Change source to Bluetooth”
• “Change source to AUX”
• “Change source to USB”
• “Play artist Beethoven”; “ Play albumGreatest Hits”; “
Play song Moonlight Sonata”; “ Play genreClassical”
TIP: Press the Browse button on the touchscreen to see all
of the music on your USB device. Your Voice Command
must match exactlyhow the artist, album, song and genre
information is displayed.
Uconnect 4 Media
512 MULTIMEDIA
Page 517 of 553

Voice Text Reply
Uconnect announcesincomingtext messages. Push the
Phone button
and say “ Listen.” (Must have compat-
ible mobile phone paired to Uconnect system.)
1. Once an incoming text message is read to you, push the Phone button
. After the beep, say: “ Reply.”
2. Listen to the Uconnect prompts. After the beep, repeat
one of the pre-defined messages and follow the system
prompts.
PRE-DEFINED VOICE TEXT REPLY RESPONSES
Yes. Stuck in traffic. See you later.No. Start without
me. I’ll be late.
Okay. Where are you? I will be minuteslate.
Call me. Are you there
yet?
I’ll call you later. I need direc- tions.See you in
of minutes.
I’m on my way. Can’t talk right
now.
I’m lost. Thanks.TIP:
Your mobile phone must have the full implementation
of the Message Access Profile (MAP) to take advantage of
this feature. For details about MAP, visit
UconnectPhone.com.
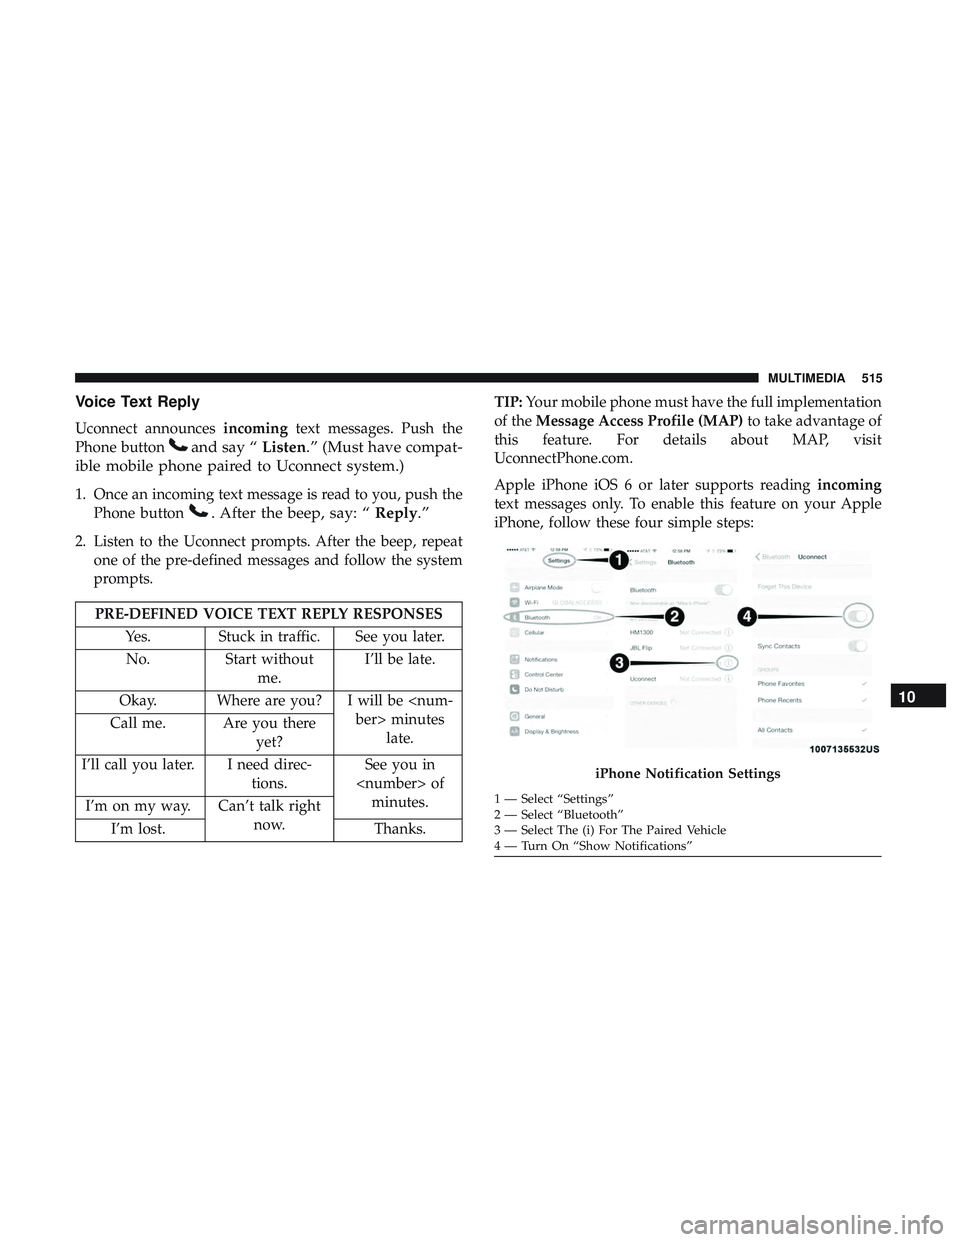
Apple iPhone iOS 6 or later supports reading incoming
text messages only. To enable this feature on your Apple
iPhone, follow these four simple steps:
iPhone Notification Settings
1 — Select “Settings”
2 — Select “Bluetooth”
3 — Select The (i) For The Paired Vehicle
4 — Turn On “Show Notifications”
10
MULTIMEDIA 515
Page 524 of 553

Do Not Disturb
With Do Not Disturb, you can disable notifications from
incoming calls and texts, allowing you to keep your eyes
on the road and hands on the wheel. For your convenience,
there is a counter display to keep track of your missed calls
and text messages while you were using Do Not Disturb.
Do Not Disturb can automatically reply with a text mes-
sage, a call or both, when declining an incoming call and
send it to voicemail.
Automatic reply messages can be:
•“I am driving right now, I will get back to you shortly.”
• Create a custom auto reply message up to 160 characters.
NOTE: Only the first 25 characters can be seen on the
touchscreen while typing a custom message. While in Do Not Disturb, Conference Call can be selected
so you can still place a second call without being inter-
rupted by incoming calls.
NOTE:
•
Reply with text message is not compatible with iPhones.
• Auto reply with text message is only available on
phones that support Bluetooth MAP.
Android Auto — If Equipped
NOTE: Feature availability depends on your carrier and
mobile phone manufacturer. Some Android Auto features
may or may not be available in every region and/or
language.
Android Auto allows you to use your voice to interact with
Android’s best-in-class speech technology through your
vehicle’s voice recognition system, and use your smart-
phone’s data plan to project your Android powered smart-
phone and a number of its apps onto your Uconnect
touchscreen. Connect your Android 5.0 (Lollipop), or
higher, to one of the media USB ports, using the factory-
provided USB cable, and press the new Android Auto icon
that replaces your “Phone” icon on the main menu bar to
begin Android Auto. Push and hold the VR button on the
steering wheel, or press and hold the “Microphone” icon
522 MULTIMEDIA
Page:
< prev 1-8 9-16 17-24