Page 321 of 553
CavityCartridge Fuse Mini-FuseDescription
12 –20 Amp Yellow Dual USB Center Console
Rear/Cigar Lighter IP – If
Equipped
15 40 Amp Green –HVAC Blower
16 20 Amp Blue –Left Spot Lamp – Police
17 20 Amp Blue –Right Spot Lamp – Police
18 30 Amp Pink –Mod Network Interface –
Police
19 ––Fuse – Spare
20 ––Fuse – Spare
21 30 Amp Pink –Fuel Pump (Non 6.2L SRT
Demon)
22 –5 Amp Tan Cyber Gateway Mod
23 –10 Amp Red Fuel Door/Diagnostic Port
24 –10 Amp Red Integrated Center Stack
25 –10 Amp Red Tire Pressure Monitor
26 –15 Amp Blue Cygnus Transmission
Module (Charger/300) /
Electronic Shift Module
(Charger/300)
27 –25 Amp Clear Amplifier – If Equipped
7
IN CASE OF EMERGENCY 319
Page 322 of 553
CavityCartridge Fuse Mini-FuseDescription
31 –25 Amp Breaker Power Seats – If Equipped
32 –15 Amp Blue HVAC Module/Cluster
33 –15 Amp Blue Ignition Switch/RF Hub
Module/Steering Column
Lock (300) – If Equipped
34 –10 Amp Red Steering Column Module/
Clock (300)
35 –5 Amp Tan Battery Sensor
36 –15 Amp Blue Electronic Exhaust Valve –
If Equipped
37 –20 Amp Yellow Radio
38 –20 Amp Yellow Power Outlet Inside Arm
Rest/Console Media Hub
40 30 Amp Pink –Fuel Pump (6.2L SRT De-
mon – If Equipped)
41 30 Amp Pink –Fuel Pump (6.2L SRT De-
mon – If Equipped)
42 30 Amp Pink –Rear Defrost
320 IN CASE OF EMERGENCY
Page 323 of 553
CavityCartridge Fuse Mini-FuseDescription
43 –20 Amp Yellow Comfort Seat And Steering
Wheel Module (Heated
Steering Wheel/RR
Heated Seats)
44 –10 Amp Red Park Assist / Blind Spot /
Rear View Camera
45 –15 Amp Blue Cluster / Rearview Mirror
/ Compass (Charger/300)
/ Humidity Sensor / For-
ward Facing Camera (Lane
Departure) / Cyber Gate-
way
46 ––Fuse – Spare
47 –10 Amp Red Adaptive Front Lighting /
Day Time Running Lamps
– If Equipped
48 –20 Amp Yellow Active Suspension – (6.4L
/ 6.2L)
49 ––Fuse – Spare
50 ––Fuse – Spare
51 –20 Amp Yellow Front Heated / Vented
Seats – If Equipped
7
IN CASE OF EMERGENCY 321
Page 461 of 553
Setting NameSelectable Options
AUX Volume Offset — If Equipped +–
NOTE:
The “AUX Volume Offset” feature provides the ability to tune the audio level for portable devices connected through
the AUX input. To make your selection, press the “AUX Volume Offset” button on the touchscreen, select “+” and
“–”. Auto Play — IfEquipped On
Off
NOTE: The Auto Play feature allows a media device to begin playing when the media device is plugged in. To make
your selection, press the On or Off buttons to activate or deactivate Auto Play.
Phone/Bluetooth
After pressing the “Phone/Bluetooth” button on the touch-
screen, the following settings will be available:
Setting Name Selectable Options
Do Not Disturb List of Settings
NOTE: Press “Do Not Disturb” to access the available settings. The following settings are: Auto Reply (both, text,
call), Auto Reply Message (custom, default) and Custom Auto Reply Message (create message).
10
MULTIMEDIA 459
Page 462 of 553
Setting NameSelectable Options
Paired Phones/Devices List of Paired Phones/Devices
NOTE:
This feature shows which phones are paired to the Phone/Bluetooth system. For further information, refer to the
Uconnect Owner ’s Manual Supplement.
SiriusXM Setup — If Equipped
After pressing the “SiriusXM Setup” button on the touch-
screen, the following settings will be available:
Setting Name Selectable Options
Tune Start OnOff
Channel Skip Name of Channel
NOTE: SiriusXM can be programmed to skip channels. To make your selection, press the “Channel Skip” button on
the touchscreen, select the channels you would like to skip.
Subscription Information Subscription Info
460 MULTIMEDIA
Page 464 of 553

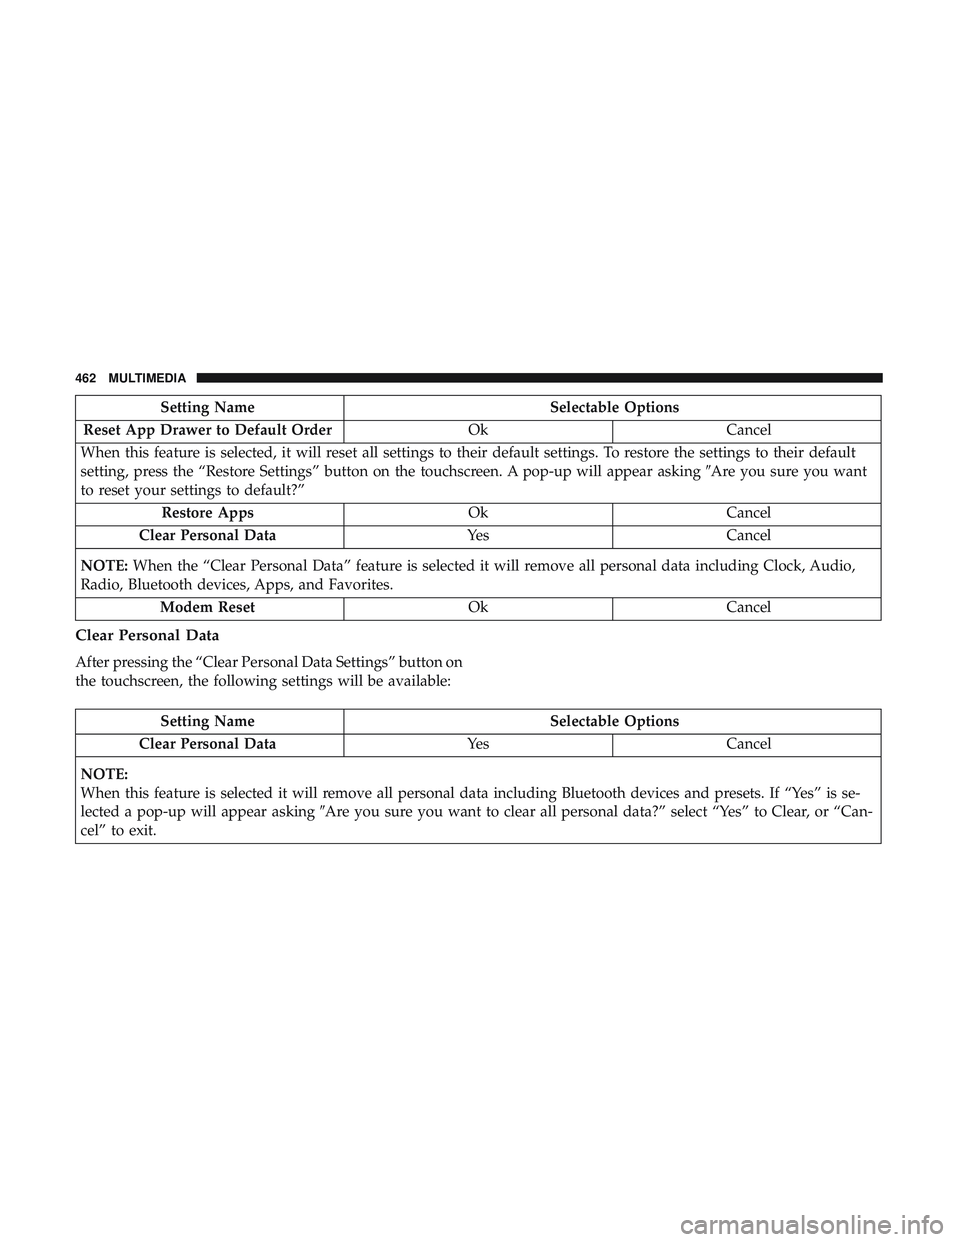
Setting NameSelectable Options
Reset App Drawer to Default Order OkCancel
When this feature is selected, it will reset all settings to their default settings. To restore the settings to their default
setting, press the “Restore Settings” button on the touchscreen. A pop-up will appear asking �Are you sure you want
to reset your settings to default?”
Restore Apps OkCancel
Clear Personal Data YesCancel
NOTE: When the “Clear Personal Data” feature is selected it will remove all personal data including Clock, Audio,
Radio, Bluetooth devices, Apps, and Favorites.
Modem Reset OkCancel
Clear Personal Data
After pressing the “Clear Personal Data Settings” button on
the touchscreen, the following settings will be available:
Setting Name Selectable Options
Clear Personal Data YesCancel
NOTE:
When this feature is selected it will remove all personal data including Bluetooth devices and presets. If “Yes” is se-
lected a pop-up will appear asking �Are you sure you want to clear all personal data?” select “Yes” to Clear, or “Can-
cel” to exit.
462 MULTIMEDIA
Page 484 of 553
Setting NameSelectable Options
AUX Volume Offset — If Equipped -3
+3
NOTE:
The “AUX Volume Offset” feature provides the ability to tune the audio level for portable devices connected through
the AUX input. To make your selection, press the AUX Volume Match button on the touchscreen, choose a level from
–3 to +3. Auto Play On Off
NOTE:
The Auto Play feature allows a media device to begin playing when the media device is plugged in. To make your
selection, press the On or Off buttons to activate or deactivate Auto Play.
Phone/Bluetooth Settings
After pressing the “Phone/Bluetooth Settings” button on
the touchscreen, the following settings will be available:
Setting Name Selectable Options
Do Not Disturb List of Settings
NOTE:
Press “Do Not Disturb” to access the available settings. The following settings are: Auto Reply (both, text, call), Auto
Reply Message (custom, default) and Custom Auto Reply Message (create message).
482 MULTIMEDIA
Page 487 of 553

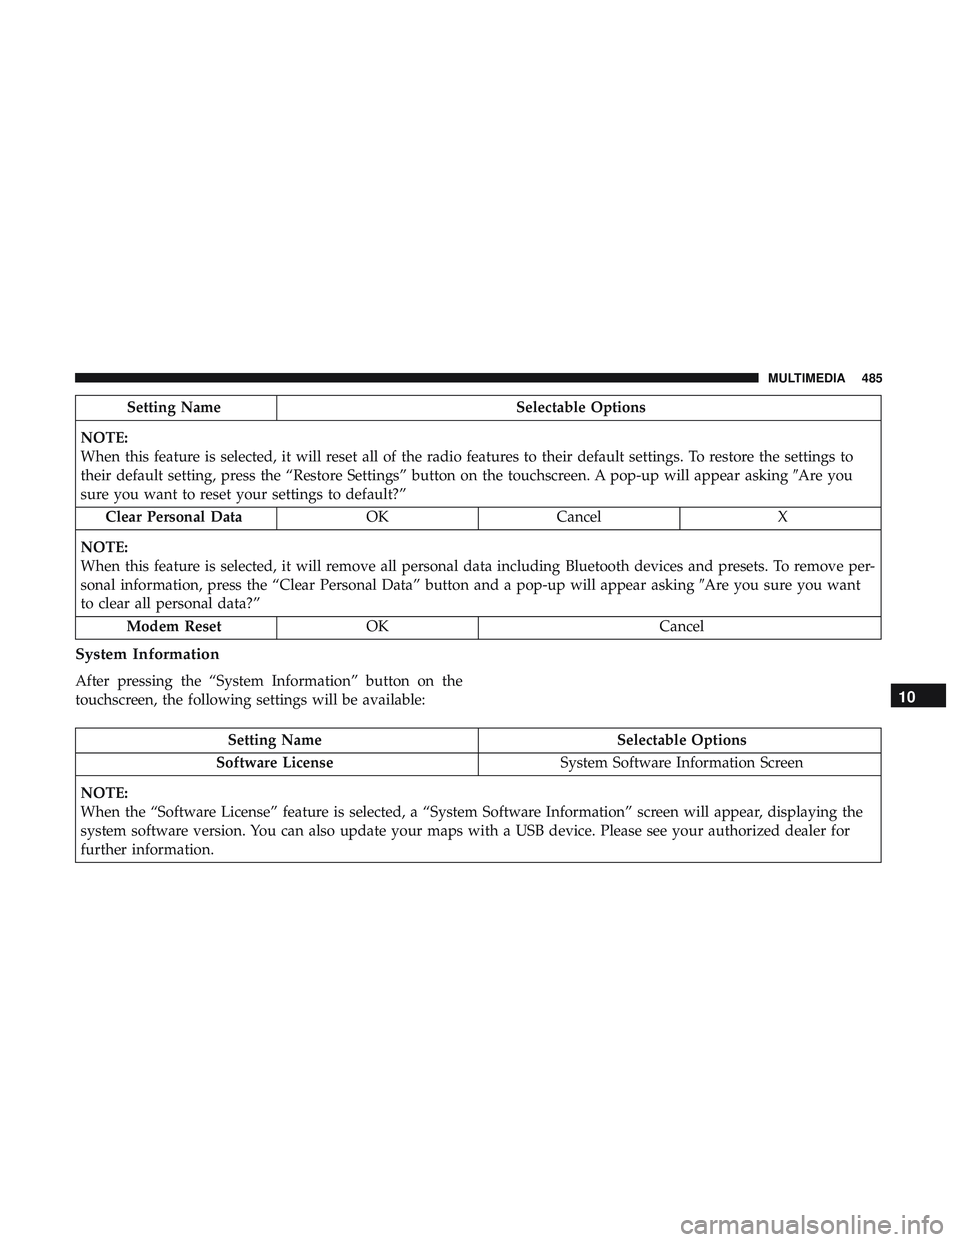
Setting NameSelectable Options
NOTE:
When this feature is selected, it will reset all of the radio features to their default settings. To restore the settings to
their default setting, press the “Restore Settings” button on the touchscreen. A pop-up will appear asking �Are you
sure you want to reset your settings to default?”
Clear Personal Data OKCancel X
NOTE:
When this feature is selected, it will remove all personal data including Bluetooth devices and presets. To remove per-
sonal information, press the “Clear Personal Data” button and a pop-up will appear asking �Are you sure you want
to clear all personal data?”
Modem Reset OK Cancel
System Information
After pressing the “System Information” button on the
touchscreen, the following settings will be available:
Setting Name Selectable Options
Software License System Software Information Screen
NOTE:
When the “Software License” feature is selected, a “System Software Information” screen will appear, displaying the
system software version. You can also update your maps with a USB device. Please see your authorized dealer for
further information.
10
MULTIMEDIA 485