Page 403 of 516

MULTIMEDIA
CONTENTS
�UCONNECT SYSTEMS ...................403
� DRAG & DROP MENU BAR ................403
� CYBERSECURITY ...................... .404
� UCONNECT SETTINGS ...................405
▫ Uconnect 4 Settings .....................406
▫ Customer Programmable Features — Uconnect
4C/4C NAV Settings ....................427
▫ Performance Pages — If Equipped ...........448
▫ Performance Control — If Equipped .........458
� STEERING WHEEL AUDIO CONTROLS — IF
EQUIPPED ........................... .468
▫ Radio Operation ....................... .468
▫ Media Mode ......................... .468
� IPOD/USB/MP3 CONTROL — IF EQUIPPED . . .469 �
RADIO OPERATION AND MOBILE PHONES . . .469
▫ Regulatory And Safety Information ..........469
� UCONNECT VOICE RECOGNITION QUICK
TIPS ................................ .471
▫ Introducing Uconnect ....................471
▫ Get Started .......................... .472
▫ Basic Voice Commands ...................473
▫ Radio .............................. .473
▫ Media .............................. .474
▫ Phone .............................. .476
▫ Voice Text Reply ...................... .477
▫ Climate ............................. .478
▫ Navigation (4C NAV) ....................479
▫ SiriusXM Guardian (4C/4C NAV)— If
Equipped ........................... .480
10
Page 416 of 516

Setting NameSelectable Options
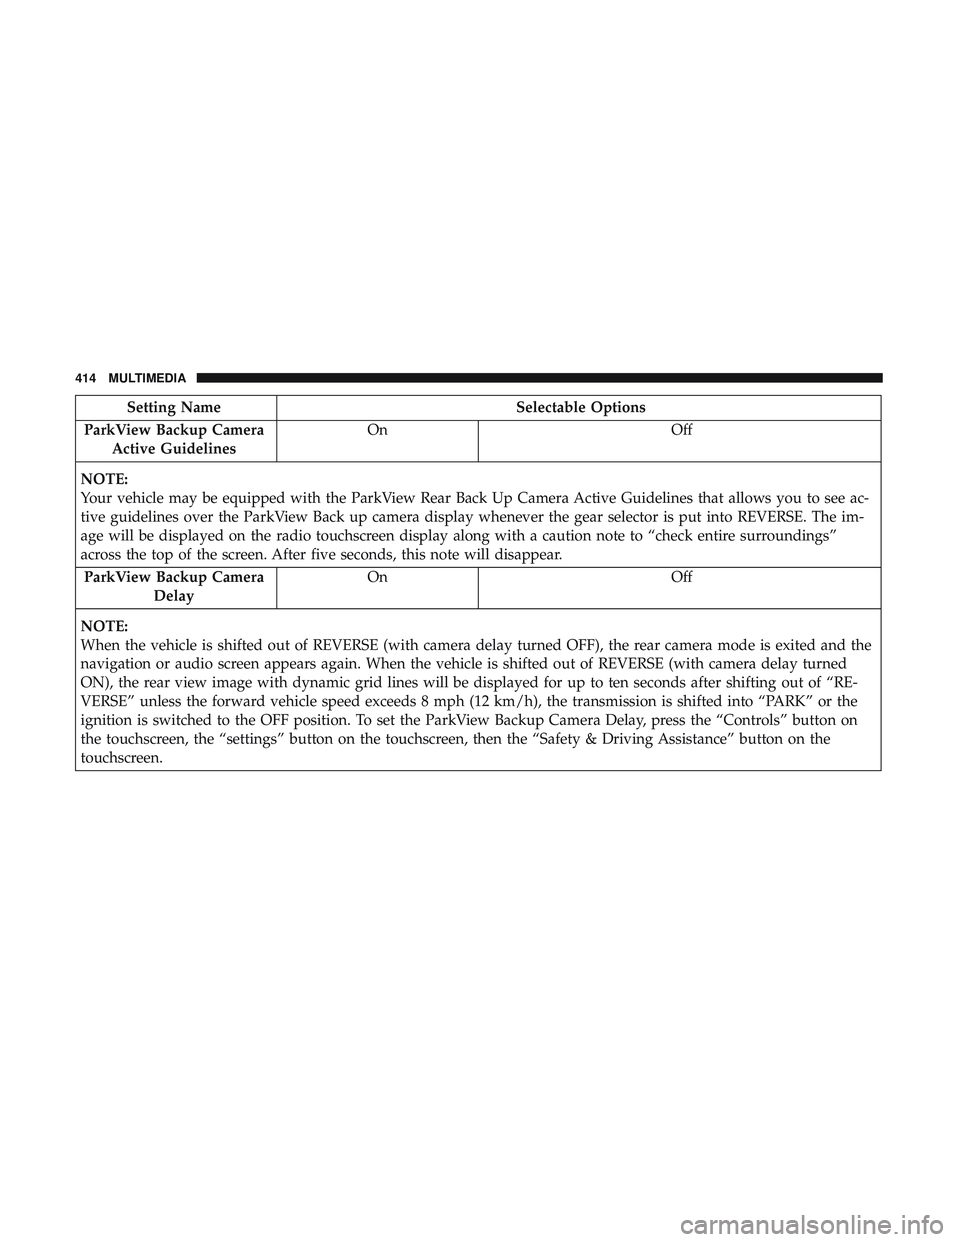
ParkView Backup Camera Active Guidelines On
Off
NOTE:
Your vehicle may be equipped with the ParkView Rear Back Up Camera Active Guidelines that allows you to see ac-
tive guidelines over the ParkView Back up camera display whenever the gear selector is put into REVERSE. The im-
age will be displayed on the radio touchscreen display along with a caution note to “check entire surroundings”
across the top of the screen. After five seconds, this note will disappear. ParkView Backup Camera Delay On
Off
NOTE:
When the vehicle is shifted out of REVERSE (with camera delay turned OFF), the rear camera mode is exited and the
navigation or audio screen appears again. When the vehicle is shifted out of REVERSE (with camera delay turned
ON), the rear view image with dynamic grid lines will be displayed for up to ten seconds after shifting out of “RE-
VERSE” unless the forward vehicle speed exceeds 8 mph (12 km/h), the transmission is shifted into “PARK” or the
ignition is switched to the OFF position. To set the ParkView Backup Camera Delay, press the “Controls” button on
the touchscreen, the “settings” button on the touchscreen, then the “Safety & Driving Assistance” button on the
touchscreen.
414 MULTIMEDIA
Page 424 of 516
Audio
After pressing the “Audio” button on the touchscreen, the
following settings will be available:
Setting NameSelectable Options
Equalizer +-
NOTE:
When in the “Equalizer” display you may adjust the Bass, Mid and Treble settings. Adjust the settings with the “+”
and “–” buttons on the touchscreen or by selecting any point on the scale between the “+” and “–” buttons on the
touchscreen. Balance/Fade Arrow Buttons “C” icon
NOTE:
The “Balance/Fade” feature allows you to adjust the Balance and Fade settings. Press and drag the speaker icon or
use the arrows to adjust, tap the “C” icon to readjust to the center. Speed Adjusted Volume Off
12 3
NOTE:
The “Speed Adjusted Volume” feature increases or decreases volume relative to vehicle speed. To change the Speed
Adjusted Volume press the “Speed Adjusted Volume” button on the touchscreen and select from “Off,” “1,” “2” or
“3” buttons on the touchscreen.
422 MULTIMEDIA
Page 425 of 516
Setting NameSelectable Options
Surround Sound — If Equipped On
Off
NOTE:
The “Surround Sound” feature provides simulated surround sound mode. To make your selection, press the “Sur-
round Sound” button on the touchscreen, and select “On” or “Off.” AUX Volume Offset — If Equipped +–
NOTE:
The “AUX Volume Offset” feature provides the ability to tune the audio level for portable devices connected through the
AUX input. To make your selection, press the “AUX Volume Offset” button on the touchscreen, select “+” and “–”.
Loudness — If Equipped On
Off
NOTE:
The “Loudness” feature improves sound quality at lower volumes. To make your selection, press the “Loudness” but-
ton on the touchscreen, select “On” or “Off”.
10
MULTIMEDIA 423
Page 427 of 516

Setting NameSelectable Options
Subscription Information Subscription Info
NOTE:
New vehicle purchasers or lessees will receive a free limited time subscription to SiriusXM Satellite Radio with your
radio. Following the expiration of the free services, it will be necessary to access the information on the Subscription
Information screen to re-subscribe.
1. Press the “Subscription Info” button on the touchscreen to access the Subscription Information screen.
2. Write down the SIRIUS ID numbers for your receiver. To reactivate your service, either call the number listed on the screen or visit the provider online.
SiriusXM Travel Link is a separate subscription.
Restore Settings
After pressing the “Restore Settings” button on the touch-
screen, the following settings will be available:
Setting Name Selectable Options
Restore Settings YesCancel
NOTE:
When the “Restore Settings” feature is selected it will reset the Display, Clock, Audio, and Radio Settings to their de-
fault settings. If “Yes” is selected, a pop-up will appear asking �Are you sure you want to reset your settings to de-
fault?” Select “Yes” to restore, or “Cancel” to exit.
10
MULTIMEDIA 425
Page 429 of 516

Customer Programmable Features — Uconnect
4C/4C NAV Settings
Press the “Apps” button (If Equipped), and then
press the “Settings” button on the touchscreen to dis-
play the menu setting screen. In this mode, the
Uconnect system allows you to access programmable
features that may be equipped such as Language, Dis-
play, Units, Voice, Clock, Safety & Driving Assistance,
Lights, Doors & Locks, Auto-On Comfort, Engine Off
Options, Audio, Phone, SiriusXM Setup, Restore Set-
tings, Clear Personal Data and System Information.
NOTE: Depending on the vehicles options, feature settings
may vary. When making a selection, press the button on the touch-
screen to enter the desired mode. Once in the desired
mode, press and release the preferred setting “option” until
a check-mark appears next to the setting, showing that
setting has been selected. Once the setting is complete,
either press the back arrow button on the touchscreen to
return to the previous menu, or press the “X” button on the
touchscreen to close out of the settings screen. Pressing the
up or down arrow button on the right side of the screen
will allow you to toggle up or down through the available
settings.
10
MULTIMEDIA 427
Page 444 of 516

Setting NameSelectable Options
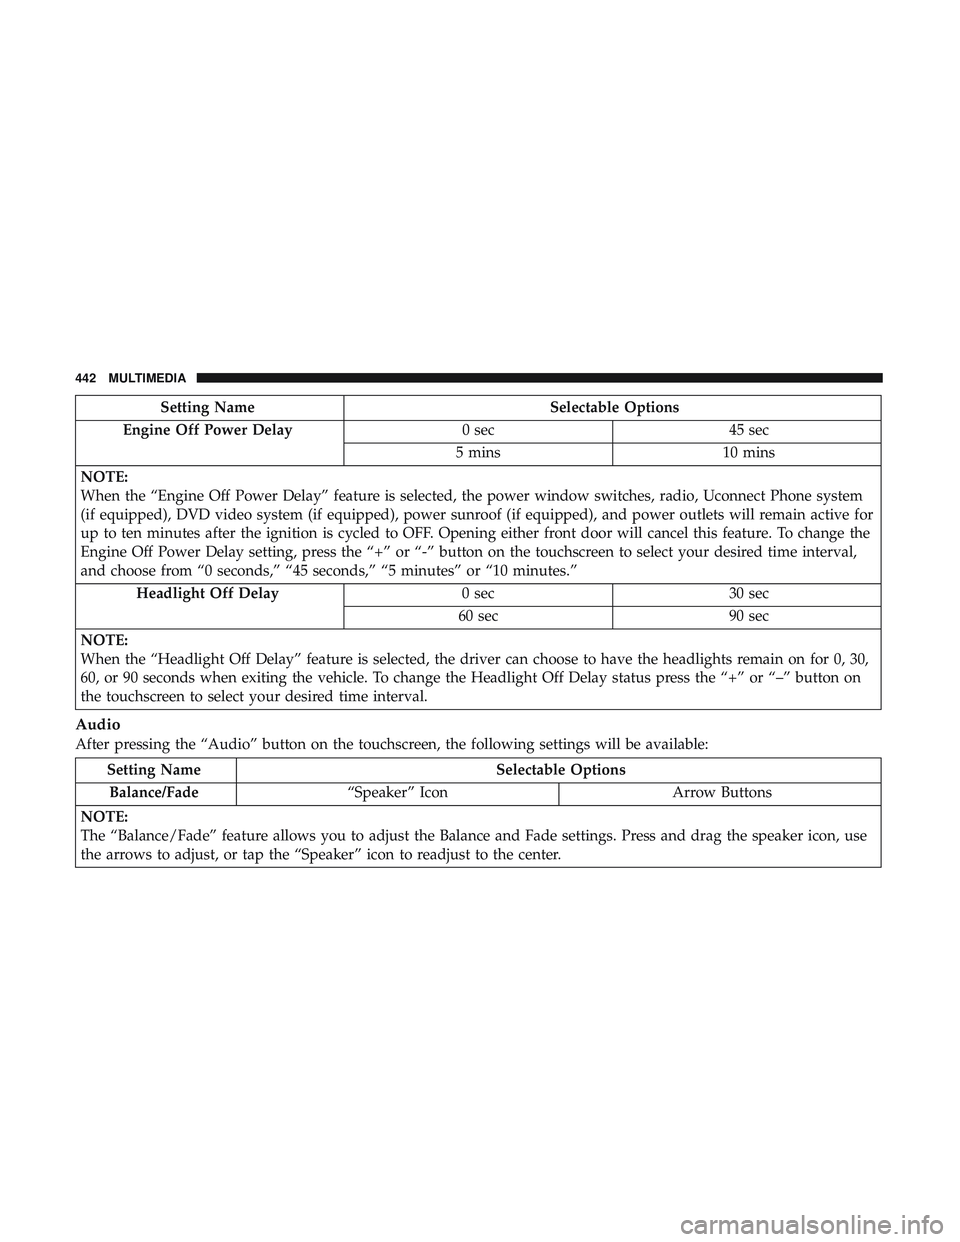
Engine Off Power Delay 0 sec45 sec
5 mins 10 mins
NOTE:
When the “Engine Off Power Delay” feature is selected, the power window switches, radio, Uconnect Phone system
(if equipped), DVD video system (if equipped), power sunroof (if equipped), and power outlets will remain active for
up to ten minutes after the ignition is cycled to OFF. Opening either front door will cancel this feature. To change the
Engine Off Power Delay setting, press the “+” or “-” button on the touchscreen to select your desired time interval,
and choose from “0 seconds,” “45 seconds,” “5 minutes” or “10 minutes.” Headlight Off Delay 0 sec30 sec
60 sec 90 sec
NOTE:
When the “Headlight Off Delay” feature is selected, the driver can choose to have the headlights remain on for 0, 30,
60, or 90 seconds when exiting the vehicle. To change the Headlight Off Delay status press the “+” or “–” button on
the touchscreen to select your desired time interval.
Audio
After pressing the “Audio” button on the touchscreen, the following settings will be available:
Setting Name Selectable Options
Balance/Fade “Speaker” Icon Arrow Buttons
NOTE:
The “Balance/Fade” feature allows you to adjust the Balance and Fade settings. Press and drag the speaker icon, use
the arrows to adjust, or tap the “Speaker” icon to readjust to the center.
442 MULTIMEDIA
Page 446 of 516
Setting NameSelectable Options
AUX Volume Offset — If Equipped -3
+3
NOTE:
The “AUX Volume Offset” feature provides the ability to tune the audio level for portable devices connected through
the AUX input. To make your selection, press the AUX Volume Match button on the touchscreen, choose a level from
–3 to +3. Auto Play On Off
NOTE:
The Auto Play feature allows a media device to begin playing when the media device is plugged in. To make your
selection, press the On or Off buttons to activate or deactivate Auto Play.
Phone/Bluetooth Settings
After pressing the “Phone/Bluetooth Settings” button on
the touchscreen, the following settings will be available:
Setting Name Selectable Options
Do Not Disturb List of Settings
NOTE:
Press “Do Not Disturb” to access the available settings. The following settings are: Auto Reply (both, text, call), Auto
Reply Message (custom, default) and Custom Auto Reply Message (create message).
444 MULTIMEDIA