Page 113 of 696
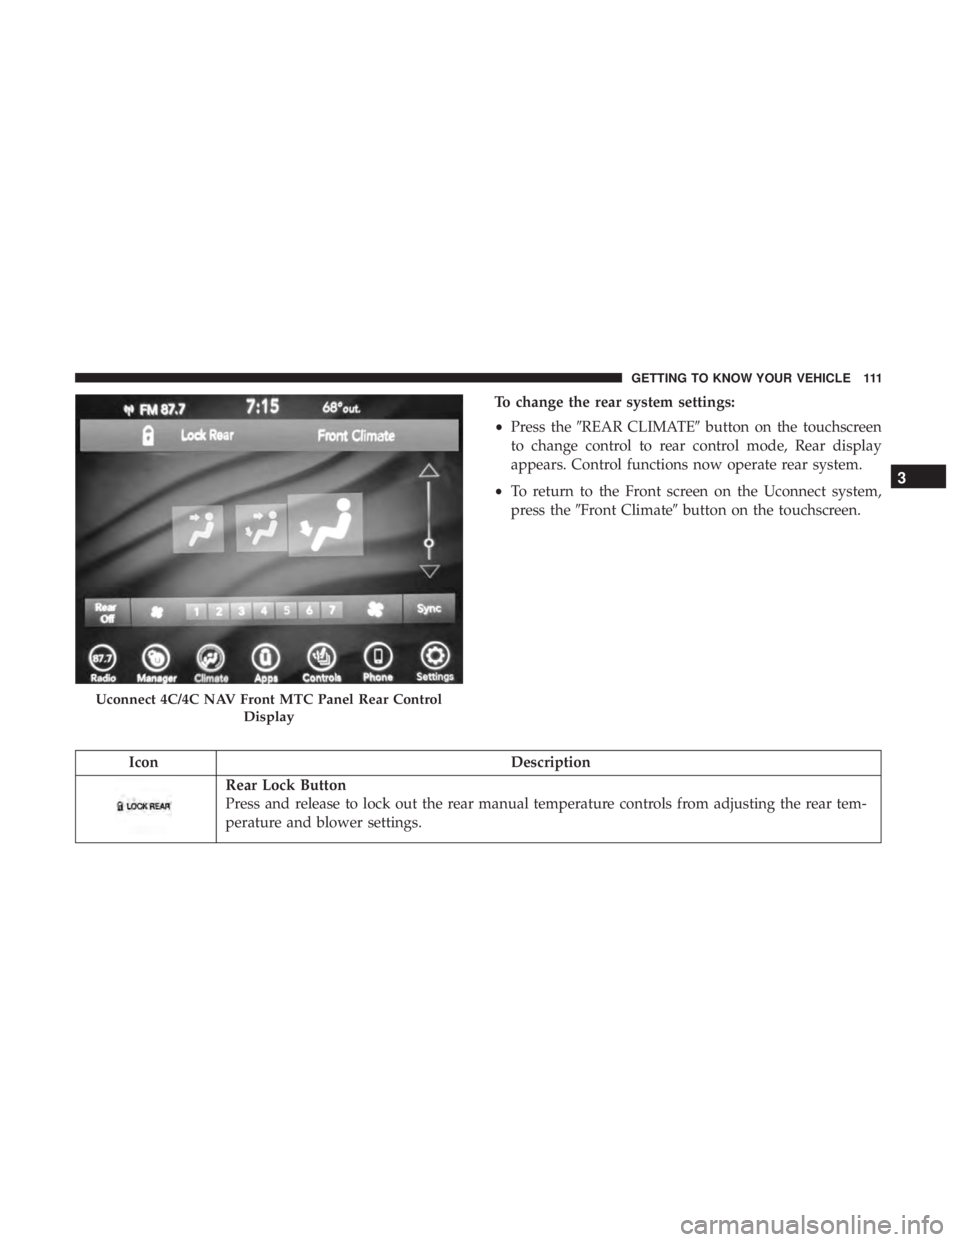
To change the rear system settings:
•Press the �REAR CLIMATE� button on the touchscreen
to change control to rear control mode, Rear display
appears. Control functions now operate rear system.
• To return to the Front screen on the Uconnect system,
press the �Front Climate� button on the touchscreen.
Icon Description
Rear Lock Button
Press and release to lock out the rear manual temperature controls from adjusting the rear tem-
perature and blower settings.
Uconnect 4C/4C NAV Front MTC Panel Rear Control
Display
3
GETTING TO KNOW YOUR VEHICLE 111
Page 114 of 696

IconDescription
Front Climate Button
Press and release this button to change the display on the Uconnect system back to the Front
Climate Controls.
Rear Passenger Temperature Up and Down Buttons
Provides the rear passengers with independent temperature control. Push the up arrow button
on the touchscreen to increase the temperature. Push the down arrow button on the touchscreen
to decrease the temperature. When the SYNC feature is active, the passenger ’s temperature
moves up and down with the driver ’s temperature.
SYNC Button
Press the SYNC button on the touchscreen to toggle the SYNC feature on/off. The SYNC indica-
tor is illuminated when this feature is enabled. SYNC is used to synchronize the front and rear
passenger temperature settings with the driver temperature setting. Changing the front or rear
passenger temperature setting while in SYNC exits this feature.
NOTE:The SYNC setting is only available on the touchscreen.
Blower Control
Blower Control is used to regulate the amount of air forced through the climate system. There
are seven blower speeds available. Adjusting the blower causes automatic mode to switch to
manual operation. The speeds can be selected using the buttons on the touchscreen.
112 GETTING TO KNOW YOUR VEHICLE
Page 119 of 696
Automatic Uconnect 4 Climate Control Overview
Uconnect 4 With 7–inch Display Automatic Temperature Controls
3
GETTING TO KNOW YOUR VEHICLE 117
Page 120 of 696
Automatic Uconnect 4C/4C NAV Climate Control Overview
Uconnect 4C/4C With 8.4–inch Display NAV Automatic Climate Controls
118 GETTING TO KNOW YOUR VEHICLE
Page 125 of 696
Controlling The Rear Climate Controls From The
Front ATC Panel—If Equipped
The Three-Zone ATC system allows for adjustment of the
rear climate controls from the front ATC panel.
To change the rear system settings:
•Press the �REAR CLIMATE� button on the touchscreen
to change control to rear control mode, Rear display
appears. Control functions now operate rear system.
•
To return to the Front screen on the Uconnect system, press
the �Front Climate� or “Done” button on the touchscreen.
Uconnect 4 Front ATC Panel Rear Control Display
Uconnect 4C/4C NAV Front ATC Panel Rear Control
Display
3
GETTING TO KNOW YOUR VEHICLE 123
Page 126 of 696

IconDescription
REAR AUTO Rear Auto Button Automatically controls the rear interior cabin temperature by adjusting airflow distribution and
amount. Performing this function causes the system to switch between manual mode and auto-
matic modes. Refer to “Automatic Operation” within this section for more information.
Rear Lock Button
Press and release to lock out the rear manual temperature controls from adjusting the rear tem-
perature and blower settings.
Front Climate Button
Press and release this button to change the display on the Uconnect system back to the Front
Climate Controls.
Rear Passenger Temperature Up And Down Buttons
Provides the front occupants with the ability to control the rear temperature. Push the up arrow
button on the touchscreen to increase the temperature. Push the down arrow button on the
touchscreen to decrease the temperature. When the SYNC feature is active, the passenger ’s tem-
perature will move up and down with the driver ’s temperature.
124 GETTING TO KNOW YOUR VEHICLE
Page 132 of 696
 — If
Equipped
Automatic Operation
1. Push the AUTO button on the faceplate, or the AUTObutton on the touchscreen on the Automatic Tempera-
ture Control (ATC) Pane")
Automatic Temperature Control (ATC) — If
Equipped
Automatic Operation
1. Push the AUTO button on the faceplate, or the AUTObutton on the touchscreen on the Automatic Tempera-
ture Control (ATC) Panel.
2. Next, adjust the temperature you would like the system to maintain by adjusting the driver and passenger
temperature control buttons. Once the desired tempera-
ture is displayed, the system will achieve and automati-
cally maintain that comfort level.
3. When the system is set up for your comfort level, it is not necessary to change the settings. You will experience
the greatest efficiency by simply allowing the system to
function automatically.
NOTE:
• It is not necessary to move the temperature settings for
cold or hot vehicles. The system automatically adjusts
the temperature, mode, and blower speed to provide
comfort as quickly as possible.
• The temperature can be displayed in U.S. or Metric units
by selecting the US/Metric customer-programmable fea- ture. Refer to the “Uconnect Settings” in “Multimedia”
for further information.
To provide you with maximum comfort in the Automatic
mode during cold start-ups, the blower fan will remain on
low until the engine warms up. The blower will increase in
speed and transition into Auto mode.
Manual Operation Override
This system offers a full complement of manual override
features. The AUTO symbol in the front ATC display will
be turned off when the system is being used in the manual
mode.
Operating Tips
NOTE: Refer to the chart at the end of this section for
suggested control settings for various weather conditions.
Summer Operation
The engine cooling system must be protected with a
high-quality antifreeze coolant to provide proper corrosion
protection and to protect against engine overheating. OAT
coolant (conforming to MS.90032) is recommended. Refer
to “Fluids And Lubricants” in “Technical Specifications”
for proper coolant selection.
130 GETTING TO KNOW YOUR VEHICLE
Page 141 of 696
Sunroof Maintenance
Use only a non-abrasive cleaner and a soft cloth to clean the
glass panel.
Ignition Off Operation
The power sunroof switch will remain active for up to
approximately 10 minutes after the ignition switch is
turned to the OFF/LOCK position. Opening either front
door will cancel this feature.
NOTE:Ignition Off time is programmable through the
Uconnect System. Refer to “Uconnect Settings” in “Multi-
media” for further information.
HOOD
Opening
The hood release lever (to open the primary latch) and
safety latch (to open the secondary latch) must be released
to open the hood.
1. Pull the hood release lever located under the driver ’s side of the instrument panel. 2. Move to the outside of the front of the vehicle.
3. Push the safety latch release lever toward the passenger
side of the vehicle. The safety latch is located behind the
center front edge of the hood.
Hood Release Lever
3
GETTING TO KNOW YOUR VEHICLE 139