Page 99 of 696

When exiting the vehicle the driver can choose to have the
headlights remain on for 30, 60, or 90 seconds or not remain
on. To change the timer setting, select the proper setting
through the Uconnect System.
Refer to “Uconnect Settings” in “Multimedia” for further
information.
If the headlights are turned off before the ignition, they will
turn off in the normal manner.
NOTE:The headlights must be turned off within 45 sec-
onds of turning the ignition OFF to activate this feature.
Lights-On Reminder
If the headlights or the parking lights are left on after the
ignition switch is turned OFF, a chime will sound when the
driver’s door is opened.
Front Fog Lights — If Equipped
To activate the front fog lights, turn on the parking lights or
the low beam headlights and push in the headlight switch
control knob. Pushing the headlight switch control knob in
a second time will turn the front fog lights off.
Turn Signals
Move the multifunction lever up or down and the arrows
on each side of the instrument cluster flash to show proper
operation of the front and rear turn signal lights.
NOTE: If either light remains on and does not flash, or
there is a very fast flash rate, check for a defective outside
light bulb. If an indicator fails to light when the lever is
moved, it would suggest that the indicator bulb is defec-
tive.
Fog Light Switch
3
GETTING TO KNOW YOUR VEHICLE 97
Page 105 of 696

•Use of Rain-X or products containing wax or silicone
may reduce rain sensor performance.
• The Rain Sensing feature can be turned on and off
through the Uconnect System. Refer to “Uconnect Set-
tings” in “Multimedia” for further information.
The Rain Sensing system has protective features for the
wiper blades and arms. It will not operate under the
following conditions:
• Low Temperature Wipe Inhibit — The Rain Sensing
feature will not operate when the ignition is first
switched ON, when the vehicle is stationary and the
outside temperature is below 32°F (0°C), unless the
wiper control on the multifunction lever is moved, the
vehicle speed becomes greater than 3 mph (5 km/h) or
the outside temperature rises above freezing.
• Neutral Wipe Inhibit — The Rain Sensing feature will
not operate when the ignition is ON, when the transmis-
sion gear selector is in the NEUTRAL position and the
vehicle speed is less than 3 mph (5 km/h), unless the
wiper control on the multifunction lever is moved, the
vehicle speed is greater than 3 mph (5 km/h) or the gear
selector is moved out of the NEUTRAL position. •
Remote Start Mode Inhibit — On vehicles equipped
with Remote Starting system, Rain Sensing wipers are
not operational when the vehicle is in the remote start
mode. Once the operator is in the vehicle and has placed
the ignition switch in the RUN position, rain sensing
wiper operation can resume, if it has been selected, and
no other inhibit conditions (mentioned previously) exist.
Rear Wiper And Washer
Rear Windshield Wiper Operation
Rotate the windshield wiper lever center ring upwards to
operate one of two modes for the rear window wiper:
• First detent — intermittent mode.
• Second detent — continuous mode.
Rear Windshield Washer Operation
Pushing the windshield wiper lever forward activates the
rear window washer. If the lever is pushed while on the
intermittent setting, the wipers will turn on and operate for
several wipe cycles after the lever is released, and then
resume the intermittent interval previously selected. If the
lever is pushed while the wipers are in the off position, the
wipers will operate several wipe cycles, then turn off.
3
GETTING TO KNOW YOUR VEHICLE 103
Page 112 of 696
IconDescription
Mix Mode
Mix Mode
Air is directed through the floor, defrost, and side window demister outlets. This setting works
best in cold or snowy conditions that require extra heat to the windshield. This setting is good
for maintaining comfort while reducing moisture on the windshield.
Climate Control OFF Button
Press and release this button to turn the Climate Control ON/OFF.
Controlling The Rear Climate Controls From The
Front MTC Display/Touchscreen
The Three-Zone MTC system allows for adjustment of the
rear climate controls from the front MTC display/
touchscreen.
Uconnect 4 Front MTC Panel Rear Control Display
110 GETTING TO KNOW YOUR VEHICLE
Page 113 of 696
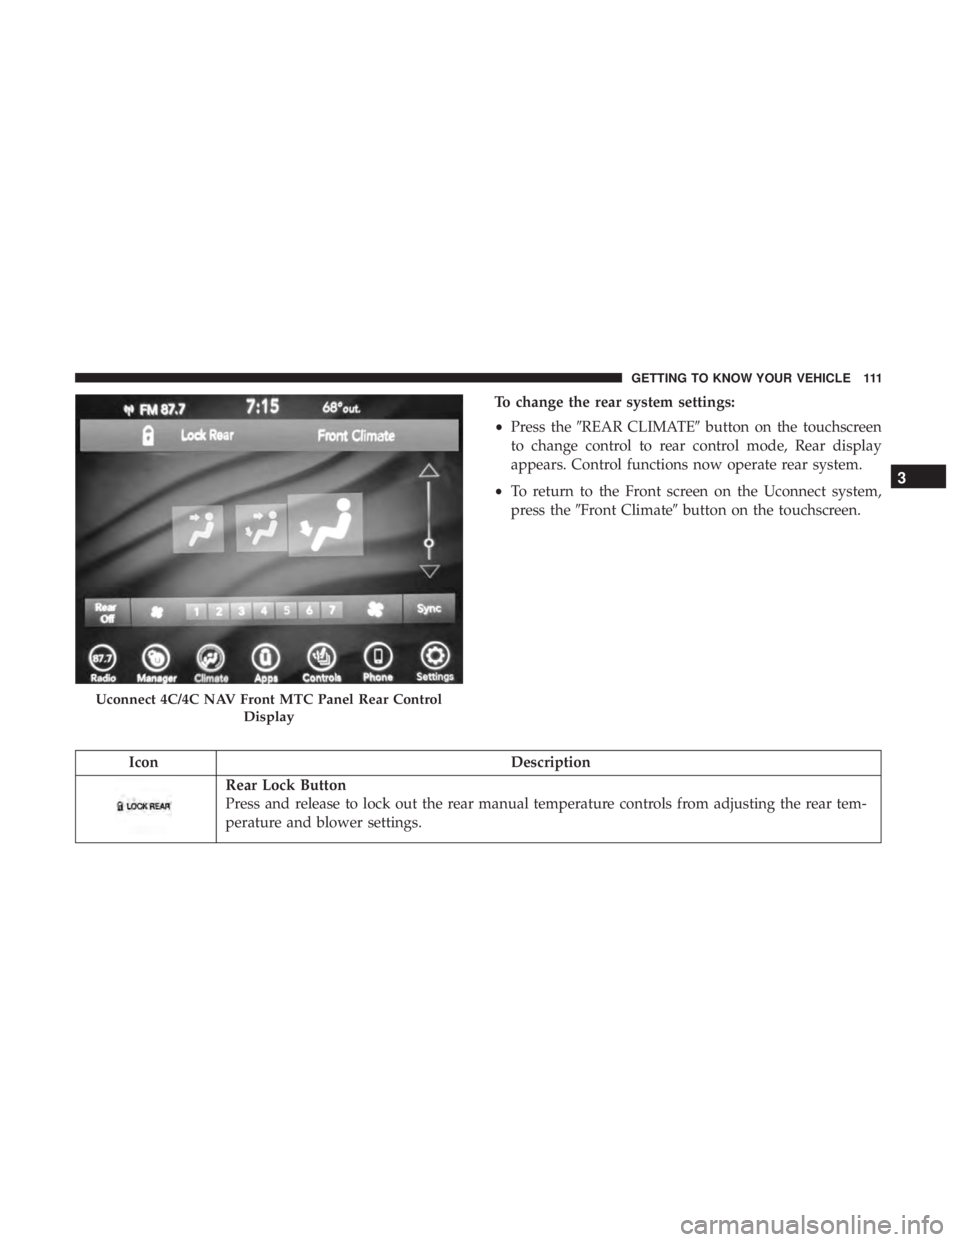
To change the rear system settings:
•Press the �REAR CLIMATE� button on the touchscreen
to change control to rear control mode, Rear display
appears. Control functions now operate rear system.
• To return to the Front screen on the Uconnect system,
press the �Front Climate� button on the touchscreen.
Icon Description
Rear Lock Button
Press and release to lock out the rear manual temperature controls from adjusting the rear tem-
perature and blower settings.
Uconnect 4C/4C NAV Front MTC Panel Rear Control
Display
3
GETTING TO KNOW YOUR VEHICLE 111
Page 125 of 696
Controlling The Rear Climate Controls From The
Front ATC Panel—If Equipped
The Three-Zone ATC system allows for adjustment of the
rear climate controls from the front ATC panel.
To change the rear system settings:
•Press the �REAR CLIMATE� button on the touchscreen
to change control to rear control mode, Rear display
appears. Control functions now operate rear system.
•
To return to the Front screen on the Uconnect system, press
the �Front Climate� or “Done” button on the touchscreen.
Uconnect 4 Front ATC Panel Rear Control Display
Uconnect 4C/4C NAV Front ATC Panel Rear Control
Display
3
GETTING TO KNOW YOUR VEHICLE 123
Page 132 of 696
 — If
Equipped
Automatic Operation
1. Push the AUTO button on the faceplate, or the AUTObutton on the touchscreen on the Automatic Tempera-
ture Control (ATC) Pane")
Automatic Temperature Control (ATC) — If
Equipped
Automatic Operation
1. Push the AUTO button on the faceplate, or the AUTObutton on the touchscreen on the Automatic Tempera-
ture Control (ATC) Panel.
2. Next, adjust the temperature you would like the system to maintain by adjusting the driver and passenger
temperature control buttons. Once the desired tempera-
ture is displayed, the system will achieve and automati-
cally maintain that comfort level.
3. When the system is set up for your comfort level, it is not necessary to change the settings. You will experience
the greatest efficiency by simply allowing the system to
function automatically.
NOTE:
• It is not necessary to move the temperature settings for
cold or hot vehicles. The system automatically adjusts
the temperature, mode, and blower speed to provide
comfort as quickly as possible.
• The temperature can be displayed in U.S. or Metric units
by selecting the US/Metric customer-programmable fea- ture. Refer to the “Uconnect Settings” in “Multimedia”
for further information.
To provide you with maximum comfort in the Automatic
mode during cold start-ups, the blower fan will remain on
low until the engine warms up. The blower will increase in
speed and transition into Auto mode.
Manual Operation Override
This system offers a full complement of manual override
features. The AUTO symbol in the front ATC display will
be turned off when the system is being used in the manual
mode.
Operating Tips
NOTE: Refer to the chart at the end of this section for
suggested control settings for various weather conditions.
Summer Operation
The engine cooling system must be protected with a
high-quality antifreeze coolant to provide proper corrosion
protection and to protect against engine overheating. OAT
coolant (conforming to MS.90032) is recommended. Refer
to “Fluids And Lubricants” in “Technical Specifications”
for proper coolant selection.
130 GETTING TO KNOW YOUR VEHICLE
Page 141 of 696
Sunroof Maintenance
Use only a non-abrasive cleaner and a soft cloth to clean the
glass panel.
Ignition Off Operation
The power sunroof switch will remain active for up to
approximately 10 minutes after the ignition switch is
turned to the OFF/LOCK position. Opening either front
door will cancel this feature.
NOTE:Ignition Off time is programmable through the
Uconnect System. Refer to “Uconnect Settings” in “Multi-
media” for further information.
HOOD
Opening
The hood release lever (to open the primary latch) and
safety latch (to open the secondary latch) must be released
to open the hood.
1. Pull the hood release lever located under the driver ’s side of the instrument panel. 2. Move to the outside of the front of the vehicle.
3. Push the safety latch release lever toward the passenger
side of the vehicle. The safety latch is located behind the
center front edge of the hood.
Hood Release Lever
3
GETTING TO KNOW YOUR VEHICLE 139
Page 224 of 696

WARNING!
•If you use a trailer brake controller with your trailer,
the trailer brakes may be activated and deactivated
with the brake switch. If so, there may not be enough
brake pressure to hold both the vehicle and the
trailer on a hill when the brake pedal is released. In
order to avoid rolling down an incline while resum-
ing acceleration, manually activate the trailer brake
or apply more vehicle brake pressure prior to releas-
ing the brake pedal.
• HSA is not a parking brake. Always apply the
parking brake fully when exiting your vehicle. Also,
be certain to place the transmission in PARK.
• Failure to follow these warnings can result in a
collision or serious personal injury.
Disabling And Enabling HSA
This feature can be turned on or turned off. To change the
current setting, proceed as follows:
• If disabling HSA using Uconnect Settings, refer to
“Uconnect Settings” in “Multimedia” for further infor-
mation.
Rain Brake Support (RBS)
Rain Brake Support may improve braking performance in
wet conditions. It will periodically apply a small amount of
brake pressure to remove any water buildup on the front
brake rotors. It functions when the windshield wipers are
in LO or HI speed. When Rain Brake Support is active,
there is no notification to the driver and no driver interac-
tion is required.
Ready Alert Braking (RAB)
Ready Alert Braking may reduce the time required to reach
full braking during emergency braking situations. It antici-
pates when an emergency braking situation may occur by
monitoring how fast the throttle is released by the driver.
The EBC will prepare the brake system for a panic stop.
Trailer Sway Control (TSC)
TSC uses sensors in the vehicle to recognize an excessively
swaying trailer and will take the appropriate actions to
attempt to stop the sway. TSC will become active automati-
cally once an excessively swaying trailer is recognized.
Note that TSC cannot stop all trailers from swaying.
Always use caution when towing a trailer and follow the
trailer tongue weight recommendations. Refer to “Trailer
222 SAFETY