2018 CHRYSLER PACIFICA engine mount
[x] Cancel search: engine mountPage 423 of 696

WARNING!(Continued)
•Driving through standing water limits your vehicle’s
braking capabilities, which increases stopping dis-
tances. Therefore, after driving through standing
water, drive slowly and lightly press on the brake
pedal several times to dry the brakes.
• Failure to follow these warnings may result in inju-
ries that are serious or fatal to you, your passengers,
and others around you.
CAUTION!
•Always check the depth of the standing water before
driving through it. Never drive through standing
water that is deeper than the bottom of the tire rims
mounted on the vehicle.
• Determine the condition of the road or the path that
is under water and if there are any obstacles in the
way before driving through the standing water.
• Do not exceed 5 mph (8 km/h) when driving through
standing water. This will minimize wave effects.
(Continued)
CAUTION! (Continued)
•Driving through standing water may cause damage
to your vehicle’s drivetrain components. Always in-
spect your vehicle’s fluids (i.e., engine oil, transmis-
sion, axle, etc.) for signs of contamination (i.e., fluid
that is milky or foamy in appearance) after driving
through standing water. Do not continue to operate
the vehicle if any fluid appears contaminated, as this
may result in further damage. Such damage is not
covered by the New Vehicle Limited Warranty.
• Getting water inside your vehicle’s engine can cause
it to lock up and stall out, and cause serious internal
damage to the engine. Such damage is not covered by
the New Vehicle Limited Warranty.
6
STARTING AND OPERATING 421
Page 483 of 696
3. Using a small screwdriver or similar tool, remove theManual Park Release access cover, which is to the lower
left of the steering column.
4. The Manual Park Release access cover is connected to a red tether strap. Pull the tether strap out as far as it will
go, then release it. The transmission should now be in
NEUTRAL, allowing the vehicle to be moved.
NOTE: When the lever is locked in the released position,
the tether will remain outside of the trim panel and the
access cover cannot be re-installed.
5. Release the parking brake only when the vehicle is securely connected to a tow vehicle.
To Reset The Manual Park Release:
1. Apply firm pressure to the brake pedal while seated in the driver ’s seat.
2. Pull the tether strap out again, then release it.
3. Allow the tether to retract with the lever back to its original position. 4. Verify that the transmission is in PARK.
5. Confirm that the tether has retracted fully and re-install
the access cover. If the access cover cannot be re-
installed, repeat steps 1 through 4.
FREEING A STUCK VEHICLE
If your vehicle becomes stuck in mud, sand or snow, it can
often be moved using a rocking motion. Turn the steering
wheel right and left to clear the area around the front
wheels. Then shift back and forth between DRIVE and
REVERSE while gently pressing the accelerator.
NOTE: Shifts between DRIVE and REVERSE can only be
achieved at wheel speeds of 5 mph (8 km/h) or less.
Whenever the transmission remains in NEUTRAL for more
than two seconds, you must press the brake pedal to
engage DRIVE or REVERSE.
Use the least amount of accelerator pedal pressure that will
maintain the rocking motion without spinning the wheels
or racing the engine.
7
IN CASE OF EMERGENCY 481
Page 514 of 696
Adding Coolant
Your vehicle has been built with an improved engine
coolant (OAT coolant conforming to MS.90032) that allows
extended maintenance intervals. This engine coolant (anti-
freeze) can be used up to ten years or 150,000 miles
(240,000 km) before replacement. To prevent reducing this
extended maintenance period, it is important that you use
the same engine coolant (OAT coolant conforming to
MS.90032) throughout the life of your vehicle.
Please review these recommendations for using Organic
Additive Technology (OAT) engine coolant (antifreeze)
that meets the requirements of FCA Material Standard
MS.90032. When adding engine coolant (antifreeze):
•We recommend using Mopar Antifreeze/Coolant 10
Year/150,000 Mile (240,000 km) Formula OAT (Organic
Additive Technology) that meets the requirements of
FCA Material Standard MS.90032.
• Mix a minimum solution of 50% OAT engine coolant
that meets the requirements of FCA Material Standard
MS.90032 and distilled water. Use higher concentrations
(not to exceed 70%) if temperatures below �34°F (�37°C)
are anticipated. Please contact an authorized dealer for
assistance. •
Use only high purity water such as distilled or deionized
water when mixing the water/engine coolant (anti-
freeze) solution. The use of lower quality water will
reduce the amount of corrosion protection in the engine
cooling system.
NOTE:
• It is the owner’s responsibility to maintain the proper
level of protection against freezing according to the
temperatures occurring in the area where the vehicle is
operated.
• Some vehicles require special tools to add coolant prop-
erly. Failure to fill these systems properly could lead to
severe internal engine damage. If any coolant is needed
to be added to the system, please contact a local autho-
rized dealer.
• Mixing engine coolant (antifreeze) types is not recom-
mended and can result in cooling system damage. If
HOAT and OAT coolant are mixed in an emergency,
have a authorized dealer drain, flush, and refill with
OAT coolant (conforming to MS.90032) as soon as pos-
sible.
512 SERVICING AND MAINTENANCE
Page 551 of 696

In the event power assist is lost for any reason (i.e.,
repeated brake applications with the engine off) the brakes
will still function. However, the effort required to brake the
vehicle will be much greater than that required with the
power system operating.
WHEEL AND TIRE TORQUE SPECIFICATIONS
Proper lug nut/bolt torque is very important to ensure that
the wheel is properly mounted to the vehicle. Any time a
wheel has been removed and reinstalled on the vehicle, the
lug nuts/bolts should be torqued using a properly cali-
brated torque wrench using a high quality six sided (hex)
deep wall socket.
Torque Specifications
Lug Nut/BoltTorque **Lug Nut/Bolt
Size Lug Nut/Bolt
Socket Size
100 Ft-Lbs (135 N·m) M12 x 1.5
19 mm
**Use only your authorized dealer recommended lug nuts/
bolts and clean or remove any dirt or oil before tightening.
Inspect the wheel mounting surface prior to mounting the
tire and remove any corrosion or loose particles. Tighten the lug nuts/bolts in a star pattern until each
nut/bolt has been tightened twice. Ensure that the socket is
fully engaged on the lug nut/bolt (do not insert it half-
way).
Wheel Mounting Surface
9
TECHNICAL SPECIFICATIONS 549
Page 580 of 696
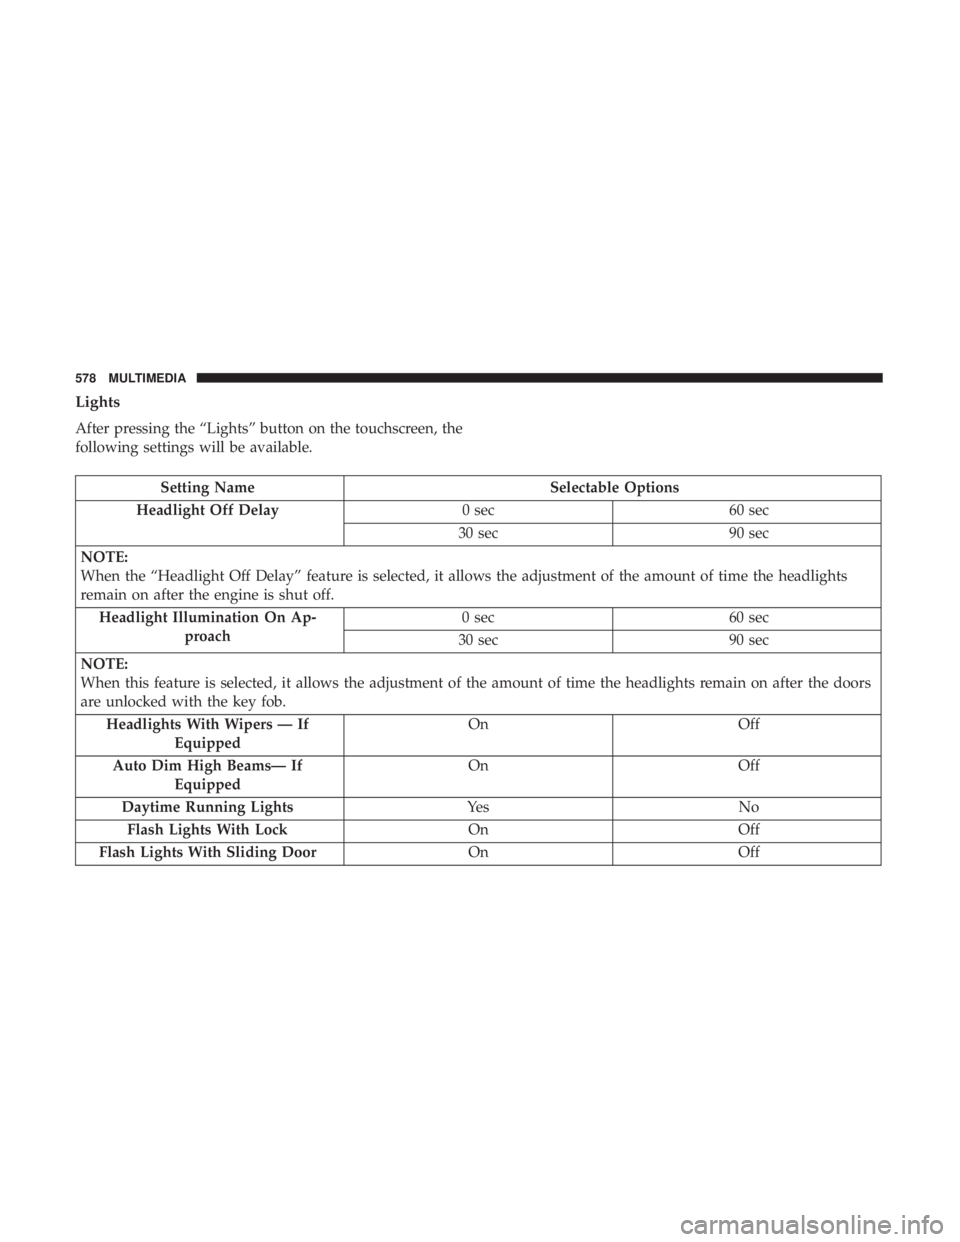
Lights
After pressing the “Lights” button on the touchscreen, the
following settings will be available.
Setting NameSelectable Options
Headlight Off Delay 0 sec60 sec
30 sec 90 sec
NOTE:
When the “Headlight Off Delay” feature is selected, it allows the adjustment of the amount of time the headlights
remain on after the engine is shut off. Headlight Illumination On Ap- proach 0 sec
60 sec
30 sec 90 sec
NOTE:
When this feature is selected, it allows the adjustment of the amount of time the headlights remain on after the doors
are unlocked with the key fob. Headlights With Wipers — If Equipped On
Off
Auto Dim High Beams— If Equipped On
Off
Daytime Running Lights Ye sN o
Flash Lights With Lock OnOff
Flash Lights With Sliding Door OnOff
578 MULTIMEDIA
Page 585 of 696
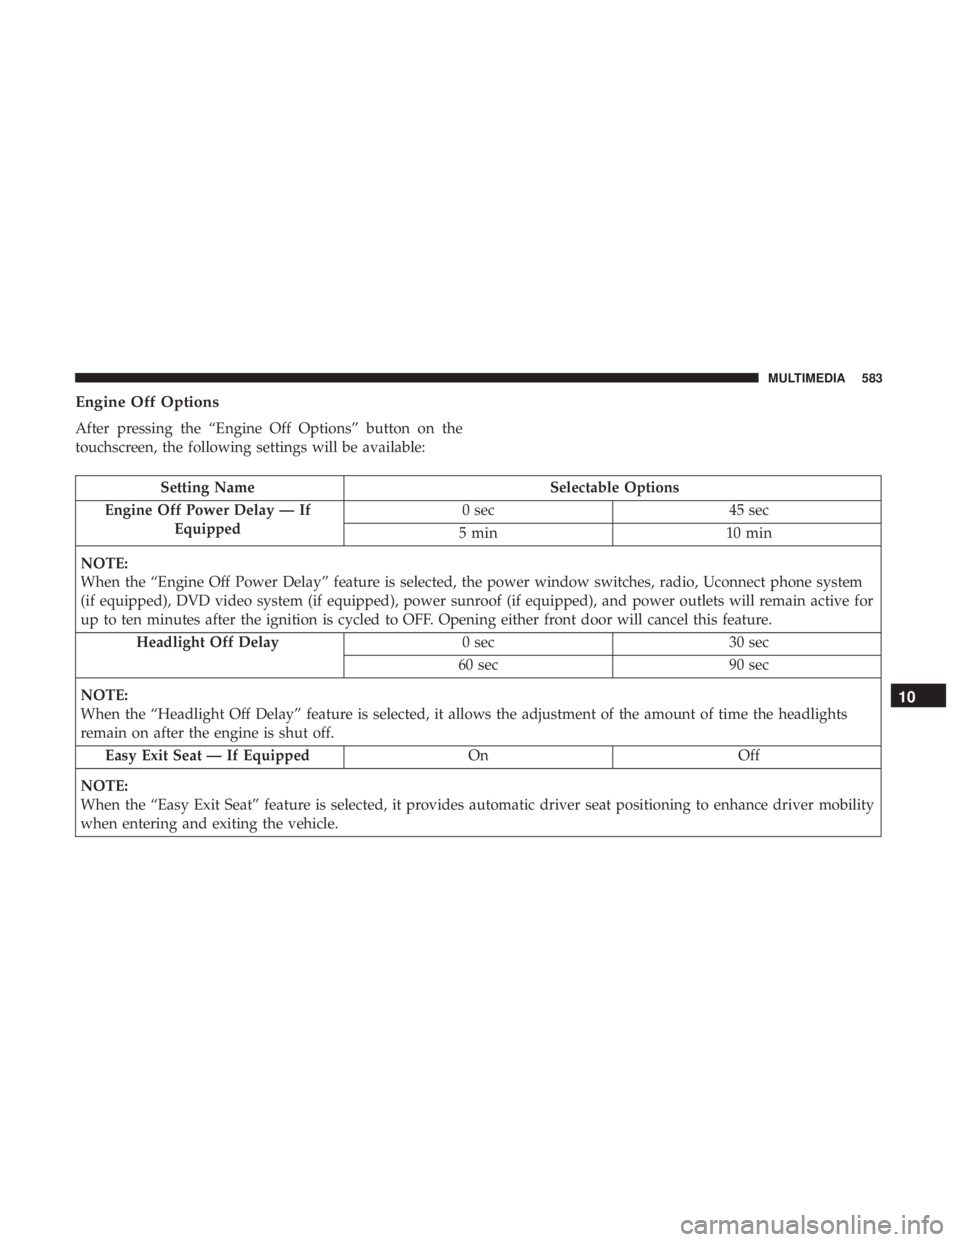
Engine Off Options
After pressing the “Engine Off Options” button on the
touchscreen, the following settings will be available:
Setting NameSelectable Options
Engine Off Power Delay — If Equipped 0 sec
45 sec
5 min 10 min
NOTE:
When the “Engine Off Power Delay” feature is selected, the power window switches, radio, Uconnect phone system
(if equipped), DVD video system (if equipped), power sunroof (if equipped), and power outlets will remain active for
up to ten minutes after the ignition is cycled to OFF. Opening either front door will cancel this feature. Headlight Off Delay 0 sec30 sec
60 sec 90 sec
NOTE:
When the “Headlight Off Delay” feature is selected, it allows the adjustment of the amount of time the headlights
remain on after the engine is shut off. Easy Exit Seat — If Equipped OnOff
NOTE:
When the “Easy Exit Seat” feature is selected, it provides automatic driver seat positioning to enhance driver mobility
when entering and exiting the vehicle.
10
MULTIMEDIA 583
Page 611 of 696
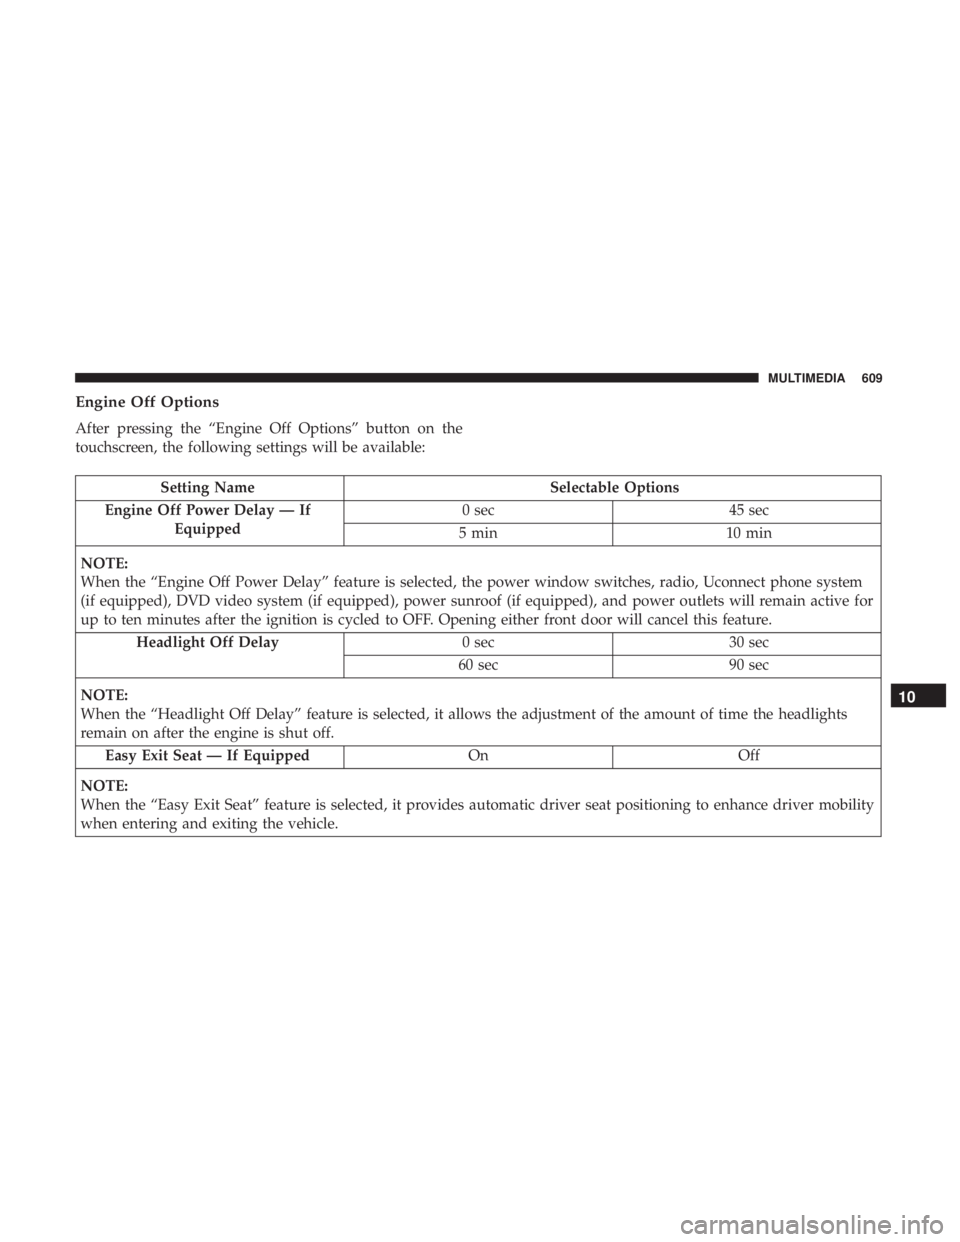
Engine Off Options
After pressing the “Engine Off Options” button on the
touchscreen, the following settings will be available:
Setting NameSelectable Options
Engine Off Power Delay — If Equipped 0 sec
45 sec
5 min 10 min
NOTE:
When the “Engine Off Power Delay” feature is selected, the power window switches, radio, Uconnect phone system
(if equipped), DVD video system (if equipped), power sunroof (if equipped), and power outlets will remain active for
up to ten minutes after the ignition is cycled to OFF. Opening either front door will cancel this feature. Headlight Off Delay 0 sec30 sec
60 sec 90 sec
NOTE:
When the “Headlight Off Delay” feature is selected, it allows the adjustment of the amount of time the headlights
remain on after the engine is shut off. Easy Exit Seat — If Equipped OnOff
NOTE:
When the “Easy Exit Seat” feature is selected, it provides automatic driver seat positioning to enhance driver mobility
when entering and exiting the vehicle.
10
MULTIMEDIA 609
Page 682 of 696

Cargo Load Floor..........................146
Cargo Tie-Downs .......................... .146
Car Washes ...............................543
Cellular Phone ............................650
Center High Mounted Stop Light ...............437
Certification Label ..........................405
Chains, Tire ............................. .538
Change Oil Indicator ........................187
Changing A Flat Tire .....................446, 517
Chart, Tire Sizing .......................... .519
Check Engine Light (Malfunction Indicator Light). . . .210
Checking Your Vehicle For Safety ...............300
Checks, Safety ............................ .300
Child Restraint ............................276
Child Restraints Booster Seats ............................280
Center Seat LATCH .......................288
Child Seat Installation ..................291, 294
How To Stow An unused ALR Seat Belt ........290
Infant And Child Restraints .................278
Lower Anchors And Tethers For Children .......282
Older Children And Child Restraints ...........279
Seating Positions ........................ .281
Using The Top Tether Anchorage .............296
Cigar Lighter ............................ .172Clean Air Gasoline
........................ .551
Cleaning Wheels ............................... .537
Climate Control ............................104
Automatic ..........................117,118
Manual ............................... .104
Rear ..............................114,126
Coat Hook ...............................167
Cold Weather Operation ..................... .310
Compact Disc (CD) Maintenance ................669
Compact Spare Tire ........................ .535
Computer, Trip/Travel .......................197
Contract, Service.......................... .674
Cooling
Pressure Cap (Radiator Cap) ............513
Cooling System ............................510
Adding Coolant (Antifreeze) .................512
Coolant Level .......................... .513
Cooling Capacity ........................ .555
Disposal Of Used Coolant ..................513
Drain, Flush, And Refill ....................511
Inspection ..........................510, 513
Points To Remember ..................... .514
Pressure Cap ............................513
Radiator Cap .......................... .513
Selection Of Coolant (Antifreeze) ..........511,555
680 INDEX