Page 446 of 696
Cavity Cartridge FuseBlade FuseDescription
F77A –10 Amp Red RR Entertainment Screen 1 & 2/Media HUB 1 &
2/3rd Row USB Charge Only/2nd Row USB
Charge Only/Vaccum Cleaner SW/3rd Row Re- cline ST SW/LT & RT Stow N Go SW/LT & RT Sliding Door SW Backlight
F77B –10 Amp Red Rain Sensor/Sunroof /CRVMM
F78A –15 Amp Blue Transmission Control Module (TCM)/ E-Shifter
F78B –15 Amp Blue Instrument Cluster
F79 –10 Amp Red ICS/Front And Rear HVAC/ SCCM/ EPB
F80 – – Not Used
F81 – – Not Used
F82 – – Not Used
F83 20 Amp Blue –TT Park Lights — If Equipped
30 Amp Pink –Headlamp Washer Pump — If Equipped
F84 – – Not Used
F85 –20 Amp Yellow Cigar Lighter
F86 – – Not Used
F87 – – Not Used
F88 –20 Amp Yellow Front Heated Seats
F89 –20 Amp Yellow Rear Heated Seats
444 IN CASE OF EMERGENCY
Page 447 of 696
Cavity Cartridge FuseBlade FuseDescription
F90 – – Not Used
F91 –15 Amp Blue Front Ventilated Seats/Heated Steering Wheel
F92 – 5 Amp Tan Security Gateway
F93 – – Not Used
F94 40 Amp Green –ESC Motor Pump
F95A –10 Amp Red USB Charge Port — ACC RUN
F95B –10 Amp Red Selectable Fuse Location
F96 –10 Amp Red Occupant Restraint Controller (ORC) (Airbag)
F97 –10 Amp Red Occupant Restraint Controller (ORC) (Airbag)
F98 –15 Amp Blue Left HID Headlamp
F99 30 Amp Pink –Trailer Tow Module - If Equipped
F100A –10 Amp Red AHLM
F100B –10 Amp Red Rear Camera/LBSS/RBSS/CVPM/Humidity
Sensor/In Vehicle Temperature Sensor
Circuit Breakers
CB1 25 Amp Power Seats (Driver)
CB2 25 Amp * Power Seats (Pass)
CB3 25 Amp FRT PWR Window W/O Door Nodes + RR PWR
Window Lockout
* 30A mini fuse is substituted for 25A Circuit Breaker.
7
IN CASE OF EMERGENCY 445
Page 590 of 696
Phone/Bluetooth
After pressing the “Phone/Bluetooth” button on the touch-
screen, the following settings will be available:
Setting NameSelectable Options
Phone Pop-ups Displayed in Cluster OnOff
Do Not Disturb List of Settings
NOTE:
The “Do Not Disturb” feature allows the paired phone to send a predetermined call, text, or both, to any incoming
call, or text, before sending it directly to voicemail. It also keeps a counter of all missed calls and texts while on the
road. Paired Phones and Audio Devices List of Paired Phones
NOTE:
This feature shows which phones are paired to the Phone/Bluetooth system. For further information, refer to the
Uconnect Owner ’s Manual Supplement. Smartphone Projection Manager List Of Connected Phones
NOTE:
Pressing “Smartphone Projection Manager” feature allows you to see a list of all connected phones and gives you the
option to determine which phone will be used for projection (Apple CarPlay or Android Auto).
588 MULTIMEDIA
Page 613 of 696
Phone/Bluetooth
After pressing the “Phone/Bluetooth” button on the touch-
screen, the following settings will be available:
Setting NameSelectable Options
Phone Pop-ups Displayed in Cluster OnOff
Do Not Disturb List Of Settings
NOTE:
Press “Do Not Disturb” to access the available settings. The following settings are: Auto Reply (both, text, call), Auto
Reply Message (custom, default) and Custom Auto Reply Message (create message). Paired Phones And Audio Devices List Of Paired Phones
NOTE:
This feature shows which phones and audio devices are paired to the Phone/Bluetooth system. For further informa-
tion, refer to the Uconnect Owner ’s Manual Supplement. Smartphone Projection Manager OnOff
10
MULTIMEDIA 611
Page 616 of 696
Setting NameSelectable Options
Clear Personal Data OKCancel
NOTE:
When the “Clear Personal Data” feature is selected it will remove all personal data including Bluetooth devices and
presets.
System Information
After pressing the “System Information” button on the
touchscreen, the following settings will be available:
Setting Name Selectable Options
Software License System Software Information Screen
NOTE:
When this feature is selected, a “Software License” screen will appear, displaying the system software version.
614 MULTIMEDIA
Page 617 of 696

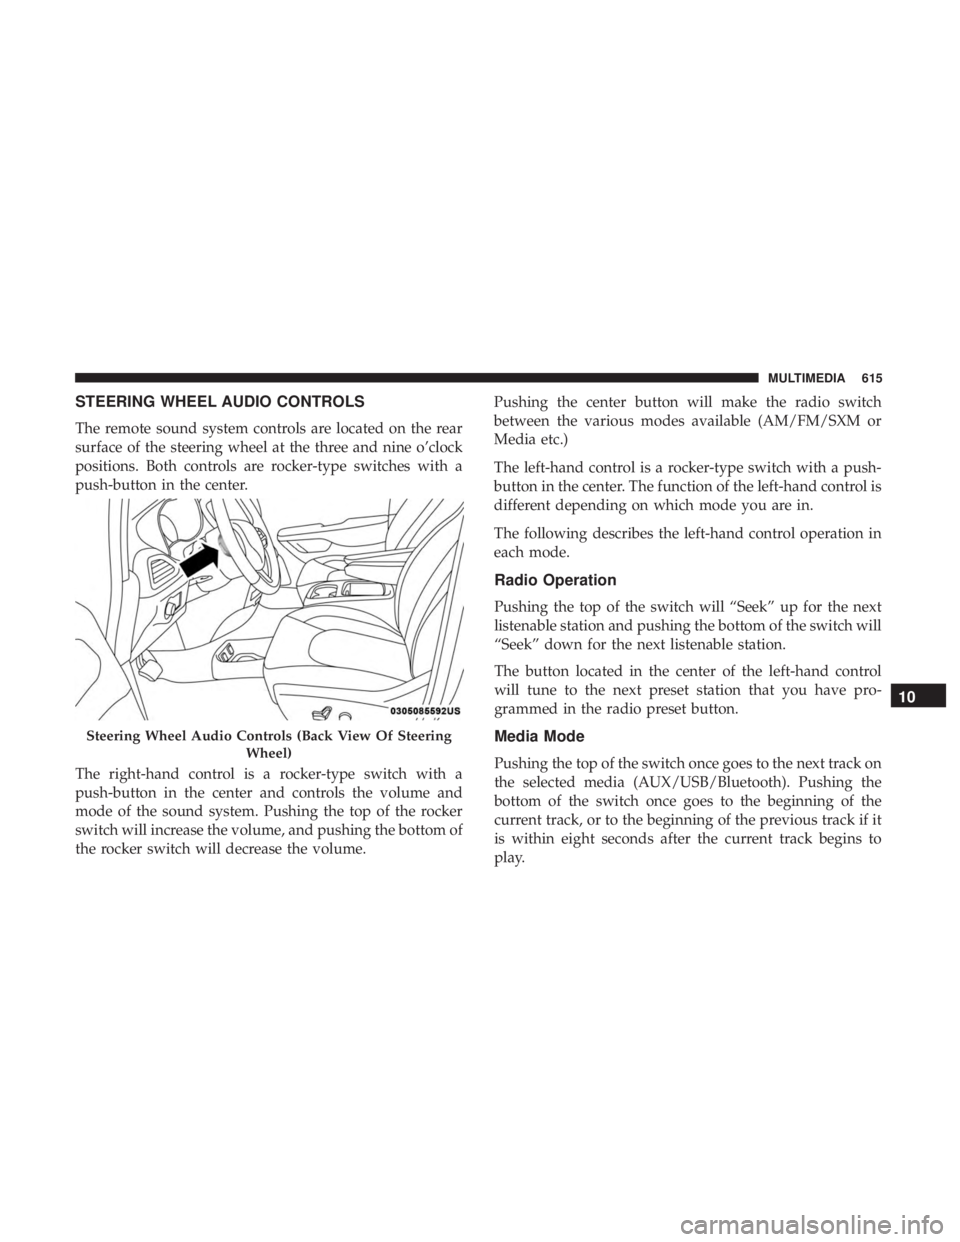
STEERING WHEEL AUDIO CONTROLS
The remote sound system controls are located on the rear
surface of the steering wheel at the three and nine o’clock
positions. Both controls are rocker-type switches with a
push-button in the center.
The right-hand control is a rocker-type switch with a
push-button in the center and controls the volume and
mode of the sound system. Pushing the top of the rocker
switch will increase the volume, and pushing the bottom of
the rocker switch will decrease the volume.Pushing the center button will make the radio switch
between the various modes available (AM/FM/SXM or
Media etc.)
The left-hand control is a rocker-type switch with a push-
button in the center. The function of the left-hand control is
different depending on which mode you are in.
The following describes the left-hand control operation in
each mode.
Radio Operation
Pushing the top of the switch will “Seek” up for the next
listenable station and pushing the bottom of the switch will
“Seek” down for the next listenable station.
The button located in the center of the left-hand control
will tune to the next preset station that you have pro-
grammed in the radio preset button.
Media Mode
Pushing the top of the switch once goes to the next track on
the selected media (AUX/USB/Bluetooth). Pushing the
bottom of the switch once goes to the beginning of the
current track, or to the beginning of the previous track if it
is within eight seconds after the current track begins to
play.
Steering Wheel Audio Controls (Back View Of Steering
Wheel)
10
MULTIMEDIA 615
Page 632 of 696

Disc Menu
When listening to a CD Audio disc, CD Data disc, DVD or
Blu-ray, pushing the remote control’s arrow buttons will
navigate the cursor on the rear touchscreen in the desired
direction, on whichever touchscreen is selected. The UP,
DOWN, LEFT, and RIGHT arrow buttons, and the OK and
MENU buttons on the remote, along with the correspond-
ing buttons overlaid on the radio touchscreen, can be used
to navigate the disc menu when it appears. This can be
used to select specific chapters in a movie, navigate special
features, or to play the movie from the menu.
NOTE:Inserting a disc into the player will “auto play” the
disc if already in the �Disc�source menu on the rear
screens, and the disc supports “auto play.”
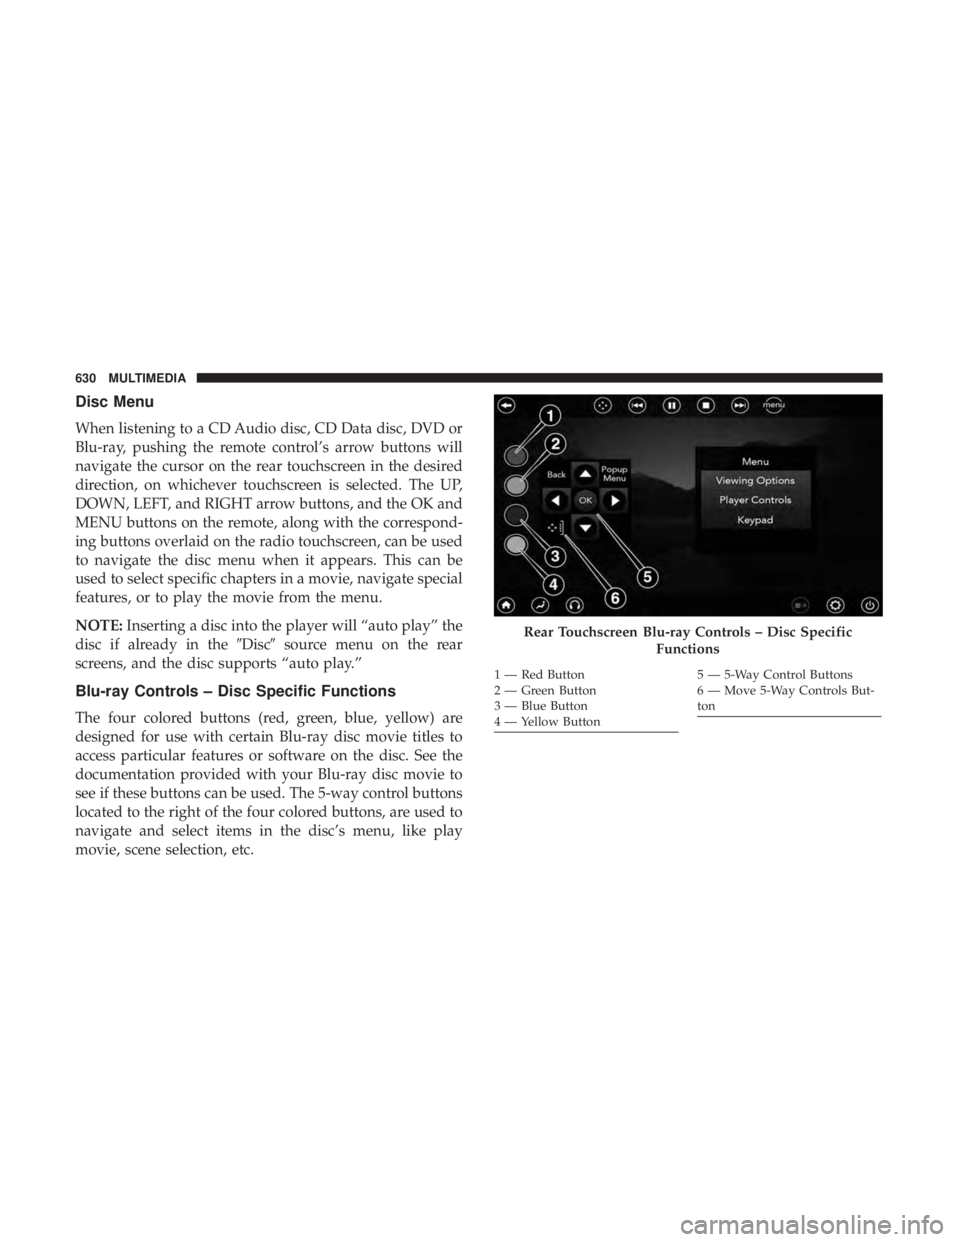
Blu-ray Controls – Disc Specific Functions
The four colored buttons (red, green, blue, yellow) are
designed for use with certain Blu-ray disc movie titles to
access particular features or software on the disc. See the
documentation provided with your Blu-ray disc movie to
see if these buttons can be used. The 5-way control buttons
located to the right of the four colored buttons, are used to
navigate and select items in the disc’s menu, like play
movie, scene selection, etc.
Rear Touchscreen Blu-ray Controls – Disc Specific
Functions
1 — Red Button
2 — Green Button
3 — Blue Button
4 — Yellow Button5 — 5-Way Control Buttons
6 — Move 5-Way Controls But-
ton
630 MULTIMEDIA
Page 641 of 696
IconDescription
AUTO Button
Automatically controls the rear interior cabin temperature by adjusting airflow distribution and amount.
Toggling this function will cause the system to switch between manual mode and automatic modes. Re-
fer to “Automatic Operation” in�Getting To Know Your Vehicle” for more information.
Rear Passenger Temperature Up and Down Buttons
Provides the rear passengers with independent temperature control. Push the button on the touchscreen
to increase or decrease the temperature. The temperature will get warmer as you move up toward the
red arrow and colder as you move down toward the blue arrow.
Headliner Mode
Headliner Mode
Air comes from the outlets in the headliner. Each of these outlets can be individually adjusted to direct
the flow of air. Moving the air vanes of the outlets to one side will shut off the airflow.
10
MULTIMEDIA 639