Page 584 of 696
Auto-On Comfort Systems — If Equipped
After pressing the “Auto-On Comfort & Remote Start”
button on the touchscreen, the following settings will be
available:
Setting NameSelectable Options
Auto-On Driver Heated/
Ventilated Seat & Steering Wheel With Vehicle Start — If Equipped Off
Remote Start All Starts
NOTE:
When this feature is selected the driver ’s heated seat and heated steering wheel will automatically turn ON when
temperatures are below 40° F (4.4° C). When temperatures are above 80° F (26.7° C) the driver vented seat will turn
on.
582 MULTIMEDIA
Page 601 of 696

Setting NameSelectable Options
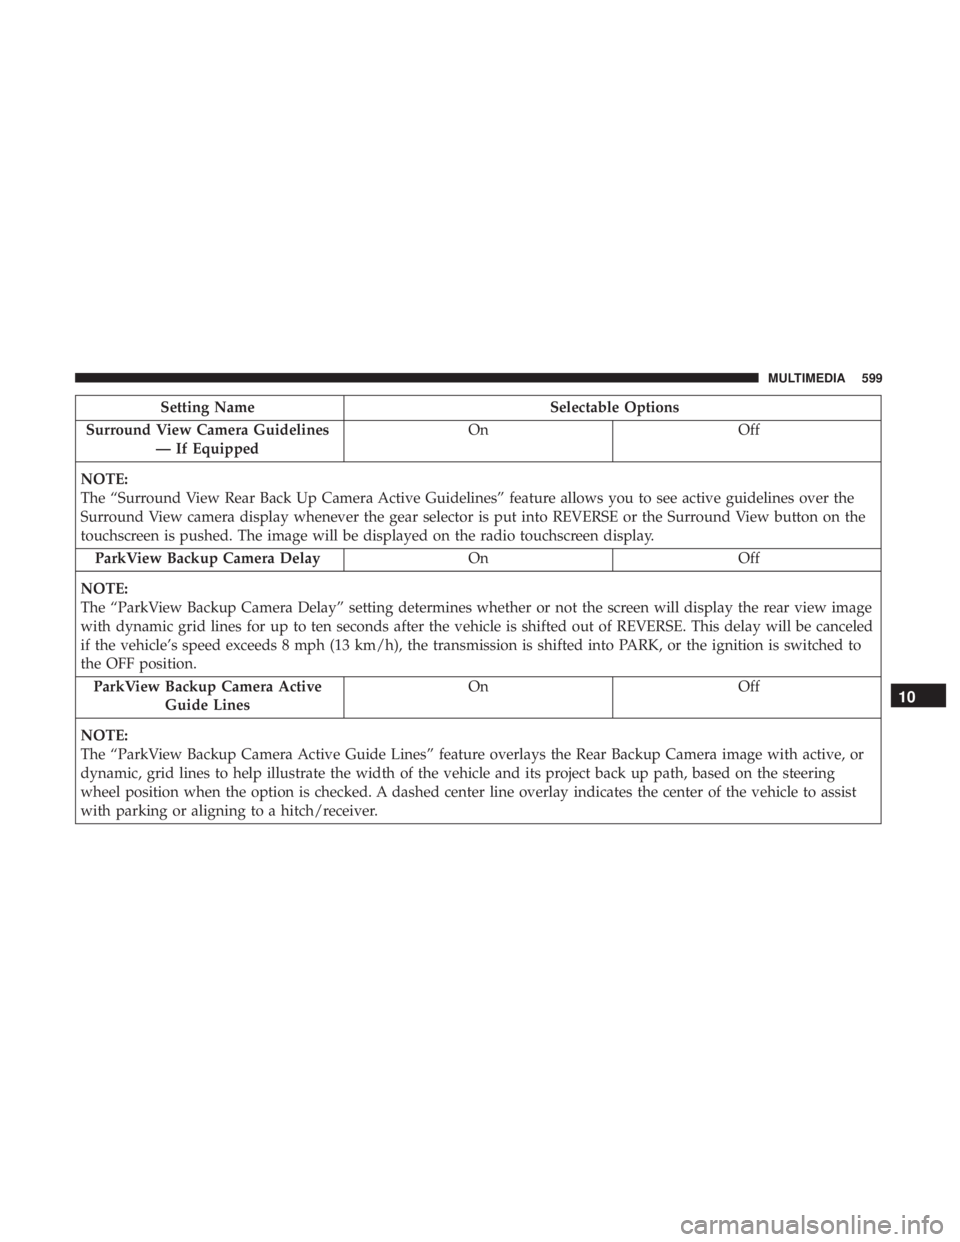
Surround View Camera Guidelines — If Equipped On
Off
NOTE:
The “Surround View Rear Back Up Camera Active Guidelines” feature allows you to see active guidelines over the
Surround View camera display whenever the gear selector is put into REVERSE or the Surround View button on the
touchscreen is pushed. The image will be displayed on the radio touchscreen display. ParkView Backup Camera Delay OnOff
NOTE:
The “ParkView Backup Camera Delay” setting determines whether or not the screen will display the rear view image
with dynamic grid lines for up to ten seconds after the vehicle is shifted out of REVERSE. This delay will be canceled
if the vehicle’s speed exceeds 8 mph (13 km/h), the transmission is shifted into PARK, or the ignition is switched to
the OFF position. ParkView Backup Camera Active Guide Lines On
Off
NOTE:
The “ParkView Backup Camera Active Guide Lines” feature overlays the Rear Backup Camera image with active, or
dynamic, grid lines to help illustrate the width of the vehicle and its project back up path, based on the steering
wheel position when the option is checked. A dashed center line overlay indicates the center of the vehicle to assist
with parking or aligning to a hitch/receiver.
10
MULTIMEDIA 599
Page 604 of 696
Setting NameSelectable Options
ParkSense — If Equipped Sound Only Sound and Display
NOTE:
The “ParkSense” system setting will scan for objects behind the vehicle when the transmission gear selector is in RE-
VERSE and the vehicle speed is less than 7 mph (11 km/h), when enabled. It will provide an alert (audible and/or
visual) to indicate the proximity to other objects. The system can be enabled with “Sound Only,” or “Sound and Dis-
play.” Front ParkSense Volume LowMedium High
Rear ParkSense Volume LowMedium High
Sliding Door Alert — If Equipped On
Off
NOTE:
When the “Sliding Door Alert” feature is selected, a chime plays when the sliding door reverses or an obstacle is
sensed. LaneSense Warning — If Equipped Early
Medium Late
NOTE:
The “LaneSense Warning” setting determines at what distance the LaneSense system will warn you, through steering
wheel feedback, of a possible lane departure. LaneSense Strength — If Equipped Low
Medium High
602 MULTIMEDIA
Page 610 of 696

Setting NameSelectable Options
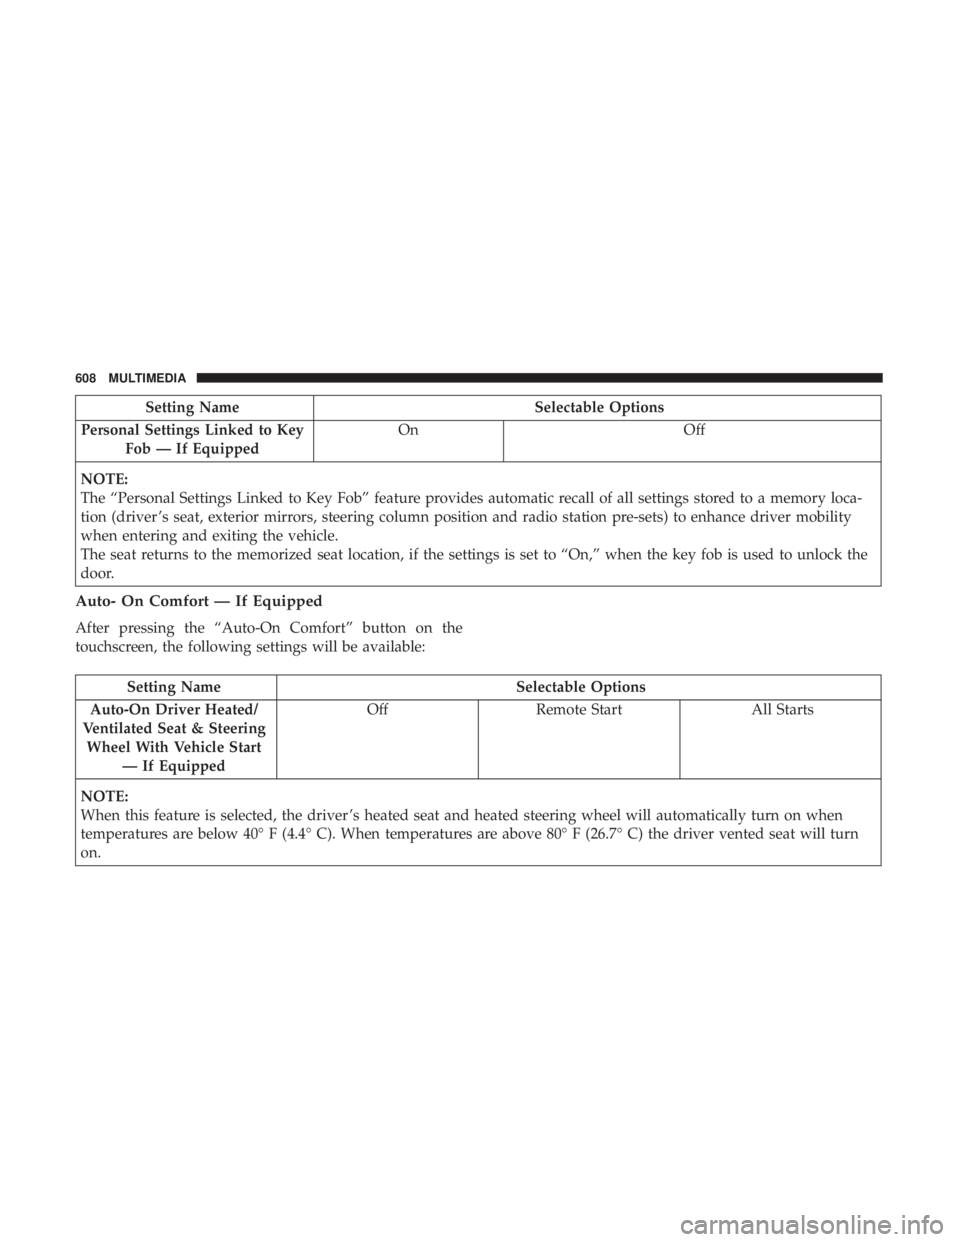
Personal Settings Linked to Key Fob — If Equipped On
Off
NOTE:
The “Personal Settings Linked to Key Fob” feature provides automatic recall of all settings stored to a memory loca-
tion (driver ’s seat, exterior mirrors, steering column position and radio station pre-sets) to enhance driver mobility
when entering and exiting the vehicle.
The seat returns to the memorized seat location, if the settings is set to “On,” when the key fob is used to unlock the
door.
Auto- On Comfort — If Equipped
After pressing the “Auto-On Comfort” button on the
touchscreen, the following settings will be available:
Setting Name Selectable Options
Auto-On Driver Heated/
Ventilated Seat & Steering Wheel With Vehicle Start — If Equipped Off
Remote Start All Starts
NOTE:
When this feature is selected, the driver ’s heated seat and heated steering wheel will automatically turn on when
temperatures are below 40° F (4.4° C). When temperatures are above 80° F (26.7° C) the driver vented seat will turn
on.
608 MULTIMEDIA
Page 617 of 696

STEERING WHEEL AUDIO CONTROLS
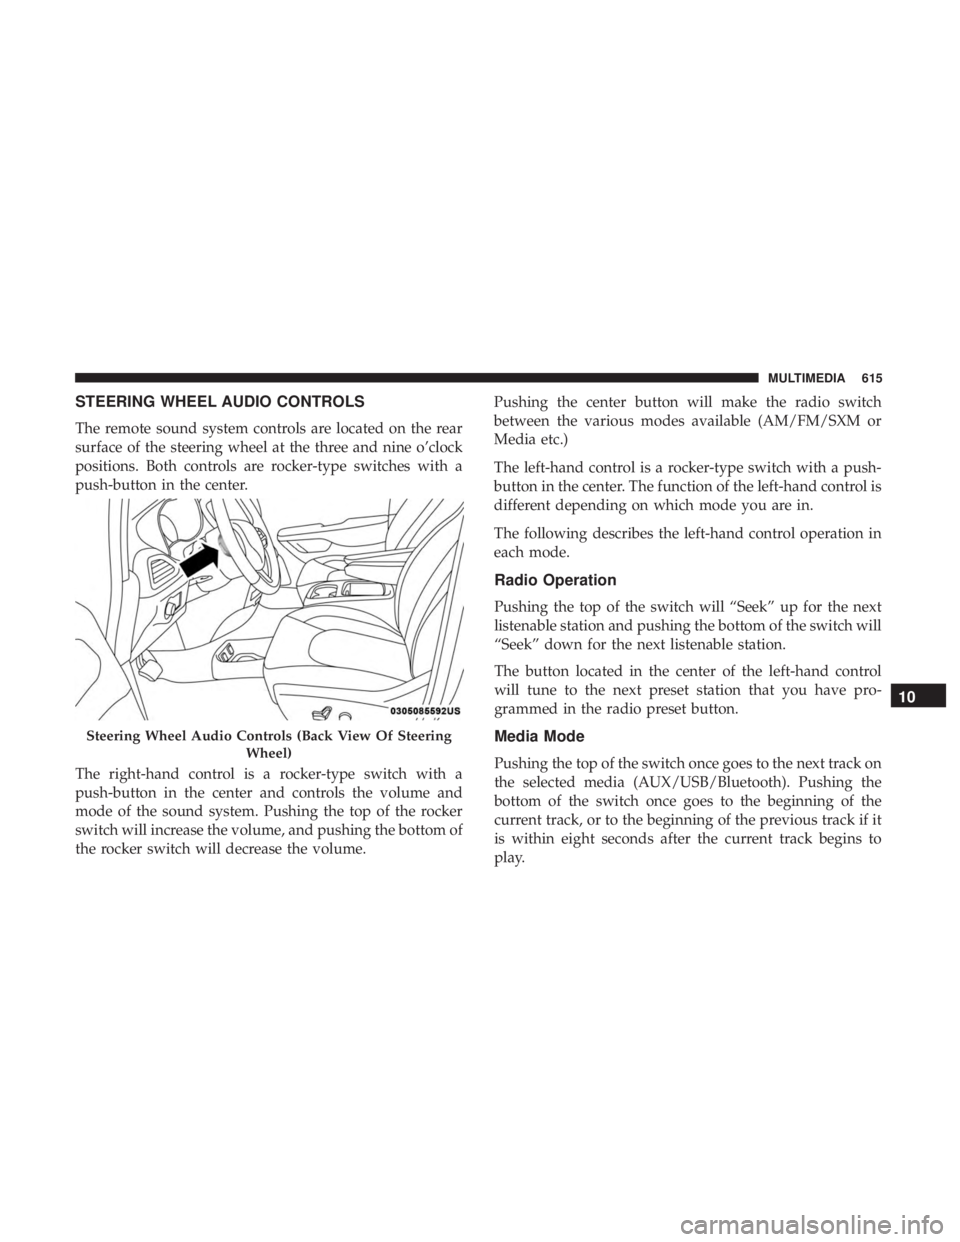
The remote sound system controls are located on the rear
surface of the steering wheel at the three and nine o’clock
positions. Both controls are rocker-type switches with a
push-button in the center.
The right-hand control is a rocker-type switch with a
push-button in the center and controls the volume and
mode of the sound system. Pushing the top of the rocker
switch will increase the volume, and pushing the bottom of
the rocker switch will decrease the volume.Pushing the center button will make the radio switch
between the various modes available (AM/FM/SXM or
Media etc.)
The left-hand control is a rocker-type switch with a push-
button in the center. The function of the left-hand control is
different depending on which mode you are in.
The following describes the left-hand control operation in
each mode.
Radio Operation
Pushing the top of the switch will “Seek” up for the next
listenable station and pushing the bottom of the switch will
“Seek” down for the next listenable station.
The button located in the center of the left-hand control
will tune to the next preset station that you have pro-
grammed in the radio preset button.
Media Mode
Pushing the top of the switch once goes to the next track on
the selected media (AUX/USB/Bluetooth). Pushing the
bottom of the switch once goes to the beginning of the
current track, or to the beginning of the previous track if it
is within eight seconds after the current track begins to
play.
Steering Wheel Audio Controls (Back View Of Steering
Wheel)
10
MULTIMEDIA 615
Page 637 of 696
The headphone power indicator and controls are located
on the right ear cup.
NOTE:Uconnect Theater must be turned on before sound
can be heard from the headphones. To conserve battery life,
the headphones will automatically turn off approximately
three minutes after the Uconnect Theater system is turned
off. Changing The Audio Mode For Headphones
1. Ensure the remote control and the headphones are on
the same channel.
2. Push the Home button on the remote control.
3. When the Home menu appears on the touchscreen, use the arrow buttons on the remote control to navigate to
the available modes and push the OK button to select
the new mode or use the Gesture Pad at the top of the
remote control.
Uconnect Theater Headphones
1 — Power ON/OFF Button
2 — Volume Control Wheel
3 — Channel Selector Button
Headphone Channel Selector Button
10
MULTIMEDIA 635
Page 654 of 696
NOTE:If you see the NAV icon on the bottom bar, or in the
Apps menus, of your touchscreen, you have the Uconnect
4C NAV system. If not, you have a Uconnect 4C system.
Get Started
All you need to control your Uconnect system with your
voice are the buttons on your steering wheel.
Helpful hints for using Voice Recognition:
1. Visit UconnectPhone.com to check mobile device and feature compatibility and to find phone pairing instruc-
tions.
2. Reduce background noise. Wind and passenger conver- sations are examples of noise that may impact recogni-
tion.
3. Speak clearly at a normal pace and volume while facing straight ahead. The microphone is positioned on the
rearview mirror and aimed at the driver.
4. Each time you give a Voice Command, you must first push either the Voice Recognition (VR) or Phone button,
wait until afterthe beep, then say your Voice Command.
Uconnect 4C NAV
652 MULTIMEDIA
Page 660 of 696
Apple iPhone iOS 6 or later supports readingincoming
text messages only. To enable this feature on your Apple
iPhone, follow these four simple steps:
TIP: Voice Text Reply is not compatible with iPhone, but if
your vehicle is equipped with Siri Eyes Free, you can use
your voice to send a text message.Climate
Too hot? Too cold? Adjust vehicle temperatures hands-free
and keep everyone comfortable while you keep moving
ahead. (If vehicle is equipped with climate control.)
Push the VR button
. After the beep, say one of the
following commands:
• “Set driver temperature to 70degrees”
• “Set passenger temperature to 70degrees”
TIP: Voice Command for Climate may only be used to
adjust the interior temperature of your vehicle. Voice
Command will not work to adjust the heated seats or
steering wheel if equipped.
iPhone Notification Settings
1 — Select “Settings”
2 — Select “Bluetooth”
3 — Select The (i) For The Paired Vehicle
4 — Turn On “Show Notifications” 658 MULTIMEDIA