2018 CHRYSLER PACIFICA HYBRID change time
[x] Cancel search: change timePage 99 of 614

Front Fog Lights — If Equipped
To activate the front fog lights, turn on the parking lights or
the low beam headlights and push in the headlight switch
control knob. Pushing the headlight switch control knob in
a second time will turn the front fog lights off.
Turn Signals
Move the multifunction lever up or down and the arrows
on each side of the instrument cluster flash to show proper
operation of the front and rear turn signal lights.NOTE:
If either light remains on and does not flash, or
there is a very fast flash rate, check for a defective outside
light bulb. If an indicator fails to light when the lever is
moved, it would suggest that the indicator bulb is defec-
tive.
Turn Signal Warning
If the vehicle electronics sense that the vehicle has traveled
for about 1 mile (1.6 km) with the turn signals on, a chime
will sound and a message will display in the cluster to alert
the driver.
Lane Change Assist — If Equipped
Tap the multifunction lever up or down once, without
moving beyond the detent, and the turn signal (right or
left) will flash three times then automatically turn off.
Battery Protection
This feature provides battery protection to avoid wearing
down the battery if the headlights or parking lights are left
on for extended periods of time when the ignition switch is
in the LOCK position. After eight minutes of the ignition
switch being in the LOCK position and the headlight
switch in any position other than OFF or AUTO, the lights
will turn off automatically until the next cycle of the
ignition switch or headlight switch.Fog Light Switch
3
GETTING TO KNOW YOUR VEHICLE 97
Page 112 of 614

MAX A/C
MAX A/C sets the control for maximum cooling perfor-
mance.
Press and release to toggle between MAX A/C and the
prior settings. The button illuminates when MAX A/C is
on.
In MAX A/C, the blower level and mode position can be
adjusted to desired user settings. Pressing other settings
will cause the MAX A/C operation to switch to the selected
setting and MAX A/C to exit.
Recirculation
When outside air contains smoke, odors, or high humidity,
or if rapid cooling is desired, you may wish to recirculate
interior air by pressing the Recirculation control button.
The Recirculation indicator will illuminate when this but-
ton is selected. Press the button a second time to turn off
the Recirculation mode and allow outside air into the
vehicle.
NOTE:In cold weather, use of Recirculation mode may
lead to excessive window fogging. The Recirculation fea-
ture may be unavailable (button on the touchscreen greyed
out) if conditions exist that could create fogging on the
inside of the windshield.Automatic Temperature Control (ATC) —
If Equipped
Automatic Operation
1. Push the AUTO button on the front ATC Panel and the word “AUTO” will illuminate in the front ATC display,
along with two temperatures for the driver and front
passenger. The system will then automatically regulate
the amount of airflow.
2. Adjust the temperature you would like the system to maintain, by adjusting the driver, passenger, and rear
temperatures. Once the desired temperature is dis-
played, the system will achieve and automatically main-
tain that comfort level.
3. When the system is set up for your comfort level, it is not necessary to change the settings. You will experience
the greatest efficiency by simply allowing the system to
function automatically.
NOTE: It is not necessary to move the temperature set-
tings. The system automatically adjusts the temperature,
mode and fan speed to provide comfort as quickly as
possible.
To provide you with maximum comfort in the automatic
mode, during cold start-ups, the blower fan will remain on
110 GETTING TO KNOW YOUR VEHICLE
Page 138 of 614

1. Place the ignition in the ON/RUN position.
2. Place the hand-held transmitter 1 to 3 inches (3 to 8 cm)away from the HomeLink button you wish to program
while keeping the HomeLink indicator light in view.
3. Push and hold the HomeLink button you want to program while you push and hold the hand-held trans-
mitter button. 4. Continue to hold both buttons and observe the indicator
light. The HomeLink indicator will flash slowly and
then rapidly after HomeLink has received the frequency
signal from the hand-held transmitter. Release both
buttons after the indicator light changes from slow to
rapid.
5. At the garage door opener motor (in the garage), locate the “LEARN” or “TRAINING” button. This can usually
be found where the hanging antenna wire is attached to
the garage door opener/device motor. Firmly push and
release the “LEARN” or “TRAINING” button. On some
garage door openers/devices there may be a light that
blinks when the garage door opener/device is in the
LEARN/TRAIN mode.
NOTE: You have 30 seconds in which to initiate the next
step after the LEARN button has been pushed.
6. Return to the vehicle and push the programmed HomeLink button twice (holding the button for two
seconds each time). If the garage door opener/device
activates, programming is complete.
NOTE: If the garage door opener/device does not activate,
push the button a third time (for two seconds) to complete
the training.
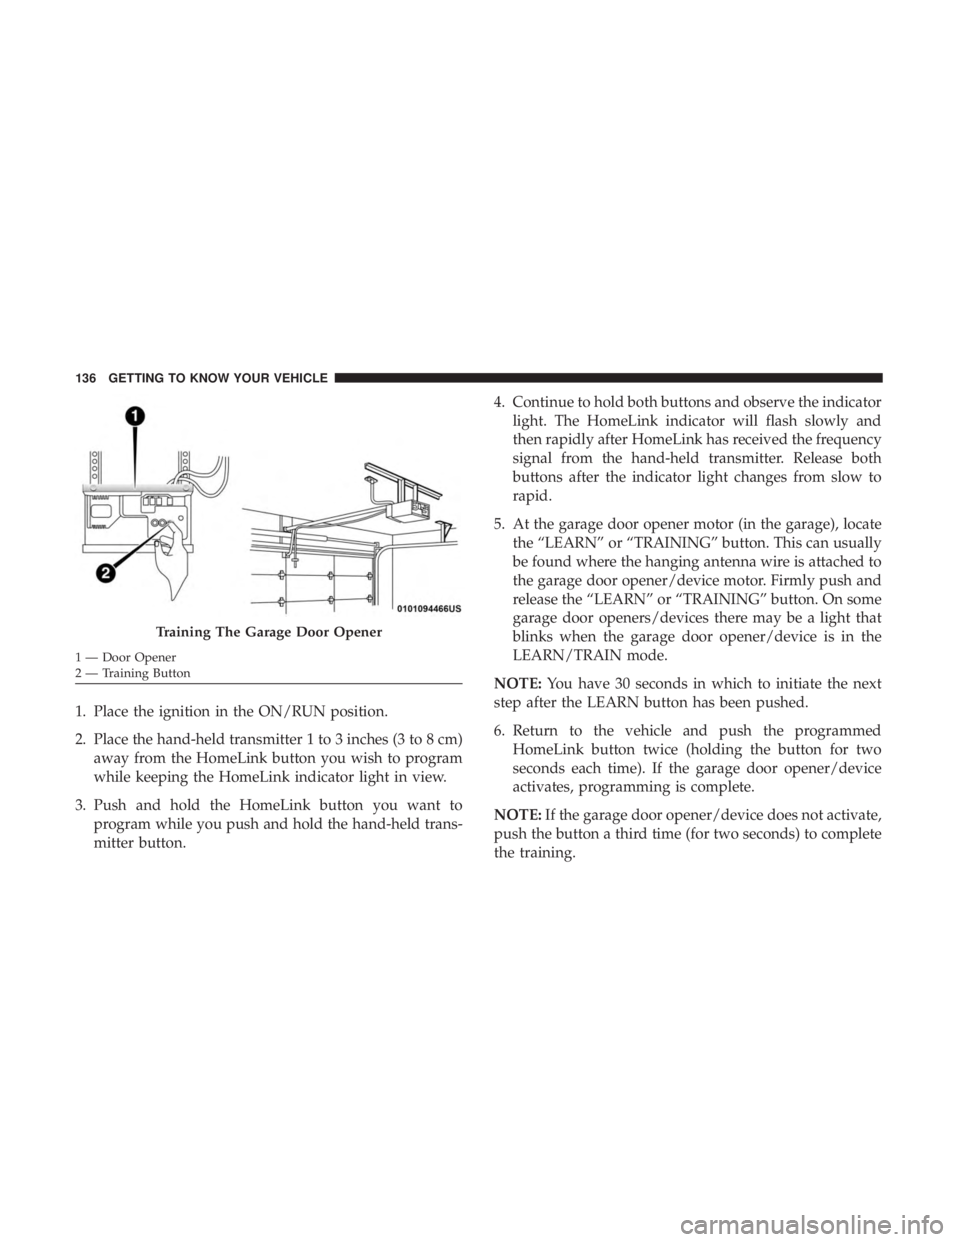
Training The Garage Door Opener
1 — Door Opener
2 — Training Button 136 GETTING TO KNOW YOUR VEHICLE
Page 140 of 614

2. Press and hold the desired HomeLink button until theindicator light begins to flash after 20 seconds. Do not
release the button.
3. Without releasing the button, proceed with “Program- ming A Non-Rolling Code” step 2 and follow all remain-
ing steps.
Canadian/Gate Operator Programming
For programming transmitters in Canada/United States
that require the transmitter signals to “time-out” after
several seconds of transmission.
Canadian radio frequency laws require transmitter signals
to time-out (or quit) after several seconds of transmission –
which may not be long enough for HomeLink to pick up
the signal during programming. Similar to this Canadian
law, some U.S. gate operators are designed to time-out in
the same manner.
It may be helpful to unplug the device during the cycling
process to prevent possible overheating of the garage door
or gate motor.
1. Cycle the ignition to the ON/RUN position. 2. Place the hand-held transmitter 1 to 3 inches (3 to 8 cm)
away from the HomeLink button you wish to program
while keeping the HomeLink indicator light in view.
3. Continue to press and hold the HomeLink button, while you press and release (“cycle”) your hand-held trans-
mitter every two seconds until HomeLink has success-
fully accepted the frequency signal. The indicator light
will flash slowly and then rapidly when fully trained.
4. Watch for the HomeLink indicator to change flash rates. When it changes, it is programmed. It may take up to 30
seconds or longer in rare cases. The garage door may
open and close while you are programming.
5. Press and hold the programmed HomeLink button and observe the indicator light.
NOTE: •If the indicator light stays on constantly, programming
is complete and the garage door/device should acti-
vate when the HomeLink button is pressed.
• To program the two remaining HomeLink buttons,
repeat each step for each remaining button. DO NOT
erase the channels.
138 GETTING TO KNOW YOUR VEHICLE
Page 164 of 614

•Unless reset, this message will continue to display each
time the ignition is cycled to the ON/RUN position.
• To reset the oil change indicator after performing the
scheduled maintenance, refer to the following proce-
dure.
Without pressing the brake pedal, push the ENGINE
START/STOP button and place the ignition in the ON/
RUN position (do not start the vehicle.)
1. Push the OKbutton to enter the instrument cluster
display menu screen.
2. Push and release the downarrow button to access the
”Oil Life” menu screen.
3. Push the leftarrow button or right arrow button to
access the “Vehicle Info” submenu.
4. Hold the OKbutton to reset the “Oil Life” to 100%.
5. Push the uparrow button to exit the instrument cluster
display menu screen.
NOTE: If the indicator message illuminates when you
start the vehicle, the oil change indicator system did not
reset. If necessary, repeat this procedure.Fuel And Oil Refresh Mode
Since it is possible to operate this vehicle for extended
periods of time without running the gas engine, the fuel
within the vehicle’s fuel tank can become stale. To prevent
engine and/or fuel system damage due to stale fuel, as
well as, maintaining internal engine lubrication, this ve-
hicle is equipped with a “Fuel and Oil Refresh Mode”.
The vehicle will automatically enter into the Fuel and Oil
Refresh Mode to minimize potential for stale fuel, and to
ensure lubrication of internal engine components. When
operating in this mode, the gas engine will run to provide
vehicle propulsion (electric only operation is inhibited). A
message will be displayed in the instrument cluster when-
ever Fuel and Oil Refresh Mode is active.
The vehicle will automatically exit the Fuel and Oil Refresh
Mode when conditions have been satisfied. If the vehicle
enters Fuel and Oil Refresh Mode, due to fuel which has
been in the fuel tank for a long period of time (becoming
stale fuel), the engine will run whenever the vehicle is
operational (no electric only operation) until the low fuel
level warning is activated. It is possible to exit the Fuel and
Oil Refresh Mode sooner by adding new fuel to the
vehicle’s fuel tank.
162 GETTING TO KNOW YOUR INSTRUMENT PANEL
Page 167 of 614

Oil Life (Hold OK Button To Reset)
The “Hold OK to Reset” instruction will be displayed at all
times, but the following conditions will need to be met in
order to reset Oil Life:
•The vehicle must be off
• The ignition must be in the ON/RUN position
If the conditions are met, holding the OKbutton will reset
the gauge and the numeric display will return to 100%.
If the conditions are not met, a popup message will display
for 5 seconds, describing the required conditions, and then
the Oil Life screen will reappear.
Driver Assist — If Equipped
Push and release the upordown arrow button until Driver
Assist is highlighted in the instrument cluster display.
Adaptive Cruise Control and LaneSense:
• Driver Assist Screen shows the current status of both the
ACC and the LaneSense systems
• Popup messages also indicate the status of the system
and/or the conditions that need to be met Adaptive Cruise Control (ACC) Feature
The instrument cluster display will show the current ACC
system settings. The information displayed depends on ACC
system status. Push the Adaptive Cruise Control (ACC)
on/off button (located on the steering wheel) until one of the
following displays in the instrument cluster display:
•
Adaptive Cruise Control Off: when ACC is deactivated,
the display will read “Adaptive Cruise Control Off.”
• Adaptive Cruise Control Ready: when ACC is activated
but the vehicle speed setting has not been selected, the
display will read “Adaptive Cruise Control Ready.”
Push the SET + or the SET- button (located on the
steering wheel).
ACC SET
When ACC is set, the set speed will display in the
instrument cluster.
The ACC screen may display once again if any ACC
activity occurs, which may include any of the following:
• Distance Setting Change
• System Cancel
• Driver Override
4
GETTING TO KNOW YOUR INSTRUMENT PANEL 165
Page 172 of 614

Speed Warning — If Equipped
Push and release theupordown arrow button until Speed
Warning is highlighted in the instrument cluster display.
Push and release the OKbutton to enter speed warning.
Use the upordown arrow button to turn the speed
warning ON or OFF, then push and release the OKbutton
to confirm the selection. If the ON status is selected, use the
up ordown arrow button to set the desired speed, then
push the OKbutton to set the speed for the speed warning.
A speed warning telltale will illuminate in the instrument
cluster, with a number matching the set speed, with a pop
up message to inform the driver that the speed warning
has been set to the desired speed. Each time the set speed
is exceeded, a single chime will sound and a pop up
warning message will display. If the set speed is exceeded
more than 2 mph (3 km/h), a continuous chime will sound
for up to 10 seconds, or until the speed is no longer
exceeded. The telltale in the instrument cluster will also
change from white to yellow, and a pop up warning
message will pop up on the instrument cluster display.
NOTE: Speed Warning is unavailable while KeySense is in
use.
Battery Saver On/Battery Saver Mode Message —
Electrical Load Reduction Actions — If Equipped
The vehicle is equipped with an Intelligent Battery Sensor
(IBS) to perform additional monitoring of the 12 volt
electrical system and status of the 12 volt vehicle battery.
In cases when the IBS detects charging system failure, or
the 12 volt vehicle battery conditions are deteriorating,
electrical load reduction actions will take place to extend
the driving time and distance of the vehicle. This is done by
reducing power to or turning off non-essential 12 volt
electrical loads. Load reduction will be functional when the
vehicle propulsion system is active.
The vehicle may not be running depending on the HV
battery SOC or temperature. It will display a message if
there is a risk of battery depletion to the point where the
vehicle may stall due to lack of electrical supply, or will not
restart after the current drive cycle.
When 12 volt load reduction is activated, the message
“Battery Saver On” or “Battery Saver Mode” will appear in
the Instrument Cluster Display.
These messages indicate the 12 volt vehicle battery has a
low state of charge and continues to lose electrical charge at
a rate that the charging system cannot sustain.
170 GETTING TO KNOW YOUR INSTRUMENT PANEL
Page 195 of 614

WARNING!(Continued)
the performance of the ESC system. Changes to the
steering system, suspension, braking system, tire
type and size or wheel size may adversely affect ESC
performance. Improperly inflated and unevenly
worn tires may also degrade ESC performance. Any
vehicle modification or poor vehicle maintenance
that reduces the effectiveness of the ESC system can
increase the risk of loss of vehicle control, vehicle
rollover, personal injury and death.
ESC Operating Modes
NOTE:Depending upon model and mode of operation, the
ESC system may have multiple operating modes.
ESC On
This is the normal operating mode for the ESC. Whenever
the vehicle is started, the ESC system will be in this mode.
This mode should be used for most driving conditions.
Alternate ESC modes should only be used for specific
reasons as noted in the following paragraphs. Partial Off
The “Partial Off” mode is intended for times when a more
spirited driving experience is desired. This mode may
modify TCS and ESC thresholds for activation, which
allows for more wheel spin than normally allowed. This
mode may be useful if the vehicle becomes stuck.
To enter the “Partial Off” mode, momentarily push the
“ESC Off” button and the “ESC Off Indicator Light” will
illuminate. To turn the ESC on again, momentarily push
the “ESC Off” button and the “ESC Off Indicator Light”
will turn off.
NOTE:
When driving with snow chains, or when starting
off in deep snow, sand, or gravel, it may be desirable to
allow more wheel spin. This can be accomplished by
momentarily pushing the “ESC Off” button to enter partial
mode “Partial Off” mode. Once the situation requiring
“Partial Off” mode is overcome, turn ESC back on by
momentarily pushing the “ESC Off” button. This may be
done while the vehicle is in motion.
5
SAFETY 193