Page 449 of 614
Front Wiper Blade Removal/Installation
CAUTION!
Do not allow the wiper arm to spring back against the
glass without the wiper blade in place or the glass may
be damaged.
1. Lift the wiper arm to raise the wiper blade off of the glass, until the wiper arm is in the full up position.
2. To disengage the wiper blade from the wiper arm, flipup the release tab on the wiper blade and while holding
the wiper arm with one hand, slide the wiper blade
down towards the base of the wiper arm.
Wiper Blade With Release Tab In Locked Position
1 — Wiper Blade
2 — Release Tab
3—WiperArm
8
SERVICING AND MAINTENANCE 447
Page 450 of 614
3. With the wiper blade disengaged, remove the wiperblade from the wiper arm by holding the wiper arm
with one hand and separating the wiper blade from the
wiper arm with the other hand (move the wiper blade
toward the right side of the vehicle to separate the wiper
blade from the wiper arm). 4. Gently lower the wiper arm onto the glass.
Installing The Front Wipers
1. Lift the wiper arm off of the glass, until the wiper arm is
in the full up position.
Wiper Blade With Release Tab In Unlocked Position
1—WiperBlade
2 — Release Tab
3—WiperArm
Wiper Blade Removed From Wiper Arm
1 — Wiper Blade
2—WiperArm
3 — Release Tab
448 SERVICING AND MAINTENANCE
Page 451 of 614

2. Position the wiper blade near the hook on the tip of thewiper arm with the wiper release tab open and the blade
side of the wiper facing up and away from the wind-
shield.
3. Insert the hook on the tip of the arm through the opening in the wiper blade under the release tab.
4. Slide the wiper blade up into the hook on the wiper arm and rotate the wiper blade until it is flush against the
wiper arm. Fold down the latch release tab and snap it
into its locked position. Latch engagement will be
accompanied by an audible click.
5. Gently lower the wiper blade onto the glass.
Rear Wiper Blade Removal/Installation
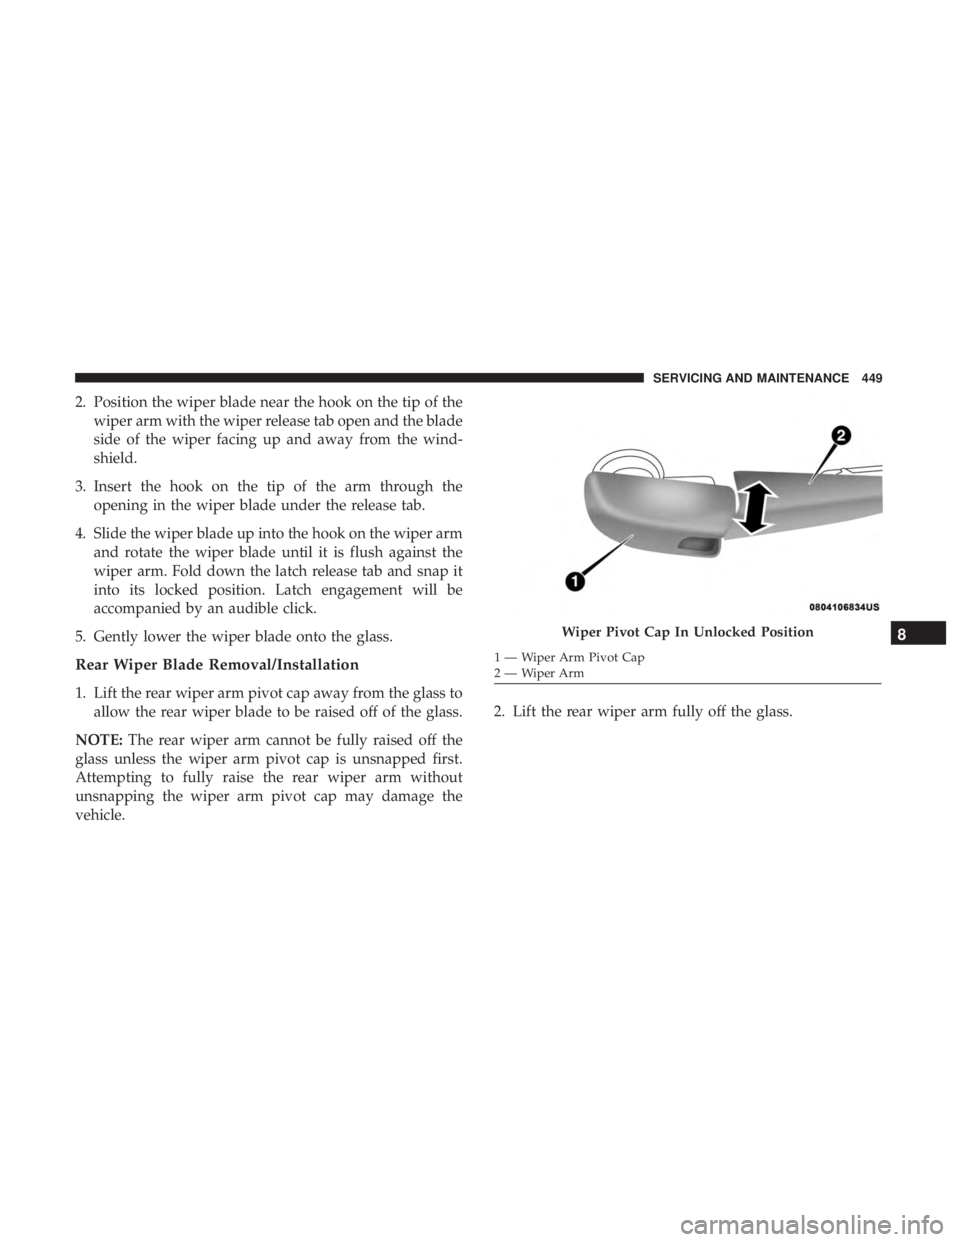
1. Lift the rear wiper arm pivot cap away from the glass to allow the rear wiper blade to be raised off of the glass.
NOTE: The rear wiper arm cannot be fully raised off the
glass unless the wiper arm pivot cap is unsnapped first.
Attempting to fully raise the rear wiper arm without
unsnapping the wiper arm pivot cap may damage the
vehicle. 2. Lift the rear wiper arm fully off the glass.
Wiper Pivot Cap In Unlocked Position
1 — Wiper Arm Pivot Cap
2—WiperArm
8
SERVICING AND MAINTENANCE 449
Page 517 of 614
Clock
After pressing the “Clock” button on the touchscreen, the
following settings will be available:
Setting NameSelectable Options
Sync Time With GPS — If Equipped OnOff
Set Time Hours +-
NOTE:
The “Set Time Hours” feature will allow you to adjust the hours. The “Sync time with GPS” button on the touch-
screen must be unchecked. Set Time Minutes +-
NOTE:
The “Set Time Minutes” feature will allow you to adjust the minutes. The “Sync time with GPS” button on the touch-
screen must be unchecked. Time Format 12hrs24hrs
AM PM
10
MULTIMEDIA 515
Page 525 of 614
Setting NameSelectable Options
Headlight Illumi-
nated On Approach 0 sec
30 sec 60 sec 90 sec
NOTE:
When the “Headlight Illumination On Approach” feature is selected, it allows the adjustment of the amount of time
the headlights remain on after the doors are unlocked with the key fob. Headlights WithWipers — IfEquipped On
Off
Auto Dim High Beams — IfEquipped On
Off
NOTE:
When the “Auto Dim High Beams” feature is selected, the high beam headlights will activate/deactivate automati-
cally under certain conditions. Daytime Running Lights On
Off
Flash Lights With Lock On
Off
Flash Lights With Sliding Door On
Off
10
MULTIMEDIA 523
Page 526 of 614
Doors & Locks
After pressing the “Doors & Locks” button on the touch-
screen, the following settings will be available:
NOTE:The auto door lock feature default condition is
enabled. When enabled, the door locks will lock automati-
cally when the vehicle’s speed exceeds 12 mph (20 km/h).
The auto door lock feature can be enabled or disabled by
your authorized dealer per written request of the customer.
Please see your authorized dealer for service.
Setting Name Selectable Options
Auto Unlock On Exit On Off
NOTE:
When the “Auto Unlock On Exit” feature is selected, all doors will unlock when the vehicle is stopped and the trans-
mission is in the PARK or NEUTRAL position and the driver’s door is opened. Flash Lights With Lock OnOff
Sound Horn With Lock — If Equipped Off
1st Press 2nd Press
Sound Horn With Remote Start — If Equipped On
Off
524 MULTIMEDIA
Page 527 of 614

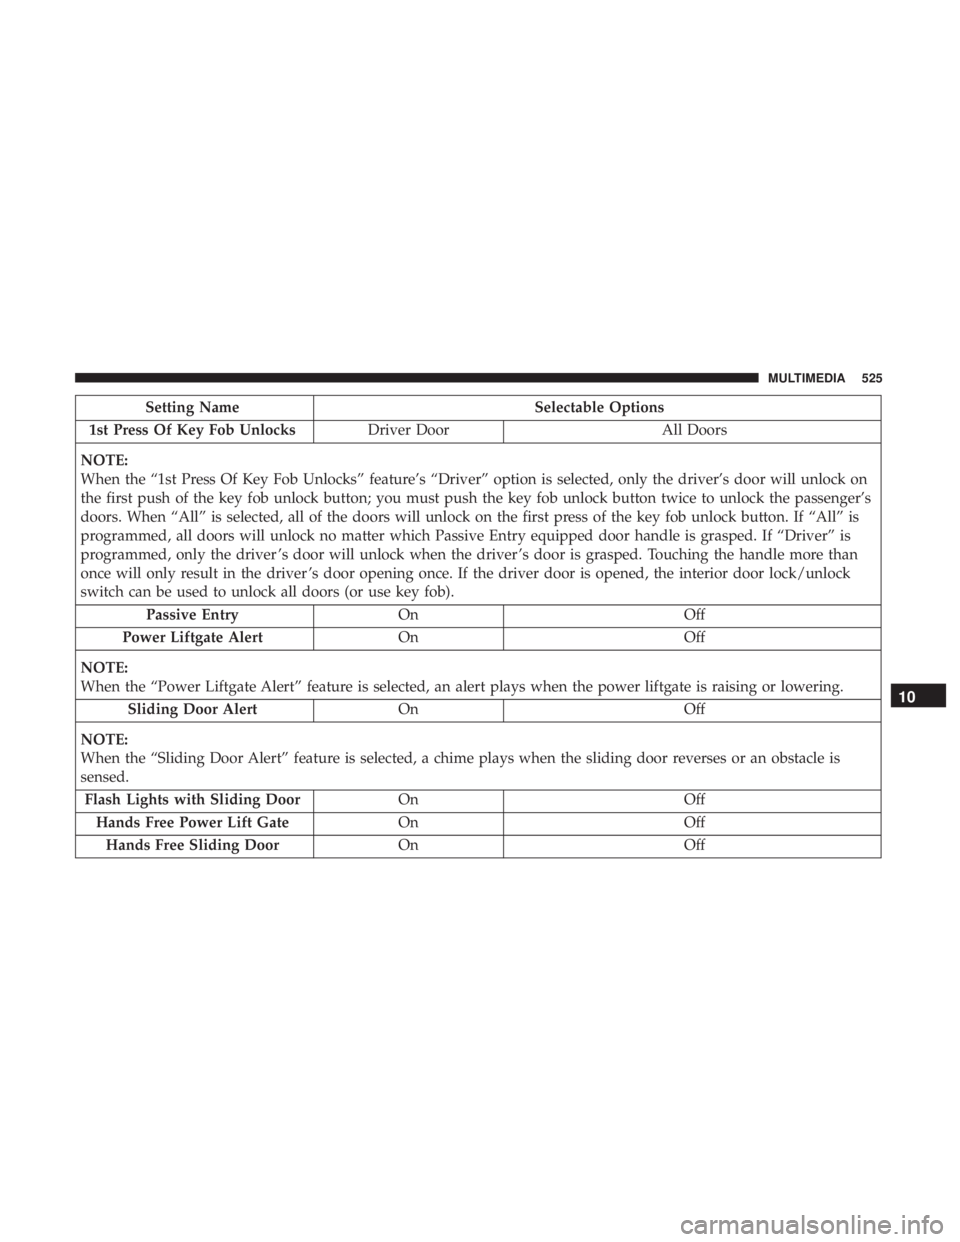
Setting NameSelectable Options
1st Press Of Key Fob Unlocks Driver Door All Doors
NOTE:
When the “1st Press Of Key Fob Unlocks” feature’s “Driver” option is selected, only the driver’s door will unlock on
the first push of the key fob unlock button; you must push the key fob unlock button twice to unlock the passenger’s
doors. When “All” is selected, all of the doors will unlock on the first press of the key fob unlock button. If “All” is
programmed, all doors will unlock no matter which Passive Entry equipped door handle is grasped. If “Driver” is
programmed, only the driver ’s door will unlock when the driver ’s door is grasped. Touching the handle more than
once will only result in the driver ’s door opening once. If the driver door is opened, the interior door lock/unlock
switch can be used to unlock all doors (or use key fob). Passive Entry On Off
Power Liftgate Alert On Off
NOTE:
When the “Power Liftgate Alert” feature is selected, an alert plays when the power liftgate is raising or lowering. Sliding Door Alert On Off
NOTE:
When the “Sliding Door Alert” feature is selected, a chime plays when the sliding door reverses or an obstacle is
sensed. Flash Lights with Sliding Door OnOff
Hands Free Power Lift Gate OnOff
Hands Free Sliding Door OnOff
10
MULTIMEDIA 525
Page 528 of 614

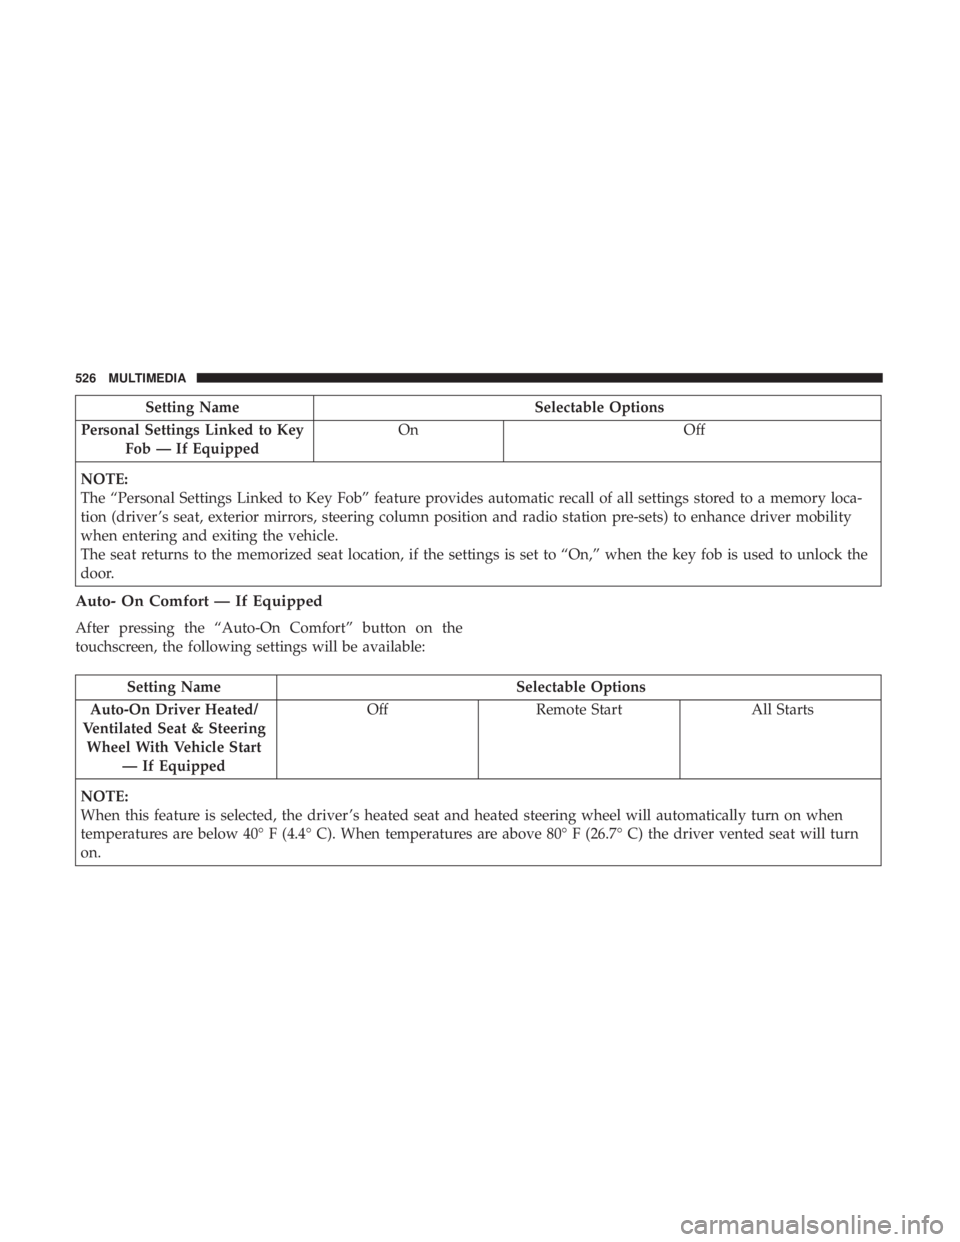
Setting NameSelectable Options
Personal Settings Linked to Key Fob — If Equipped On
Off
NOTE:
The “Personal Settings Linked to Key Fob” feature provides automatic recall of all settings stored to a memory loca-
tion (driver ’s seat, exterior mirrors, steering column position and radio station pre-sets) to enhance driver mobility
when entering and exiting the vehicle.
The seat returns to the memorized seat location, if the settings is set to “On,” when the key fob is used to unlock the
door.
Auto- On Comfort — If Equipped
After pressing the “Auto-On Comfort” button on the
touchscreen, the following settings will be available:
Setting Name Selectable Options
Auto-On Driver Heated/
Ventilated Seat & Steering Wheel With Vehicle Start — If Equipped Off
Remote Start All Starts
NOTE:
When this feature is selected, the driver ’s heated seat and heated steering wheel will automatically turn on when
temperatures are below 40° F (4.4° C). When temperatures are above 80° F (26.7° C) the driver vented seat will turn
on.
526 MULTIMEDIA