2018 CHEVROLET SILVERADO 1500 Z71 ECO mode
[x] Cancel search: ECO modePage 320 of 501
Chevrolet Silverado Owner Manual (GMNA-Localizing-U.S./Canada/Mexico-
11349200) - 2018 - CRC - 2/27/18
Driving and Operating 319
Vehicle SeriesTrailer WeightWeight-Distributing Hitch
Usage Hitch Distribution
1500 Up to 3 175 kg (7,000 lb) OptionalRefer to trailer
manufacturer ’s
recommendation
1500 Over 3 175 kg (7,000 lb) Required50%
2500/3500 Up to 9 080 kg (20,000 lb) OptionalRefer to trailer
manufacturer ’s
recommendation
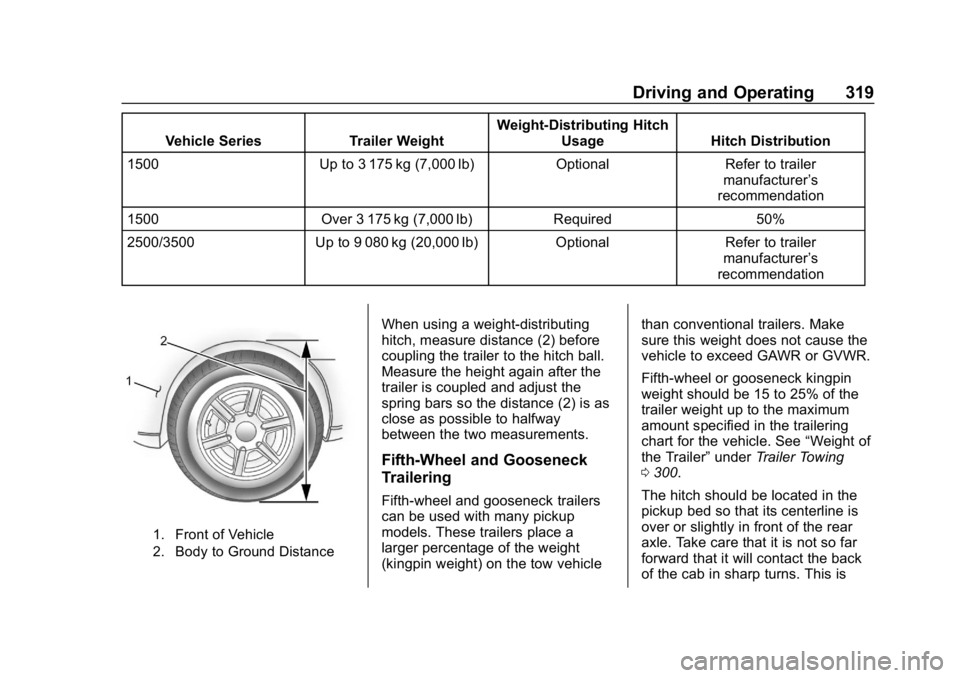
1. Front of Vehicle
2. Body to Ground Distance
When using a weight-distributing
hitch, measure distance (2) before
coupling the trailer to the hitch ball.
Measure the height again after the
trailer is coupled and adjust the
spring bars so the distance (2) is as
close as possible to halfway
between the two measurements.
Fifth-Wheel and Gooseneck
Trailering
Fifth-wheel and gooseneck trailers
can be used with many pickup
models. These trailers place a
larger percentage of the weight
(kingpin weight) on the tow vehicle than conventional trailers. Make
sure this weight does not cause the
vehicle to exceed GAWR or GVWR.
Fifth-wheel or gooseneck kingpin
weight should be 15 to 25% of the
trailer weight up to the maximum
amount specified in the trailering
chart for the vehicle. See
“Weight of
the Trailer” underTrailer Towing
0 300.
The hitch should be located in the
pickup bed so that its centerline is
over or slightly in front of the rear
axle. Take care that it is not so far
forward that it will contact the back
of the cab in sharp turns. This is
Page 324 of 501
Chevrolet Silverado Owner Manual (GMNA-Localizing-U.S./Canada/Mexico-
11349200) - 2018 - CRC - 2/27/18
Driving and Operating 323
.Black: Ground
Be sure to consult the aftermarket
electric brake controller owner ’s
manual to determine wire color
coding of the electric trailer brake
controller. The wire colors on the
brake controller may be different
from the vehicle.
The electric trailer brake controller
should be installed by your dealer or
a qualified service center.
Tow/Haul Mode
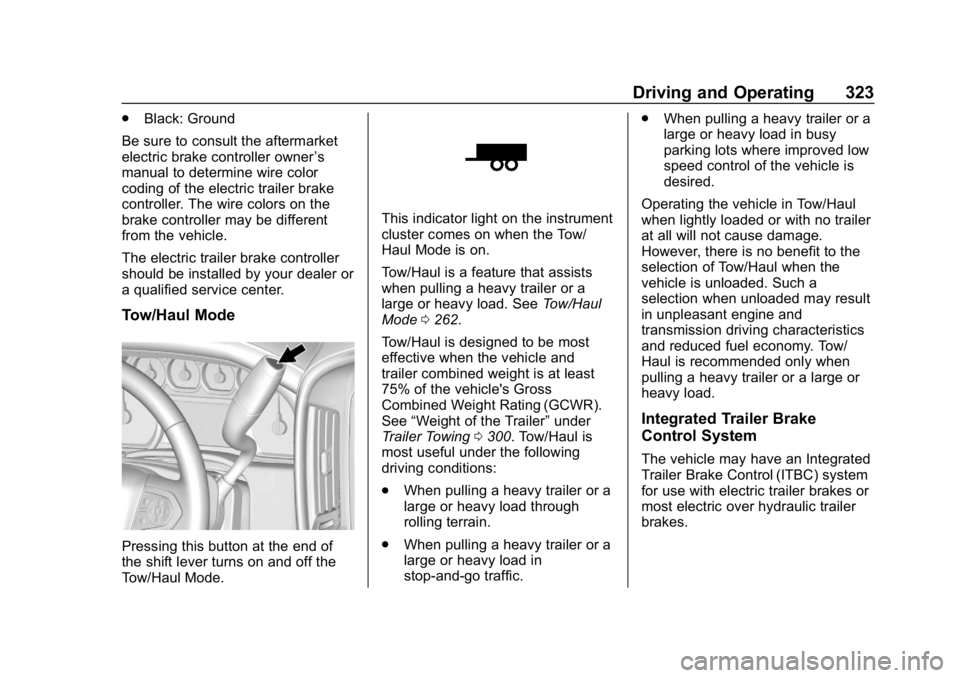
Pressing this button at the end of
the shift lever turns on and off the
Tow/Haul Mode.
This indicator light on the instrument
cluster comes on when the Tow/
Haul Mode is on.
Tow/Haul is a feature that assists
when pulling a heavy trailer or a
large or heavy load. See Tow/Haul
Mode 0262.
Tow/Haul is designed to be most
effective when the vehicle and
trailer combined weight is at least
75% of the vehicle's Gross
Combined Weight Rating (GCWR).
See “Weight of the Trailer” under
Trailer Towing 0300. Tow/Haul is
most useful under the following
driving conditions:
. When pulling a heavy trailer or a
large or heavy load through
rolling terrain.
. When pulling a heavy trailer or a
large or heavy load in
stop-and-go traffic. .
When pulling a heavy trailer or a
large or heavy load in busy
parking lots where improved low
speed control of the vehicle is
desired.
Operating the vehicle in Tow/Haul
when lightly loaded or with no trailer
at all will not cause damage.
However, there is no benefit to the
selection of Tow/Haul when the
vehicle is unloaded. Such a
selection when unloaded may result
in unpleasant engine and
transmission driving characteristics
and reduced fuel economy. Tow/
Haul is recommended only when
pulling a heavy trailer or a large or
heavy load.
Integrated Trailer Brake
Control System
The vehicle may have an Integrated
Trailer Brake Control (ITBC) system
for use with electric trailer brakes or
most electric over hydraulic trailer
brakes.
Page 329 of 501
Chevrolet Silverado Owner Manual (GMNA-Localizing-U.S./Canada/Mexico-
11349200) - 2018 - CRC - 2/27/18
328 Driving and Operating
instrument cluster. Vehicle speed
must be reduced. If trailer sway
continues, StabiliTrak can reduce
engine torque to help slow the
vehicle. SeeTraction Control/
Electronic Stability Control 0276.
{Warning
Even if the vehicle is equipped
with TSC, trailer sway could result
in loss of control and the vehicle
could crash. If excessive trailer
sway is detected, slow down to a
safe speed. Check the trailer and
vehicle to help correct possible
causes. These could include an
improperly or overloaded trailer,
unrestrained cargo, improper
trailer hitch configuration,
excessive vehicle-trailer speed,
or improperly inflated or incorrect
vehicle or trailer tires. See Towing
Equipment 0318 for trailer
ratings and hitch setup
recommendations. Adding non-dealer accessories can
affect the vehicle performance. See
Accessories and Modifications
0
336.
Electronic Trailer Sway Control
Devices
Some trailers may come equipped
with an electronic device designed
to reduce or control trailer sway.
Aftermarket equipment
manufacturers also offer similar
devices that connect to the wiring
between the trailer and the vehicle.
These devices may interfere with
the vehicle’ s trailer brake or other
systems, including integrated
anti-sway systems, if equipped.
Messages related to trailer
connections or trailer brakes could
appear on the Driver Information
Center (DIC). The effect that these
devices may have on vehicle
handling or trailer brake
performance is unknown.
{Warning
Use of electronic trailer sway
control devices could result in
reduced trailer brake
performance, loss of trailer
brakes, or other malfunctions, and
could cause a crash. You or
others could be injured or killed.
Before using one of these
devices:
. Ask the device or trailer
manufacturer if the device
has been thoroughly tested
for compatibility with the
make, model, and year of
the vehicle as well as
optional equipment installed
on the vehicle.
. Before driving on the open
roads, check that the trailer
brakes are working properly.
Drive the vehicle with the
trailer attached on a level
road surface that is free of
traffic at about 32-40 km/h
(Continued)
Page 352 of 501
Chevrolet Silverado Owner Manual (GMNA-Localizing-U.S./Canada/Mexico-
11349200) - 2018 - CRC - 2/27/18
Vehicle Care 351
reason for fluid loss. If a leak
occurs, take the vehicle to your
dealer service department and have
it repaired as soon as possible. See
Recommended Fluids and
Lubricants0451 for the proper fluid
to use.
Hydraulic Clutch
For vehicles with a manual
transmission, it is not necessary to
regularly check clutch fluid unless
you suspect there is a leak in the
system. Adding fluid will not correct
a leak. A fluid loss in this system
could indicate a problem. Have the
system inspected and repaired.
When to Check and What
to Use
The hydraulic clutch fluid reservoir
cap has this symbol on it. See
Engine Compartment Overview
0 338 for reservoir location.
Refer to Recommended Fluids and
Lubricants 0451 for the proper fluid
to use. The fluid requires changing.
See Maintenance Schedule 0443.
How to Check and Add Fluid
Visually check the clutch fluid
reservoir. The hydraulic clutch fluid
system should be closed and
sealed.
Do not remove the cap to check the
fluid level or to top-off the fluid level.
Remove the cap only when
necessary to add the proper fluid.
Engine Air Cleaner/Filter
If the vehicle has a diesel engine,
see “8-Cylinder Pickup Models”
under “Engine Air Cleaner/Filter” in
the Duramax diesel supplement for
the correct inspection and
replacement procedures. The engine air cleaner/filter is on
the passenger side of the engine
compartment. See
Engine
Compartment Overview 0338.
When to Inspect the Engine Air
Cleaner/Filter
For intervals on changing and
inspecting the engine air filter, see
Maintenance Schedule 0443.
How to Inspect the Engine Air
Cleaner/Filter
Do not start the engine or have the
engine running with the engine air
cleaner/filter housing open. Before
removing the engine air cleaner/
filter, make sure that the engine air
cleaner/filter housing and nearby
components are free of dirt and
debris. Remove the engine air
cleaner/filter. Lightly tap and shake
the engine air cleaner/filter (away
from the vehicle), to release loose
dust and dirt. Inspect the engine air
cleaner/filter for damage, and
replace if damaged. Do not clean
the engine air cleaner/filter or
components with water or
compressed air.
Page 359 of 501
Chevrolet Silverado Owner Manual (GMNA-Localizing-U.S./Canada/Mexico-
11349200) - 2018 - CRC - 2/27/18
358 Vehicle Care
Overheated Engine
Protection
Operating Mode
If an overheated engine condition
exists and the ENGINE POWER IS
REDUCED message displays, an
overheat protection mode which
alternates firing groups of cylinders
helps to prevent engine damage. In
this mode, a loss in power and
engine performance will be noticed.
This operating mode allows the
vehicle to be driven to a safe place
in an emergency. Driving extended
distances and/or towing a trailer in
the overheat protection mode
should be avoided.
Caution
After driving in the overheated
engine protection operating
mode, the engine oil will be
severely degraded. Any repairs
performed before the engine is
cool may cause engine damage.
Allow the engine to cool before(Continued)
Caution (Continued)
attempting any repair. Repair the
cause of coolant loss, change the
oil, and reset the oil life system.
SeeEngine Oil 0343.
Engine Fan
If the vehicle has a clutched engine
cooling fan, when the clutch is
engaged, the fan spins faster to
provide more air to cool the engine.
In most everyday driving conditions,
the fan is spinning slower and the
clutch is not fully engaged. This
improves fuel economy and reduces
fan noise. Under heavy vehicle
loading, trailer towing, and/or high
outside temperatures, the fan speed
increases as the clutch more fully
engages, so an increase in fan
noise may be heard. This is normal
and should not be mistaken as the
transmission slipping or making
extra shifts. It is merely the cooling
system functioning properly. The fan will slow down when additional
cooling is not required and the
clutch disengages.
This fan noise may also be heard
when starting the engine. It will go
away as the fan clutch partially
disengages.
If the vehicle has electric cooling
fan(s), the fans may be heard
spinning at low speed during most
everyday driving. The fans may turn
off if no cooling is required. Under
heavy vehicle loading, trailer towing,
high outside temperatures,
or operation of the air conditioning
system, the fans may change to
high speed and an increase in fan
noise may be heard. This is normal
and indicates that the cooling
system is functioning properly. The
fans will change to low speed when
additional cooling is no longer
required.
The electric engine cooling fans
may run after the engine has been
turned. off. This is normal and no
service is required.
Page 400 of 501
Chevrolet Silverado Owner Manual (GMNA-Localizing-U.S./Canada/Mexico-
11349200) - 2018 - CRC - 2/27/18
Vehicle Care 399
If the vehicle has a base level
DIC, use the trip odometer
reset stem to scroll to the Tire
Pressure screen.
5. If the vehicle has an uplevel DIC, press and hold the
V
(Set/Reset) button located in
the center of the DIC controls.
If the vehicle has a base level
DIC, press and hold the trip
odometer reset stem for about
five seconds. A message
asking if the process should
begin should appear. Select
yes and press the trip
odometer reset stem to confirm
the selection.
The horn sounds twice to
signal the receiver is in relearn
mode and the TIRE
LEARNING ACTIVE message
displays on the DIC screen.
6. Start with the driver side front tire.
7. Place the relearn tool against the tire sidewall, near the valve
stem. Then press the button to
activate the TPMS sensor. A horn chirp confirms that the
sensor identification code has
been matched to this tire and
wheel position.
8. Proceed to the passenger side front tire, and repeat the
procedure in Step 7.
9. Proceed to the passenger side rear tire, and repeat the
procedure in Step 7.
10. Proceed to the driver side rear tire, and repeat the procedure
in Step 7. The horn sounds two
times to indicate the sensor
identification code has been
matched to the driver side rear
tire, and the TPMS sensor
matching process is no longer
active. The TIRE LEARNING
ACTIVE message on the DIC
display screen goes off.
11. Turn the vehicle off.
12. Set all four tires to the recommended air pressure
level as indicated on the Tire
and Loading Information label.
Tire Inspection
We recommend that the tires,
including the spare tire, if the
vehicle has one, be inspected
for signs of wear or damage at
least once a month.
Replace the tire if:
.The indicators at three or
more places around the tire
can be seen.
.There is cord or fabric
showing through the tire's
rubber.
.The tread or sidewall is
cracked, cut, or snagged
deep enough to show cord or
fabric.
.The tire has a bump, bulge,
or split.
.The tire has a puncture, cut,
or other damage that cannot
be repaired well because of
the size or location of the
damage.
Page 412 of 501
Chevrolet Silverado Owner Manual (GMNA-Localizing-U.S./Canada/Mexico-
11349200) - 2018 - CRC - 2/27/18
Vehicle Care 411
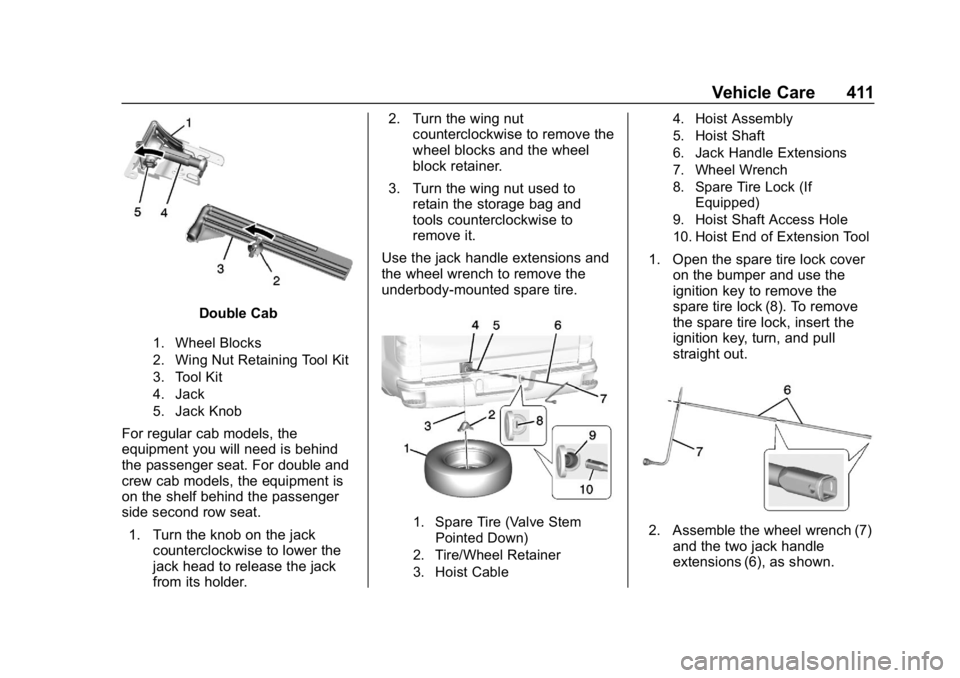
Double Cab
1. Wheel Blocks
2. Wing Nut Retaining Tool Kit
3. Tool Kit
4. Jack
5. Jack Knob
For regular cab models, the
equipment you will need is behind
the passenger seat. For double and
crew cab models, the equipment is
on the shelf behind the passenger
side second row seat.1. Turn the knob on the jack counterclockwise to lower the
jack head to release the jack
from its holder. 2. Turn the wing nut
counterclockwise to remove the
wheel blocks and the wheel
block retainer.
3. Turn the wing nut used to retain the storage bag and
tools counterclockwise to
remove it.
Use the jack handle extensions and
the wheel wrench to remove the
underbody-mounted spare tire.
1. Spare Tire (Valve Stem Pointed Down)
2. Tire/Wheel Retainer
3. Hoist Cable 4. Hoist Assembly
5. Hoist Shaft
6. Jack Handle Extensions
7. Wheel Wrench
8. Spare Tire Lock (If
Equipped)
9. Hoist Shaft Access Hole
10. Hoist End of Extension Tool
1. Open the spare tire lock cover on the bumper and use the
ignition key to remove the
spare tire lock (8). To remove
the spare tire lock, insert the
ignition key, turn, and pull
straight out.
2. Assemble the wheel wrench (7)and the two jack handle
extensions (6), as shown.
Page 416 of 501
Chevrolet Silverado Owner Manual (GMNA-Localizing-U.S./Canada/Mexico-
11349200) - 2018 - CRC - 2/27/18
Vehicle Care 415
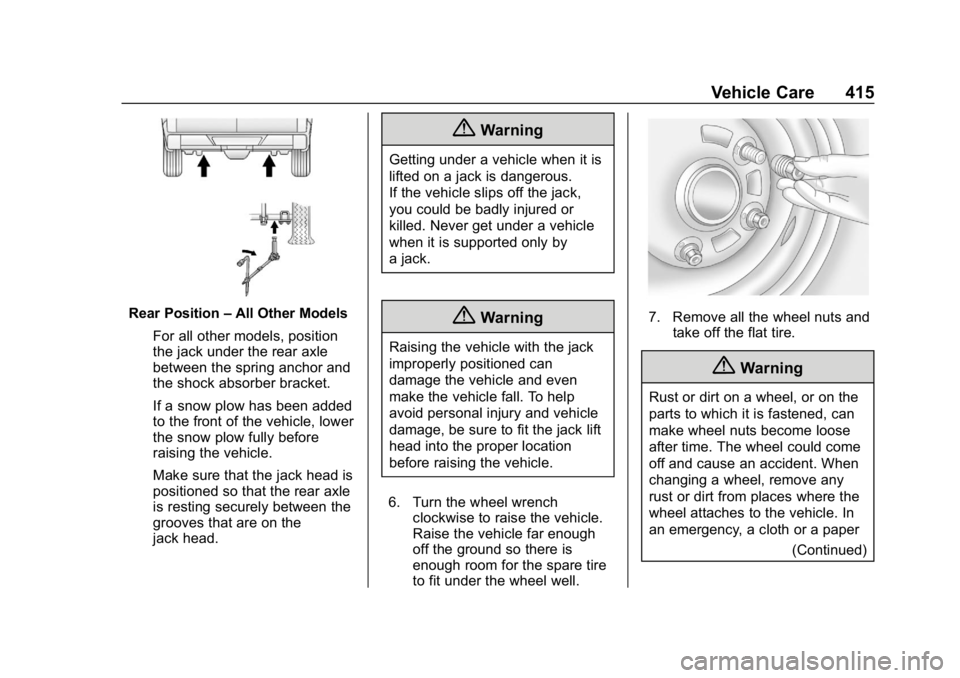
Rear Position–All Other Models
For all other models, position
the jack under the rear axle
between the spring anchor and
the shock absorber bracket.
If a snow plow has been added
to the front of the vehicle, lower
the snow plow fully before
raising the vehicle.
Make sure that the jack head is
positioned so that the rear axle
is resting securely between the
grooves that are on the
jack head.
{Warning
Getting under a vehicle when it is
lifted on a jack is dangerous.
If the vehicle slips off the jack,
you could be badly injured or
killed. Never get under a vehicle
when it is supported only by
a jack.
{Warning
Raising the vehicle with the jack
improperly positioned can
damage the vehicle and even
make the vehicle fall. To help
avoid personal injury and vehicle
damage, be sure to fit the jack lift
head into the proper location
before raising the vehicle.
6. Turn the wheel wrench clockwise to raise the vehicle.
Raise the vehicle far enough
off the ground so there is
enough room for the spare tire
to fit under the wheel well.
7. Remove all the wheel nuts andtake off the flat tire.
{Warning
Rust or dirt on a wheel, or on the
parts to which it is fastened, can
make wheel nuts become loose
after time. The wheel could come
off and cause an accident. When
changing a wheel, remove any
rust or dirt from places where the
wheel attaches to the vehicle. In
an emergency, a cloth or a paper
(Continued)